background image

Service Work

Skippi

Ottobock  |  27 

6.7  Back

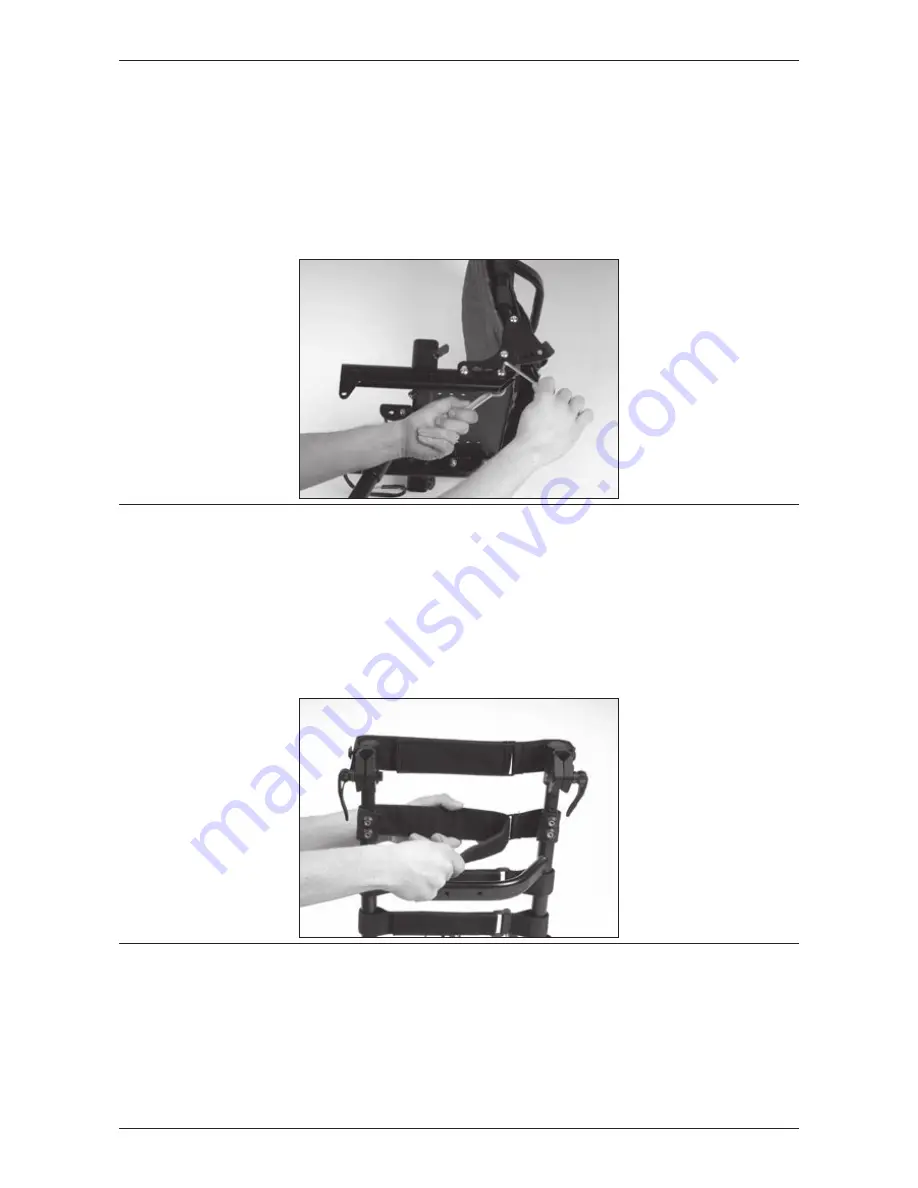
The back of the Skippi is attached to the seat frame with two bearing plates on the left and 

right. Each of the two bearing plates is attached to the seat frame with two screws and to the 

back with one screw. For loosening these three screws, use a size 5 Allen wrench and a size 

13 open-end wrench. Loosen the two screws on the seat frame on the left and right to remove 

the back. The fourth screw on the bearing plate serves as stop for the back angle adjustment.

Fig. 16  Loosening the bearing plate

Back upholstery
For replacing the back upholstery of the Skippi, simply pull it off the hook-and-loop straps and 

reattach the new upholstery to the straps.
For readjusting the back upholstery, remove the upholstery and readjust the hook and loop 

straps on the frame.

Fig. 17  Adjusting the back upholstery

Summary of Contents for SKIPPI

Page 1: ...Skippi Service Manual ...

Page 2: ......

Page 3: ...eral information on electromagnetic interference 11 2 7 2 Warnings regarding effects of electromagnetic interference 12 2 7 3 Interference resistance of this power wheelchair 13 2 8 Safety instructions for disposal 13 3 Transportation and storage 14 3 1 Transportation 14 3 2 Storage 15 4 Required tools and accessories 16 5 Information display 17 6 Service Work 18 6 1 Checking the general condition...

Page 4: ...ter 51 8 4 3 Drive Menu 52 8 4 4 Steer Menu 53 8 4 5 Hand Controls Menu 54 8 4 6 Speed Mode 55 8 4 7 Joystick Menu 56 8 4 8 Sound and Display Menu 56 8 4 9 Charger Inhibit Menu 57 8 4 10 Seat Menu 57 8 4 11 Lights Menu 58 8 4 12 Current Limits Menu 58 8 4 13 Multi Function Input 1 Menu 59 8 4 14 Multi Function Input 2 Menu 59 8 4 15 Multi Function Input 3 Menu 60 8 4 16 Compensation Menu 60 8 4 17...

Page 5: ... with changing clinical conditions Only use original spare parts for all service and maintenance work The service and main tenance tasks described here should only be completed by trained qualified personnel and not by the user of the device This service and maintenance manual refers to the respective spare parts catalogues and the instructions for use of the described products Please use these do...

Page 6: ...General information Skippi 6 Ottobock 1 2 Overview Fig 1Overview 1 Standard back 6 Caster wheel 2 Side panel 7 Motor 3 Standard seat 8 Drive wheel 4 Brake lever 9 Frame 5 Footrest 10 Control panel ...

Page 7: ...pi power wheelchair has been confirmed by CE certification and the declaration of conformity 2 3 General safety instructions Information Regular maintenance is important It increases safety and prolongs the service life of the product CAUTION Risk of suffocation Packaging materials must be kept out of reach of children NOTICE Risk of damage due to unauthorised service Service and maintenance work ...

Page 8: ...ubsidiaries under Ottobock Worldwide Additional documentation can be downloaded from the manufacturer s website at www ottobock de or www ottobock com 2 4 Safety instructions for the use of tools and accessories CAUTION Risk of health impairment due to the use of incorrect tools When completing the tasks only use tools that are suitable for the conditions at the place of work and for which safety ...

Page 9: ... rule Secure the product to prevent it from tipping over or falling e g off the workbench Some components of the power wheelchair e g the batteries frame seat and motors are very heavy Hoisting devices of sufficient capacity must be used where applicable Clean disinfect the product before you start testing it Consult the instructions for use regarding product care and product specific testing inst...

Page 10: ...acts are assigned correctly CAUTION Risk of injury while working on the battery Only use Ottobock battery chargers which have been tested and approved for use with the given batteries by the manufacturer observe information on battery charger Failure to do so can result in a battery explosion and endangerment to health due to contact with battery acid Smoking and open flames are prohibited while w...

Page 11: ...ber of sources of relatively intense electromagnetic fields in the everyday environment Some of these sources are obvious and easy to avoid Others are not apparent and exposure is unavoidable However we believe that by following the warnings listed below your risk to EMI will be minimized U U The sources of radiated EMI can be broadly classified into three types Handheld portable transceivers tran...

Page 12: ...re of nearby transmitters such as radio or TV stations and try to avoid coming close to them U U If unintended movement or brake release occurs turn the power wheelchair OFF as soon as it is safe U U Be aware that adding accessories or components or modifying the power wheelchair may make it more susceptible to interference from radio wave sources Note There is no easy way to evaluate the effect o...

Page 13: ...instructions for disposal Information If the power wheelchair is no longer in use it must be disposed of properly in accordance with natio nal regulations In case of disposal all components and materials of the power wheelchair must be recycled or dis posed of properly CAUTION Risk of polluting the environment with battery acid The batteries of the power wheelchair contain a toxic acid They must n...

Page 14: ... due to falling The maximum weight of the power wheelchair when empty is 68 kg 150 lbs Only use hoists and transport means of sufficient capacity for transport Secure the power wheelchair to the means of transport e g with tensioning straps Use the eyebolts at the front and back of the power wheelchair and the defined anchor points in the transport vehicle Before transporting the power wheelchair ...

Page 15: ...sed area Remove the main fuse as otherwise there is a risk of deep discharge The storage location must be dry and have sufficient air circulation Humidity must not build up The power wheelchair must not be subjected to any damaging exterior influences e g rain snow or strong solar radiation during storage The manufacturer recommends storing the power wheelchair with slightly elevated tyre pressu r...

Page 16: ... handle wrench and sockets sizes 8 20 Ring or open end wrenches sizes 8 24 Allen wrenches sizes 2 8 Torque wrench 5 50 Nm Puller Pin punch Ø 3 mm Plastic hammer Metal rod Ø approx 10 mm length approx 400 mm Hand drill 4 mm drill bit Tyre iron Tyre lever Inner tube repair kit Side cutting pliers Water pump pliers gripping width up to 32 mm Liquid thread lock medium strength Handheld programming dev...

Page 17: ...ion For information on errors displayed please see sections 7 and 8 Messages are shown on the control panel display monitor Display symbol Information Driving menu with speed level and battery ca pacity Low battery capacity Charging process with drive away lock Electric back adjustment Electric seat tilt ...

Page 18: ...attachment replace defective components U U Check cable connections and plug connections 6 2 Control unit Via the enAble 40 control the Skippi can show causes of error messages on the display Er ror sources in the drive section and in the electric options are indicated by flashing of the cor responding sections in the display s pictograph The handheld programming device can be used to change the p...

Page 19: ...re attached in the same way to the side panel of the Skippi They are clamped to the underside of the armrest pad with an iron rail Attendant control The attendant control for the Skippi can only be mounted in combination with the height ad justable push handles The control is attached to the upper end of the push handle cut a hole in the end of the rub ber hand grip and insert the holder for the a...

Page 20: ...void loss of functionality and permanent battery damage Ensure correct polarity when connecting the batteries and state of charge meter Battery CAUTION Risk of injury if the locking mechanism is not properly engaged Check that the bolts are properly engaged at both sides on the outside of the base support The bolts must be clearly visible so that the frame cannot unexpectedly disengage from the dr...

Page 21: ...Keep the battery charger from overheating The vent openings of the charger must not be covered Turn off the control unit during the charging process so that the entire charging current flows to the battery Avoid dust and dirt Only clean with a dry cloth The charge level of the batteries determines the range of the power wheelchair The following factors influence battery capacity U U Ambient temper...

Page 22: ...the battery charger for further details on use and on the LED displays 6 4 Replacing the controller NOTICE Damage due to connection errors When connecting the cables ensure correct assignment For information on connecting the controller please see section 8 2 Prior to installing the following preparatory work is required U U Remove the battery packs see section 6 3 For installation proceed as foll...

Page 23: ...ight Loosen this set screw using a size 3 Allen wrench Set the desired armrest height and retighten the set screw Fig 10 Setting the height of the side panel Changing the position of the side panels Side panel mounting brackets are located on the left and right sides of the seat frame By loosening the two set screws which are located on the underside you can change the posi tion of the side panel ...

Page 24: ...attached with two set screws After loosening these two set screws you can either change the position of the pad or completely remove it The third set screw is used for additionally clamping the armrest pad Fig 12 Underside of the armrest and Changing the position Lateral pads The lateral pad is attached to the side panel with a hook and loop closure ...

Page 25: ...ten the two countersunk head screws Adjusting the seat depth The seat depth of the Skippi is continuously adjustable from 300 mm to 370 mm 11 8 to 14 6 To adjust the seat depth loosen the two individual screws on the left and right of the seat frame s front end For loosening these screws you need an Allen wrench Once you have loosened these two screws you can pull out the front part of the seat fr...

Page 26: ...he front the seat is attached with the seat angle adjustment mechanism Here loosen the seat at the bottom of the angle adjustment mechanism which is attached to the frame Loos en the screw using a size 5 Allen wrench Once you have loosened all connections you can remove the seat Lap belt The lap belt of the Skippi is must be attached to the bearing plate For attachment an attach ment plate with ey...

Page 27: ... 13 open end wrench Loosen the two screws on the seat frame on the left and right to remove the back The fourth screw on the bearing plate serves as stop for the back angle adjustment Fig 16 Loosening the bearing plate Back upholstery For replacing the back upholstery of the Skippi simply pull it off the hook and loop straps and reattach the new upholstery to the straps For readjusting the back up...

Page 28: ...ootrest with unlock lever By loosening the screws on the telescoping footrest tube at the top and bottom the footplate can be adapted to the lower leg length and to the thickness of the child s seat cushion To set the lower leg length you need a size 5 Allen wrench Fig 19 Adjusting the lower leg length Ensure that the telescoping tubes of both footrests are set equally Use a folding ruler if nec e...

Page 29: ... receivers of the Skippi can be telescoped in transverse direction independently from each other Each side can be telescoped outwards continuously by 60 mm 2 4 For set ting the footrest receivers you first have to loosen one of the two screws at the front of the seat frame using a size 5 Allen wrench Fig 21 Telescoping the footrest receiver and Telescoping the footrest receiver ...

Page 30: ...lectric back angle adjustment For the electric back angle adjustment a bracket is attached to the seat frame on the left side This bracket is part of the seat frame Fig 23 Electric back angle adjustment The actuator is pushed onto a bearing bolt with a diameter of 8 mm 0 3 on the left front side of the power wheelchair below the seat plate The bearing bolt is normally screwed into the rear bore Be...

Page 31: ...chair frame Users and attendants must not reach into the danger area WARNING Risk of pinching or crushing in the electric seat adjustment area The seat height adjustment function may only be used on a level surface When activating the seat height adjustment optional back angle adjustment optional and seat tilt optional there are pinch and shear points in the area between the seat frame and wheelch...

Page 32: ...tem B For tightening you need a 5 mm Allen wrench and a 13 mm open end wrench 3 Move pull the lift seat up to make room for the installation see item C B B A A C Fig 25 Attaching the assembly unit to the base frame and Installed lifted seat height adjustment 4 Remove the retaining bar for the controller and install the alternative retaining bar see item D Here you need a size 6 Allen wrench 5 Befo...

Page 33: ...o protrude into the adjustment area NOTICE Damage if the connecting cable is too short It is very important to make sure that the cable of the adjustment motor is sufficiently long when activating the lift seat and that cables are not at risk of getting pinched 9 A micro switch see item J activated by a magnetic pin see item K is located near the front of the lift seat It reduces the driving speed...

Page 34: ...switch and Installed micro switch N M N Fig 30 Controller with connected main cable and Charging and programming receptacle 6 11 1 Programming To be able to use the lift seat it is first necessary to programme the control unit 1 Connect the handheld programming device to the charging and programming receptacle of the hand control device see item N 2 Follow the menu tree Program Motor Controller Mu...

Page 35: ...rs is possible Actuator 1 Function Actuator 1 Function 0 5 Set value to 5 Signification Selection of the lift seat component Actuator 1 Speed Actuator 1 Speed 0 100 Set value to 100 Signification Varies speed of actuator 1 lift seat adjustment drive Actuator 1 Stop Current Actuator 1 Stop Current 0 12 A Set value to 2 A Signification The driver turns off if the current ex ceeds this value Actuator...

Page 36: ...able from the control panel and the cables of the front lights Take care not to damage any cables when removing the seat 6 13 Motors Each motor of the Skippi has a red brake lever To unlock the brakes these have to be pushed outwards which means that the brakes are released and that the Skippi can be pushed This is also indicated on the display when switching on the wheelchair control After pressi...

Page 37: ...t the drive unit sustainer to protect it from wobbling and tilting to the side Use suitable materials such as wooden blocks to do so Remove the drive wheel using a size 6 Allen wrench The motor is attached to the drive unit sustainer with four carriage screws For disassembling you need a size 13 open end wrench Fig 33 Loosening the motor screws For reassembling the motors please proceed in reverse...

Page 38: ...e screw from the outside Make sure that the locknut on the other side of the fork is in position Hand tighten the screw Drive wheels Two drive wheel versions are available for the Skippi with pneumatic tyres standard equip ment and with puncture proof tyres For working on the drive wheels you need a size 6 Allen wrench and tyre iron First loosen the 4 Allen head screws on the front side to disasse...

Page 39: ...nt lights each consisting of a front LED light and a direction indicator The front lights are fastened to the self contacting side panels When the side panels are in serted into the side panel holders the contacts touch each other and current can flow Fig 36 Installed side panel and Contacts Rear lights The rear lights are attached to the rear side of the drive unit sustainer with two holders The ...

Page 40: ...ontact Fig 37 Loosening the protective glass of the direction indicator replacing the front direction indicator When installing the lamp make sure that the lamp s noses engage in the socket s notches and turn the lamp a quarter turn clockwise to fix it in place Now remount the protective glass Insert the lower nose in the notch and let the upper nose engage with light pressure Replacing the rear l...

Page 41: ... tubes Tube clamps for attachment are included in the delivery First loosen the screws on the left and right of the uppermost back strap Now put the tube clamps onto the upper ends and attach them with two screws each inserted through the rear side of the back tube Finally screw the up permost strap to the bore holes provided on the tube clamps You need a size 6 Allen wrench for this work Fig 39 F...

Page 42: ...k strap and screws Fig 41 Installing the pennant Bumper bar The bumper bar is attached at the front to the caster attachment devices First remove the two protective caps from the caster attachment devices Now replace the mounting nut with the threaded rod and screw it in place Position the eyelet of the bumper bar on the caster attachment device as shown on the photo Attach the bumper bar with the...

Page 43: ... the bumper bar Fig 45 Mounted bumper bar Joystick accessories To mount joystick accessories first pull off the upper end of the joystick A pin is exposed Here you can mount accessories such as a fork for tetraplegics a golf ball or a stick etc Once you have set the accessory onto the pin secure it by tightening the set screw 1 2 3 4 ...

Page 44: ...a problem by following the measures described here please contact Ottobock Errors are either shown on the control panel display LCD monitor see Section 7 2 or dis played using the handheld programming device The handheld programming device see Sec tion 8 4 can capture errors more precisely with the help of error codes 7 1 Diagnostic steps For troubleshooting purposes the control unit of the power ...

Page 45: ...ction between the hand control device and controller Defective cabling software or hardware Check cabling plug con nections Battery under voltage Battery deep discharge Charge as soon as pos sible Battery over voltage Voltage too high after full charge and driving down hill Continue driving slowly Fault with seat tilt mo tor Faulty cabling or plug con nection defective actuator Check cabling plug ...

Page 46: ...s of error messages on the display Error sources in the drive section and in the electric options are indicated by flashing of the corresponding sections in the display s pictograph The hand programming device can be used to make parameter changes Fig 46 Components of the enAble40 wheelchair control 1 Attendant control 2 Hand control device 3 Controller 8 2 Installation and Wiring Fig 47 Dimension...

Page 47: ...control unit is programmable i e the settings for the various programmable parameters can be set using a programming device Two programming devices are available a handheld programming device and a PC programming station PCPS The PCPS has ad ditional functions not offered by the handheld programming device On the other hand the handheld programming device is more portable The PCPS is usually used ...

Page 48: ...programming device 3 Connect the bus plug of the handheld programming device to a free bus receptacle e g on the bottom of the display module 8 3 1 3 Operation Menu organisation The main menu contains nine menus Each of these is identified by a special symbol Items are arranged hierarchically within the menus Menu structure The menu name for each of the nine root menus is displayed in bold at the ...

Page 49: ... WARNING Risk of accidents and injury due to incorrect configuration settings Modified parameter set tings in the configuration can lead to changes in driving characteristics In particular changes to the speed acceleration braking or joystick settings can lead to unexpected and therefore uncontrolla ble operating performance with a risk of accidents Always test the driving characteristics of the p...

Page 50: ...onfiguration parameter deter mines which of these four configurations is active 8 4 1 Configuration Parameter When the Configuration parameter is changed Powerbase stores the parameters of this configuration but the hand programming device does not This is why you should disconnect and then reconnect the hand programming device after changing the Configuration parame ter so that the hand programmi...

Page 51: ...s that lie between the two profiles Parameter Allowable Range Description MyChair 1 0 2 0 A setting of 1 0 selects Profile 1 a setting of 2 0 selects Profile 2 All other settings 1 1 1 9 select a blend or interpolation between the individual parameters in Profile 1 and 2 Profile 1 Characterised by the settings in the Drive and Steer menus of Profile 1 Profile 2 Characterised by the settings in the...

Page 52: ...low speed Rev Max Speed 1 100 Maximum reverse speed with speed limit set to 100 Rev Min Speed 1 100 Maximum reverse speed with speed limit set to 0 Rev Accel High Speed 1 100 Reverse acceleration with speed limit set to 100 Rev Accel Low Speed 1 100 Reverse acceleration with speed limit set to 0 Rev Decel High Speed 1 100 Rate of deceleration when the wheelchair is driving backward at high speed R...

Page 53: ...ration from a turn when the power wheelchair is driv ing at low speed Steer Sensitivity 1 100 Controls the steering sensitivity in the middle segment of the joy stick range This parameter determines how much joystick deflec tion is required in order to make small steering corrections at high speed A value of 1 makes the control unit very unresponsive extensive joystick deflection is required for s...

Page 54: ... a short beep If this process was not completed successfully only the key symbol is shown on the display after the activation test is complete in order to indicate that the drive away lock is still ac tive In order to cancel the drive away lock you have to turn off the system and carry out the start up sequence again If the parameter is set to 2 you have to move the joystick as follows during the ...

Page 55: ...lowing settings Fwd Max Speed 100 Fwd Min Speed 20 Turn Accel High Speed 80 Turn Accel Low Speed 60 Selected Speed Mode 50 The resulting driving and steering characteristics are as follows Forward speed 100 20 50 20 60 Steering acceleration 80 60 50 60 70 Parameter Allowable Range Description Number of Modes 1 5 Number of speed modes the driver can access Speed 1 0 100 Speed limit for Speed Mode 1...

Page 56: ...ermines the pause after which the wheelchair accelerates back wards following a quick stop This allows the driver to release the joystick in the centre position without having the wheelchair move backwards Start Delay 0 0 1 0 s Delay before the wheelchair starts moving after the joystick is moved from the centre position Throttle Calibrate On Off This parameter is set to On in order to start the j...

Page 57: ...ional parameters permit simultaneous operation of two actuators and determine how the joystick controls the seat adjustments Parameter Allowable Range Description Actuator Toggle Mode On Off When set to On the joystick can be used as a toggle switch Pushing the joystick ahead or back switches the driver output to the next state e g up down up down When the actua tor is started in a particular dire...

Page 58: ...s an error is recognised below this current Indicator Time out 0 30 s Sets the maximum time a direction indicator remains active before it is turned off automatically A value of 0 deactivates this function 8 4 12 Current Limits Menu Parameter Allowable Range Description Peak Current Limit 5 75 A Delivers a motor current boost Sets the motor current limit effective for the Peak Current Time Peak Cu...

Page 59: ...meter is ignored when InhH is se lected first parameter 2 Speed Limit Input High 0 100 Sets the speed limit when the input is high or the potentiometer 100 K has contact to B This parameter is ignored when InhL is selected first parameter 1 8 4 14 Multi Function Input 2 Menu The parameters in the Multi Function Input 2 menu can be used to lock one or both actua tors in order to set a speed limit M...

Page 60: ...functions are active when the contact is open Act 1 Dir Inhibit On Off Set to On actuator 1 is locked in the positive direction Act 1 Dir Inhibit On Off Set to On actuator 1 is locked in the negative direction Act 2 Dir Inhibit On Off Set to On actuator 2 is locked in the positive direction Act 2 Dir Inhibit On Off Set to On actuator 2 is locked in the negative direction Speed Limit 0 100 Sets the...

Page 61: ...t ance 0 600 mΩ Sets the actual system resistance motor brushes cables plugs used for load compensation and speed limit evaluation It is important to determine this value directly using the motor test described below Motor Current Rating 0 75 A Sets the value to which the motor current is reduced if the excess motor temperature limit is exceeded Time at Max Cur rent 0 255 s Sets the estimated time...

Page 62: ...3 V Voltage at which the BDI battery capacity is reset to 100 Start Charge Volt age 0 3 V Voltage above which the battery charging process is recog nised Partial Charge Min 10 100 The charge in required in order to reset the BDI to a higher value in case of a partial charge Rest Voltage overwrites this parameter Discharge Rate 0 30 Discharge rate for the battery Higher values apply to larger bat t...

Page 63: ...he left hand direction indicator lights Turn Signal Current 0 6 A Current on the direction indicator lights Headlights Voltage 0 24 V Voltage on the headlights Headlights Current 0 6 A Current on the headlights Motor Controller Input 1 0 5 V Voltage on Multi Function Input 1 Input 2 On Off Status of Multi Function Input 2 Input 3 On Off Status of Multi Function Input 3 M1 Bridge Temp 40 150 C Temp...

Page 64: ...ols Are the batteries charged Are the tyres correctly inflated Do all manual and power functions work properly Do all control functions work properly Do the brakes work Does the braking distance conform to the specifications If intended Are all options required to take part in road traffic installed and fully functional e g warning triangle lights warning flashers Only for combination of the power...

Page 65: ...quested by the manufacturer in case of com plaints Provide the user or attendant with a copy of the completed record of delivery The user or attendant has been instructed in the use of the product and was informed of the residual risks Customer Year of manufacture Serial no The product was delivered by Place date Signature of specialist dealer Signature of user attendant ...

Page 66: ... a copy of the completed maintenance report Customer Reuse Yes No Year of manufacture Serial no Skippi general condition Driving report Areas For all the components listed here check the functioning setting and screw connections and look for signs of damage or deformation In good condition Damaged Exchange replace 1 Control unit Control panel hol der Control unit cable 2 Batteries Battery packs Ca...

Page 67: ...our seat Contoured back Electric back adjust ment Electric seat tilt Electric seat height adjustment Mechanical seat tilt Push handles 7 Side panel Brackets Clothing protector 8 Footrests Brackets Elevating footrest 9 Options Belt Adapter for headrest Heel straps Comments Maintenance performed by Place Date Signature ...

Page 68: ...ile from the Customer Care Center CCC at oa ottobock com or from the manufacturer s service department see inside back cover or back page for ad dresses 11 2 Torque values of the screw connections Unless otherwise specified screw connections are tightened with the following torque values Thread diameter M4 3 Nm Thread diameter M5 5 Nm Thread diameter M6 10 Nm Thread diameter M8 25 Nm ...

Page 69: ...Skippi Ottobock 69 ...

Page 70: ...Skippi 70 Ottobock ...

Page 71: ...ey T 90 212 3565040 F 90 212 3566688 info ottobock com tr www ottobock com tr Africa Otto Bock Algérie E U R L 32 rue Ahcène Outaleb Coopérative les Mimosas Mackle Ben Aknoun Alger DZ Algérie T 213 21 913863 F 213 21 913863 information ottobock fr www ottobock fr Otto Bock Egypt S A E 28 Soliman Abaza St Mohandessein Giza Egypt T 20 2 37606818 F 20 2 37605734 info ottobock com eg www ottobock com ...

Page 72: ...Otto Bock Mobility Solutions GmbH Lindenstraße 13 07426 Königsee Rottenbach Germany www ottobock com Ihr Fachhändler Your specialist dealer Ottobock 647G57 GB 05 1704 ...

Reviews: