2
table of contents
1. Parts List. . . . . . . . . . . . . . . . . . . . . . . . . . . . . . . . . . . . . 2
2. Assembly . . . . . . . . . . . . . . . . . . . . . . . . . . . . . . . . . . . . 2
3. Powering the TeleTrack AZ-G Mount. . . . . . . . . . . . . . . . 4
4. Attaching a Telescope or Camera. . . . . . . . . . . . . . . . . . 4
5. The TeleTrack AZ-G Hand Controller . . . . . . . . . . . . . . . 5
6. Aligning the TeleTrack AZ-G . . . . . . . . . . . . . . . . . . . . . . 6
7. Care and Cleaning . . . . . . . . . . . . . . . . . . . . . . . . . . . . . 9
8. Technical Specifications . . . . . . . . . . . . . . . . . . . . . . . . 10
9. Appendices . . . . . . . . . . . . . . . . . . . . . . . . . . . . . . . . . . 12
1. Parts list
Qty.
Description
1
Hand controller
1
Hand controller cable
1
Adjustable tripod
1
Fork arm
1
L-bracket with ¼"-20 adapter
1
Computer Interface cable
1
Hand controller bracket
2. assembly
The TeleTrack AZ-G Mount comes partially assembled and
can become operational in a matter of minutes. It is packaged
in one reusable shipping carton. Remove all parts from the
box. Make sure all the parts listed In Section 1 are present.
Remember to save all the shipping containers so that they
can be used to transport the mount. In the unlikely event that
you need to return the mount, you must use the original pack-
aging.
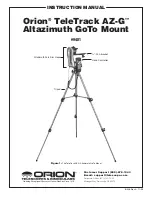
Refer to Figures 1, 2, and 3 during assembly.
1. Remove the tripod from its box. Note that each leg has
two telescoping sections. To extend each leg, loosen the
leg lock lever by rotating it counterclockwise, then extend
the leg. When it has been extended to the desired length,
rotate the leg lock lever clockwise until tight. Before placing
an instrument on the mount, it is a good idea to press down
on the tripod to make sure the legs are locked securely
and will not give way under the instrument’s weight.
2. The TeleTrack AZ-G’s tripod has a wide stance for
enhanced stability. The widest stance is achieved when
the leg brace is as far down as it will go on the elevator
shaft housing. The leg brace lock knob should be tight-
ened to secure the stance.
If you are using the tripod in a confined space, the stance
can be narrowed by loosening the leg brace lock knob and
pushing the legs closer together. Re-tighten the lock knob
to secure the legs in the new position. Be aware that the
tripod will become more prone to tipping as its stance is
narrowed. Be very careful when mounting an instrument
with an offset, or unwieldy, center of gravity on the tripod,
especially if it begins to approach the 9 lb. weight limit.
3. With the tripod secure, the fork arm can be easily attached
using the 3/8"-16 threaded post on top of the tripod mount-
ing platform. There is also a 3mm socket-head cap screw
on the underside of the mounting platform that helps to
lock the fork arm in place. Loosen, but do not remove,
this allen-screw so that the fork arm will not contact the
lock-screw while attaching the head. Hold the fork arm so
its circular base is facing downward and place it on the
3/8"-16 threaded post gently. Rotate the entire fork arm
C
ongratulations on your purchase of a quality Orion product. Your new TeleTrack AZ-G Altazimuth
GoTo Mount allows high performance support for terrestrial or astronomical observations. The TeleTrack
AZ-G is an “altazimuth” type of mount which can move in both altitude (up and down) and azimuth (left
and right) with respect to the ground. Designed for use during day or night, your TeleTrack AZ-G mount
features a smooth altazimuth fork arm head, adjustable tripod, and multi-function hand controller for
convenient operation.
The TeleTrack AZ-G Altazimuth GoTo Mount is designed for small telescopes, spotting scopes and cam-
eras. The weight of the instrument supported by the mount should not exceed 9 lbs. The mount will also
work best with short tube optical systems no longer than 15" (380mm).
This precision mount will locate and automatically slew to thousands of fascinating celestial denizens
including the planets of our solar system, our Moon, galaxies, nebulae, stars, and star clusters. With a
little practice, you’ll find that the TeleTrack AZ-G Mount is an invaluable tool for getting the most out of
your astronomical observing sessions.
These instructions will help you set up and properly use your TeleTrack AZ-G mount. Please read them
over thoroughly before getting started. It may take a few observing sessions to become familiar with
all the features of the TeleTrack AZ-G mount, so keep this manual handy until you have mastered your
mount’s operation.


