


27
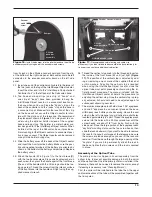
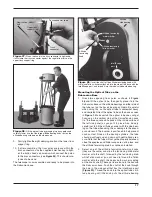
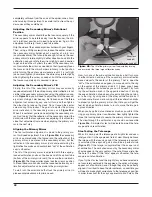
Loosen the eight captive connecting bolts that attach the
2.
side and front panels to the top baseplate
(Figure 45).
You will have to turn the hand knobs about seven full
turns or so to unthread the bolts completely from their
receptacles in the top baseplate. Remember, the bolts
are captive so they will not come out when they are dis-
engaged. When you have loosened each bolt seven full
turns or so, lift the side panel/front panel structure off of
the top baseplate and set it down next to the baseplate
assembly. Do not disassemble the top baseplate from the
bottom baseplate.
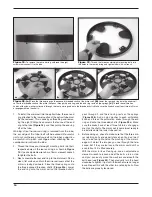
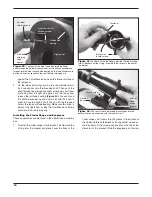
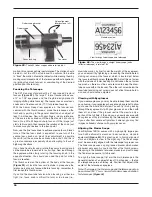
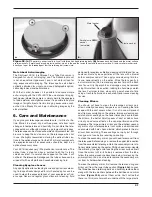
To remove the side panels from the front panel, loosen
3.
the four captive connecting bolts that attach the front
panel to the side panels
(Figure 46).
You will have to turn
the hand knobs about seven full turns or so to unthread
the bolts completely from their receptacles in the side
panels.
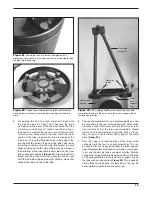
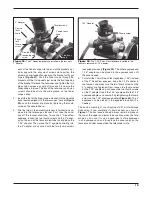
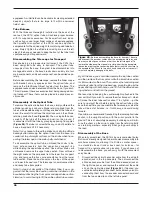
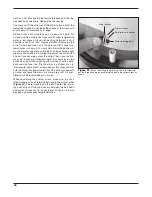
Now the base has been broken down into four component
pieces: the baseplate assembly, the two side panels (with
side braces attached), and the front panel. To prevent dam-
age to the encoder connecting board and the altitude encoder
assembly on the base side panels, we recommend that you
not stack anything on those surfaces, and keep them facing
up during transport
(Figure 47).
When putting the XX14i into a vehicle, common sense pre-
vails. It is important that the optical tube sections do not get
knocked around; this can cause the optics to become mis-
aligned, and could dent the tube. We recommend transporting
(and storing) the tube assembly in the optional padded case
set for proper protection. The case set includes a two padded
cases for the tube sections, plus a pole case that holds the
four truss pole assemblies, and a secondary mirror cover. All
the cases have carry handles, and one of the padded cases
has an accessory pocket for added convenience.
To reassemble the telescope, just reverse the disassembly
procedure above.
5. astronomical Observing
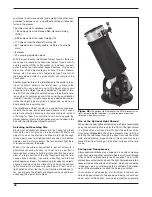
The SkyQuest XX14i IntelliScope Truss Tube Dobsonian pro-
vides prodigious capability for observing the many wonders of
the heavens, from the major planets to deep-space nebulas
and galaxies. In this section we give you some astronomical
observing tips and briefly summarize what you can expect to
see.
The IntelliScope Computerized Object Locator
One of the most exciting features of the XX14i is its com-
patibility with the IntelliScope Computerized Object Locator.
When plugged into the IntelliScope port on the base, the
Object Locator enables the user to point the telescope quickly
and effortlessly to more than 14,000 astronomical objects with
the push of a few buttons. After a simple two-star alignment
procedure, you just select an object to view from the intuitive
keypad, then read the guide arrows on the Object Locator’s
illuminated liquid crystal display and move the telescope in
the corresponding direction. In seconds, the object will be
waiting in the telescope’s field of view, ready to observe. It’s
that simple!
The two guide arrows and associated “navigation numbers”
tell you in what direction to move the telescope to pinpoint
an object’s location. As the telescope approaches the object’s
location, the numbers get progressively smaller. When the
navigation numbers reach zero, the telescope will be pointed
right at the object. You just look into the eyepiece and enjoy
the view!
The IntelliScope Computerized Object Locator works by
communicating electronically with the pair of high-resolution,
9,216-step digital encoders installed in the base. The encod-
ers allow highly precise positioning of the telescope to coor-
dinates programmed into the Object Locator’s database for
each astronomical object. Since the telescope is not depen-
dent on motors for movement, you can point the telescope at
Figure 46.
Loosen the four captive connecting bolts that attach
the side panels to the front panel.
Figure 47.
When transporting the disassembled base, lay the
side panels so the encoders face upward and don’t stack anything
on top of them, to prevent their getting damaged.