background image

ESP

AÑOL

ENGLISH

FRANÇAIS

DEUTSCH

POR

TUGUÊS

VR383 Manual-Eng (086-002906-020)

POR

TUGUÊS

ENGLISH

FRANÇAIS

DEUTSCH

IT

ALIANO

IT

ALIANO

ESP

AÑOL

8

9

Turning Alarm Setting On or Off

Changing the Alarm Time

You can change the alarm time by following the instructions below.

Press VOL+/VOL- to adjust values.

The alarm setting is automatically turned on when the alarm time has been changed.

Turning Off Ringing Alarm

When the alarm sounds, press any button (except the 

LASER

 button) to stop the

ringing. It will also automatically stop after 30 seconds.

If the voice recorder is in 

Recorder Mode

, the alarm will not sound even if

it is enabled. Instead, the Alarm Indicator will blink for 30 seconds or until
any button is pressed.

Press MODE/INDEX

or wait 30 seconds

Alarm Mode

Clock Mode

Press MODE/INDEX

Press VOL+ /
VOL- to turn
alarm setting
on / off

Press

DISP/SET

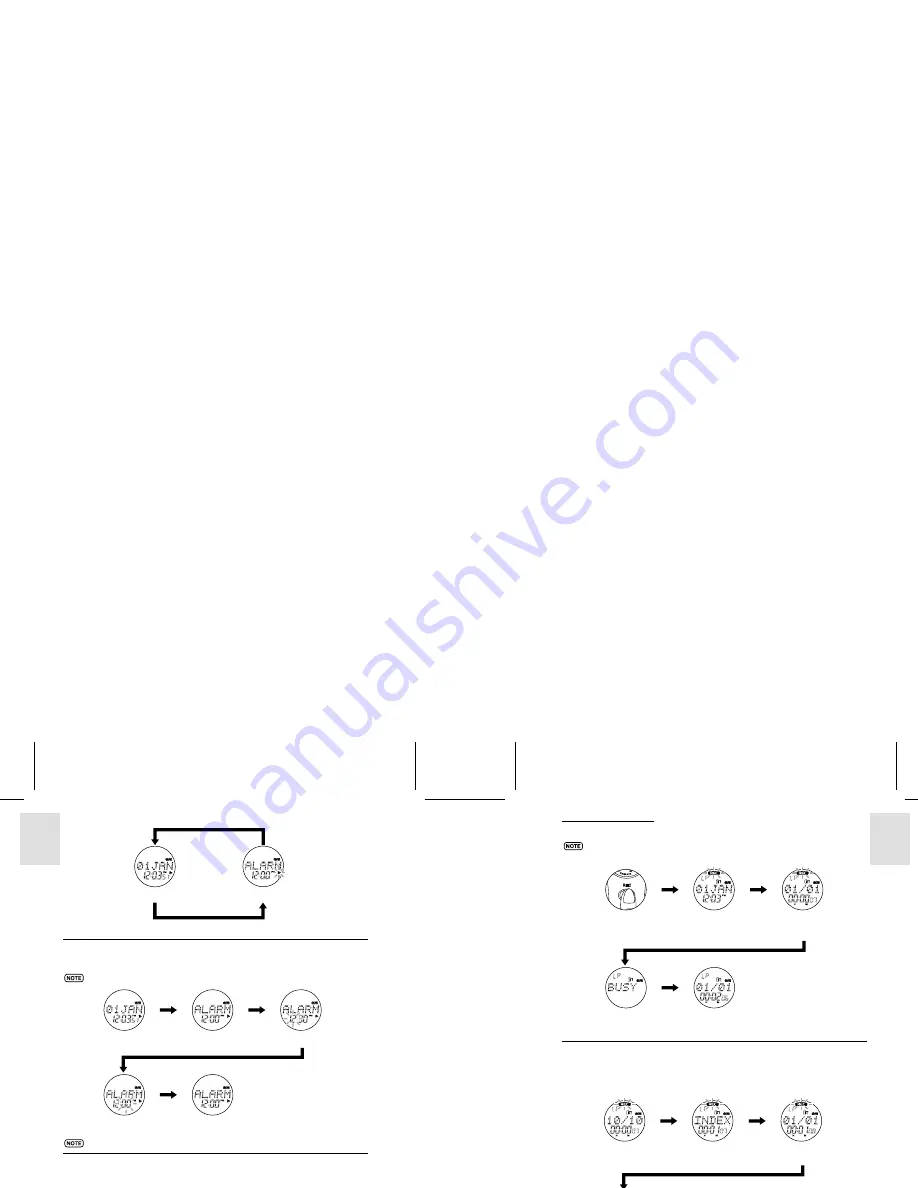
1. Normal Clock Operation

Press DISP/SET

Press &

hold DISP/SET

Press

DISP/SET

2. Alarm Mode

3. Change the Alarm’s Hour

4. Change the Alarm’s Minute

5. Return to Alarm Mode

RECORDER MODE

Recording Messages

To view the remaining recording time left, press 

DISP/SET

 while recording. The

word “

REMAIN

” will appear on-screen with the remaining recording time displayed.

Marking Indexes while Recording

Indexes may be added to messages while recording so that you can search and listen
to specific portions of a message easily. Up to a total of 99 indexes may be marked
in messages in the same folder. A single message may also have multiple indexes.
To mark an index:

Wait 3

seconds

Wait 1

second

1. Press REC in any mode to

start recording messages.

2. Date and time of

recording is displayed.

3. Current message’s

elapsed recording
time is displayed.

Press REC

4. Recording ends.

“BUSY” displayed
while storing message.

5. Message is stored.

Device returns to
Recorder Mode.

Wait 1 second

1. Message recording in

progress.

Press

MODE/INDEX

Wait 1

second

2. Index is inserted into

recording.

3. Current number of indexes in

message displayed right after.

4. Device returns to message

recording

Summary of Contents for VR383

Page 1: ...Displays 5 Clock Mode 5 Recorder Mode 5 Getting Started 6 Package Contents 6 Installing the Batteries 6 Using the Digital Voice Recorder 7 Clock Mode 7 Setting the Date and Time 7 Turning Alarm Setti...

Page 2: ...allows you to record up to 198 messages with a total duration of 136 minutes and the ability to organize recordings into 2 separate folders The messages remain intact even when batteries are removed b...

Page 3: ...rder for long periods of time Then remove the device from the pouch and keep it in a well ventilated place in order to prevent molding Check all major functions when the voice recorder is unused for a...

Page 4: ...ay Displays date day month or year 3 Time Display Displays time in HH MM SS AM PM format 4 Alarm Icon Indicates whether the alarm is enabled or disabled 5 Battery Level Indicator Displays the current...

Page 5: ...2 Insert the two AAA batteries into the compartment making sure to align them correctly with the battery graphics inside 3 Place the battery door back on and switch the lock to the right 4 The voice...

Page 6: ...rding Messages To view the remaining recording time left pressDISP SET while recording The word REMAIN willappearon screenwiththeremainingrecordingtimedisplayed Marking Indexes while Recording Indexes...

Page 7: ...ecorder can perform a number of dif ferent functions Functions Descriptions Display Remaining Playback Time Press DISP SET during playback Adjust Volume Press VOL or VOL Skip to Previous Message Press...

Page 8: ...ntly selected message blinks 3 BUSY displayed while message is erased Wait 1 second 4 Message erased Device returns to Recorder Mode VOICE RECORDER SETTINGS Your voice recorder has five different sett...

Page 9: ...laser beam for It is advisable to lock the laser when the function is currently not in use To activate the laser pointer press and hold the LASER button LOCKING THE LASER The LASER LOCK switch can be...

Page 10: ...ch Unlock the LASER LOCK switch Press VOL during playback Disconnect the earphone from the device or listen via the earphone Turn on the alarm setting Problem Symptom Check This Remedy Continued Probl...

Page 11: ...to Part 15 of the FCC Rules These limits are designed to provide reasonable protection against harmful interference in a residential installation This equipment generates uses and can radiate radio fr...

Reviews: