background image

- 11 -

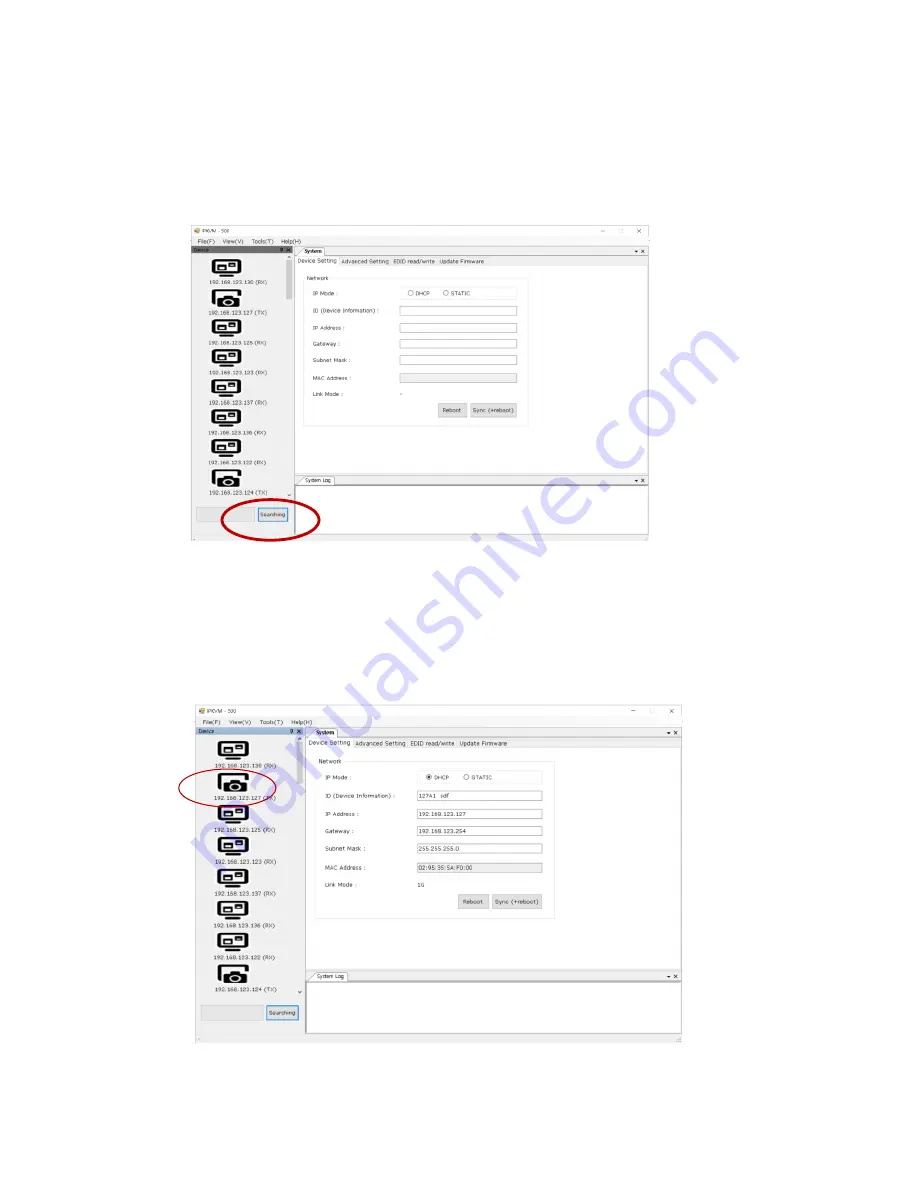
4) Device (Host /Client) setting:

It helps to find all TXs and RXs in the network and register automatically. But please remind

that all TXs and RXs in the network should have different IP address. If you connect TXs and
RXs in the network for the first time, please do modify network information of each TXs and
RXs as below.

♦ Modify IP address and device information on the network

(1) Click 

‘Searching’ button.

Then, Remote Manager detects connected devices and shows on left list window.

(2) To modify connected devices, select one of listed devices on the left list window. User

can modify IP address, gateway, and subnet mask of the devices on the right window.

(3) Add device name on the right window.

It supports up to 32 characters including numbers and English alphabets.

(4) Click 

‘Sync’ button to save and use TX or RX information.

Summary of Contents for IPKVM-500-ED

Page 1: ...1 4K HDMI IPKVM Extender 25 0595 95 IPKVM 500 ED User s Manual Doc No OIPKVM D161129 Rev1 2 WWW OPTICIS COM...

Page 2: ...m Installation 10 3 Access to menu of PC Program 10 4 Device Host Client setting 11 5 Advanced Setting configuration of Bit rate OSD display and Blocking 12 6 EDID read write 13 7 Update Firmware 15 1...

Page 3: ...D Decoder connected to a display receives the encoded signal over network and decodes it to regenerates the video and data for users The provided PC program makes the transmitters and receivers units...

Page 4: ...untable a quarter width of 19 Mounting bracket OPSCB complying with VESA 75 100 Application KVM RCS ROS Video control room 3 Supporting Video Resolutions for Input Output 1 HDMI 1 4 3840x2160p 24 25 3...

Page 5: ...ance even though they support these functions Opticis tested and confirmed the performance of L2 L3 switches as below So opticis recommends user to use the switches for easy set up List of L2 switches...

Page 6: ...e mainly external 5V AC DC power adaptor The internal power supplied through a HDMI pin 18 from the graphic source is used to identify normal connection between a source and TX IPKVM 500 E Connector d...

Page 7: ...r knob or console switch console indicator set and display Local Remote Authority Note1 If you change a video source to another one you have to reset the power of all TXs and RXs by re plugging of the...

Page 8: ...s Remote state and C means Console state Console State can be selected to Local or Remote state by external console switch Refer to Page 21 External Local Remote Authority Setting 8 LED Indication IPK...

Page 9: ...ct HDMI IN port in IPKVM 500 E TX to the PC by supplied HDMI cable Step 4 Connect mini USB port in IPKVM 500 E TX to USB port in PC with supplied USB cable Step 5 Connect Local Display port in IPKVM 5...

Page 10: ...ase enter the password number 0315 2 PC Program Installation Important If you use IPKVM 500 EDs in intranet between routers you need to check the IP addresses Gateway and Subnet Mask of the PC 1 Run t...

Page 11: ...d RXs as below Modify IP address and device information on the network 1 Click Searching button Then Remote Manager detects connected devices and shows on left list window 2 To modify connected device...

Page 12: ...Important It recommends that these advanced settings are applied to all hosts or clients because all devices need to have same configuration for fast switching with bit rate and blocking and EDID dat...

Page 13: ...of many clients and controlled with keyboard and mouse on the network 1 N multicast mode default For details please refer to Page 18 Multicast streaming and blocking function Available These TXs are r...

Page 14: ...n Then you can see the saved EDID data as below The TX isn t connected with display monitor you can see Fail message EDID write from a host or a client to all hosts recommended After you read EDID dat...

Page 15: ...ly with PC 2 Select a device to upgrade on the left list window Note User can see the present Firmware version of the selected device on the right side window 3 Please check the IP address and Gateway...

Page 16: ...16...

Page 17: ...nnected keyboard Ctrl Alt Shift Backspace Ctrl right Enter Ctrl right ESC Press a hotkey to exit from the GUI on the connected keyboard ESC key IP Address Device Information and status will be shown a...

Page 18: ...mode 1 1 in application such as ROS For details please refer to Page 18 multicast streaming and blocking function 2 Set Local or Remote with the Console Switch 3 Operation with Audio Port Note Select...

Page 19: ...bled Please set blocking function enabled on PC Program Remote Manager You may see status of hosts TXs on the GUI of a client RX as below Available The hosts TXs are ready to connect with the client C...

Page 20: ...TX HDMI Audio Analog Line in Line out Audio Output RX HDMI Audio Analog Line Out Dual output RS 232 Port optional 3 Pin Terminal Block for Knob alarm interface 3 Stage Slide Switch TX Local Remote Con...

Page 21: ...authority at an external switch for user s convenience Connect the console switch left image to DIO terminal block of the TX device by using a cable right image You can set a Local or Remote control a...

Page 22: ...22 15 Power Rack PR5V 16 General Specification Image Rear side Front Rear...

Page 23: ...k Switch Setup Network connectivity issue Slow in switching time more than 5 seconds different FW version different resolutions between host devices TXs different frame rates between host devices TXs...

Page 24: ...h 2K monitor there is no display change video resolution of PC source to 1080p60 connect PC with the host or client through network switch or directly and run PC Program And then read write EDID from...

Page 25: ...sion Opticis shall have no further obligation under the foregoing limited warranty if the product has been damaged due to abuse misuse neglect accident unusual physical or electrical stress unauthoriz...

Page 26: ...Opticis web site www opticis com or contact techsupp opticis com or support direktronik se Opticis Locations HQ 16Fl Kins Tower 8 Seongnam daero 331 beon gil Bundang gu Seongnam si Gyeonggi o 463 844...

Reviews: