background image

- 5 -

3. Before Using iVI SI ON+

3-2. How to ON/ OFF the system

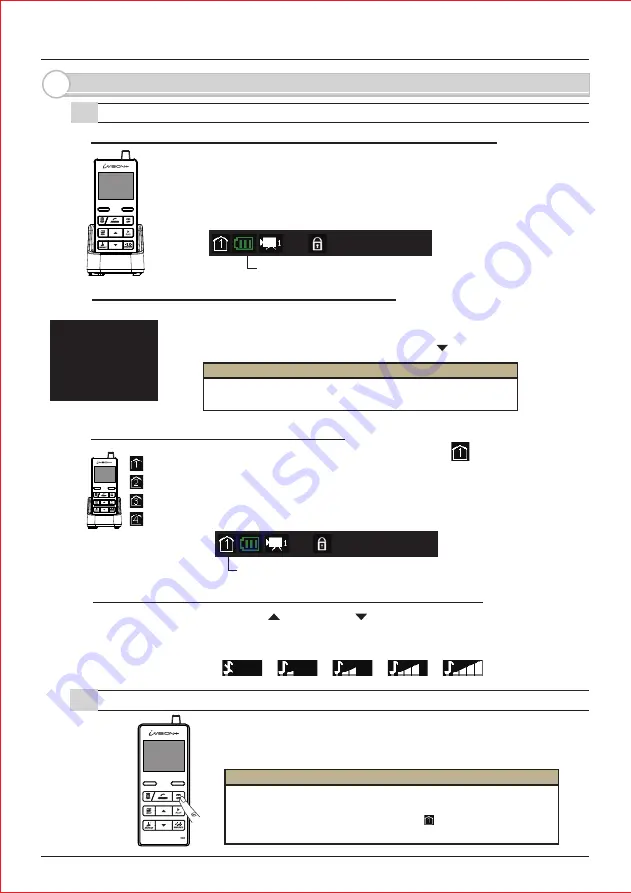
3-1. Getting ready with iVI SI ON+  system

Before using iVI SI ON+  system, the system must be installed accordingly
to individual I nstallation I nstruction. Once the installation is done, please
make sure that each Handheld Monitor Unit is fully charged on a cradle.
The OFF button lights up while charging until fully charged. 

To check number of iVI SI ON+  devices in your system, press and hold
LEFT function key for 3 sec to bring up a SYSTEM SETUP menu. 
Select “ 3 DEVI CES I N NETWORK”  by DOWN    button and confirm OK.

Pressing down the “ OFF”  button for 3 seconds,
will turn ON/ OFF the Handheld Monitor Unit.

I dentify the Main Handheld Unit by an indicator      on a screen.
The main handheld unit is the unit that captures and stores images 
while “ Auto Recording Function” is activated.
The main unit must stay turned ON for the “ Auto Recording Function”

CHECK 1:  Handheld Monitor Unit needs to be charged before usage

CHECK 2:  Confirm devices registered in the system

CHECK 3:  I dentify the Main Handheld Unit

CHECK 4:  Select a chime volume from the Handheld Monitor Unit

While in I DLE MODE, Use UP     and DOWN     keys to select a chime volume for
each Handheld Monitor Unit in the iVI SI ON+  system.

At least one paired Handheld Monitor Unit needs to stay turned
“ ON”  to respond to a call from the external Door Camera Unit.
When the main Handheld Monitor Unit     is turned off,
Auto Recording feature does not work.

20XX/XX/XX 11:59AM

This indicator shows battery status on the Handheld Monitor Unit.

SYSTEM SETUP

1 DATE & TI ME

2 SYSTEM CONFI GURATI ON

3 DEVI CES I N NETWORK

4 PC CONNECTI ON

OK

BACK

I DLE MODE

20XX/XX/XX 11:59AM

I DLE MODE

This indicator No. 1 is shown on the main unit. 2,3 & 4 are sub units.

<

<

<

<

MUTE

MAX

Caution

I nstallation I nstruction of Handheld Monitor Unit
[ 7-1 Confirming number of iVI SI ON+  devices in a HOME I D]

REFERENCE

Summary of Contents for iVision+

Page 1: ...nd sound of the iVISION can not be guaranteed at all times Performance of this product depends on the environment where the product is being used Please carefully read all included documents and test...

Page 2: ...an image 4 4 Ending ANSWER BROWSING MODE Returning to IDLE MODE 4 3 Operating OPEN DOOR function 5 1 How Auto Recording works 5 2 Changing number of images to be captured in Auto Recording 5 3 Timing...

Page 3: ...is was at your door Replace an old door bell with video If you already have a door bell with 10 24VAC DC power supplied enable Door Camera Unit for a browsing feature and actively view from a Handhel...

Page 4: ...irmation of a command that appears on the lower left of the screen Press and hold for 3 sec to enter into SYSTEM SETUP menu Used for confirmation of a command that appears on the lower right of the sc...

Page 5: ...dheld Monitor Units Please replace the batteries when Handheld Monitor Units show a low battery status indicator on upper middle of the screen The sign indicates that Door Camera Unit has low power su...

Page 6: ...in unit must stay turned ON for the Auto Recording Function CHECK 1 Handheld Monitor Unit needs to be charged before usage CHECK 2 Confirm devices registered in the system CHECK 3 Identify the Main Ha...

Page 7: ...next field DATE TIME SETUP 20XX XX XX 11 59 AM OK BACK Complete the setup with OK While another HU is in ANSWER MODE the Date Time Setting will not be reflected on the unit When addtional IVP HU are a...

Page 8: ...with a Door Camera Unit if additional Gateway Chime Unit has been installed you can press the OPEN DOOR to open a electric door lock or activate an additional third party equipment Press ANSWER butto...

Page 9: ...Unit IVP GU and properly connected to a third party equipment OPEN DOOR DOOR1 DOOR2 Pressing OPEN DOOR button will bring an OPEN DOOR menu on the screen Select DOOR1 or DOOR2 to activate a designated...

Page 10: ...TIME 2 SYSTEM CONFIGURATION 3 DEVICES IN NETWORK 4 PC CONNECTION OK BACK NOTE Please enter SYSTEM SETUP menu by pressing down on LEFT function key for more than 3 seconds Select 2 SYSTEM CONFIGURATIO...

Page 11: ...deleted they can not be restored CAUTI ON CONNECT TO PC OK BACK 1 Enter SYSTEM SETUP menu by pressing LEFT function key for more than 3 seconds 2 Select 4 PC CONNECTION by using UP and DOWN keys Confi...

Page 12: ...LEFT function key is being pressed Use this mode to avoid unwanted sound from the house to be heard from a Door Camera Unit Listener and speaker side switches automatically in this mode Use this in a...

Page 13: ...lume on the Door Camera Unit 7 3 Door Open Duration Setting This setting adjust a operation time of a NO NC terminal output on IVP GU to 1 sec 5 sec 30 sec or 60 sec This setting is only active while...

Page 14: ...k 4 If the Handheld Monitor Unit is too close to the Door Camera Unit a howling sound can occur 3OHDVH PRYH WKH 93 8 DZD IURP 93 8 XQWLOO the howling sound disappears Is the AC adaptor disconnected fr...

Page 15: ...14 MEMO...

Page 16: ...ww optexeurope com OPTEX SECURITY SAS France URL http www optex security com OPTEX SECURITY Sp z o o Poland URL http www optex com pl OPTEX DONGGUAN CO LTD SHANGHAI OFFICE China URL http www optexchin...

Reviews: