17
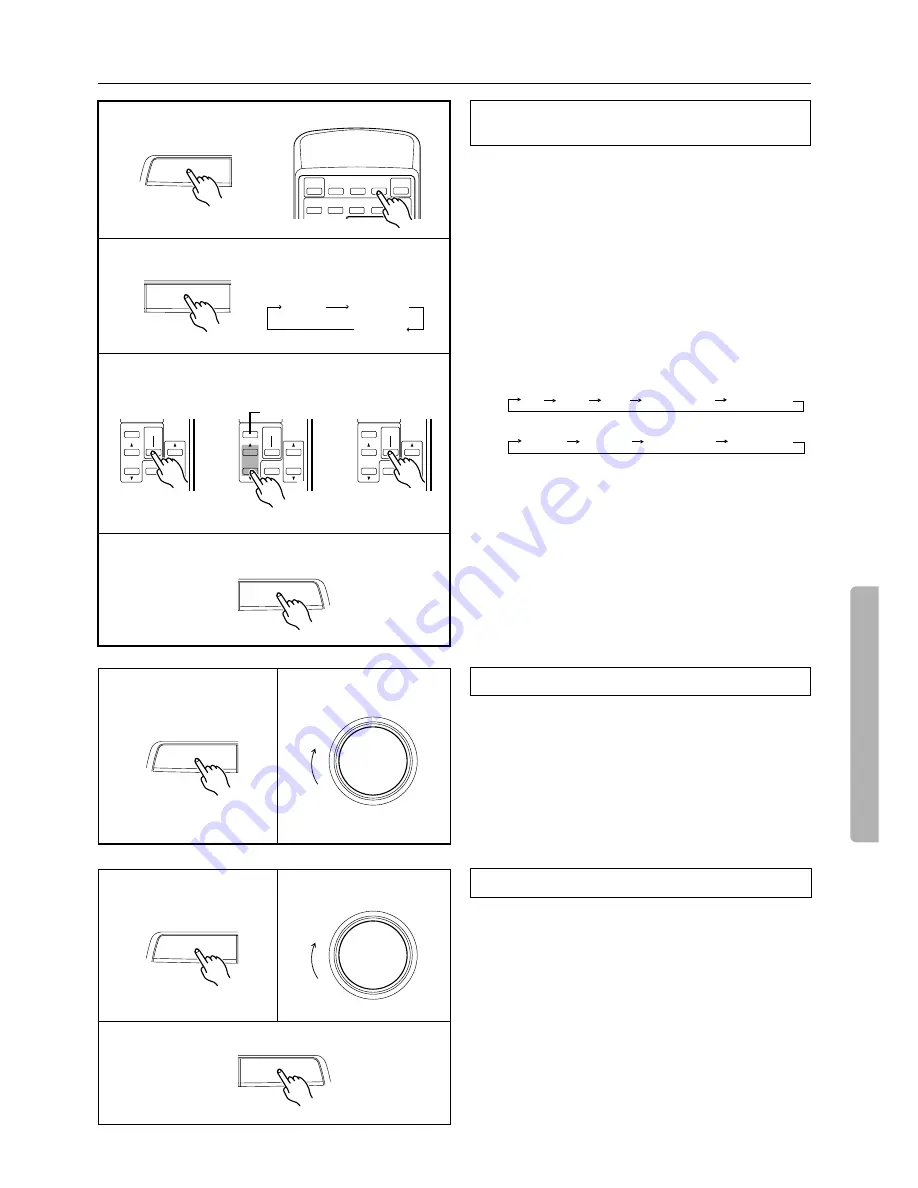
To enjoy Surround mode or Stereo mode
1. Select a source encoded with Dolby Surround and use the SUR-
ROUND MODE button to select DOLBY PRO LOGIC mode.
2. Use the CENTER MODE button to select a center mode.
When you press the CENTER MODE button, the name of each
mode will be shown on the display for three seconds in turn.
3. Adjust the volume level of the connected speakers as follows
so that all the speakers sound at the same level in the listen-
ing position.
3-1. Press the TEST TONE button on the remote controller.
The test tone will start sounding from the Front L speaker,
then move to other speakers. Each test tone lasts a few sec-
onds.
The test tone moves from speaker to speaker in the follow-
ing order:
If Center mode is NORMAL or WIDEBAND:
If Center mode is PHANTOM:
3-2. Press the LEVEL
π
or
†
button to change the volume
level of the test tone output from the target speaker.
You will hear the test tone continuously as long as you are
adjusting the volume level. After you finish adjusting the
level of a given speaker, the test tone will stop sounding for
a moment, then move to the next speaker. You can also use
the CH SEL buttons to send the test tone to the desired
speaker manually.
3-3. Press the TEST TONE button again to stop the test tone.
4. Use the DELAY TIME button to set the delay time.
When you press the DELAY TIME button, DELAY and the
delay time will be shown for 3 seconds on the display.
1. Use the SURROUND MODE button to select Dolby Pro
Logic mode.
2. Play a Dolby Surround-encoded source.
3. Use the MASTER VOLUME control knob to adjust the
level.
•
Adjust the bass and treble ranges, if necessary. The Bass and
Treble controls are effective for the Front L and R speakers.
Refer to “Adjusting the volume level of the subwoofer” on page
14 for more information on how to adjust the subwoofer level.
1. Use the SURROUND MODE button to select the desired mode.
HALL:
This mode simulates the atmosphere of a concert hall.
STEREO:
This mode is used when you do not wish to use the
Surround mode. All input sound is output from the front speak-
ers directly.
2. Use the MASTER VOLUME control knob to adjust the level.
•
Adjust the bass and treble ranges, if necessary. The Bass and
Treble controls are effective for the Front L and R speakers.
Refer to “Adjusting the volume level of the subwoofer” on page
14 for more information on how to adjust the subwoofer level.
3. If you have selected Hall mode, use the DELAY TIME but-
ton to select the delay time from 15, 20, 30, 40, or 50ms.
When you press the DELAY TIME button, “DELAY” and the
delay time value appear on the display for three seconds.
Adjusting the speaker volumes before enjoying
Dolby Pro Logic Surround sound
Enjoying Dolby Pro Logic Surround sound
Enjoying Hall Surround or Stereo sound
DVD
VOLUME
LEVEL
CH SEL
MUTING
TEST
TONE
DVD
VOLUME
LEVEL
CH SEL
MUTING
TEST
TONE
DVD
VOLUME
LEVEL
CH SEL
MUTING
TEST
TONE
CH SEL
3-
1
3-
2
3-
3
DELAY TIME
CENTER MODE
SURROUND MODE
POWER
SLEEP
DIMMER
SUR
MODE
VIDEO-1 VIDEO-2
TAPE
DVD
C D
TUNER
TUNER
PHONO
INPUT SELECTOR
PRESET
MULTI-CH
INPUT
GROUP
1
2
DELAY TIME
CENTER MODE
OUND MODE
When the button is pressed, the
mode will change as shown below.
NORMAL
WIDEBAND
PHANTOM
DELAY TIME
CENTER MODE
ROUND MODE
4
Left Center Right Right Surround Left Surround
Front Left Front Right Right Surround Left Surround
SURROUND MODE
1
MASTER VOLUME
3
SURROUND MODE
1
MASTER VOLUME
2
DELAY TIME
CENTER MODE
ROUND MODE
3


