background image

49

Listening to Radio Broadcasts

One of the features of the TX-DS898 that is most frequently used is
its ability to play FM and AM broadcast radio stations. The TX-
DS898 provides a number of listening modes perfect for listening to
the radio and getting the most out of your audio system. Also, by
presetting radio stations that you listen to frequently, you can select
them easily by pressing the CH +/– buttons on the remote controller.

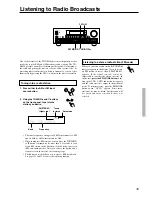
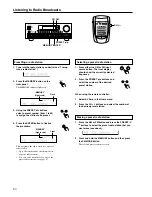
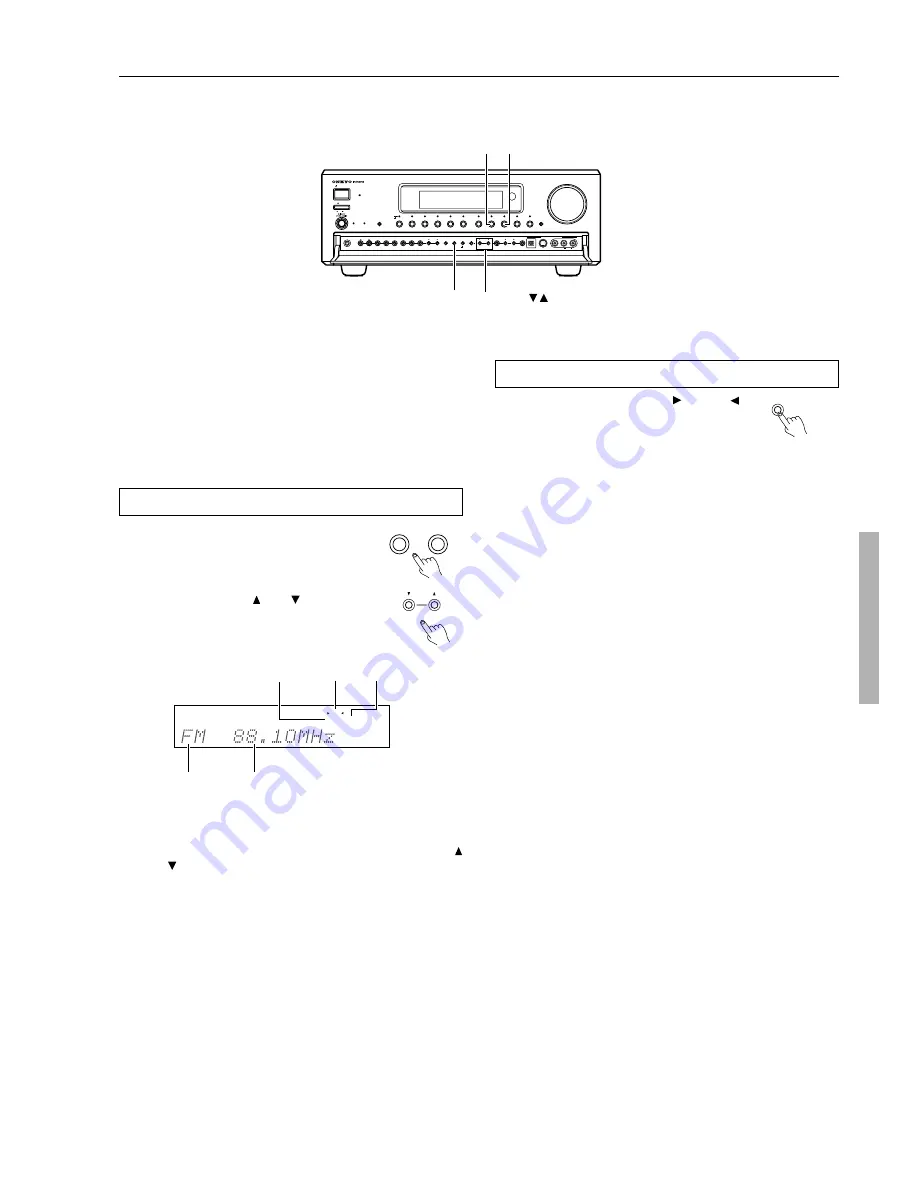
Tuning into a radio station

1. Press either the AM or FM input

source button.

2. Using the TUNING   and   buttons

on the front panel, tune into the
station you desire.

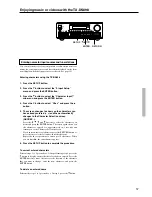
Listening to a stereo radio station (FM mode)

When you tune into a radio station,   TUNED 
indicator appears in the display. If you tune into
an FM station in stereo, then “FM STEREO”
appears. If the signal is weak, it may be
impossible to tune into the station in stereo. In
such a case, press the FM MODE button on the
front panel. The AUTO indication disappears
and the radio station is output in the monaural
mode. To return to stereo, press the FM MODE
button again. “AUTO” appears. Some inter-
station noise may be heard, but the sound will
not cut in and out as it would if stereo was
selected.

Tuned

in stereo

Band

Frequency

Auto mode

“FM STEREO”

(Lights red)

• The tuner frequency changes in 50 kHz increments for FM

and 10 kHz (or 9 kHz) increments for AM.

• When tuning into FM stations, you can press the TUNING 

or   button continuously for more than 0.5 seconds to scan
for an FM station in the direction of the button you pressed
(FM auto tuning mode). After you release the button and a
station is received in stereo, the scanning stops.

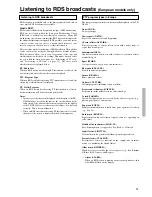
• The European model allows you to receive RDS broadcasts.

See pages 51 and 52 for a more detailed explanation.

AUTO

TUNED

FM STEREO

FM MODE

FM

AM

TUNING

STANDBY/ON

OFF

ON

POWER

STANDBY

MASTER  VOLUME

FM

AM

PHONO

C D

TAPE

DVD

VIDEO 

3

VIDEO 

5

VIDEO 

4

VIDEO 

2

VIDEO 

1

AUDIO

SELECTOR

DISPL AY

PURE AUDIO

UPSAMPLING

PHONES

ZONE 

2 LEVEL

STEREO SURROUND

THX

DSP

REC OUT

ZONE 

2

OFF

DIMMER

FM MODE

MEMORY

SETUP

CLEAR

ENTER

RETURN

VIDEO 

5/VIDEO CAM INPUT

TUNING

PRESET

S VIDEO

AUDIO

VIDEO

L

R

DIGITAL 

FM MODE

TUNING

FM AM

/

Summary of Contents for Integra TX-DS898

Page 1: ... the unit Following the instructions in this manual will enable you to obtain optimum performance and listening enjoyment from your new AV Receiver Please retain this manual for future reference TX DS898 Appendix 85 Remote controller 61 Setup and operation 29 Before using 2 AV Receiver Instruction Manual Facilities and connections 8 ...

Page 2: ...built up static charges Article 810 of the National Electrical Code ANSI NFPA 70 provides in formation with regard to proper grounding of the mast and sup porting structure grounding of the lead in wire to an antenna discharge unit size of grounding conductors location of an tenna discharge unit connection to grounding electrodes and requirements for the grounding electrode See Figure 1 15 Lightni...

Page 3: ...ck or other hazards 22 Safety Check Upon completion of any service or repairs to the appliance ask the service technician to perform safety checks to determine that the appliance is in proper operation condition 23 Wall or Ceiling Mounting The appliance should be mounted to a wall or ceiling only as recommended by the manufacturer 24 Heat The appliance should be situated away from heat sources suc...

Page 4: ...roadcasts 51 PTY program types in Europe 51 Displaying Radio Text RT 52 Performing a PTY scan 52 Performing a TP scan 52 Enjoying music or videos with the TX DS898 53 Basic operation 53 Temporarily turning off the sound 53 Adjusting the bass and treble 53 Listening with headphones 53 Changing the listening mode 54 Switching the display 55 Adjusting the brightness of the front display 55 Facilities...

Page 5: ...ng and Moving Devices 76 Adding devices 76 Moving menu items 76 5 Delete and restore 77 Delete 77 Restore 77 6 Recording Macros and Setting Timers 78 Recording macros 78 Editing macros 78 Setting timers 79 Editing timers 79 7 ChadEdit 80 System requirements 80 Troubleshooting 81 General Problems 81 Programming Problems 81 FAQ 82 Overview of Symbols 83 Specifications 84 Using the sleep time remote ...

Page 6: ...M Tuner Features 40 FM AM random presets FM auto tuning RDS European models only with PS PTY RT TP Other Performance Features IntelliVolume Character Input Unique and fully customizable universal touchscreen remote controller Supplied accessories Check that the following accessories are supplied with the TX DS898 AM loop antenna 1 Remote controller 1 Batteries AA R6 or UM 3 4 RS232 cable for PC co...

Page 7: ... 2 REMOTE CONTROL AC INLET 120V VOLTAGE SELECTOR 220 230V Setting the Voltage selector Worldwide models only Worldwide models are equipped with a voltage selector to conform with local power supplies Be sure to set this switch to match the voltage of the power supply in your area before plugging in the unit Determine the proper voltage for your area 220 230 V or 120 V If the preset voltage is not ...

Page 8: ...Multi function display Zone 2 indicator Front door European models only STANDBY ON OFF ON POWER STANDBY MASTER VOLUME FM AM PHONO CD TAPE DVD VIDEO 3 VIDEO 5 VIDEO 4 VIDEO 2 VIDEO 1 ZONE 2 GRN REC RED AUDIO SELECTOR DISPLAY PURE AUDIO UPSAMPLING TX DS898 PUSH TO OPEN PHONES ZONE 2 LEVEL STEREO SURROUND THX DSP REC OUT ZONE 2 OFF DIMMER FM MODE MEMORY SETUP CLEAR ENTER RETURN VIDEO 5 VIDEO CAM INPU...

Page 9: ...of noise The result is high fidelity music playback true to the original source PHONES jack 53 This is a standard stereo jack for connecting stereo headphones ZONE 2 LEVEL buttons 58 Press to enter the mode for adjusting the volume in the remote zone Zone 2 REC OUT ZONE 2 OFF buttons 58 60 These buttons allow you to use the TX DS898 to output to a remote zone Zone 2 or to another component for rec...

Page 10: ...rements for FM and 10 kHz or 9 kHz increments for AM When FM is selected you can hold down one of the tuning buttons and then release it to activate the auto search feature It will search for a station in the direction of the button you pressed and stop when it tunes into one When navigating through the menu settings these buttons move the cursor up or down or change the highlighted item ENTER but...

Page 11: ... each time this button is pressed 56 Second operation menu page 2 3 Listening mode buttons Direct Changes the listening mode directly to the Direct listening mode If pressed the listening mode for the selected input source set in the Listening Mode Preset is also changed to the Direct listening mode When the listening mode is set to Direct you can switch between Direct and Pure Audio Stereo Change...

Page 12: ...t in the Listening Mode Preset is also changed Display For changing the display in the front display Re EQ Depending on the listening mode you can turn the cinema re equalization function on or off 43 46 Third operation menu page 3 3 Setup button For displaying and quitting the setup menu 30 Return button For entering the selected setting and returning to the previous menu 30 Test button Outputs a...

Page 13: ...he volume in the remote zone Zone 2 ON button For disabling the function of the remote zone Zone 2 OFF button For activating the function of the remote zone Zone 2 Input Selector buttons Selects an input source CD CD DVD DVD Tuner FM AM Phono PHONO Tape1 TAPE Tape2 Not used with the TX DS898 Video1 VIDEO 1 Video2 VIDEO 2 Video3 VIDEO 3 Video4 VIDEO 4 Video5 VIDEO 5 CH VOL MUTE CONT LIGHT Zone 2 ...

Page 14: ... inputs and outputs on the rear panel There are three digital inputs with coaxial jacks and four with optical jacks The inputs accept digital audio signals from a compact disc LD DVD or other digital source component For digital output there is 1 optical output The digital outputs can be connected to MD recorders CD recorders DAT decks or other similar components Since an analog connection must be...

Page 15: ...nana plug connectors other than European models AC OUTLETS The TX DS898 is supplied with AC mains outlets for connecting the power cords from other devices so that their power is supplied through the TX DS898 By doing this you can use the STANDBY ON button on the TX DS898 to turn on and off the connected devices as well The shape number and total capacity of the AC outlets may differ depending on ...

Page 16: ...R emitter on the remote sensor of the component or facing it RS 232 The RS 232 port is to be used in conjunction with an external controller to control the operation of the TX DS898 by using an external device The RS 232 port may also be used in the future to update the operating software of the TX DS898 so that it will be able to support new digital audio formats and the like as they are introduc...

Page 17: ... Ex DVD Audio player MPEG decoder GND Use this GND terminal for connecting the ground or earth wire if a turntable is connected Refer to Connecting a turntable on page 18 Composite video jack S video jack VIDEO IN OUT These are the video inputs and outputs On the rear panel there are five video inputs and two video outputs and each one includes both composite video and S video configurations Conne...

Page 18: ... or earth wire to the GND terminal For some turntables however connecting the ground wire may cause increased noise and in such a case a ground wire is not necessary and should not be connected 2 Connecting a compact disc player CD Using an RCA type audio connection cable connect the output terminal on the compact disc player to the CD input jacks on the TX DS898 Make sure that you properly connec...

Page 19: ...he COMPONENT VIDEO INPUT jacks With the initial settings of the TX DS898 the DVD input source is set for the COMPONENT VIDEO INPUT 1 jack If the video connection is made at COMPONENT VIDEO INPUT 2 this must be changed at the Setup menu Input Setup Video Setup Component Video see page 38 Using an RCA type audio connection cable connect the audio output terminal on the device to the audio DVD IN jac...

Page 20: ...for REC OUT at the TX DS898 Note The output from the DIGITAL OUTPUT jack of the TX DS898 is only the digital signal input to the DIGITAL INPUT jack 6 Connecting a video cassette recorder VIDEO 1 Using an RCA type video connection cable connect the video output terminal composite on the video cassette recorder to the VIDEO 1 IN jacks on the TX DS898 and video input terminal to the VIDEO 1 OUT jacks...

Page 21: ...output if the television or projector is equipped with an S video input it is unnecessary to connect the video connectors If it is equipped with only a video input connect it to the MONITOR OUT VIDEO output If the monitor or projector is equipped with an S video output terminal connect it to the MONITOR OUT S VIDEO terminal with an S video cable If it does not have an S video output terminal conne...

Page 22: ...S ES Matrix 6 1 or DTS ES Discrete 6 1 audio Subwoofer Produces powerful and heavy bass Minimum speaker configuration for surround sound playback Front right and left speakers Surround right and left speakers The sound recorded for the center speaker and the subwoofer will be properly distributed to the front right and left speakers for optimized surround playback Speaker placement Ideal speaker p...

Page 23: ... Ω to the TX DS898 If the impedance of even one speaker is between 4 and 6 Ω be sure to set the speaker impedance setting accordingly see page 31 To prevent damage to circuitry never short circuit the positive and negative speaker wire NO Surround Back left speaker Surround Back right speaker 15mm 1 3 4 5 2 Notes When you are using only one speaker or when you wish to listen to monaural mono sound...

Page 24: ...place them in a different room or separated area for listening to music This other room or area is referred to as the remote zone Zone 2 while the room where the TX DS898 is located is the main zone In addition the IR IN OUT allows you to control the TX DS898 from the remote zone Zone 2 with the remote controller even though the remote zone is physically separated The diagram below shows how to ma...

Page 25: ...he remote sensor on the front of the TX DS898 will not be output to the IR OUT terminal The following equipment sold separately is essential for operation Onkyo s Multi Room System kits IR Remote Controller Extension System or Multiroom A V distribution and control systems from Niles and Xantech to name a few The IR IN input allows you to control the TX DS898 from the remote zone Zone 2 with the r...

Page 26: ... use of an outdoor antenna is recommended Connecting the AM loop antenna The AM loop antenna is for indoor use only Set it in the direction and position where you receive the clearest sound Put it as far away as possible from the TX DS898 televisions speaker cables and power cords When reception is not satisfactory with the attached AM loop antenna alone connection of an outdoor antenna is recomme...

Page 27: ... electrical shock grounding is necessary Follow item 14 of the Important Safeguards on page 2 when you install the outdoor antenna Note If you are using the TX DS898 worldwide model in a region where AM frequencies are delineated by 10 kHz steps be sure to set the AM Freq Step Setup setting accordingly see page 31 RE OUT ANTENNA CENTER L AUDIO R L AM FM 75 FM RE OUT ANTENNA CENTER L AUDIO R L AM F...

Page 28: ...ement of the unit On the average memory contents are protected over a period of a few weeks after the last time the unit has been turned off This period is shorter when the unit is exposed to a highly humid climate 3 Press the STANDBY ON button to turn on the TX DS898 The display and four jog dial indicators will light up and the STANDBY indicator will turn off If you press the STANDBY ON button a...

Page 29: ...libration 2 Input Setup 1 Digital Setup 2 Multichannel Setup 3 Video Setup 4 Character Input 5 Intelli Volume 6 Listening Mode Preset ENTER Quit SETUP Input DVD 2 Input Setup 1 Digital Setup 2 Multichannel Setup 3 Video Setup 4 Character Input 5 Intelli Volume ENTER Quit SETUP Input DVD 1 Speaker Setup 1 Speaker Config 2 Speaker Distance 3 Level Calibration 4 Bass Peak Level Quit SETUP ENTER Quit ...

Page 30: ...r buttons select the sub menu that you want to enter and press the ENTER button Each sub menu has different settings that can be changed as desired and they are all explained below To change a setting first select it using the and cursor buttons and then change the setting using the and cursor buttons 5 Press the RETURN button to set the new settings and return to the previous menu screen and agai...

Page 31: ...lect to perform the remote zone Zone 2 operations from the remote zone Advanced Menu 0 Hardware Setup 1 Speaker Impedance 2 IR IN Setup 3 AM Frequency Step ENTER Quit SETUP Advanced Menu 0 Hardware Setup 0 1 Speaker Impedance a Minimum 6 ohms Quit SETUP Advanced Menu 0 Hardware Setup 0 2 IR IN Setup a Position Main Quit SETUP The Hardware Setup menu will need to be set before you use your TX DS898...

Page 32: ...r the remote zone Zone 2 to the SURR BACK ZONE 2 PRE OUT or SURR BACK ZONE 2 SPEAKERS terminals using the internal amplifier of the TX DS898 Not Activated Select when not connecting the speakers for the remote zone Zone 2 to the SURR BACK ZONE 2 PRE OUT or SURR BACK ZONE 2 SPEAKERS terminals not using the internal amplifier of the TX DS898 Memo Tip When setting the speaker size in the Speaker Conf...

Page 33: ...o your normal listening position between 1 and 30 feet in 0 5 feet intervals 0 3 to 9 meters in 0 15 meter intervals 1 2 Speaker Distance sub menu Here you will enter the distance from each speaker to your normal listening position This is important for the timing of the acoustics to create the proper sound space that the TX DS898 and today s sound systems are able to produce Notes Speakers that y...

Page 34: ...ise from the center speaker 2 Using the and cursor buttons adjust the volume level of the noise from the center speaker so that it is the same level as the front left speaker You can jog back and forth between the speakers to help you compare the volume levels 3 Press the cursor button again The TX DS898 will now emit the pink noise from the front right speaker 4 Repeat steps 2 and 3 above for the...

Page 35: ...ly raise the volume to the point where the sound becomes distorted and then back it off until it returns to normal This is the proper setting for the bass peak level After setting the Peak Level at the Bass Peak Level sub menu press the RETURN button The values are set and the previous screen appears Notes The volume can be adjusted to either or between 81 to 18 decibels in 1 decibel increments Do...

Page 36: ...igital Setup sub menu The settings made in this sub menu are valid for the input source that is currently selected with the input source buttons at the front panel and therefore these settings are made separately for each digital input source This sub menu will not appear if the selected input source button is AM or FM If this setting is incorrectly made the digital audio signals may not be proper...

Page 37: ...ay a CD or LD that supports DTS when All is selected you may hear a noise for a short while until the DTS decoder recognizes the DTS encoded signal and starts operating This is not a malfunction If you press the pause or skip button on the player while playing a DTS source a short noise may be heard This is not a malfunction In such cases try playing the source in the DTS selected The DTS indicato...

Page 38: ...o of the input source that you changed from is continued For example if the selected input source is VIDEO 1 and you then change to CD set to Last Valid then the audio from the CD input is played while the video from VIDEO 1 continues If no video signal is to be assigned to the input source set b Component Video If a component is connected to the one of the COMPONENT VIDEO inputs 1 or 2 then that ...

Page 39: ...ton to the location of mistaken character and enter the desired character To erase a character enter a blank space in its place After completing the name to exit repeatedly press the ENTER button Continue until the name is finished or until you have reached 10 characters 2 5 Intelli Volume sub menu This sub menu allows you to set some of the special features offered by the TX DS898 a Intelli Volum...

Page 40: ...le if your DVD player also plays compact discs and the DVD video signal is Dolby Digital and the compact disc signal is PCM then you can set a different listening mode for each This is especially convenient if you frequently play the same types of movies or music Advanced Menu 2 Input Setup 2 6 ListeningMode Preset a Analog PCM Stereo b PCM fs 96k Stereo c Dolby D Dolby D d DTS DTS f D F 2ch PLII ...

Page 41: ...uses the surround channels to provide a natural sound space that cannot be provided with normal stereo output This mode can be used with VHS and DVD videos with the mark and certain television programs The Music mode can be used with music compact discs and other stereo sources If no surround speakers are connected then the surround sound is divided and output from the front left and right channel...

Page 42: ...at cannot be provided with normal stereo output This mode can be used with music compact discs and other stereo sources DTS Used for playing DTS source DTS ES Discrete 6 1 With the addition of the surround back channel this new format has all 6 1 channels recorded independently for a completely discrete digital format Since all channels are recorded independently high fidelity surround playback wi...

Page 43: ...erts its digital sampling frequency to twice its current frequency for an even further detailed sound reproduction This can be set to either On or Off When On is selected the Upsampling indicator lights c Subwoofer When Yes is selected for the Subwoofer setting in the Speaker Config sub menu set this to Off if you do not want to have sound output from the subwoofer This setting is only effective w...

Page 44: ... level can be adjusted to either or between 10 to 0 decibels in 1 decibel increments For DTS input source signals the LFE level becomes that set here A setting of 0 decibels is recommended for optimum performance however if the low frequency range is too strong lower this setting as necessary 3 6 Mono Setup The settings shown below are enabled when the listening mode is set to Mono Parameter Setti...

Page 45: ... channel digital input signals c DTS ES Selects DTS ES mode Auto When the DTS source has the DTS ES flag ID signal for DTS ES the listening mode is automatically changed to DTS ES Discrete 6 1 or DTS ES Matrix 6 1 If the DTS source has no DTS ES flag the mode is changed to DTS 5 1 On When the DTS source has the DTS ES flag the listening mode is automatically changed to DTS ES Discrete 6 1 or DTS E...

Page 46: ...tening mode the set parameters become enabled Parameter Setting Initial value a Front Effect Off On On b Reverb Level Low Middle High Middle c Rever Time Short Middle Long Middle a Front Effect Some live recordings contain acoustic reverberation When you play these sources more reverberation will be applied by the DSP creating too much reverb effects and the sound loses frame or presence In this c...

Page 47: ...tting allows you to set the maximum volume that can be output with the MASTER VOLUME dial to prevent components from being damaged by excessively loud volumes For the absolute volume display method this can be set between 50 and 99 For the relative volume display method this can be set between 32 and 17 decibels To not set a maximum volume select Off d Power On Volume This sets a designated volume...

Page 48: ...TV Format The default setting is Auto which means that the television format is detected and automatically set by the TX DS898 However if you know the correct format you can use this setting to choose either PAL or NTSC so that no time is wasted on detection a Background Color Select either Blue1 Blue2 Green1 Green2 Magenta Red1 or Red2 as the background color while the OSD Setup menu is displayed...

Page 49: ...o station is output in the monaural mode To return to stereo press the FM MODE button again AUTO appears Some inter station noise may be heard but the sound will not cut in and out as it would if stereo was selected Tuned in stereo Band Frequency Auto mode FM STEREO Lights red The tuner frequency changes in 50 kHz increments for FM and 10 kHz or 9 kHz increments for AM When tuning into FM stations...

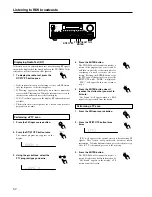
Page 50: ...front display should show the currently selected frequency 2 Press the PRESET buttons and select the number of the desired preset station When using the remote controller 1 Select AV Amp in the Home menu 2 Press the CH buttons and select the number of the desired preset station This programs the radio station as a preset radio station Up to 40 stations can be stored in memory as preset radio stati...

Page 51: ...tation Also unusual characters may appear on the display if the TX DS898 receives characters that cannot be displayed correctly This is not a malfunction When an RDS station broadcasting PS information is selected the name of the station is displayed instead of the frequency PTY program types in Europe The text given in parenthesis is what is actually displayed on the TX DS898 None NONE No program...

Page 52: ... station TP will appear if the current station is broadcasting TP signals This station will periodically broadcast traffic information To find a different station proceed to the next step Also if TP is displayed proceed to the next step Performing a PTY scan 1 Press the FM input source button 2 Press the RT PTY TP button twice The current program type appears on the display Performing a TP scan 1 ...

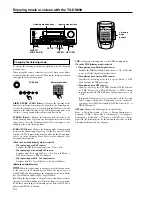
Page 53: ...eadphone volume level can be adjusted at the Setup menu see page 48 Note that the signal to the remote zone Zone 2 will not be affected whether or not headphones are connected Adjusting the bass and treble You can adjust the bass and treble levels at the Setup menu Audio Adjust Tone Control This function only affects the front left and right speakers center speaker and subwoofer Only the bass leve...

Page 54: ... Pro Logic II Music dts When the input source is a digital source this button works as the same for the Surround button When the input source is Analog PCM this button changes the listening mode between DTS Neo 6 Music and DTS Neo 6 Cinema TX DS898 Remote controller Listening mode buttons Enjoying music or videos with the TX DS898 Listening mode buttons Input source buttons STEREO SURROUND THX DSP...

Page 55: ...rn to the original settings when the TX DS898 is put in standby 1 Press the CH Sel button and select the desired speaker 2 Press the or button to adjust the volume level Remote controller Notes You cannot select a speaker if the Speaker Config sub menu of the Speaker Setup is set to No or None If the speaker level is set to 1 dB or higher the maximum level indicated on the display will change if y...

Page 56: ...Adjust the speaker output levels so that you can hear the same sound level from each speaker at the listening position For the front right front left center surround right and surround left speakers the output levels can be adjusted between 12 to 12 decibels The subwoofer can be adjusted between 30 to 12 decibels 5 Adjust the volume with the MASTER VOLUME dial or the VOL buttons on the remote cont...

Page 57: ...creen If you enter an incorrect character press the RETURN button to move the cursor to the left and re enter the character Repeat the above operations to enter up to 10 characters When you are finished the entered name appears 6 Press the SETUP button to complete the procedure To correct entered characters Perform steps 1 to 4 given above After performing step 4 press the button to display a name...

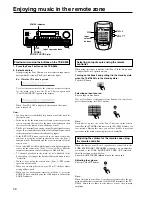
Page 58: ...ing on the Zone 2 and putting it in the standby state when the TX DS898 is in the standby state Tap the ON button Selecting an input source Press an input source button If you select Tuner of the input selector buttons you can select a preset channel using the CH buttons Adjusting the volume Press the VOL buttons Input source buttons Input selector buttons Notes If a sleep time is set with the Sle...

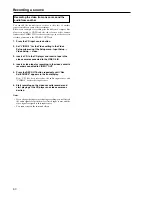
Page 59: ...URE AUDIO UPSAMPLING PHONES ZONE 2 LEVEL STEREO SURROUND THX DSP REC OUT ZONE 2 OFF DIMMER FM MODE MEMORY SETUP CLEAR ENTER RETURN VIDEO 5 VIDEO CAM INPUT TUNING PRESET S VIDEO AUDIO VIDEO L R DIGITAL REC OUT 3 Start recording at the recording component as desired To confirm the settings press the REC OUT button The current settings will appear for 3 seconds in the front display To record an input...

Page 60: ...up menu Input Setup Video Setup Video 3 Insert a CD in the CD player and insert a tape in the video camera connected to the VIDEO 5 IN 4 Insert a video tape for recording in the video cassette recorder connected to VIDEO 1 OUT 5 Press the REC OUT button repeatedly until Rec Sel SOURCE appears in the front display Now CD has been selected as the audio input source and VIDEO 5 as the video input sou...

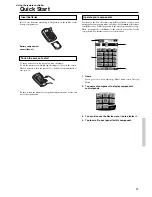
Page 61: ...ur components Fresh out of the box the remote controller is already set up to work with popular components made by Onkyo Programming the remote controller is easy Add components to the Device menu as necessary Then program the commands to the remote controller for the components For instructions refer to the manual 1 Home If you get lost you can always go Home menu screen Just tap Home 2 Tap name ...

Page 62: ... MUTE CONT LIGHT 1 2 3 4 5 6 7 8 9 10 11 8 Mode menu Customize the remote controller see below Quick reference Modes 1 Normal use controlling components 2 Learn commands from other remote controllers When a macro panel is displayed this button changes to REC for recording macros 3 Assign letters and symbols to buttons and commands 4 Add a new component or group of macros 5 Delete a button componen...

Page 63: ...ord macros and set timers To make the remote controller your universal remote controller it is designed to learn from existing remote controllers Direct access buttons The buttons labeled MUTE CH and VOL are direct access buttons The direct access buttons make these frequently used functions available even when the touchscreen is off You can program them so that they always operate the same compon...

Page 64: ...ammed Direct access buttons Left and Right buttons and buttons on the touchscreen can all be programmed You can set the direct access and Left Right buttons to always perform the same function Or you can program them to perform different functions depending on the device For instructions see Programming Buttons on page 73 3 Control panel to send commands to components 4 Panel number shows active c...

Page 65: ...ack on After a few seconds the remote controller starts up automatically and beeps twice to indicate that it is ready to use When batteries are running low the Low Battery icon blinks at the center top of the display Replace the batteries as soon as possible to ensure perfect performance Note The remote controller retains all settings when batteries have run out or when you replace them You will o...

Page 66: ...menu you find buttons for the most common video and audio devices The remote controller is set up by default to operate with Onkyo devices 1 Select a device in the Home menu The following screen appears When selecting CD DVD MD or CDR When you select CD DVD MD or CDR the preset RC codes for operating Onkyo s CD player DVD player MD recorder or CD recorder are used and the operation buttons for the...

Page 67: ...r corresponding RC codes are pre installed in the remote controller s memory You need to select your brand from the list and because not every device of a certain brand uses the same RC codes you might also have to select a set of RC codes for your brand 3 Tap Next A scrollable list of brands for the selected device and a virtual auto zooming mini keyboard appears 2 Select Yes to define the brand ...

Page 68: ...n the list is used for most devices of the selected brand When you do not know which code set to select from the list you can use Search mode See Defining brands by searching on page 69 7 Select a code set from the list The selected code set will be highlighted The Search button switches to Next 8 Tap Next The remote controller switches to Try mode The first control panel of the selected device is...

Page 69: ...hen your device responds to more than one code set install the most suitable one The name of the responding code set is displayed when you tap the OK button so you know which code set to select from the list after you have tried other code sets The remote controller switches to Try mode The first control panel of selected device is displayed 7 Try the buttons on the different control panels and ch...

Page 70: ...on page 73 Tap the device you want to operate The first control panel of the selected device appears 2 In the Device menu tap the device you want to operate The control panel that was last accessed for the device appears Note You can also activate the Device menu from Home by tapping the device tab icon Device tab Device menu Getting Started Via the Device menu The Device menu allows you to easily...

Page 71: ...Touchscreen buttons Left and Right button below the touchscreen Direct access buttons to the right of the touchscreen Using touchscreen buttons Sending commands By touching the touchscreen buttons you send commands to the device you have selected When you send a command the remote controller icon shows transmitting signals The name of the active device is indicated on the device tab Scrolling Most...

Page 72: ...ht of the touchscreen stays on Sets how long the backlight of the direct access and Left Right buttons stays on Function Turns the backlight always on or off when activating the touchscreen Note When you choose always off you can only activate the backlight using the backlight button Hides or shows the Mode button Hiding the Mode button prevents unwanted changes to stored commands Adjusts or turns...

Page 73: ... the label To hide the Mode menu To prevent accidental changes to the remote controller interface and commands you can hide the Mode menu 1 Make sure the remote controller is in Use mode 2 Touch and hold the remote controller icon for a few seconds The first setup panel appears 3 Scroll down to the second setup panel 4 Tap the Mode Menu button The mode menu icon is crossed out 5 Tap The remote con...

Page 74: ... s learning eye as shown on page 73 4 Tap the remote controller button you want to program The button starts blinking 5 Press and hold the corresponding button on your device s original remote controller If the remote controller has learned the command successfully OK blinks on the remote controller icon You can let go of the button you re holding If the remote controller has not learned the comma...

Page 75: ...character you need Note You can zoom out again without tapping a character by pressing the Right button labeled Zoom For capital letters and symbols press the Left button repeatedly to display the keyboard you want 5 Tap Enter to save the changes and return to the panel you were or Tap Cancel to return to the panel you were without saving changes 6 Label all other items you want and return to Use ...

Page 76: ... later The remote controller gives you the possibility to add the device with or without RC codes Add by RC codes Choose this option if you think the new device understands RC codes The new device is added with operational buttons Don t add RC codes If you choose this option the new device is added without operational buttons You can program them as described in Programming control panel buttons o...

Page 77: ...ly You have to delete them via the Device menu Deleting a button or button function Note Buttons without bold frame can not be deleted You can only hide them by removing their label see Labeling a button on page 75 1 Switch to Delete mode by using the Mode button 2 Tap the button you want to delete 3 Tap Delete Button Action The result depends on the element you are deleting Control panel button T...

Page 78: ...ord a macro or to set a timer there must be at least one macro group or timer group in the Macro menu To create these groups see page 79 Recording macros 1 Tap the Macro menu button 2 Open the macro menu and select a macro group 3 Switch to Edit mode via the Mode button Empty the macro buttons appear in the macro control panel 4 Tap the button you want to use for your macro 5 Enter the sequence of...

Page 79: ...a device at the time you set 1 Tap the Macro menu button 2 Open the macro menu and select a timer group 3 Switch to Edit mode by using the Mode button Empty timer buttons appear in the timer control panel 4 Tap the button you want to set a timer for The first timer control panel appears in which you can set the start time 5 Enter the command the timer has to execute A timer can contain either a si...

Page 80: ... your remote controller add delete modify and move control panels devices and commands anywhere on the touchscreen save duplicate and share configuration files codes or devices with other remote controllers preview new configuration files on ChadEmulator In this way you can check how the remote controller s interface will look like import new graphics to create new buttons and designs personalize ...

Page 81: ...he new command assigned to the button The TV goes blank or the input source changes The Device menu item might be programmed to switch the input source Operate the device without affecting the input source see page 71 The Remote controller will not edit label or delete commands If the label locked appears on the Remote controller icon the device control panels have been locked to prevent unwanted ...

Page 82: ...controller restarts and beeps to indicate it is ready for use How do I revert to the original configuration Reverting to the original configuration restores the remote controller s devices and commands to its state when you purchased it This means that all programming is lost permanently Normally you never have to revert the Remote controller 1 Touch and hold the Remote controller icon for a few s...

Page 83: ... freeze Main index page Picture freeze Programmable timer general Tracking Application assistance Actual time on screen EPG Electronic Program Guide Video output Pause Stop Normal run normal speed Normal run normal speed Fast run fast speed Fast run fast speed Slow run slow speed Slow run slow speed Eject Recording general Key Navigate Still mode Tape running direction Next track Previous track Fa...

Page 84: ...se with RC codes to operate different brands Operating distance of 10 meters 33 feet Learning frequency up to 56 kHz Learning distance 5 cm 2 inch up to 30 cm 1 foot 2 MB non volatile flash memory retains commands when batteries are not present 512 K SRAM 4 AA 1 5 V batteries Approximately 6 months with typical use Power on by tapping the touchscreen power off automatically management 153 6 x 94 1...

Page 85: ...wer Power cord is disconnected Connect power cord External noise in the affecting the internal microcomputer Turn the power button off and then on again or remove the power cord from the outlet and then plug it in again Internal fuse is blown Contact your Onkyo Service Center Power turns on but no sound Muting is displayed Press the MUTE button on the remote controller to turn it off Bad connectio...

Page 86: ...d Check connections Objects are interfering with remote controller signals Move inferring objects away from path of remote controller signals If one of the messages shown below appears Not available with headphones use The operation is not allowed because headphones are plugged into the TX DS898 Not available with Multichannel use Cannot be used while the multichannel output is being used Not avai...

Page 87: ...Phono Overload 120 mV RMS at 1 kHz 0 5 T H D Frequency Response 10 Hz to 100 kHz 1 3 dB CD in Direct mode RIAA Deviation 20 Hz to 20 kHz 0 8 dB Tone Control Bass 10 dB at 50 Hz Treble 10 dB at 20 000 Hz Signal to Noise Ratio Stereo Phono 80 dB IHF A 5 mV input CD Tape 110 dB IHF A 0 5 V input TUNER SECTION FM Tuning Range 87 5 108 0 MHz 50 kHz steps Usable Sensitivity Mono 11 2 dBf 1 0 µV 75 ohms ...

Page 88: ...RPORATION 18 Park Way Upper Saddle River N J 07458 U S A Tel 201 785 2600 Fax 201 785 2650 http www onkyousa com ONKYO EUROPE ELECTRONICS GmbH Industriestrasse 20 82110 Germering GERMANY Tel 089 849 320 Fax 089 849 3265 E mail info onkyo de ONKYO CHINA LIMITED Units 2102 2107 Metroplaza Tower I 223 Hing Fong Road Kwai Chung N T HONG KONG Tel 852 2429 3118 Fax 852 2428 9039 E ...

Reviews: