background image

The

Xsight

ToUcH

/

Xsight

coloUr

is the latest fully-featured universal remote control from ONE FOR

ALL. It offers full control of all your infra-red controlled Audio Video devices, as well as high-end features
such as Learning, Profiles and Activity Control. You can set up your remote to control your devices by
following the simple on-screen instructions on the remote, or connect to a PC for adding advanced
features such as Activities and Favorites.

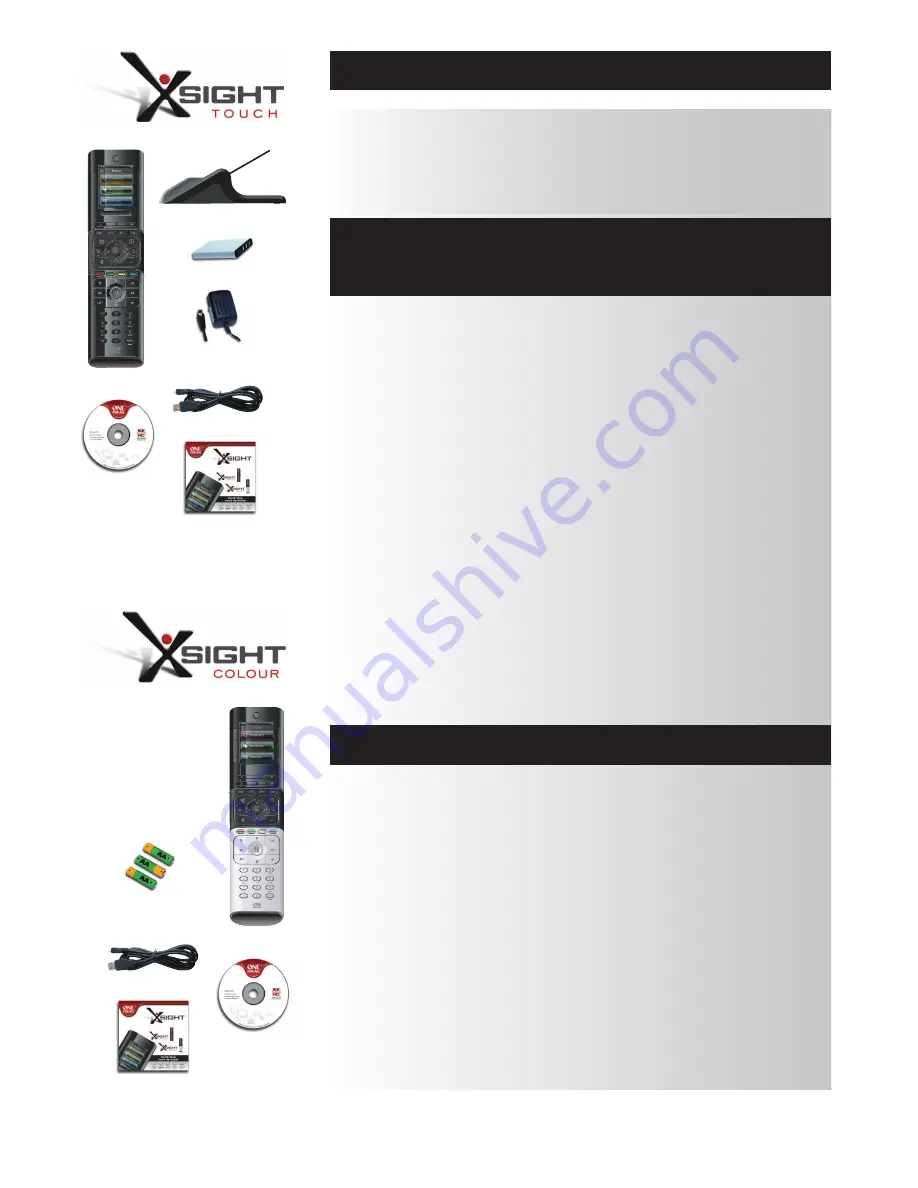
Inside the packaging you will find the following:

• Your “

Xsight

coloUr” or “

Xsight

ToUcH” Universal remote control

• charging cradle (

Xsight

ToUcH)

• ac/Dc adaptor for charging cradle (

Xsight

ToUcH)

• lithium Ion battery (

Xsight

ToUcH) or 3 x aa Batteries (

Xsight

coloUr)

• USB cable
• cD-rom with remote software and User manual
• Quick Start Guide

Firstly, install the battery supplied in the packaging by matching the co and – to the illustrations
in the battery compartment.

Only

Xsight

TOUCH: The supplied battery comes partially charged, but we recommend charging

the battery for approximately an hour before use.
To do this, connect the charging cradle to a power outlet using the supplied AC/DC Adaptor and place
the remote on the cradle. The display will show the “battery charging icon”. In order to fully charge
the remote, leave it in the cradle for approximately 4 hours.

To begin setting up your

Xsight

you have two options:

1)

Follow the on-screen instructions on the remote while in front of the devices you wish to control.
This is the quickest method to set up the remote for basic control of your devices. For more
advanced setup, you can connect the remote to your PC once it is operating all your devices
correctly.

2)

To use PC setup, including Activities (translation), Favorites (translation) etc, insert the CD-ROM into
your PC and follow the install wizard. Connect the remote when prompted by the software using the
included USB Cable.

To start using your remote at any time, simply touch it or press a key and it will respond and the backlight
will illuminate. You can adjust the amount of time the light is on for in the Settings Menu (see page 16).

Xsight

features the following types of controls:

• hard keys on the remote’s front that let you control common device features.
• fully-interactive screen (

Xsight

TOUCH features a Touch Screen) that provides functions for your devices

appropriate to your pattern of use.

www.oneforall.com

3

Getting to Know Xsight

Unpacking and Setting Up

“Xsight ToUcH” or “

Xsight

coloUr”

(See also the Xsight Quick Guide)

Using Xsight Keys and Touch screen

Charging Cradle

AC/DC Adaptor

for Charging Cradle

3x AA

Batteries

USB Cable

USB Cable

Lithium Ion battery

CD Rom

CD Rom

Quick Start Guide

Quick Start Guide

Summary of Contents for Xsight Colour

Page 1: ...User Manual English ...

Page 2: ...vorites 9 Activities 9 Devices 9 Profiles 10 Settings 10 Device Setup 11 Add Device 11 Delete Device 12 View Code 12 Learning 13 Volume Control 14 Clock 15 Audio 15 Brightness 15 Timeout 16 Language 16 RF On Off 16 Reset 16 2 www oneforall com English Getting to Know Xsight 3 Home Screen and Everyday Use 9 Settings 11 PC Setup 17 ...

Page 3: ...ully charge the remote leave it in the cradle for approximately 4 hours To begin setting up your Xsight you have two options 1 Follow the on screen instructions on the remote while in front of the devices you wish to control This is the quickest method to set up the remote for basic control of your devices For more advanced setup you can connect the remote to your PC once it is operating all your ...

Page 4: ...4 www oneforall com 1 3 4 5 7 6 8 9 10 11 2 Keys Xsight coloUr ...

Page 5: ...our video or audio feed exit Exit guide and menu channel keys Operates channel up down functions in video devices and preset up down in audio devices Volume keys Controls volume and mute navigation keys Operates the navigation functions of your device if available Teletext keys Accesses teletext functions if your device has text features Transport keys Operates DVR functions and performs tradition...

Page 6: ...6 www oneforall com 1 3 4 5 7 6 8 9 10 11 2 Keys Xsight ToUcH ...

Page 7: ...audio feed exit Exit guide and menu channel keys Operates channel up down functions in video devices and preset up down in audio devices Volume keys Controls volume and mute navigation keys Operates the navigation functions of your device if available Teletext keys Accesses teletext functions if your device has text features Transport keys Operates DVR functions and performs traditional Play Pause...

Page 8: ...top brands for the selected device in your region If a certain device type or brand is not listed set up all of you other devices and then use the PC Setup see page 17 to add that particular device type or brand If a PC connection is not available you can also Learn a Device using the original remote For Learning see page 13 2 once the brand has been selected you can then search through the availa...

Page 9: ...to control your DVD Player but the Volume Keys to control your Surround Sound Amp When you have set up your Activity it will appear as a key on your touch screen When this key is pressed as well as changing the function of the keys the remote will send a series of commands to your AV Devices to make sure they are in the right state for your Activity For example it would turn on the TV DVD Player a...

Page 10: ... sub sets of Favorites to be Profiles Profiles can be set up using PC Setup only To access Profiles at any time you can press the favorites key underneath the screen and you will then be able to choose between All or individual Profiles Settings The Settings key will take you to a menu allowing you to change options on the remote as well as adding or deleting devices and learning commands from you...

Page 11: ... correctly you can accept the current code by pressing works or test the next code by pressing next When the device has been set up you will have the option to set up another device 1 Select Device Setup from the Settings menu 2 Select add Device The first page of devices is displayed 3 Select the device type you are adding After you select a device type the available device brands are listed Note...

Page 12: ...arning message 4 Select Yes to delete the device or no to exit without deleting the device View code The View code screen shows you which code the remote is using to control your device This information can be used by Customer Service should you need to contact them The code can be viewed by selecting the desired device from the list of currently set up devices 1 Select Device Setup from the Setti...

Page 13: ...ome Favorites Activities and Devices 4 Locate the remote for the device you want to learn from Align the source remote with the bottom end of the ONE FOR ALL no further than 5 inches apart preferably between 2in and 5in 5cm and 12cm 5 On the remote you are learning from press the key you want to learn a If the function is not learned correctly an error message is displayed Select Yes to try learni...

Page 14: ...locking Volume to a device 1 Select Volume control from the Settings menu 2 Review the explanatory screens then click oK 3 Select lock Volume The first page of devices is displayed Note If you do not see the device you want to assign volume to scroll through the pages to view more de vices 4 Select the device you want to lock volume to The remote will display a confirmation screen 5 Click finish r...

Page 15: ...ttings menu allows you to adjust the level of this sound 1 Select audio from the Settings menu 2 Select a tone from the Audio screen to hear a sample beep 3 Select oK The remote will save the selected tone as the key press sound clock audio This setting allows you to adjust the brightness of the screen on the remote 1 Select Brightness from the Settings menu 2 Select a brightness level The screen ...

Page 16: ...io Frequency RF This means it is compatible with the separately available Xsight RF XTender allowing you to control you devices even if they are hidden in a closed cabinet It is also compatible with ONE FOR ALL Light Accessories for full control of your home lighting However if you do not own these accessories you have the option to turn of the RF Transmission 1 Select rf on off from the Settings ...

Page 17: ...o 70 screen keys to automatically select your favorite channels with one key press Also add logos and custom graphics to these keys to make it even easier Profiles Group your Favorites by family member or genre Also available are the following Direct model number entry the exact code for your devices can be found without having to search Key Edit keys can be moved edited or added to your devices M...

Reviews: