background image

5-13

Section

W: Edit PC ID

125

Menu item

Function

Page

S: Save PC ID

Saves PC ID data as a file.

129

L: Retrieve PC ID

Reads PC ID data from a file into the
memory.

No PC IDs are set when the Controller Link
Support Software is started. To use PC IDs,
the PC ID file must be read into the memory.

129

F: FILL

Writes the same data into the specified range
of nodes displayed on the PC ID Edit Screen.
This item can be used to specify the same
network address for multiple nodes at a time
or to specify similar PC IDs for multiple
nodes.

130

C: Clear

Clears data in the specified range of nodes
displayed on the PC ID Edit Screen.

131

P: Print

Prints PC ID data.

131

K: Check

Checks PC ID data for errors or
inconsistencies and displays any errors.

132

O: Sort

Sorts PC ID data on the PC ID Edit Screen in
the following sequence: 
Numeric 

 uppercase 

 lowercase

133

R: Find

Searches the specified PC ID data. The node
corresponding to the specified PC ID or the
PC ID corresponding to the specified node
can be found.

134

5-13-1 About PC IDs

A PC ID is a name assigned to a node on the Controller Link Network.

If a PC ID is registered, the node can be specified using the PC ID instead of the
network and node addresses.

Note

1) PC IDs are set only for convenience in using the Controller Link Support

Software and are not set at the nodes themselves.

2) PC ID files for the Controller Link Support Software are compatible with

those for the SYSMAC Support Software and the SYSMAC LINK Support
Utility. Therefore, PC ID files can be transferred between them.

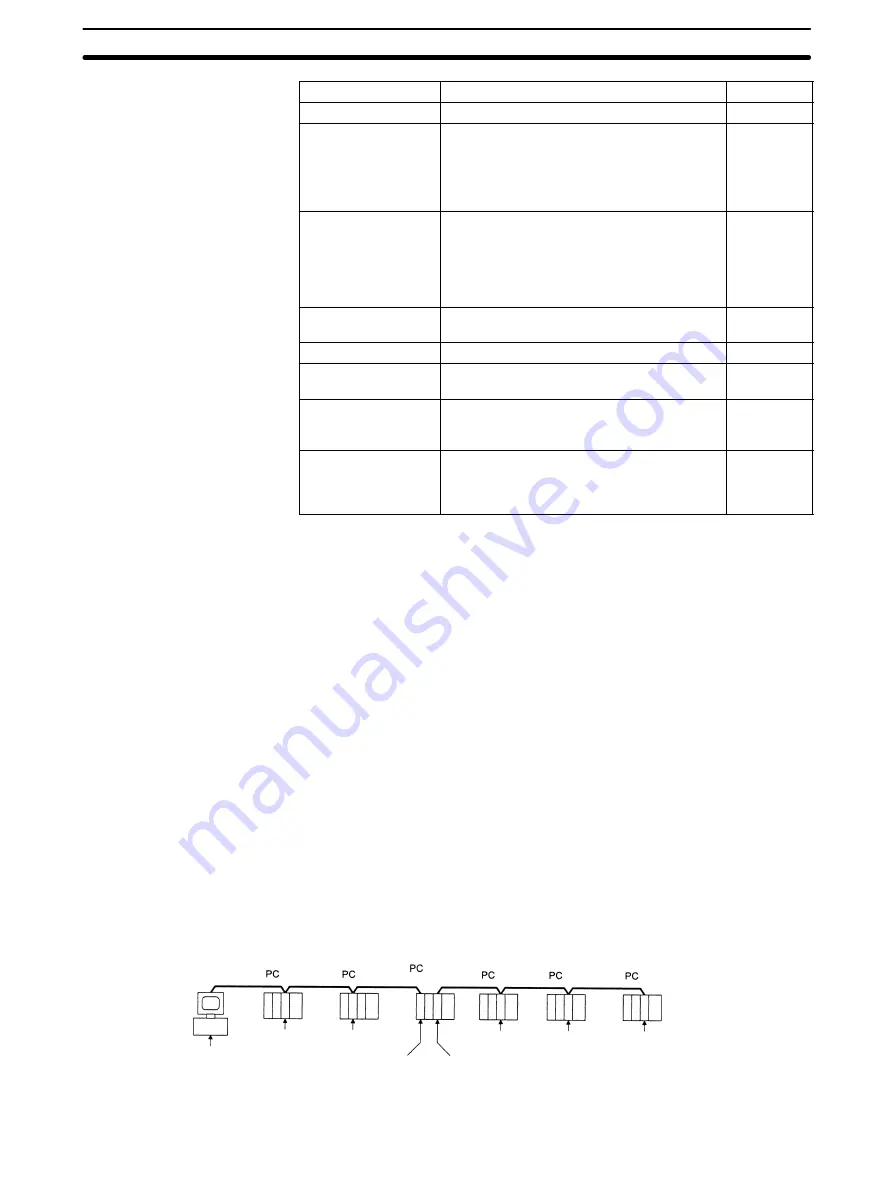
Assign an easy-to-remember PC ID to each node, such as in the following exam-
ple.

Controller Link Network
(network 1)

Node address 1
“Process1”

Node address 4
“Control”

Node address 2
“Assemble”

Node address 3
“Inspect”

Node address 10
No name

Node address 1
“Process2”

Node address 2
“Build”

Node address 3
“Check”

Controller Link Network
(network 2)

(bridge node)

Specifying PC IDs

Summary of Contents for SYSMAC 3G8F5-CLK11-E

Page 1: ...Cat No W369 E1 1 Controller Link Support Software Ver 2 00 SYSMAC C200HW ZW3AT2 E V2 OPERATION MANUAL ...

Page 2: ......

Page 3: ...SYSMAC C200HW ZW3AT2 E V2 Controller Link Support Software Ver 2 00 Operation Manual Revised March 2000 ...

Page 4: ......

Page 5: ... for any thing else Visual Aids The following headings appear in the left column of the manual to help you locate different types of information Note Indicates information of particular interest for efficient and convenient operation of the product 1 2 3 1 Indicates lists of one sort or another such as procedures checklists etc OMRON 2000 All rights reserved No part of this publication may be repr...

Page 6: ......

Page 7: ...5 3 1 Starting and Exiting the Controller Link Support Software 16 3 2 Basic Operations 19 3 3 Connecting to a Node 23 SECTION 4 Basic Operating Procedures 37 4 1 Starting the Network for the First Time 38 4 2 Starting Data Links 38 4 3 Interconnecting Networks 39 SECTION 5 Operating Procedures 41 5 1 Keyboard Operation 43 5 2 Main Menu 43 5 3 L Data Link 45 5 4 P Set Network Parameters 83 5 5 R R...

Page 8: ...5 B Using Modems 149 C Registering the Controller Link Support Software in the SYSMAC Support Software 163 D Running the Controller Link Support Software under Windows 95 165 E Editing the Device Information Setting File 167 Index 173 Revision History 177 ...

Page 9: ...ed with Controller Link Support Boards Use Controller Link Support Software Ver 1 10 or earlier versions with Controller Link Support Boards W308 Please read this manual and related manuals carefully and be sure you understand the information pro vided before attempting to use the Controller Link Support Software Precautions provides general precautions for using the Controller Link Support Softwa...

Page 10: ......

Page 11: ...rtant for the safe and reliable application of the product You must read this section and understand the information contained before attempting to set up or operate the Controller Link Support Software 1 Intended Audience xii 2 General Precautions xii 3 Safety Precautions xii 4 Application Precautions xii 5 Trademarks xiii 6 Checking the Contents xiii ...

Page 12: ...at hand for reference during operation WARNING It is extremely important that a PC and all PC Units be used for the specified purpose and under the specified conditions especially in applications that can directly or indirectly affect human life You must consult with your OMRON representative before applying a PC System to the above mentioned applications 3 Safety Precautions WARNING Do not attemp...

Page 13: ...rks of International Business Machines Corporation U S A PC PR210H is a registered trademark of NEC Corporation ESC P is a registered trademark of Seiko Epson Corporation Other brands and their products are trademarks or registered trademarks of their respective holders and should be noted as such 6 Checking the Contents Confirm that the following items are included with your purchase These items ...

Page 14: ......

Page 15: ...k Support Software 2 1 1 1 Features 2 1 1 2 Functions 3 1 1 3 Additional Functions 3 1 1 4 Main Functions 4 1 1 5 Connecting to the Network 5 1 2 Checking Components 7 1 2 1 C200HW ZW3AT2 E V2 Controller Link Support Software 7 1 3 Operating Environment 7 1 3 1 Compatible Computers 7 1 3 2 Printers 8 1 4 Overall Flow of Operation 9 1 5 Menu Hierarchy 10 ...

Page 16: ... wired and optical ring Controller Link Unit for SYSMAC CQM1H PCs wired only Controller Link Support Board for IBM PC AT or compatible computer wired and optical The Controller Link Support Software can print the current screen or data The Controller Link Support Software can create routing tables which allow in ter network connections Data files for routing tables can be shared with the SYSMAC Su...

Page 17: ...ks PC ID editing Assigns a unique ID to each PC Using PC IDs allows easier PC management than using network and node addresses System setup Sets the communications parameters for the Controller Link Support Software the PC to be connected the service conditions for the Controller Link Support Software and so on These must be set before the Controller Link Support Software is connected to a node No...

Page 18: ... specify the send areas at the local node and the numbers of words to be received from a particular areas at remote nodes Controller Link Network Starting and Stopping Data Links Controller Link Support Software Starting and stopping IBM PC AT or compatible PC startup node Controller Link Network Displaying Network and Node Status Controller Link Support Software IBM PC AT or compatible Data link ...

Page 19: ...troller Link Network IBM PC AT or compatible IBM PC AT or compatible Displaying Error Logs Controller Link Support Software IBM PC AT or compatible Reading error log Controller Link Network Node 2 Error code 020C Date Time 96 09 10 10 00 1 1 5 Connecting to the Network The Controller Link Support Software can be run from a computer that is con nected to a Network PC as a dedicated programming devi...

Page 20: ... Software SYSMAC Support Software IBM PC AT or compatible Controller Link Network IBM PC AT or compatible The Controller Link Support Software can also be run directly from a Network computer Controller Link Network IBM PC AT or compatible Controller Link Support Software Supplemental Connection Information The Controller Link Support Software can be connected to PCs via modems Controller Link Sup...

Page 21: ...levels are not possible Controller Link Network 1st network local Controller Link Net work 3rd network Controller Link Net work 4th network 4 Network levels are not possible 1 2 Checking Components When you first open the container check the contents to be sure you have the product you ordered and that all items are present 1 2 1 C200HW ZW3AT2 E V2 Controller Link Support Software The C200HW ZW3AT...

Page 22: ...he following keys are required Home Escape Control Page Up Page Down Backspace F1 through F10 End Insert Delete Tab OS IBM PC DOS 7 0 or later Microsoft MS DOS 6 2 or later Windows 95 98 1 3 2 Printers To print data from the Controller Link Support Software use a printer that can execute the following emulation Printer specifications PCL2 specifications IBM ESC P The following printers are recomme...

Page 23: ...en press the Enter Key Start This screen is displayed for a few seconds Select the desired item from the menus to perform setting or monitoring operations Follow the instructions displayed on the screen The path to C CLK must be specified in AUTOEXEC BAT Type C CLK CLKSS then press the Enter Key ...

Page 24: ...ller Link Support Board is installed in the computer If a Controller Link Support Board is not installed in the computer these menu items cannot be selected Note Use Controller LInk Support Software Ver 1 10 when creating a Controller Link Network with a Controller Link Support Board This version is included with the Support Board Also use the SYSMAC C200HW ZW3AT2 E 3G8F5 CLK11 E CLK21 E Controlle...

Page 25: ...n This section describes how to install the C200HW ZW3AT2 E V2 Controller Link Support Software 2 1 Preparations for Installation 12 2 1 1 Check Items 12 2 1 2 Backing Up the Installation Disk 12 2 2 Installation Procedure 13 ...

Page 26: ...ure using the following drive structure as the example If the drive structure is different replace the drive name Floppy disk drive Drive A for 3 5 2HD floppy disks Hard disk drive Drive C contains the DOS system Note 1 Write protect the Controller Link Support Software disk to ensure that files are not accidentally erased 2 Always create a backup copy for the Controller Link Support Software in o...

Page 27: ...disk drive Drive A Destination drive in hard disk Drive C Destination directory C CLK If the drives to be used are different from those shown in this example replace drives A and C in the following descriptions with the actual drives to be used Any directory name up to 8 characters long can be specified as the destination di rectory Always follow the procedure described in this section Otherwise t...

Page 28: ...EC BAT Command Usage CLKSS 6 Use a text editor to add the following line anywhere in the AUTOEXEC BAT file as indicated by the message in step 5 path PATH C CLK This completes the installation procedure Note If the Controller Link Support Software is registered in the SYSMAC Support Software it can be started from the SYSMAC Support Software s Option Menu See Appendix C Registering the Controller ...

Page 29: ...e Controller Link Support Software to the Network 3 1 Starting and Exiting the Controller Link Support Software 16 3 1 1 Starting the Software 16 3 1 2 Exiting the Software 18 3 2 Basic Operations 19 3 2 1 Screen Displays 19 3 2 2 Selecting Menu Items 20 3 2 3 Entering Word Addresses 20 3 2 4 Selecting a File from the File List Screen 22 3 2 5 Printing Screens 23 3 3 Connecting to a Node 23 3 3 1 ...

Page 30: ... Turn on the power of the computer The computer will be started from the hard disk and command input will be prompted as shown below C Note If another application is started terminate it and display a DOS com mand input prompt Refer to the related manuals for your computer and the application software Make sure that the current drive is the drive in which the Controller Link Sup port Software has ...

Page 31: ...led or does not operate normally an error message will be displayed U The Controller Link Support Software is started for use with a Controller Link Unit for connecting to a PC Even if the Controller Link Unit is not connected to a PC no error will occur The Controller Link Unit may be connected to PC only when data needs to be transferred between them Both B and U omitted The Controller Link Supp...

Page 32: ...e Controller Link Support Software will terminate and the system will be ready to receive the next command as shown below C Note a If the Controller Link Support Software is started from the SYS MAC Support Software or Windows it will return to the original state when terminated b If the Controller Link Support Software is started for use with the Controller Link Support Board the Controller Link ...

Page 33: ...or numerical value at the cursor position Function Keys The Function Keys labels are arranged from left to right and correspond to the F1 to F10 Keys respectively Pressing a Function Key executes the displayed function For example pressing the F1 Menu Key displays the Main Menu The functions of Function Keys differ according to the screen displayed Note The display color of the function and subfun...

Page 34: ...use the Up and Down Cursor Keys Press the Enter Key to select the item at the cursor position Example Data Link Submenu In this example pressing the Enter Key selects E Edit table 3 2 3 Entering Word Addresses The Controller Link Support Software displays the Function Keys at the bottom of the screen as shown below when the cursor moves to the word address entry field The word address entry method...

Page 35: ...le E0_00000 Enter a bank number by pressing one of the numeric keys or A to F The bank number must be a single digit hexadecimal number The bank number must be followed by a word address Example Pressing 1 bank number 1 E1_00000 Specify a word address by pressing the numeric keys Each time a numeric key is pressed the corresponding number appears on the right end of the highlighted portion and the...

Page 36: ...played Enter a file name with Alphanumeric Keys the Insert Key the De lete Key and the Backspace Key The character string before the last backslash is treated as a directory name When the window is first displayed the directory specified in Data disk drive of the System setup Menu is displayed Example In this example C CLK DATA is treated as the directory name Press the F8 Files Key A list of file...

Page 37: ... while printing 3 3 Connecting to a Node 3 3 1 Connection Method Running from a Computer Node If the Controller Link Support Software is being used in a computer in which a Controller Link Support Board is installed and the computer is connected as a Network node you need not bother to connect the Controller Link Support Soft ware If the Support Board is activated normally the Controller Link Supp...

Page 38: ...or Peripheral device connector on CVM1 or CV series PC Peripheral Bus Peripheral Port on CQM1H PCs Computer Cable PC PC com munica tions PC AT CQM1 CIF02 and CS1W CN114 Peripheral port on CQM1H PC Peripheral Bus or Host Link RS 232C Host Link Port on PC s CPU Unit Computer Cable PC PC com munica tions PC AT If the RS 232C connector on the XW2Z 200S D Sub 25 pin D Sub 9 pin XW2Z 500S D Sub 25 pin D...

Page 39: ... ripheral bus the PC must be set to the same baud rate as the Controller Link Support Software Note See 5 14 3 Setting PC Communications on page 137 in 5 14 System Setup to set the baud rate for the Controller Link Support Software CS1 series PCs Connecting to Peripheral Port When connecting to the peripheral port on the CPU Unit set DIP switch pin 4 to OFF and set the baud rate for the Controller...

Page 40: ...Standard communications parameters 9600 bps 1 According to DM6651 Initial status 0000 Standard communications parameters at 9 600 bps Peripheral port DM 6650 Setting the Baud Rate Baud rate 00 1200 bps see note 01 2400 bps 02 4800 bps 03 9600 bps 04 19200 bps Initial status 0000 1200 bps Peripheral port DM 6651 bits 0 to 7 Note The baud rate cannot be set to 1 200 bps for the Controller Link Suppo...

Page 41: ...al port settings to the same settings as the Controller Link Support Software Set the baud rate for the Controller Link Support Software to a value in the range 2 400 to 19 200 bps Connecting to RS 232C Port Peripheral bus connection to the RS 232C port is not possible Host Link If the Controller Link Support Software is to communicate with a PC via a Host Link the PC must be set to the same commu...

Page 42: ...Controller Link Support Software In the software switch settings of the Serial Communications Board Unit regis tered in the CX Programmer s I O table select the serial port for connection set the serial communications mode to Host Link and make the same communica tions settings as the Controller Link Support Software CS1 series Serial Communications Board Unit ...

Page 43: ...6646 Initial status 0000 Standard communications at 9 600 bps RS 232C port DM6645 Bits 8 to 11 are valid for only the master node with 1 1 link Bits 0 to 7 and 12 to 15 are valid only when DIP switch pin 5 on the CPU Unit is set to OFF The standard communications parameters are as follows Start bits 1 bit Data bits 7 bits Stop bits 2 bits Parity Even Baud rate 9 600 bps Always set the mode to be u...

Page 44: ...pecified in the Controller Link Support Software Use the DIP switch on the PC and the PC Setup to set the communications pa rameters for the Host Link connection Note Use the SYSMAC Support Software to set up the PC Setup I O port setting selector switch Set the selector switch to RS 232C System setup DIP switch pin 4 To set to the values specified by the DIP switch Set DIP switch pin 4 to ON To s...

Page 45: ...t 2 Set the tens digit with the left switch and the ones digit with the right switch Setting Example Node No 29 x 100 Node No x 101 Note 1 Do not specify a node number higher than 31 Doing so results in a error and lights the ERC2 indicator on the display panel 2 Since the Controller Link Support Software and the Host Link Unit are al ways connected on the one to one basis the node number can norm...

Page 46: ...hod Full duplex 2 CTS switch communications port 1 ON The CTS signal ready to receive is always set to ON 0 V fixed Always set this switch pin to ON when connecting the Controller Link Support Software OFF Cannot be set 3 CTS switch communications port 2 ON The CTS signal ready to receive is always set to ON 0 V fixed Always set this switch pin to ON when connecting the Controller Link Support Sof...

Page 47: ...o be performed This item is valid only in full duplex mode Select Yes or No No Communications mode Specify the communications mode Half duplex is valid only for RS 232C interface Select full duplex or half duplex Full duplex Retries Specify whether data is to be resent from scratch when transmission is interrupted This item is valid in half duplex mode Select No or Yes No Send stop code Xoff Speci...

Page 48: ...ue is 13 Hex and the bit string is as follows 13 Hex 0001 0011 Specify an Xon send stop release code The initial value is 11 Hex and the bit string is as follows 11 Hex 0001 0001 Specify the transmission delay The initial value is 00 Hex 0 ms and the bit string is as follows 00 Hex 0000 0000 Set all bits of bytes 5 to 9 to 0 b7 b6 b5 b4 b3 b2 b1 b0 Byte 0 b7 b6 b5 Baud rate b7 b6 b5 b4 b3 b2 b1 b0...

Page 49: ... 0001 Specify the transmission delay The initial value is 00 Hex 0 ms and the bit string is as follows 00 Hex 0000 0000 Set all bits of bytes 15 to 19 to 0 b7 b6 b5 b4 b3 b2 b1 b0 Byte 10 b7 b6 b5 Baud rate b7 b6 b5 b4 b3 b2 b1 b0 11 0 0 0 0 0 0 Retries 0 No 1 Yes Communications mode 0 Full duplex 1 Half duplex Xon Xoff control 0 No 1 Yes b7 b6 b5 b4 b3 b2 b1 b0 12 b7 b6 b5 b4 b3 b2 b1 b0 13 b7 b6...

Page 50: ... the range 2 400 to 19 200 bps Connecting to RS 232C Port Use one of the following methods when connecting to the RS 232C port on the CPU Unit a Set DIP switch pin 5 to ON and set the baud rate for the Controller Link Support Software to 9 600 bps b Set DIP switch pin 5 to OFF and set the PC Setup word DM 6645 RS 232C port settings to 0000 Hex standard setting Set the baud rate for the Controller ...

Page 51: ... for the Controller Link Support Software Actual procedures are provided in Sec tion 5 Operating Procedures 4 1 Starting the Network for the First Time 38 4 2 Starting Data Links 38 4 2 1 Manually Set Data Links 38 4 2 2 Automatically Set Data Links 39 4 3 Interconnecting Networks 39 ...

Page 52: ...Item Selection Main Menu N Echoback test 4 PC IDs This step is optional Assign a PC ID to each node to facilitate node management and Controller Link Support Software operations Main Item Selection Main Menu W Edit PC ID 4 2 Starting Data Links 4 2 1 Manually Set Data Links 1 2 3 1 Setting Device Information Specify the model of each node on the Controller Link Network This in formation is used to...

Page 53: ...Links After the Data Link Tables Have Been Trans ferred to the Nodes For automatically set data links set the data link auto setting parameters for the data link startup node Refer to the Controller Link Unit Operation Manu al W309 for details Main Item Selection Main Menu L Data Link Data Link submenu F2 R Start Stop WARNING Before starting a data link make sure that data link parameters have bee...

Page 54: ...the routing tables as a file after transferring them to the node Repeat the routing table creation check transfer save procedures until the routing tables are registered at all nodes Main Item Selection Main Menu R Routing table Routing table submenu F2 S Save Caution Once routing tables are transferred to a PC all CPU Bus Units at the node will be reset This is for the purpose of reading and enab...

Page 55: ...5 4 P Set Network Parameters 83 5 5 R Routing Table 85 5 5 1 Outline of Routing Tables 86 5 5 2 Setting Routing Tables 87 5 5 3 Communications Range 87 5 5 4 Displaying the Routing Table Menu 88 5 5 5 Creating and Editing Routing Tables E Edit 88 5 5 6 Checking Routing Tables K Check 91 5 5 7 Initializing Routing Tables C Initialize 93 5 5 8 Saving Routing Tables as a File S Save 93 5 5 9 Reading ...

Page 56: ...he Edit PC ID Menu 129 5 13 5 Saving PC ID Data as a File S Save PC ID 129 5 13 6 Reading PC ID Data from a File L Retrieve PC ID 129 5 13 7 Specifying Multiple Nodes F FILL 130 5 13 8 Clearing Multiple PC IDs C Clear 131 5 13 9 Printing PC ID Data P Print 131 5 13 10 Checking PC ID Data K Check 132 5 13 11 Sorting PC ID Data O Sort 133 5 13 12 Searching PC ID Data R Find 134 5 14 I System Setup 1...

Page 57: ...wing items Menu item Function Page L Data Link Performs various data link operations such as creating and editing data link tables transferring data link tables to nodes starting and stopping data links and displaying operating status This item has the following menu 45 P Set Network parameters Modifies network communications parameters to provide the most suitable Controller Link communications f...

Page 58: ...arameters Use this item for network maintenance This item has the following menu 112 K Connection Information Displays the order of connection for the nodes that make up the Optical Ring Controller Link Network as well as the connection status and the contents of errors This data can be stored in files from which they can be read and displayed This function can only be used with Optical Ring Netwo...

Page 59: ...le 64 L Retrieve table Reads data link tables from a file to the memory 66 T Transfer table Writes data link tables from the memory to each node or reads data link tables from each node to the memory Data link tables in the memory can also be compared with the data link tables at each node 67 D Delete table Deletes data link tables from the specified node to remove the node from the data links 74 ...

Page 60: ...are used to create or edit a data link table for each node One screen is provided for each node Main Menu Node selection Data Link Table Screen previous node Data Link Table Screen selected node Data Link Table Edit Screens Data Link Table Screen next node F10 End Key ESC Key F8 Key Page Up Key F9 Key Page Down Key F9 Key Page Down Key F8 Key Page Up Key F4 Key Page Up Key F5 Key Page Down Key Nod...

Page 61: ...node 2 Area 1 of node 3 Node 2 Node 3 Node 2 Node 3 Can be set The first word for each node is automatically displayed If the data link table for the remote node has been set the link source word will be automatically displayed If it has not been set nothing will be displayed The send area for the local node is displayed as Send area If the data link table for the node at the cursor position has b...

Page 62: ...rds Node 1 15 words Node 2 20 words Node 2 20 words Node 3 30 words Node 3 30 words Send area Data Link Table for Node 1 Data Link Table for Node 2 Data Link Table for Node 3 When data link status is to be used specify in the Status Word field the first word of the area in which data link status is to be stored Example To store data link status in DM 01000 to DM 01015 set the first status word to ...

Page 63: ...20 wds Line C errors 3 15 wds Line A errors 1 15 wds Line B errors 2 30 wds Line C errors 3 15 wds Line A errors 1 15 wds Line B errors 2 30 wds 2 Use Setting Form 2 to enter the values to be set in the data link table 3 Enter the values in the Controller Link Support Software Automatically displayed Automatically displayed Controller Link Support Software Data Link Setting Form 2 Date ___ ___ ___...

Page 64: ...or each reception node Setting Example The following is an example of data link areas and the corresponding data link tables Area 1 of Node 1 Area 1 of Node 2 Area 1 of Node 3 Receive area Send area Node 2 20 words Node 3 15 words Node 1 15 words Node 2 30 words Node 1 10 words Node 2 30 words Node 3 15 words Node 1 15 words Data Link Table for Node 1 Data Link Table for Node 2 Data Link Table for...

Page 65: ... when the Controller Link Support Software is exited To avoid this use Save table to save the data created or edited with Edit table 2 If data link tables have already been saved or transferred the following pro cedures can be used to read the tables to the Controller Link Support Soft ware and edit them again Retrieve table on page 66 Controller Link Computer under the Transfer Table Menu on page...

Page 66: ... E Edit Table E Edit Table is used to create or edit data link tables Note 1 E Edit Table creates or edits data link tables in the computer memory To actually set the data link table at a node select T Transfer table from the Data Link Menu Also save the data link tables as a file by selecting S Save table from the Data Link Menu Otherwise the table data will be cleared when the Controller Link Su...

Page 67: ...l number of words in the data link area 2 for each node These items are not displayed for a node for which a data link table has not been set Press the F3 Delete Key or the Delete Key to delete the data link table for the node in the cursor position When either of these keys is pressed a con firmation message will appear at the bottom of the screen To delete the data link table press Y and then th...

Page 68: ...ed The newly inserted line is for a node with the next smallest unspecified address F6 Offset Switches between the offset display mode and no offset display mode If an attempt is made to switch the mode when offset data has already been entered a confirmation message will be displayed Press Y and then the Enter Key to set all the offsets to 0 and removes the offset displays To cancel the operation...

Page 69: ...e d CIO 0000 to 2555 LR 000 to 199 see note c DM 00000 to 24575 see note d EM banks 0 to 7 00000 to 32765 see note d CIO 0000 to 247 LR 00 to 63 DM 0000 to 5999 see note d EM 0000 to 6143 see note d CIO 00000 to 65534 LR 00000 to 65534 DM 00000 to 65534 EM banks 0 to 15 00000 to 65534 No of words Num Wd 000 to 1000 Offset 000 to 999 Status word CIO 0001 to 6128 LR 000 to 184 see note c DM 00000 to...

Page 70: ...CV series PC it will be allocated to the CIO1000 to CIO1199 d The number of DM words and the number of EM banks differ ac cording to the CPU Unit model used Refer to the PC operation or programming manual for details Set All can be used to simply create data link areas similar to automatically set data link areas An example is shown below Start word Same size Start word Same size Area 1 Area 2 Aft...

Page 71: ...e Automatically determined ascending order for data link areas Can be changed later by deleting or inserting nodes Cannot be changed later Data link status words Can be specified in CIO IR DM or EM Can be specified only in CIO IR Press the F6 Set All Key at the Node Information Screen to display the follow ing window The items are almost the same as the items that are set in the DM parameter area ...

Page 72: ...000 to 65534 LR 00000 to 65534 DM 00000 to 65534 EM banks 0 to 15 00000 to 65534 CIO 00000 to 65534 LR 00000 to 65534 DM 00000 to 65534 EM banks 0 to 15 00000 to 65534 Note a Because IBM PC AT or compatible computers have no data areas it is meaningless to specify first status words and link start words for areas 1 and 2 The data link area always starts from the beginning of the specified area and...

Page 73: ...the one for automatically set data links at each node participating in the data links Press the Escape Key to cancel the execution and return to the Node Informa tion Screen The execution can also be canceled by pressing the F1 Menu Key the F2 Menu Key or the F10 End Key The following screens are displayed when these keys are pressed F1 Main Menu F2 Data Link Menu F10 Node Information Screen 5 3 5...

Page 74: ...tion To deselect the copy destination node or erase Yes move the cursor to the node address marked with Yes then press the Enter Key again Yes will be erased to deselect the copy destination node 4 After specifying all destination nodes press the F6 Execute Key The data link tables will be copied 5 3 6 Initializing All Data Link Tables C Initialize Table C Initialize table is used to initialize al...

Page 75: ...ct K Check table from the Data Link Menu If the number of nodes set in all data link tables is 0 an error message will be displayed The following window will be displayed to prompt you to specify the check level 2 Select the error level to be checked The following window will be displayed to prompt you to specify the nodes to be checked When the window appears each node will be displayed as shown ...

Page 76: ...checked and the check results screen will be dis played Each error level is indicated by a different character color as follows Red Error White Warning A message is displayed in the lower part of the screen according to the check results as follows When no errors has been detected Check OK When errors are continued on the next page Continue When the current page is the last page of the error displ...

Page 77: ... over There is a node for which the total number of words in the send areas of areas 1 and 2 exceeds 1 000 Change the total number of words in the send areas of areas 1 and 2 to 1 000 or less Too many words in data link The total number of words in the data link areas of areas 1 and 2 exceeds the maximum allowable number of words for the following PCs CS1 series PCs 12 000 words C200HX HG HE PCs 8...

Page 78: ... node has no send data A send area has not been set for a node from which data reception has been specified Change the reception node or set a send area for that node Source node has no table A data link table has not been set at the node from which data reception has been specified Change the reception node or set the data link table for that node Note a Message Receive area remain will be displa...

Page 79: ...umeric Keys then press the Enter Key Use the extension CL2 for files to be saved in Ver 2 00 format and use the extension CLK for files to be saved in Ver 1 10 format If an attempt to save a file containing node addresses 33 to 62 is made with the extension CLK an error will be generated If the extension is omitted by the user it will be added automatically depending on the node addresses used in ...

Page 80: ...k tables reset as necessary Model information in CX Net on CX Programmer Model information in Controller LInk Support Software No specification No specification C200HE C200HE Z C200HG C200HG Z C200HX C200HX CVM1 CVM1 CPU21 CV2000 CV2000 CV1000 CV1000 CV500 CV500 NSB CLK Board CS1G CS1G 45 CS1H CS1H 67 CVM1 V2 CVM1 CPU21 C200HX Z C200HX 85Z C00HG Z C200HG Z C200HE Z C200HE Z IDSC No specification N...

Page 81: ...t a file name from the screen The file will be read 5 3 10 Transferring Data Link Tables T Transfer Table T Transfer table is used to transfer data link tables between nodes and the computer as follows Item Function Page R Controller Link Computer Reads the data link tables set at nodes to the computer memory 67 W Computer Controller Link Writes the data link tables from the computer memory to nod...

Page 82: ...s on the specified network will be checked and displayed in ascending order of node address When node addresses are displayed all nodes will be marked with YES which represents the target nodes for reading 3 Specify the nodes that are to be excluded from read processing Use the Cursor Keys to move the cursor to the nodes to be excluded from reading then press the Enter Key YES will be erased to de...

Page 83: ...st In this case a confirmation message for overwriting will not be displayed even if data link tables have already been set at the nodes Therefore carefully check the contents of the data link tables set at the nodes before transferring new data link tables When writing data to the CS1 series PC be sure to set pin 1 of the CPU Unit s DIP switch to OFF 2 When writing data link tables to a CVM1 or C...

Page 84: ...ed as follows depending on the number of nodes set in the data link table in the memory Nodes for which the number of nodes is not 0 Yes data link tables written Nodes for which the number of nodes is 0 No data link tables removed 3 Specify the processing for each node Use the Cursor Keys to move the cur sor to the node then press the Enter Key Each time the Enter Key is pressed the display will c...

Page 85: ...itten to the node Press Y to write the data or press N to cancel the write processing and then press the Enter Key If N is pressed to cancel the write processing Canceled due to table error will be displayed at the node address When processing for all the specified nodes is completed End will be dis played at the lower part of the screen 5 Then press the F10 End Key V Compare is used to compare da...

Page 86: ...o be excluded from comparison Use the Cursor Keys to move the cursor to the node to be excluded from comparison then press the Enter Key YES will be erased to deselect the node To reselect a node for comparison move the cursor to the node unmarked with YES then press the Enter Key again YES will be displayed to reselect the node 4 After specifying all the target nodes for comparison press the F6 E...

Page 87: ...ess with Numeric Keys then press the Enter Key The comparison error screen for the specified node will be dis played The comparison error screen differs depending on the location of the error The following will be displayed when an inconsistency is found in the num ber of nodes set first status word link start word of area 1 or link start word of area 2 When the number of nodes set is inconsistent...

Page 88: ... participating in the data links 2 The nodes for which the number of nodes set in the data link table in the computer memory is 0 will be automatically selected as the nodes from which data link tables are to be deleted Therefore data link tables can be deleted from only the nodes that are not to participate in the data links You can also change the target nodes for deletion 3 Always delete the da...

Page 89: ...nk table delete processing will start Data link tables will be deleted in ascending order of node address To cancel the delete processing press the F9 Cancel Key During delete processing Wait will be displayed in the lower part of the screen and the progress of processing will be displayed for each node When the delete processing for all the specified nodes is completed End will be displayed in th...

Page 90: ...to the node unmarked with YES then press the Enter Key again YES will be displayed to reselect the node 3 After specifying all the target nodes for print processing press the F6 Execute Key Data link table printing will start and the print status display window will appear Data link tables will be printed in ascending order of node address To cancel the printing press the F9 Cancel Key Printing wi...

Page 91: ...lly set data links or the data link parameters at the data link start node for automatically set data links have been appropriately set If the settings are inap propriate the equipment may perform unexpected operation and result in injury Even if the settings are appropriate always make sure that the equipment will not be affected before starting or stopping the data links Note Before starting the...

Page 92: ... containing the node to which the Controller Link Support Software is connected see note For CS1 series CVM1 or CV series PCs with multiple Communications Units specify the network address explicitly Node address Enter the node address of the node The setting range is between 0 and 62 Node address 0 represents the local node the address of the node to which the Controller Link Support Software is ...

Page 93: ...rk address Enter the network address of the node The setting range is between 0 and 127 Network address 0 represents the local network the address of the network containing the node to which the Controller Link Support Software is connected see note For CS1 series CVM1 or CV series PCs with multiple Communications Units specify the network address explicitly Node address Enter the node address of ...

Page 94: ...splay and changes the F9 Key function to Cancel F10 End Closes the operating status display screen The meaning of each item is as follows Item Meaning Communications cycle time Comm cycle time Displays the current communications cycle time of the Controller Link Network Data link DataLink Displays the data link operating status active inactive on the top and manual automatic on the bottom Refresh ...

Page 95: ...t Area short Displays area shortage status in the data link tables for node communications within the network as follows When the area is sufficient No display When the area is short YES When the data link is inactive No display A short area occurs when the receive area is smaller than the amount of send data and not all of the send data can be received It is not a fatal error If the receive area ...

Page 96: ...he model restrictions will apply to only the upper limits when numeric values are entered or checked b New PCs that do not appear in the model list can be displayed and selected from Controller Link Support Software by editing the de vice information setting file see Appendix E Editing the Device In formation Setting File c The version of the Controller Link Support Software is displayed on the lo...

Page 97: ...roller Link Network Therefore any change in each network parameters will affect all nodes within the network 3 Before executing P Set Network parameters always set pin 1 of the DIP switch on the CS1 series and CQM1H series CPU Unit to OFF 4 Before executing P Set Network parameters always set the system pro tect key switch on the CVM1 or CV series CPU Unit to NORMAL 1 2 3 1 Select P Set Network pa...

Page 98: ...s cycle time Too small a value results in frequent transmission timeout errors The setting range is between 16 and 238 The default is 35 Number of Polled nodes per communications cycle of Polled nodes per comm cycle Maximum number of nodes for which communications status can be checked by the network polling node during a communication cycle Increasing the value also increases the communications c...

Page 99: ... inconsistencies 91 C Initialize Initializes or clears the routing tables in the memory Use this item when routing tables are to be created from scratch 93 S Save Saves routing tables in the memory as a file 93 L Retrieve Reads routing tables from the file into the memory 94 T Transfer Writes routing tables from the memory to the specified node or reads routing tables from the specified node into ...

Page 100: ...ork 2 Controller Link Network network 1 Controller Link Unit unit number 0 Gateway SYSMAC NET Link Unit Controller Link Unit node address 5 In this network example when the PC connected to the Programming Device on network 1 is to communicate with a PC on network 2 you need to create routing tables containing the following information and transfer them to the PCs and computer on network 2 The loca...

Page 101: ...directly to such nodes and create and transfer routing tables 3 The Controller Link Support Software can set a local network table contain ing up to 16 entries and a relay network table containing up to 20 entries For C200HX HG HE PCs a maximum of two entries can be made in the local network table 5 5 3 Communications Range The Controller Link Support Software can communicate with nodes on a Con t...

Page 102: ...E Edit E Edit is used to create or edit the routing tables the local network table and the relay network table Note 1 E Edit creates or edits routing tables in the computer memory To actually set the routing tables at a node select T Transfer from the Routing Table Menu Also save the routing tables as a file by selecting S Save from the Routing Table Menu The table data will be cleared when the Co...

Page 103: ...s Unit or Board that is installed at the target node and is connected to the local network The setting range is between 0 and 15 With Controller Link the unit number is set in the following locations Communications Unit Rotary switch on the front panel of the Unit for CS1 series CVM1 and CV series PCs DIP switch pin 4 on the front panel of the Unit for C200HX HG HE PCs Fixed to 0 for CQM1H PCs Com...

Page 104: ...e relay node Enter one of the values specified in the Loc Netwk column of the Local Network Table The setting range is between 1 and 127 Relay node Specify the node address of the relay node The setting range is between 1 and 126 or between 1 and 62 for Controller Link Networks see note Note The setting range for Controller Link Units other than Optical Ring Controller Link Units is between 1 and ...

Page 105: ... then execute K Check 1 2 3 1 Select K Check from the Routing Table Menu The routing table check will start and the check results screen will be displayed A message will be displayed in the lower part of the screen according to the check results as follows When no error has been detected Check OK When errors are continued on the next page Continue When the current screen is the last page Last page...

Page 106: ...IOU unit No err The same unit number is specified more than once Change the unit number to a unique number Relay Network Table Error message Meaning Action to be taken Too many networks The number of networks set in the table is outside the allowable range 0 to 20 Data may have been damaged Initialize the routing tables then set them again End netwk addr range err The end network address is outsid...

Page 107: ...the tables to the comput er then save them 4 Routing table files for the Controller Link Support Software are compatible with those for the SYSMAC Support Software and the SYSMAC LINK Sup port Utility Therefore routing files can be transferred between them 1 2 3 1 Select S Save from the Routing Table Menu 2 Specify the file name including the directory name to be saved Enter the file name with Alp...

Page 108: ...er the file name with Alphanumeric Keys then press the Enter Key When this window appears the data directory specified in System setup will be displayed as the source directory The Insert Backspace and Delete Keys can be used to correct the characters displayed You can press the F8 Files Key to display the File Name List Screen and then select a file name from the screen The file will be read 5 5 ...

Page 109: ...the value other than 0 specified in the routing tables Refer to the Controller Link Units Operation Manual W309 for details Press the F10 End Key to cancel the routing table transfer 3 Press the F6 Execute Key The Transfer Routing Table Menu will be dis played R PC Board Computer is used to read the routing tables set at the specified node into the computer memory Note If routing tables are read f...

Page 110: ...ting tables are to be set b Specify 0 as the network address of the target network c Write the routing tables to each node on the network d If the routing tables are to be written to another network connect the Controller Link Support Software to a node on that network Select W Computer PC Board from the Transfer Routing Table Menu Rout ing table write processing will start If the routing table wr...

Page 111: ...current screen is the last page Last page When inconsistent data is found the data in the memory will be displayed in the upper row and the data at the node will be displayed in the lower row indicates that no corresponding data exists 2 If the comparison results screen extends across more than one page use the F4 Pre Pg and F5 Nxt Pg Keys to switch the screen and display the results The Page Up a...

Page 112: ...cally input see page 124 Network address Enter the network address of the node The setting range is between 0 and 127 Network address 0 represents the local network the address of the network containing the node to which the Controller Link Support Software is connected see note For CS1 series CVM1 and CV series PCs with multiple Communications Units specify the network address explicitly Node add...

Page 113: ...nting is completed the window will close and the processing will termi nate automatically The contents of the local network and relay network tables will be printed The contents of these tables being printed are the same as those displayed on the Local Network Table and Relay Network Table Screens See 5 5 5 Creating and Editing Routing Tables page 88 for details Printing Example Relay Netwk Routin...

Page 114: ...next field Item Meaning PC ID Enter the PC ID of the node Use this field only when a PC ID is to be used If a PC ID is used the network address and node address will be automatically input see page 124 Network address Enter the network address of the node The setting range is between 0 and 127 Network address 0 represents the local network the address of the network containing the node to which th...

Page 115: ...ests are completed updating of the values in the above fields will stop and the function key display will change 5 After confirming the test results press the F9 End Key 5 7 D Broadcast Test D Broadcast test is used to broadcast a communications test from the Control ler Link Support Software to all the nodes participating in the specified network In a broadcast test the Controller Link Support So...

Page 116: ...t routing tables Specify in Network address the value other than 0 specified in the routing tables Refer to the Con troller Link Units Operation Manual W309 for details 3 Press the F6 Execute Key A confirmation message will be displayed at the bottom of the window to ask you to determine whether a broadcast test is to be started 4 To delete the routing tables press Y and then the Enter Key The rou...

Page 117: ...ing status PC Run Displays the operation mode of each PC as follows YES User program is running on the PC No display User program is not running on the PC This item is not displayed when the data links are inactive The user program may stop when an error occurs in DATA LINK START or MONITOR mode In this case nothing will be displayed YES is always displayed for the Controller Link Support Board PC...

Page 118: ...e Key The Network Monitor Screen will be displayed Key Function F4 Key Pre Pg Page Up Key Displays the previous screen F5 Key Nxt Pg Page Down Key Displays the next screen F9 Cancel Stops updating the display and changes the F9 Key function to Start F9 Start Restarts updating the display and changes the F9 Key function to Cancel 4 To close the screen press the F10 End Key 5 9 E Display Error Log U...

Page 119: ...n also clear the currently displayed error log or save it as a file and read and display error log files Item Meaning Err Displays an error code that indicates an error type Refer to the Controller Link Units Operation Manual W309 or Controller Link Support Boards Operation Manual W307 for details Details Displays a code that indicates error details Refer to the Controller Link Units Operation Man...

Page 120: ...rs seconds minutes 2 digits BCD for each No of error log items 4 digits hexadecimal Node address 2 digits BCD Unused parts of the title and PC ID lines are filled with spaces The year is indicated by just the last 2 digits Files that are not in the above format cannot be displayed correctly When edit ing error log files be sure to keep to this format 5 9 3 Displaying the Error Log Menu To read dis...

Page 121: ...ocal node the address of the node to which the Controller Link Support Software is connected Note For CV series CPU Units manufactured before April 1996 lot No jj46 always set routing tables Specify in Network address the value other than 0 specified in the routing tables Refer to the Con troller Link Units Operation Manual W309 for details Press the F10 End Key to close the error log window 3 Pre...

Page 122: ...s first read the error log to the computer memory using R Read from the Error Log Menu 1 2 3 1 Select S Save from the Error Log Menu 2 Specify the file name including the directory of the file to be saved Enter the file name with Alphanumeric Keys then press the Enter Key The extension of the file name to be saved must be CLG If the extension is omitted CLG will be automatically assigned as an ext...

Page 123: ...inting Printing will be displayed in the window To cancel the printing press the F9 Cancel Key When printing for the error log has been completed the print status display window will close and the processing will automatically terminate The contents of the error log being printed are the same as those displayed on the Error Log Screen 5 10 S Display Node Status S Display Node status is used to dis...

Page 124: ... Controller Link Support Board Terminating resistor switch for CS1W CLK21 E only ON with terminating resistor ON OFF without terminating resistor OFF Baud rate bps for CS1W CLK21 E only 2 Mbps 2M 1 Mbps 1M 500 kbps 500K Power supply status for optical type only Power is supplied Y Power is not supplied N Note 1 Setting information is displayed only when the status of the following nodes is read Co...

Page 125: ...the node to which the Controller Link Support Software is connected see note For CS1 series and CV series PCs with multiple Communications Units specify the network address explicitly Node address Enter the node address of the node The setting range is between 0 and 62 Node address 0 represents the local node the address of the node to which the Controller Link Support Software is connected Note F...

Page 126: ...he Controller Link Unit for SYSMAC C200HX HG HE PCs and saves it as a file or writes the contents of a file to the EEPROM in the Unit 113 C Initialize Network parameters Initializes the network parameters used to specify Controller Link Network operation Use this item when the Controller Link Network fails to start 114 Note When replacing the Controller Link Unit or Controller Link Support Board a...

Page 127: ...so stored in the SRAM for CS1 series PCs or EEPROM for CV se ries PCs in the PC Use the following procedure to write the contents of EEPROM from the Unit to a file on the computer 1 2 3 1 Select U Unit Backup from the Maintenance Menu If a CV series or CS1 series PC is set as the destination PC in the System Setup Wrong PC will be displayed The Backup Unit Menu will be displayed 2 Select S Unit Co...

Page 128: ...work parameters for the Controller Link Unit installed in the PC connected to the Controller Link Sup port Software or for the Controller Link Support Board installed in the computer on which the Controller Link Support Software is running Use this function when the Controller Link Network fails to start Execute this function for the Controller Link Units or Controller Link Support Boards that hav...

Page 129: ...work K Connection Information has the following menu Item Function Page R Read Reads and displays the connection information for the specified node Can also be used to clear the connection information disconnection information currently displayed 119 L Retrieve Reads connection information saved in files to computer memory 122 S Save Saves connection information in computer memory to files 122 P P...

Page 130: ...each node and connector Controller Link Unit model for each node Connection Information Screen Disconnect detection node data Backup power supply status for each node Time when disconnect data recording commenced for each node Local node disconnect detection status for each node Number of node network separations for each node Number of network disconnections for each node Number of local node dis...

Page 131: ...node in order of connection i e going in the direction of the SL2 connector side of the specified node Pairs of connectors SL1 SL2 that are connected are indicated by the same color When this Network Configuration Screen is displayed for the first time after starting up the Controller Link Support Software the node to which the Controller Link Support Software is connected will be displayed at the...

Page 132: ...on participating node is a node that is not in the Network Participation List but is in the connection order information for the base node This kind of node was separated from the network after the connection information for the base node had been created Read error will be displayed in Start time of mea sure for any such node Information will not be read for any non participating nodes and there ...

Page 133: ...no adverse effect on data communications In this case identify the location of the disconnec tion using the disconnection log and remove the cause of the discon nection For details refer to information on notification and counter measures for network disconnections in the Optical Ring Controller Link Units Operation Manual W370 5 12 2 Displaying the Connection Information Menu Network Configuratio...

Page 134: ... set routing tables Specify in Network address the value other than 0 specified in the routing tables Refer to the Con troller Link Units Operation Manual W309 for details The Network Configuration Screen can be closed by pressing the F10 End Key 3 Press the F6 Execute Key The connection information will be read from the specified network and displayed on the screen While information is being read...

Page 135: ... Press Y and then the Enter Key to start reading and displaying the information To cancel the operation press N and then the Enter Key F7 Clear Clears all the connection information at a specified node Refer to Clearing Connection Information below F8 Connect Switches to the Connection Information Screen Once the screen has changed the display for this key changes to Frame F8 Frame Switches to the...

Page 136: ...n can also be cancelled by press ing the F9 Cancel Key 5 12 4 Reading Connection Information from a File L Retrieve L Retrieve is used to read connection information from files to computer memory Note When connection information is read from a file any connection information cur rently in computer memory will be lost 1 2 3 1 Select L Retrieve from the Connection Information Network Configura tion ...

Page 137: ...ied a confirmation message will be dis played asking you to specify whether the file is to be overwritten Press Y to overwrite the file or press N to cancel the save processing then press the Enter Key 3 Enter a title for the file Enter the title with Alphanumeric Keys Up to 30 char acters can be entered as the title The Insert Backspace and Delete Keys can be used to correct the characters displa...

Page 138: ...n information are printed simulta neously Node Address Order Connection Order 5 13 W Edit PC ID W Edit PC ID is used to assign a PC ID to nodes on the Controller Link Net work This section describes how to register and use PC IDs W Edit PC ID has the following menu ...

Page 139: ...R Find Searches the specified PC ID data The node corresponding to the specified PC ID or the PC ID corresponding to the specified node can be found 134 5 13 1 About PC IDs A PC ID is a name assigned to a node on the Controller Link Network If a PC ID is registered the node can be specified using the PC ID instead of the network and node addresses Note 1 PC IDs are set only for convenience in usin...

Page 140: ... ID can be assigned to a PC node such as a bridge node in which multiple Communications Units are installed To avoid confusion howev er avoid doing so wherever possible If the current window contains a PC ID input field when you specify a node spec ify the PC ID in the field then press the Enter Key The network and node ad dresses corresponding to the specified PC ID will be automatically entered ...

Page 141: ... IDs Press the F4 Read Key at the PC ID Edit Screen Read mode will be entered If you press the F4 Read Key in read or change mode the first page of the PC ID Edit Screen will be displayed when read mode is entered To display the desired page press the F6 Page Key enter the page number then press the Enter Key To move the cursor to the desired line press the F7 Row No Key enter the line number then...

Page 142: ...can be used to correct the charac ters displayed Then you can write the next data as required 1 2 3 1 Press the F5 Change Key at the PC ID Edit Screen Change mode will be entered To display the desired page press the F6 Page Key enter the page num ber screen number then press the Enter Key To move the cursor to the desired line press the F7 Row No Key enter the line number then press the Enter Key...

Page 143: ...ess the Enter Key The extension of the file name to be saved must be PCN If the extension is omitted PCN will be automatically assigned as an extension When this window appears the data directory specified in the System Setup will be displayed as the destination The Insert Backspace and Delete Keys can be used to correct the characters displayed You can press the F8 Files Key to display the File N...

Page 144: ... continue the read processing the following window will be displayed to prompt you to specify the file to be read 2 Specify the file name including the directory to be read Enter a title with Alphanumeric Keys When this window appears the data directory specified in the System Setup will be displayed as the destination The Insert Backspace and Delete Keys can be used to correct the characters disp...

Page 145: ...is between 1 and 500 When the Enter Key is pressed with the cursor in the last line number input field a confirmation message will be displayed to ask you to confirm wheth er the PC ID data is to be cleared 3 To clear the PC ID data press Y and then the Enter Key The specified range of PC ID data will be cleared and the lines following the cleared lines will be moved up to fill the gap To cancel t...

Page 146: ...ocess2 Build Check 5 13 10 Checking PC ID Data K Check K Check is used to check the PC ID data for duplicate entries 1 2 3 1 Select K Check from the Edit PC ID Menu PC ID data check processing will start and a message will appear to indicate the check is being per formed When the check processing is completed the check result screen will be displayed A message will be displayed in the lower part o...

Page 147: ...ID data again 5 13 11 Sorting PC ID Data O Sort O Sort is used to sort PC ID data It can sort PC ID data that has been ar ranged in disorganized order due to repeated editing Select O Sort from the Edit PC ID Menu Sort processing will be performed as follows 1 2 3 1 PC ID data will be sorted in ascending order of network address 2 PC ID data with the same network address will be sorted in ascendin...

Page 148: ...ID and then press the Enter Key 3 Press the F6 Execute Key Searching will start and the cursor will move to the line that matches the specified data If the specified data is not found No such data will be displayed in the up per left part of the screen and searching will terminate 4 Press the F6 Execute Key again to search for the next occurrence of the specified data Search processing can be cont...

Page 149: ...a response to an instruction sent by the Controller Link Support Software If the Controller Link Support Software does not receive a response from the node within the specified time a response timeout error will occur 140 P Printer model Sets the printer model to be connected to the Controller Link Support Software 141 D Data disk drv Sets the drive and directory to from which data is to be writte...

Page 150: ...ed with bullets D also returns to the previous screen D D D D D D D D D V Key S Key 5 14 2 Displaying the System Setup I System Setup To perform System Setup select the desired item from the System Setup win dow Each item is described on the following pages The System Setup window can be displayed as follows Select I System Setup from the Main Menu The System Setup window will be displayed ...

Page 151: ...tware connects to the PC Normally the Controller Link Support Software uses the settings only when it connects to the PC However it also refers to the settings of the destination PC Menu when Maintenance functions are used Therefore set the PC interface correctly before transferring data between the Controller Link Support Software and a node or before using Maintenance functions Note For settings...

Page 152: ...s to be connected to a CV series PC select CVM1 CV series CS1 Series If the Controller Link Support Software is to be connected to a CS1 PC select CS1 series Set Set Communications port Select the RS 232C port to be used COM1 to COM4 Set Set Baud rate Select the baud rate to be used for communications with the PC Set the same baud rate as the setting at the PC If the Controller Link Support Softwa...

Page 153: ... 800 bps and if it is to be connected to a CS1 series PC set a baud rate of at least 9 600 bps 4 Select the desired setting from the window 5 If a C series PC is selected as the destination PC the following window will be displayed to prompt you to select the operating level of the Controller Link Unit to be used If a CQM1H is selected as the PC be sure to select operation level 0 6 If another ite...

Page 154: ...el of the Controller Link Unit to be used If a CQM1H is selected as the PC be sure to select operation level 0 6 If another item is also to be set press the Escape Key to return to the pre vious screen 5 14 4 Setting the Node Response Time T Watchdog Timer If an error occurs during communications between the Controller Link Support Software and a node the node may not be able to send a response to...

Page 155: ... Graphics Compressed Graphics EPSON MJ 500 ESC P Compressed Graphics 1 2 3 1 Select P Printer model from the System Setup window The printer model window will be displayed 2 Select the desired setting from the window 3 If another item is also to be set press the Escape Key to return to the pre vious screen 5 14 6 Setting the Data Directory D Data Disk Drive D Data disk drv is used to specify the d...

Page 156: ...e memory all the data will be cleared To save the data execute one of the following save functions before quitting the Controller Link Support Software Data link tables S Save table of L Data Link in Main Menu Routing table S Save of R Routing table in Main Menu PC ID data S Save PC ID of W Edit PC ID in Main Menu Error logs S Save of E Display Error log in Main Menu Connection information S Save ...

Page 157: ...143 SECTION 6 Troubleshooting This section describes troubleshooting methods for some of the problems that can occur with the Controller Link Support Software ...

Page 158: ...Area for a C200HX HG HE Controller Link Unit is set to OFF disabled Turn ON the Routing Table Enabled Bit in the DM parameter area enabled Characters are printed abnormally The correct printer model is not set Check whether the printer model in the System Setup is correct The printer settings are incorrect Check the printer settings Printing is not possible from Windows 95 The property settings of...

Page 159: ...py disk before saving the file Echoback comm err The network has communications problems Check the network EEPROM error Data in the EEPROM in the Controller Link Unit or Controller Link Support Board is damaged Reset the data link tables network parameters and routing tables Executing Can t run PC is in monitor or run mode Change the PC mode to program mode FAT is destroyed The floppy disk memory ...

Page 160: ...exist Check the data link tables set for the local node Not in DataLink can t monitor The data link table has not been set or the local node is not participating in the data links Check the data link table set for the local node Not in DataLink can t write The data link table has not been set or the local node is not participating in the data links Check the data link table set for the local node ...

Page 161: ...the drive name of the data disk memory card or hard disk Wrong file name The specified file name is incorrect Check the file name including the extension then specify the correct file name Wrong key The entered data is wrong Enter the correct data An invalid key was pressed Press the correct key Wrong netwk number The number of networks specified in the routing table is incorrect Specify the corre...

Page 162: ......

Page 163: ...C Connection to a Host Link Unit CV500 LK201 installed in a CVM1 or CV series PC Connection in Host Link mode to a Serial Communications Board CS1W SCB21 41 or Serial Communications Unit CS1W SCU21 installed in a CS1 series PC Modem Conditions The modems in which the following items can be specified are required to allow online connection Item Setting details Baud rate 2 400 4 800 9 600 or 19 200 ...

Page 164: ...G HE ZE Connecting to a CVM1 or CV series PC Computer Modem Modem Telephone line Controller Link Network CVM1 or CV series PC Built in Host Link port or Host Link Unit Connecting to a CS1 series PC Computer Modem Modem Telephone line Controller Link Network CS1 series PC Built in Host Link port or Serial Communica tions Board Unit ...

Page 165: ...om the communications software Setting up the Controller Link Support Software System Setup Connecting online to the Controller Link Support Software C200HX HG HE ZE PC Setup for Built in Host Link Port This section describes how to set the DIP switch on the PC and set up the Host Link port RS 232C port using the PC Setup DIP Switch Turn the CPU Unit OFF and set the DIP switch on the front panel a...

Page 166: ... OFF before setting the communications path selector switch and the DIP switch Communications Path Selector Switch Set the communications path selector switch on the front panel of the PC to RS 232C DIP Switch Open the cover of the Memory Card storage section on the front panel of the PC and set the DIP switch as follows Pin No Setting Setting details 1 Baud rate of peripheral bus connector 2 Pin ...

Page 167: ...up procedure create an I O table to make the Host Link Unit ready for operation Rotary Switches on Host Link Unit Use the rotary switches SW1 to SW4 on the front panel of the Host Link Unit to set the CPU Bus Unit number and the unit number used in the Host Link system Set each rotary switch within the following setting range Rotary switch Setting details Setting range SW1 Second digit of CPU Bus ...

Page 168: ... the Host Link ports using the CPU Bus Unit System Setup under the Commu nications and CPU Bus Unit System Setup from a Programming Device for the PC Note In the CPU Bus Unit System Setup screen for the Host Link Unit 0 to 9 are used to set up communica tions port 1 and 10 to 19 are used to set up communications port 2 Set each value on the screen as shown below CPU SIOU Unit System Setup Unit 00 ...

Page 169: ... Always OFF 8 Always OFF For online connection via modems always set pin 5 of the DIP switch to OFF RS 232C port is not used with de fault setting Set other pins according to your needs PC Setup Set up the RS 232C port on the PC using Host Link Port Setup in the PC Setup using CX Programmer Set the RS 232C port as follows Example Setting the baud rate to 9 600 bps Host Link port Mode setting Baud ...

Page 170: ... messages displayed in English OFF Programming Console messages displayed in the language stored in system ROM 4 ON Expansion instructions set by user OFF Expansion instructions set to defaults 5 OFF ON Peripheral port and RS 232C port communications settings determined by default settings OFF Peripheral port and RS 232C port communications settings determined by PC Setup 6 ON User defined pin Tur...

Page 171: ... does not necessarily have to be performed for the modem at the computer If however the settings are not stored in the nonvolatile memory the modem will need to be set up using AT commands from the communications software each time a communications procedure is started Setting Items The items shown in the following table must be always set Other setting items differ according to the telephone line...

Page 172: ... plug male Abbreviation Pin No Connector hood Connect to the built in Host Link port on C200HX HG HE ZE CVM1 CV series CS1 series or CQM1H PCs or connect to the Host Link port on a Serial Communications Board Unit for CS1 series PCs Connecting the Modem to the Peripheral Port on PC When the modem is to be connected to the peripheral port on the PC connect a CQM1 CIF01 Peripheral Interface Cable to...

Page 173: ...ectors as shown below Modem Host Link Unit Abbreviation Pin No Connector hood Shield RS 232C interface RS 232C interface D Sub 25 pin plug male D Sub 9 pin plug male Abbreviation Pin No Connector hood Connecting the Cables Use the prepared cables to connect the computer to the modem and the modem to the PC ...

Page 174: ...ed quit the communications software 4 Enter the following command underlined section to start the Controller Link Support Software C CLK CLKSS 5 Set the following communications parameters using the System Setup of the Controller Link Support Software Item Setting details Baud rate 2 400 4 800 9 600 or 19 200 bps Stop bit 1 bit Parity Even Data bits 7 bit Unit No Node number 0 see note Destination...

Page 175: ...for setting the computer communication conditions modem telephone number and dial up A sample batch file for the ME2814B III is shown below These files can be created using a text editor In this exam ple the baud rate is 9 600 bps and the dialing method is tone dialing ECHO OFF MODE COM1 96 E 7 1 ECHO ATY0X3 H0 K0 M4 N6S0 1S15 128S19 10 D0 W0DT045 123 4567 AUX ECHO ON The underlined section indica...

Page 176: ......

Page 177: ...SYSMAC Support Software it is better to register the Controller Link Support Software in the SYSMAC Support Software s Option Menu This section describes how to register the Controller Link Support Software in the SYSMAC Support Soft ware 1 Select the Option Menu in the SYSMAC Support Software 2 Select Z Add new facility from the Option Menu The utility registration screen will appear ...

Page 178: ...oftware A CLK CLKSS BAT OA SYSMATE After registration processing is completed the window will return to the utility registration screen If you go back to the Option Menu you can confirm that the Controller Link Support Software has been registered A ControllerLinkSupportSoftware Note 1 Perform registration in the SYSMAC Support Software after installing Controller Link Support Software 2 When call...

Page 179: ...OK button The Controller Link Support Software setup procedure will start Follow the instructions displayed on the screen 6 When the setup procedure is completed a message will appear on screen indicating that the setup has been completed 7 Click on the OK button This completes the setup procedure Starting the Controller Link Support Software Note Always run the Controller Link Support Software in...

Page 180: ...nt reception buffer size under the communications port settings for the device manager for sys tem settings on the Control Panel If communications errors recur even after the above settings have been changed close other applications running under Windows 95 Note 1 If the same problem occurs even after the settings have been changed run the Controller Link Support Software in DOS mode 2 For compute...

Page 181: ...ing file CLKTYPE TXT resides in the directory in which the Controller Link Sup port Software was installed Editing the Device Information Setting File A new PC can also be temporarily registered by setting Others in I Device Info set in the Data Link Menu In this case however the maximum number of banks and words that can be handled by the Controller Link Support Soft ware will be registered and s...

Page 182: ...l list displayed by Device Info set When editing the device information setting file note the following restrictions Up to 10 alphanumeric characters can be specified as a model name Model names are case sensitive For all other items specify decimal numbers Always place a colon after each model number Always place a equal sign after each model name Separate each item following the maximum number o...

Page 183: ...169 Appendix F Data Link Setting Forms The forms on the next two pages can be copied and used to design data links They are described in more detail in the body of this manual ...

Page 184: ...ta Link Setting Form 1 Date System Drawing No Link start word Node Link start word Node Link start word Node Link start word Node Link start word Node Link start word Node Link start word Node Link start word Node Comments ___ ___ ___ Link start word Node Link start word Node ...

Page 185: ... Receive Send Receive Send Receive Send Receive Send Receive Send Receive Send Receive Send Receive Send Receive Send Receive Send Receive Send Receive Send Receive Send Receive Send Receive Send Receive Send Receive Send Receive Send Receive Send Receive Send Receive Send Receive Send Receive Send Receive Send Receive Send Receive Send Receive Send Receive Send Receive Send Receive Send Receive S...

Page 186: ......

Page 187: ...51 transferring 67 writing to nodes 69 data links automatically set 39 manually set 38 starting 38 starting and stopping 77 device information setting file 167 168 DIP switch 151 modem settings CQM1H PCs 156 CS1 series PCs 154 CVM1 and CV series PCs 152 DIP switch settings CV series Host Link Unit 31 E echoback test 38 EEPROM Unit backing up 113 saving 113 writing 114 error logs displaying menu 10...

Page 188: ...ion method 23 node models specifying 81 node number setting 30 node response time setting 140 non participating nodes 118 O offsets 50 online connection terminating 160 via modems 160 operating procedures 41 operation basic 19 overall flow 9 P PC communications 137 Host Link 139 Peripheral Bus 139 settings 138 PC ID 38 125 changing 128 checking data 132 clearing multiple PC IDs 131 creating and ed...

Page 189: ...ies PC 155 starting CLSS 16 startup options 17 system setup 38 135 displaying 136 transmission frame format setting 30 troubleshooting 143 verify error 118 warnings 64 Windows 95 165 computers with infrared port communications 166 precautions 166 starting CLSS 165 word addresses entering 20 CIO LR DM 20 EM 21 ...

Page 190: ... catalog number on the front cover of the manual Cat No W369 E1 1 Revision code The following table outlines the changes made to the manual during each revision Page numbers refer to the previous version Revision code Date Revised content 1 March 2000 Original production ...

Reviews: