background image

 This warranty applies to US Residents who purchase from an authorized OmniMount Dealer. OmniMount 

products are covered against defects in materials and workmanship for 5 years. OmniMount will repair or replace 
the defective component or product, at its sole discretion.

To obtain warranty service, contact OmniMount customer service at 800.MOUNT.IT (800.668.6848) or info@
omnimount.com. You must supply a copy of your original receipt. If your product must be shipped to OmniMount 
for inspection, you will be responsible for the shipping charges. Replacement product shipped to you will be 
returned freight pre-paid.

OmniMount disclaims any liability for modifications, improper installations, or installations over the specified 
weight range. To the maximum extent permitted by law, OmniMount disclaims any other warranties, expressed 
or implied, including warranties of fitness for a particular purpose and warranties of merchantability. OmniMount 
will not be liable for any damages arising out of the use of, or inability to use, OmniMount products. OmniMount 
bears no responsibility for incidental or consequential damages. This includes, but is not limited to, any labor 
charges for the repair of OmniMount products performed by anyone other than OmniMount.

This warranty gives you specific legal rights, and you may also have other rights which vary from state to state. 

Specifications are subject to change without prior notice.

 Esta garantía tiene validez para los residentes estadounidenses que hayan realizado la compra en un distribuidor 

autorizado de OmniMount. Esta garantía cubre los productos OmniMount de los defectos de materiales y de 
mano de obra por un periodo de 5 años. OmniMount, a su exclusivo criterio, reparará o reemplazará el producto 
o componente defectuoso.
Para obtener el servicio de garantía, comuníquese con el servicio de Atención al cliente de OmniMount. Llame al 
800.MOUNT.IT (800.668.6848) o escríbanos a [email protected]. Deberá proporcionar el recibo original. 
Si fuera necesario enviar el producto a OmniMount para revisarlo, los gastos de envío correrán por su cuenta. El 
producto de reemplazo que se le envíe se le devolverá con los gastos de envío pagos.
OmniMount no se hace responsable de modificaciones, instalaciones inadecuadas o instalaciones que superen 
el rango de peso especificado. En la medida en que la ley lo permita, OmniMount no se hace responsable 
de ninguna otra garantía, expresa o implícita, incluso las garantías de aptitud para un fin determinado o de 
comercialización. OmniMount no se hace responsable de ningún tipo de daños causados por el uso de los 
productos OmniMount o por el uso inapropiado de dichos productos. OmniMount no es responsable de los 
daños incidentales o emergentes. Dentro de éstos se incluyen todo tipo de gastos que pudieran surgir de las 
reparaciones de productos OmniMount que no se hayan realizado en OmniMount.
Esta garantía le otorga derechos legales específicos. Es posible que además tenga otros derechos que varían 
según el estado. 

Las especificaciones están sujetas a cambios sin previo aviso.

 Cette garantie s’applique aux résidents des États-Unis qui achètent un produit OmniMount auprès d’un détaillant 

OmniMount autorisé. Les produits OmniMount sont garantis 5 ans contre les défauts de matériaux et de 
fabrication. OmniMount se chargera de réparer ou remplacer, à son entière discrétion, tout produit qui s’avérera 
défectueux.
Pour obtenir une réparation sous garantie, contactez le service à la clientèle OmniMount au 800.MOUNT.IT 
(800.668.6848) ou à [email protected]. Vous devrez fournir une copie de votre reçu d’achat original. Si 
votre produit doit être expédié à un centre de réparation OmniMount pour y être inspecté, vous devrez payer les 
frais de port. Le produit de remplacement vous sera envoyé en port payé.
OmniMount rejette toute responsabilité relativement à quelque problème pouvant être associé à une modification 
d’un produit, à une mauvaise installation ou à une installation ne respectant pas les limites de charge. Sous 
réserve des lois en vigueur, OmniMount réfute toute autre garantie expresse ou implicite, notamment toute 
garantie de commercialisation ou de convenance à un usage quelconque. OmniMount réfute toute responsabilité 
pour des dommages résultant de l’utilisation ou de l’impossibilité d’utiliser des produits OmniMount. OmniMount 
réfute également toute responsabilité pour quelque dommage accessoire ou indirect. Ceci s’applique notamment 
aux frais de main d’œuvre pour la réparation de produits OmniMount par une personne ne travaillant pas pour 
OmniMount.
Cette garantie vous accorde des droits juridiques spécifiques, mais il est possible que vous ayez également 
d’autres droits selon votre lieu de résidence. 

Les spécifications sont susceptibles d’être modifiées sans préavis.

OmniMount Product Warranty

Summary of Contents for WM3-PJT

Page 1: ...T Universal Projector Mount Instruction Manual Manual de instrucciones Manuel d instructions Benutzerhandbuch Instructiehandleiding Manuale di istruzioni N vod k obsluze QVWUXNFMD REV XJL Kezel si k z...

Page 2: ...FRQ XQ GLVWULEXLGRU ORFDO SDUD UHFLELU DVLVWHQFLD QIRUPDFLyQ DFHUFD GH ORV SURGXFWRV TXH VH LQVWDODQ HQ OD SDUHG VWH SURGXFWR VH GLVHxy SDUD VX FRORFDFLyQ HQ SDUHGHV YHUWLFDOHV FRQ SDQHOHV GH PDGHUD R...

Page 3: ...QJHQ EHVFKDGLJLQJHQ RI HOIV GH GRRG HHV YROJHQGH ZDDUVFKXZLQJHQ YRRU X PHW GH LQVWDOODWLH EHJLQW OV X GH H LQVWUXFWLHV QLHW YROOHGLJ EHJULMSW RI DOV X WZLMIHOV KHHIW GLHQW X FRQWDFW RS WH QHPHQ PHW HH...

Page 4: ...QLPRXQW FRP iND QtFL Y DKUDQL t VH PXVt V iGRVWt R SRPRF REUiWLW QD PtVWQtKR GLVWULEXWRUD 3URGXNW SUR S LSHYQ Qt QD VW QX 7HQWR SURGXNW E O QDYU HQ SUR SRX LWt QD VYLVOp VW Q SRVWDYHQp G HY Q FK WUiP...

Page 5: ...OPH WHWpVHNHW PLHO WW KR iNH GHQpQN D QHP pUWM N D XWDVtWiVRNDW YDJ NpUGpV QN YDQ OpSM QN NDSFVRODWED HJ V DNHPEHUUHO eV DN PHULNiEDQ D 2PQL0RXQW J IpOV ROJiODWiW D WHOHIRQV iPRQ YDJ D LQIR RPQLPRXQW...

Page 6: ...vi i Contents ID Description Qty 1 Projector plate 1 2 Articulation unit 1 3 Ceiling plate w cover 1 4 Leg post covers 4 5 Projector legs 4 A 3mm leg post 4 B 4mm leg post 4 C 5mm leg post 4 D 6mm le...

Page 7: ...pWDEOLH j NJ OE hEHUVFKUHLWHQ 6LH QLFKW GDV 0D LPDOJHZLFKW YRQ NJ I U GLHVHV 3URGXNW 2YHUVFKULMGW KHW PD LPDOH GUDDJYHUPRJHQ YDQ NJ YRRU GLW SURGXFW QLHW 1RQ VXSHUDUH LO FDULFR PDVVLPR GL NJ SHU TXHV...

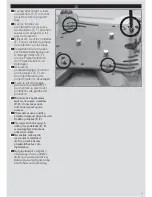
Page 8: ...vez le couvercle de la plaque de plafond Entfernen Sie die Abdeckung von der Deckenplatte Verwijder de afdekking van de plafondplaat Togliere la copertura della piastra a sof tto 6HMP WH NU W H VWURSQ...

Page 9: ...die Deckenplatte um die Montagestelle am Deckentr ger oder Deckenbalken zu markieren Gebruik de plafondplaat om de montageplaats af te tekenen op de plafondbalk Usare la piastra a sof tto come riferi...

Page 10: ...UHGQLF FDOD PP Z ZLHU RWZRU SLORWRZH UMXQN YH HW O XNDNDW HJ PP HV I UyV iU VHJtWVpJpYHO PP Mount ceiling plate using lag bolts H Coloque la placa de techo con los tornillos H Installez la plaque de...

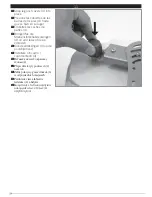
Page 11: ...de plafond en vous assurant qu il s embo te bien Lassen Sie die Deckenplattenabdeckung wieder einrasten Klik de afdekking van de plafondplaat vast Installare a incastro la copertura della piastra a so...

Page 12: ...sie zu entfernen und trennen Sie die Gelenkeinheit von der Projektorplatte Draai de borgschroef los niet uitdraaien en maak de scharniereenheid los van de projectorplaat Allentare senza rimuovere la v...

Page 13: ......

Page 14: ...eit auf die Deckenplatte und drehen Sie die Sicherheitsschraube fest Schroef de scharniereenheid op de plafondplaat en zet de veiligheidsschroef vast Avvitare l unit di articolazione sulla piastra a s...

Page 15: ...dapt es au projecteur Montieren Sie die f r den Projektor geeigneten Strebenst tzen A D Installeer de pootstijlen A D die bij de projector horen Installare i montanti A D adatti al proiettore 3 LSHYQ...

Page 16: ...ds de projecteur 5 sur les pattes Montieren Sie die Projektorstreben 5 auf den Strebenst tzen Installeer de projectorpoten 5 op de pootstijlen Installare le gambe del proiettore 5 sui montanti 3 LSHYQ...

Page 17: ...gscheiben E F um die Projektorplatte an den Projektorstreben zu befestigen Gebruik de pootbevestigingsschroeven en de plaatjes E F om de projectorplaat op de projectorpoten te bevestigen Usare le viti...

Page 18: ...tez les caches de pattes 4 Bringen Sie die Strebenst tzenabdeckungen 4 an und lassen Sie sie einrasten Klik de afdekkingen 4 op de pootstijlen vast Installare a incastro i coprimontanti 4 3 LSHYQ WH N...

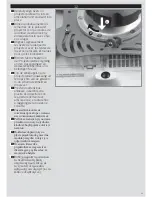
Page 19: ...arungen an der Gelenkeinheit aus und befestigen Sie sie Lijn de klinknagels op de projectorplaat nauwkeurig uit ten opzichte van de gleuven in de scharniereenheid en draai vast Prestando attenzione al...

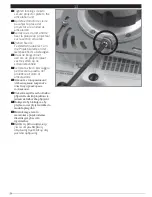
Page 20: ...aube fest um die Projektorplatte an der Gelenkeinheit zu befestigen Draai de borgschroef aan om de projectorplaat vast te zetten op de scharniereenheid Serrare la vite di bloccaggio per ssare la piast...

Page 21: ...den Projektor indem Sie den Plastikring an der Gelenkeinheit l sen Stel de kanteling en de zwenking in door de kunststofring op de scharniereenheid los te maken Regolare inclinazione e rotazione allen...

Page 22: ...ango de peso especi cado En la medida en que la ley lo permita OmniMount no se hace responsable de ninguna otra garant a expresa o impl cita incluso las garant as de aptitud para un n determinado o de...

Page 23: ...n aangekocht in de Verenigde Staten Als het product werd aangekocht buiten de Verenigde Staten kunt u bij uw lokale verdeler terecht voor de voor uw land geldende garantie Avvertenza per gli utenti re...

Page 24: ...ucto de WorldMount Merci d avoir achet un produit WorldMount Wie danken Ihnen dass Sie ein WorldMount Produkt erworben haben Grazie per aver preferito un prodotto WorldMount Dank u voor uw aankoop van...

Reviews: