background image

The complete or partial reproduction of the contents of this document outside of private use is expressly prohibited in every way. Errors and omissions excepted. 

All texts, photos and drawings are the property of nimax GmbH.


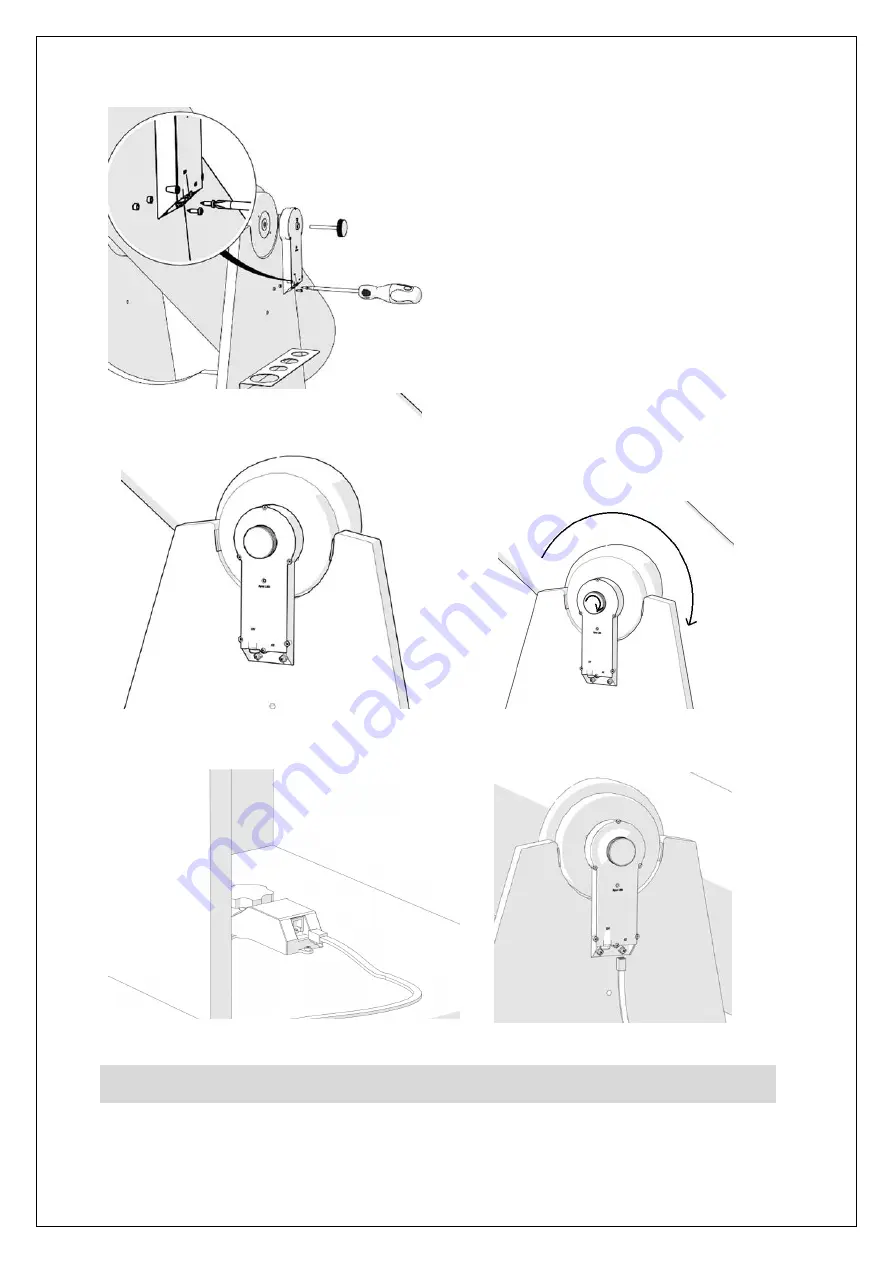
2.4. Install the Altitude Encoder and Bluetooth® Box. 

Align it 

to the side panel so that the hand knob slides and aligns with 
the side bearing. Keep the Altitude Encoder and Bluetooth® 
Box in the up-right position and place the two spacers (part #4) 
aligned to the two holes on the bottom so that they are 
sandwiched between the side plate and the Box. Use the two 
supplied screws (part #5) and the screw driver (not included) to 
fix it to the side panel. Apply some pressure to the screws in 
order to pierce them through the wood panel.  


Tighten the hand knob firmly. Test it like previously done with 
the Azimuth Encoder. 
Place the tube horizontally and then bring it to the vertical 
position. Verify if the hand knob also rotates. 


2.5. Connecting the two boxes. 

Now that the Azimuth Encoder and the Altitude Encoder and the Bluetooth® Box have 

been installed to both axes and tested (rotation) it is time to connect both with the supplier cable (part #1). 


Connect using the supplied cable. If you hear a 

“click”,

 it usually means a good connection! 

Summary of Contents for Push+ Go

Page 1: ...te use is expressly prohibited in every way Errors and omissions excepted All texts photos and drawings are the property of nimax GmbH Instruction Manual Omegon Push Go Standalone encoder system Engli...

Page 2: ...it in a variety of Dobsonian telescopes 1 What is included Packing List Bag 1 1 Cable 2 Cable holders 5x 3 Altitude Encoder and Bluetooth Box 4 Spacers 2x 5 Screws 2x 6 Washer 7 Azimuth Encoder 8 Scre...

Page 3: ...socket to the opening side Insert the original hand knob supplied with the telescope through the hole and tighten it firmly Confirm that the Azimuth Encoder is correctly fixed to its axis by rotating...

Page 4: ...sandwiched between the side plate and the Box Use the two supplied screws part 5 and the screw driver not included to fix it to the side panel Apply some pressure to the screws in order to pierce them...

Page 5: ...a smartphone holder was included Use the smartphone holder part 9 and fix it with the two supplied screws part 10 using a screw driver not included Apply some pressure to the screws so they pierce thr...

Page 6: ...to the Altitude Encoder and Bluetooth Box The Red LED will start blinking 6 Push compatibility Push is compatible with devices that use Android or with computers that use Windows operating system The...

Page 7: ...will also show either as Unknown Device or as Push Step 3 Select Push from the list and pair it by inserting the 4 digit pairing code Each Push has its own signature and when pairing it will remember...

Page 8: ...n several versions from entry level to the most advanced ones We recommend using the SkySafari Plus 4 for Android It can be downloaded from the Google Play app centre Please notice this is not a free...

Page 9: ...Time Location Munich Univ Obs Munich Coordinates Horizon Tap Location and insert your location please do not forget to choose your hemisphere N S and meridian position W E Most West European countries...

Page 10: ...hould be no more than 30 degrees but no less than 10 degrees both in Altitude Alt and Azimuth Az Avoid using alignment stars close to the horizon and zenith Step 1 Centre a bright star a star that you...

Page 11: ...rs and the object s database coordinates Please make sure you use the right hand rule up left If the problem persists make sure you are not using a star too close to the first one I get pointing error...

Reviews: