Operation
OMAX JetMachining® Center Operator’s Guide
400433D-EN
3 - 11
All other defined homes and soft limits are points that are relative to the Absolute Home location. To ensure
positioning accuracy, Absolute Home must always be re-zeroed before another home is created.
It is
important that Auto Home be run to re-zero Absolute Home at the beginning of each work day and
whenever you shut down for maintenance or reboot the PC Controller.
Absolute Home is usually in the
front corner of your machine. For the 80160, Absolute Home is in the rear, far corner of the machine.
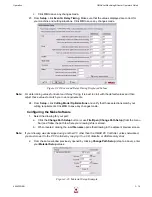
To Auto Home your OMAX:
1.
Move the cutting head to about 10 inches for each axis from the Home corner.
2.
In
Make
, click
Homes
/
Advanced
/
Auto Home...
Figure 3-6: Selecting Auto Home in OMAX Make
3.
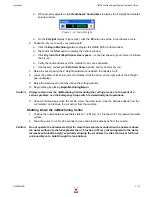
When the warning message appears, if appropriate, click
OK
.
Note:
The machine will now move in the X-axis direction until it gently contacts the X-axis hard stop. It then
moves in the Y-axis direction until it gently contacts the Y-axis hard stop.
4.
When prompted to re-zero Absolute Home, select
Yes
.
Your OMAX should now be accurately aligned and ready for use.
Operating the JetMachining Center
Note:
The following guidelines for operating the JetMachining Center assume that the OMAX operator has
received the factory training provided as part of the original equipment purchase and installation.
Configuring Your Drawing
1.
Import your part file (.dxf) into
Layout
, the OMAX drawing tool.
2.
Use the
Clean
command to clean up the drawing file by removing any unnecessary dots, closing any
gaps, and removing any duplicate entities.
3.
Define the quality of the cut needed for each part entity (see Determining Quality on page 3-6):
• Quality 1 is the lowest quality cut and the fastest.
• Quality 5 is the highest quality cut and the slowest.
4.
Add nozzle
lead-ins
and
lead-outs
to the cutting path.
• Lead-ins are typically drawn longer; lead-outs are drawn shorter.
• The side of the entity where you placed your lead-in/outs determines whether the nozzle cuts on the
left or right side of the entity.
• The nozzle travels in the direction of the least sharp turn (the widest angle) on the lead-in.
• Always verify your lead-in and lead-out configurations in Layout.
• Use a 90° lead-in and lead-out on square corners.
• Use a narrow angle on the lead-in/lead-out to minimize witness marks or blemishes.
5.
Save the completed version of your .dxf file.
Summary of Contents for JetMachining Center 2626
Page 8: ...OMAX JetMachining Center Operator s Guide viii 400433D EN ...
Page 12: ...OMAX JetMachining Center Operator s Guide xii 400433D EN ...
Page 22: ...OMAX JetMachining Center Operator s Guide Safety First 1 10 400433D EN ...
Page 140: ...OMAX JetMachining Center Operator s Guide OMAX Glossary 6 16 400433D EN ...
Page 144: ...OMAX JetMachining Center Operator s Guide Index 4 400433D EN ...


