background image

9

EN

4

5
6

8
9

7

3

1

2

1


n

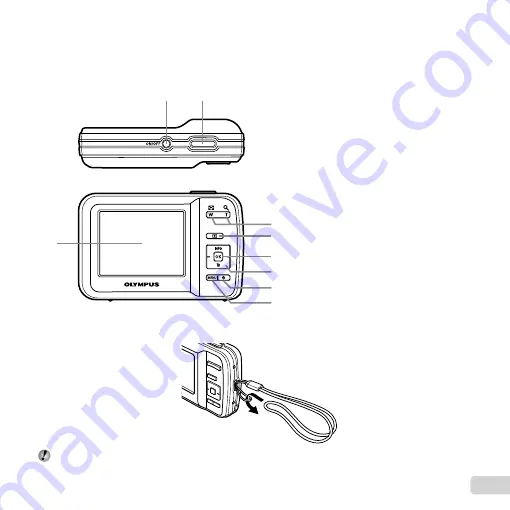
 button ........ p. 17, 18

2

 Shutter button 

............... p. 

19

3

 Monitor ................... p. 

18, 50

4

 Zoom buttons ............... p. 

20

5


q

 button 

(switch between shooting 
and playback) ....... p. 19, 22

6


H

 button (OK) ......... p. 4, 16

7

 Arrow pad 

....................... p. 

3

INFO

 button 

(change information 
display) ................. p. 21, 24

D

 button (erase) .......... p. 23

8


E

 button (menu guide)

 .................................... p. 24

9


m

 button .................. p. 5

Attaching the camera strap

Attaching the camera strap

  Pull the strap tight so that it does not come loose.

Summary of Contents for T-10

Page 1: ...his manual in a safe place for future reference We recommend that you take test shots to get accustomed to your camera before taking important photographs In the interest of continually improving our...

Page 2: ...e the Camera Camera Settings p 3 Step 5 Printing Direct printing PictBridge p 43 Print Reservations DPOF p 47 Contents Contents Names of Parts 8 Preparing the Camera 12 Shooting Viewing and Erasing 18...

Page 3: ...2 m button p 5 E button menu guide p 24 Arrow pad H left G down D button erase p 23 F up INFO button change information display p 21 24 I right H button p 4 16 The symbols FGHI displayed for image sel...

Page 4: ...menu The function menu is used to choose the shooting mode and provides access to frequently used shooting settings To select the shooting mode Use HI to select a shooting mode and press the H button...

Page 5: ...TIME BRIGHT ENGLISH BATTERY TYPE ALKALINE 1 OK SET MENU BACK 2 BATTERY TYPE ALKALINE POWER SAVE POWER SAVE OFF OFF WORLD TIME BRIGHT ENGLISH POWER SAVE ON OFF OFF Submenu 2 4 Use FG to select the des...

Page 6: ...7 ISO p 31 8 Image size Still images p 32 9 Setup X z Shooting A Movie RESET p 33 IMAGE SIZE Movies p 33 COMPRESSION Still images p 33 FRAME RATE Movies p 33 AF MODE p 34 DIGITAL ZOOM p 34 R Movies p...

Page 7: ...2 s Monitor p 40 POWER SAVE p 41 BATTERY TYPE p 41 W Language p 41 X Date time p 41 WORLD TIME p 42 1 2 MENU OK SET EXIT BACKUP PIXEL MAPPING BEEP ON q POWER ON YES FORMAT KEEP K SETTINGS YES USB CON...

Page 8: ...rts Names of Parts Camera unit 3 4 6 7 8 2 1 5 1 Strap eyelet p 9 2 Battery card compartment cover p 12 3 Microphone p 34 36 4 Flash p 29 5 Lens p 55 69 6 Self timer lamp p 30 7 USB connector p 14 43...

Page 9: ...button switch between shooting and playback p 19 22 6 H button OK p 4 16 7 Arrow pad p 3 INFO button change information display p 21 24 D button erase p 23 8 E button menu guide p 24 9 m button p 5 A...

Page 10: ...k p 13 2 Shooting mode p 18 25 3 Flash p 29 Flash standby flash charge p 50 4 Macro p 29 5 Self timer p 30 6 Exposure compensation p 30 7 White balance p 31 8 ISO p 31 9 Image size p 32 33 10 Setup me...

Page 11: ...d p 19 9 Aperture value p 19 10 ISO p 31 11 Exposure compensation p 30 12 White balance p 31 13 Image size p 32 33 14 File number 15 Date and time p 17 16 Compression still images p 33 Frame rate movi...

Page 12: ...Write protect switch Insert the card straight until it clicks into place Do not touch the contact area directly 3 For the types of batteries that can be used see Battery handling precautions p 55 Whe...

Page 13: ...o take pictures using the internal memory even when no SD SDHC memory card sold separately is inserted Using an SD SDHC memory card p 56 Number of storable pictures still images Continuous recording l...

Page 14: ...OM OLYMPUS Setup icon to open the OLYMPUS Setup window and then double click SETUP EXE If a User Account Control dialog is displayed click Yes or Continue 2 Follow the on screen instructions on your c...

Page 15: ...required for movies RAM 512MB or more 1GB or more recommended 1 GB or more required for movies 2 GB or more recommended Free Hard Drive Space 1GB or more Monitor Settings 1024 768 pixels or more Mini...

Page 16: ...um 32 000 colors 16 770 000 colors recommended Other languages can be selected from the language combo box For information on using the software see online help 3 Copy the camera manual Click the Came...

Page 17: ...2010 X Y M D MENU Y M D TIME CANCEL 4 As in Steps 2 and 3 use FGHI and the H button to set M month D day TIME hours and minutes and Y M D date order For a more accurate setting press the H button whe...

Page 18: ...tor 4 4 P P 0 0 0 0 AUTO WB AUTO WB AUTO ISO AUTO ISO 10M Number of storable still pictures p 58 Monitor standby mode screen If the PROGRAM AUTO indicator is not displayed press the H button to displa...

Page 19: ...ly press the shutter button all the way down while being careful not to shake the camera P P 1 400 1 400 F3 1 F3 1 Image review screen Press fully To view images during shooting To view images during...

Page 20: ...ly the digital zoom can be used To record a movie with optical zoom set R movies p 34 to OFF Using the zoom Pressing the zoom buttons adjusts the shooting range Pressing the wide W button Pressing the...

Page 21: ...age size Photographs taken with the zoom bar displayed in red may appear grainy Changing the shooting information display The display of the screen information can be changed to best match the situati...

Page 22: ...ck movies Select a movie and press the H button 12 30 10 10 26 10 10 26 12 30 4 30 4 30 OK MOVIE PLAY MOVIE PLAY Movie Operations during movie playback Operations during movie playback 00 12 00 34 00...

Page 23: ...a time Press I or H to advance or rewind one frame at a time Hold I or H pressed for continuous advance or rewind Resuming playback Press the H button to resume playback To stop movie playback To sto...

Page 24: ...on to display the selected image in single image view To scroll an image in close up view To scroll an image in close up view Use FGHI to move the viewing area Changing the image information display S...

Page 25: ...e shooting scene simply by pressing the shutter button 1 Set the shooting mode to M 4 4 10M The icon changes depending on the scene that the camera automatically selects In some cases the camera may n...

Page 26: ...ET 1 XFIREWORKS 1 VCUISINE dDOCUMENTS PET The camera takes a picture using the optimum settings for the scene conditions 1 When the subject is dark noise reduction is automatically activated This appr...

Page 27: ...sired effect and then press the H button to set 4 4 0 0 0 0 AUTO WB AUTO WB 10M Icon indicating MAGIC FILTER that is set Shooting mode Option MAGIC FILTER POP ART PIN HOLE FISH EYE DRAWING 1 1 Two ima...

Page 28: ...f desired frames is taken and then press the m button when finished Panorama shooting is possible for up to 10 frames For information on creating panoramas see the online help for the supplied softwar...

Page 29: ...light FLASH OFF The flash does not fire Shooting closeups Macro shooting This function enables the camera to focus and shoot subjects at close distances 1 Select the macro option in the shooting func...

Page 30: ...e is taken Y 2 SEC The self timer lamp blinks for approx 2 seconds and then the picture is taken Self timer shooting is automatically canceled after one shot To cancel the self timer after it starts T...

Page 31: ...SO sensitivity 1 Select the ISO setting option in the shooting function menu P P 0 0 0 0 AUTO WB AUTO WB 400 ISO ISO 200 ISO ISO 100 ISO ISO 10M ISO 200 1 400 1 400 F3 1 F3 1 400 200 100 ISO 200 2 Use...

Page 32: ...uitable for printing A4 8 5 11 in pictures 3M 2048 1536 Suitable for printing pictures up to A4 8 5 11 in 2M 1600 1200 Suitable for printing A5 5 7 in pictures 1M 1280 960 Suitable for printing pictur...

Page 33: ...ession mode for still Selecting a compression mode for still images COMPRESSION images COMPRESSION z Shooting menu X COMPRESSION Submenu 2 Application FINE Shooting at high quality NORMAL Shooting at...

Page 34: ...When the camera recognizes the subject the AF target mark automatically tracks the subject movement to focus on it continuously 3 To cancel the tracking press the H button Depending on the subjects o...

Page 35: ...nu 2 Application OFF No icon guide is displayed ON The explanation of the selected icon will be displayed when a shooting mode or shooting function menu icon is selected position the cursor on the ico...

Page 36: ...a high resolution image as a separate image with a smaller size for use in e mail attachments and other applications 9 320 240 1 Use HI to select an image 2 Use FG to select the size and press the H b...

Page 37: ...ethod and press the H button 2 Use HI to select an image for retouching and press the H button The retouched image is saved as a separate image Erasing images ERASE Erasing images ERASE q Playback men...

Page 38: ...Saving print settings to the image data PRINT ORDER PRINT ORDER q Playback menu X PRINT ORDER Print Reservations DPOF p 47 Print reservation can be set only for still images that are recorded to the c...

Page 39: ...ck up data Check that the battery has sufficient power before starting the backup Selecting a method for connecting Selecting a method for connecting the camera to other devices the camera to other de...

Page 40: ...BEEP Setting the operation sound BEEP r Settings 1 X BEEP Submenu 2 Application OFF ON Turns off or on the operating sound warning sound of the camera buttons Adjusting the CCD and the image Adjustin...

Page 41: ...using NiMH batteries If ALKALINE is selected with NiMH batteries the camera may fail to turn on when the batteries are low If NiMH is selected with alkaline batteries the camera may be turned off wit...

Page 42: ...The time in the home time zone the time zone selected for x in submenu 2 z The time in the travel destination time zone the time selected for z in submenu 2 x 1 Select the home time zone x z 1 2 Selec...

Page 43: ...mera vary depending on the printer that is used For details refer to the printer s instruction manual For details on the available paper types loading paper and installing ink cassettes refer to the p...

Page 44: ...NT This prints the image selected in Step 6 ALL PRINT This prints all images stored in the internal memory or card MULTI PRINT This prints one image in a multiple layout format ALL INDEX This prints a...

Page 45: ...0 26 12 30 NORM 10M FILE 100 0004 100 0004 6 Use HI to select an image 7 Press F to make a print reservation for the current image Press G to make the detailed printer settings for the current image T...

Page 46: ...peat Steps 6 and 7 to select the image to be printed make the detailed settings and set SINGLE PRINT 9 Press the H button PRINT MENU OK CANCEL SET BACK PRINT PRINT 10Use FG to select PRINT and press t...

Page 47: ...e on the card This enables easy printing at a printer or print shop supporting DPOF by using only the print reservations on the card without a computer or a camera 1 DPOF is a standard for storing aut...

Page 48: ...100 0004 100 0004 OK 0 0 SET 4 Use HI to select the image for print reservation Use FG to select the quantity Press the H button MENU OK X DATE TIME SET BACK NO NO 5 Use FG to select the X date print...

Page 49: ...press the H button Resetting the print reservation data for selected images 1 Follow Steps 1 and 2 in p 48 2 Use FG to select and press the H button 3 Use FG to select KEEP and press the H button 4 Us...

Page 50: ...in this mode Operate the zoom buttons or other buttons to restore the camera from sleep mode before taking a picture If the camera is left for another 12 minutes it automatically turns off Press the...

Page 51: ...the H button 2 MEMORY SETUP OK MEMORY FORMAT SET POWER OFF POWER OFF Internal memory problem Use FG to select MEMORY FORMAT and press the H button Next use FG to select YES and press the H button 2 E...

Page 52: ...a picture that you envision refer to the information below Focusing Focusing on the subject Taking a picture of a subject not in the center of the screen After focusing on an object at the same dista...

Page 53: ...a high ISO sensitivity is selected pictures can be taken at a high shutter speed even at locations where a flash cannot be used Selecting the ISO sensitivity p 31 Exposure brightness Taking pictures w...

Page 54: ...ored spots and color unevenness that were not in the original image can occur and the image can appear grainy The resulting image is grainier than with low ISO sensitivity as well Selecting the ISO se...

Page 55: ...tteries The number of pictures that you can take may vary considerably depending on the battery manufacturer and shooting conditions AA NiMH batteries rechargeable batteries Olympus NiMH batteries are...

Page 56: ...with this camera SD SDHC memory cards visit the Olympus website for information on memory cards that have been tested and approved for use Using a new card Using a new card Cards must be formatted wi...

Page 57: ...current memory indicator lights in red while the camera is writing data Never open the battery card compartment cover or unplug the USB cable This can not only damage the image data but also render th...

Page 58: ...pictures and continuous recording length are approximate The actual capacity varies with shooting conditions and the card used Still images Still images IMAGE SIZE COMPRESSION Number of storable stil...

Page 59: ...min 42 sec 25 min 0 sec O 53 sec 55 sec 48 min 51 sec 50 min 1 sec The maximum file size of a single movie is 2 GB regardless of the capacity of the card Increasing the number of pictures that can be...

Page 60: ...ny heat source such as a radiator heat register stove or any type of equipment or appliance that generates heat including stereo amplifiers Handling the Camera Handling the Camera WARNING Do not use t...

Page 61: ...follow all instructions regarding the use of batteries Never attempt to disassemble a battery or modify it in any way solder etc If battery fluid gets into your eyes flush your eyes immediately with...

Page 62: ...adio tower or transmission towers In such cases turn the camera off and on again before further operation Always observe the operating environment restrictions described in the camera s manual Battery...

Page 63: ...yrighted material may violate applicable copyright laws Olympus assumes no responsibility for unauthorized photographing use or other acts that infringe upon the rights of copyright owners Copyright N...

Page 64: ...serviceable used parts that meet Olympus s quality assurance standards for warranty or any other repairs and ii make any internal or external design and or feature changes on or to its products withou...

Page 65: ...nd communications pertaining to the subject matter hereof This limited warranty is exclusively for the benefit of the original customer and cannot be transferred or assigned WHAT TO DO WHEN SERVICE IS...

Page 66: ...visions of Guarantee 1 OLYMPUS IMAGING CORP Shinjuku Monolith 2 3 1 Nishi Shinjuku Shinjuku ku Tokyo 163 0914 Japan grants a one year World Wide Guarantee This worldwide Guarantee must be presented at...

Page 67: ...s authorized service station at his own risk and shall be responsible for any costs incurred in transporting the product 3 This warranty does not cover the following and the customer will be required...

Page 68: ...epresentations or warranties either expressed or implied by or concerning any content if these written materials or software and in no event shall be liable for any implied warranty of merchantability...

Page 69: ...9 equivalent to 36 to 108 mm on a 35 mm camera Photometric system Digital ESP metering system Shutter speed 4 to 1 2000 sec Shooting range 0 6 m 2 0 ft to W 1 0 m 3 3 ft to T normal 0 2 m 0 7 ft to W...

Page 70: ......

Page 71: ...VR082202...

Reviews: