EN-29
Addit
io
n
al inf
o
rma
tion
Troubleshooting
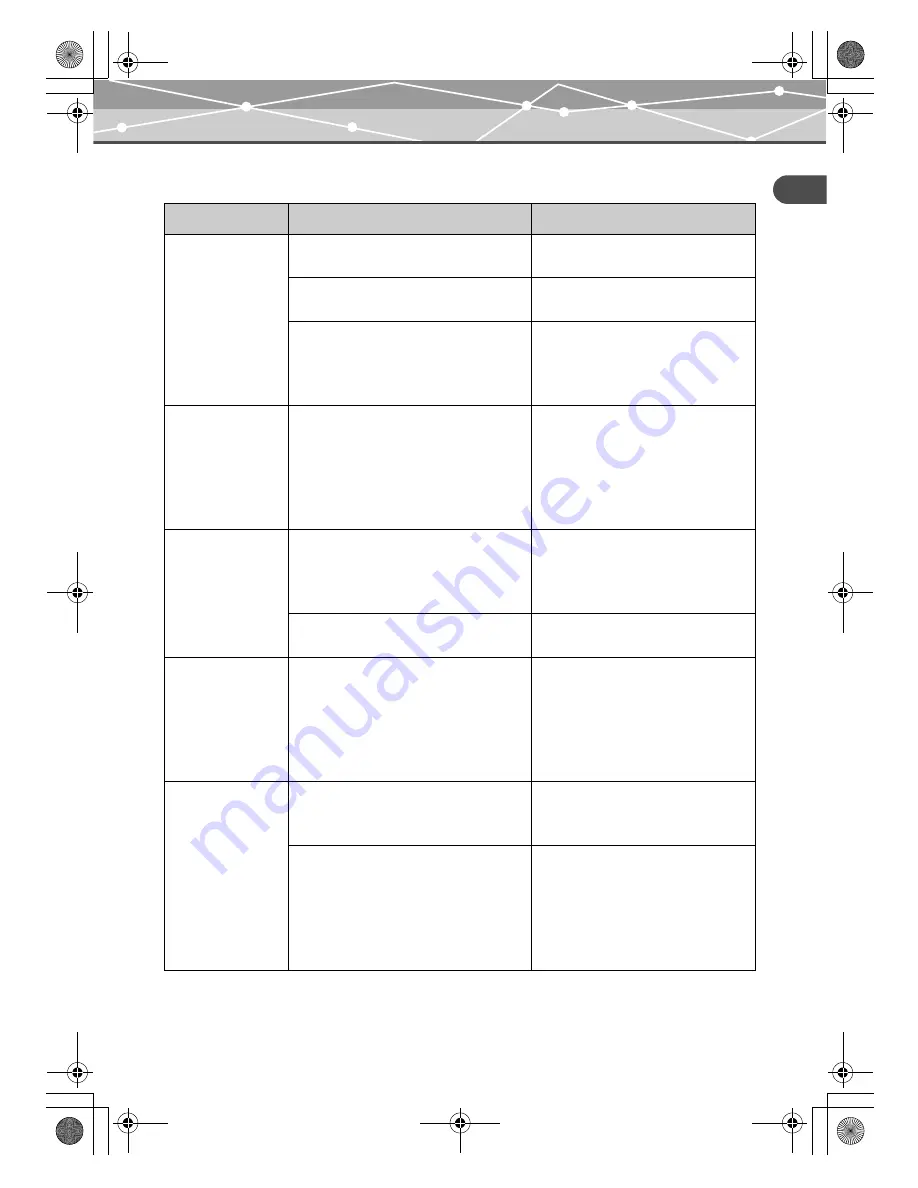
Dock&Done mode
Problem
Cause/Status
Solution
The Dock&Done
menu does not
appear on the digital
camera after
connecting to the
unit.
The unit is not turned on.
Turn on the power to the unit and make
sure that the power indicator turns on.
The digital camera is not properly
connected to the unit.
Turn the unit off, then back on before
connecting the digital camera.
The unit is in PC mode.
Set the Dock&Done mode/PC mode
switch to the Dock&Done mode and
make sure that the Dock&Done mode
indicator turns on.
“STORING
ONLY” cannot be
selected from the
Dock&Done menu
on the digital
camera.
Newly taken image file is not in the digital
camera.
After taking new pictures, set the
digital camera back on the cradle.
“STORE
:
PRINT”
cannot be selected
from the
Dock&Done menu
on the digital
camera.
Print order information is not set.
Check to see if a print order
information has been set. If not, set the
print order information and connect the
digital camera to the unit again.
The printer is not connected, or the power
of the printer is not on.
Check to see if the printer is properly
connected and turned on.
“STORE
:
SEL.
PRINT” cannot be
selected from the
Dock&Done menu
on the digital
camera.
The printer is not connected, or the power
of the printer is not on.
Check to see if the printer is properly
connected and turned on.
An image file
cannot be stored.
Not enough hard disk space is available.
Back up image files on the unit and
then use OLYMPUS Master software
to delete the image files.
The image file was taken by a
Dock&Done-incompatible digital camera,
and then stored by a Dock&Done-
compatible digital camera.
Image data taken by a Dock&Done-
incompatible digital camera may not
be storable on the storage unit. For
details about changing the storing
mode, refer to the reference manual
supplied with the digital camera.
00Kura_E.book Page 29 Tuesday, October 26, 2004 1:14 PM


