background image

27

EN

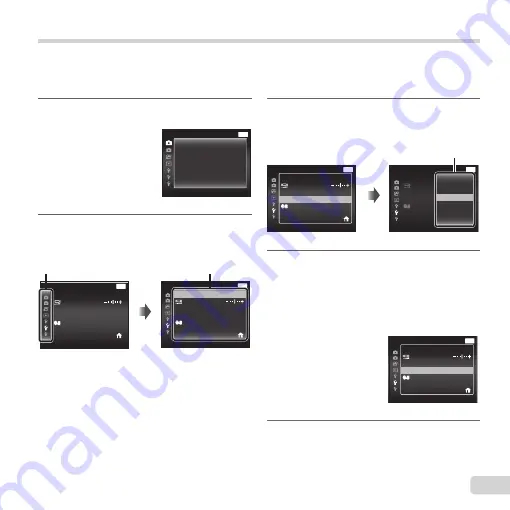
 Using the setup menu

Press the 

 button during shooting or playback to display the setup menu. 

The setup menu provides access to a variety of camera settings, such as shooting and playback functions, 
time and date settings, and display options.

3

 Use 

FG

 to select the desired 

submenu 1 and then press the 

A


button.

Power Save

Power Save

Off

MENU

Settings Menu 2

Pixel Mapping

Back

World Time

World Time

NTSC/PAL

NTSC

English

X

’13/02/26 12:30

Power Save

Power Save

Pixel Mapping

MENU

Settings Menu 2

Back

World Time

World Time

NTSC/PAL

X

On

Off

Submenu 2

4

 Use 

FG

 to select the desired 

submenu 2 and then press the 

A


button.


Once a setting is selected, the display returns 
to the Submenu 1.


There may be additional operations.

Power Save

Power Save

On

MENU

Settings Menu 2

Pixel Mapping

Back

World Time

World Time

NTSC/PAL

NTSC

English

X

’13/02/26 12:30

5

 Press the 

 button to 

complete the setting.

1

 Press the 

 button.


The setup menu is displayed.

MENU

On

On

Off

Camera Menu 1

Date Stamp

AF Illuminat.

Reset

Reset
Compression

Icon Guide

Normal

AF Mode
Digital Zoom

Face/iESP

Off

Back

2

 Press 

H

 to select the page tabs. 

Use 

FG

 to select the desired 

page tab and press 

I

.

MENU

Settings Menu 2

Pixel Mapping

Back

Power Save

Power Save

World Time

World Time

NTSC/PAL

NTSC

English

Off

X

’13/02/26 12:30

Page tab

Pixel Mapping

MENU

Settings Menu 2

Power Save

Power Save

World Time

World Time

NTSC/PAL

Back

NTSC

English

Off

X

’13/02/26 12:30

Submenu 1

Summary of Contents for D-780

Page 1: ...tions carefully to enjoy optimum performance and a longer service life Keep this manual in a safe place for future reference We recommend that you take test shots to get accustomed to your camera before taking important photographs In the interest of continually improving products Olympus reserves the right to update or modify information contained in this manual ...

Page 2: ...Multi connector 4 Self timer lamp AF illuminator 5 Flash 6 Lens 7 Microphone 8 Speaker 9 Tripod socket 10 Battery card cover or Digital camera Strap Lithium Ion Battery LI 50B USB AC adapter F 2AC USB cable CB USB7 OLYMPUS Setup CD ROM Other accessories not shown Warranty card Contents may vary depending on purchase location ...

Page 3: ...itching between shooting and playback 8 A button OK 9 Arrow pad INFO changing information display erase flash I Y self timer G 10 button Attaching the camera strap Attaching the camera strap Pull the strap tight so that it does not come loose Arrow pad H left G down F up I right FGHI instruct to press the up down left right arrow pad ...

Page 4: ...rd the battery lock knob Damage to the battery exterior scratches etc may produce heat or an explosion Slide the battery lock knob in the direction of the arrow to unlock and then remove the battery 3 Insert the card straight until it clicks into place Write protect switch Always use SD SDHC SDXC cards or Eye Fi card with this camera Do not insert other types of memory cards Using the card p 62 Do...

Page 5: ... camera and charge the battery For charging the battery abroad see Using your charger and USB AC adapter abroad p 61 The battery is not fully charged at shipment Before use be sure to charge the battery until the indicator lamp turns off up to 4 hours Connecting the camera Connecting the camera Indicator lamp On Charging Off Charged AC outlet or USB cable supplied Connector cover Multi connector ...

Page 6: ... included USB AC adapter has been designed to be used for charging and playback Do not take pictures while the USB AC adapter is connected to the camera Be sure to unplug the power plug of the USB AC adapter from the wall outlet when the charging is complete or the playback ends For details on the battery see Battery Handling Precautions p 70 For details on the USB AC adapter see USB AC adapter p ...

Page 7: ...ess the A button 2 Press FG of the arrow pad to select the year for Y X MENU Back Y M D Y M D Time 2013 Date and time setting screen 3 Press I of the arrow pad to save the setting for Y X MENU Back Y M D Y M D Time 2013 4 As in Steps 2 and 3 press FGHI of the arrow pad to set M month D day Time hours and minutes and Y M D date order and then press the A button For precise time setting press the A ...

Page 8: ...vie press the R button Set the shooting functions using the function menu or the setup menu To view images press the q button to switch to playback mode To return to standby mode press the q button again or press the shutter button halfway down and then release it Press and hold the q button while the camera is turned off to start up the camera in the playback mode In this case pressing the q butt...

Page 9: ... gently press the shutter button all the way down while being careful not to shake the camera Press halfway Press fully Shooting still images 1 Press the n button to turn on the camera 2 Select the shooting mode p 13 3 Hold the camera and compose the shot When holding the camera take care not to cover the flash microphone or other important parts with your fingers etc Take care so that the flash w...

Page 10: ...elected to best match the shooting conditions 1 Press I P P Flash Auto 0 0 0 0 AUTO WB AUTO WB AUTO ISO AUTO ISO MENU MENU 16M 3 4 2 Use HI to select the setting option and press the Q button to set Option Description Flash Auto The flash fires automatically in low light or backlight conditions Redeye Pre flashes are emitted to reduce the occurrence of red eye in your photos Fill In The flash fire...

Page 11: ...to select the setting option and press the Q button to set Option Description Y Off The self timer is deactivated Y 12 sec The self timer lamp turns on for approx 10 seconds then blinks for approx 2 seconds and then the picture is taken Y 2 sec The self timer lamp blinks for approx 2 seconds and then the picture is taken To cancel the self timer after it starts To cancel the self timer after it st...

Page 12: ... R R 6 ISO sensitivity R R 7 Drive R R 8 Image size still images R R 9 Aspect R R 10 Recording with sound R R 11 Image size movies R R 12 Movie recording length R R 13 Movie recording icon R R 14 World time R 15 Date stamp R R 16 Compression R R 17 Number of storable still pictures R R 18 Current memory R R 19 Battery check R R 20 AF target mark R R R 21 Grid Guide R 22 Aperture value R R R 23 Shu...

Page 13: ... Watercolor Reflection Miniature p Panorama mode List of settings available in each shooting mode p 57 List of settings p 58 List of P settings p 60 1 Press H of the arrow pad on standby mode screen first and press HI to select shooting mode To select the Q and P submodes display submodes by using G first Then use HI to select the desired submode and press the A button MENU MENU 16M Scene Mode 3 4...

Page 14: ...to select a retouching item and press the Q button MENU Off Eye Color Back Learning about the shooting modes P P mode The camera will select the appropriate aperture value and shutter speed for the subject Changes can also be made to various shooting settings such as exposure compensation as needed M M mode The camera will automatically select the optimal shooting mode for the scene The shooting c...

Page 15: ...unctions may be limited in some modes Refer to the descriptions displayed on the submode selection screen and select the desired submode P P mode You can shoot with special effects Refer to the sample images displayed on the submode selection screen and select the desired submode The best shooting settings for each effect are pre programmed so some function settings cannot be changed Note that som...

Page 16: ...of the second frame and press the shutter button 4 Repeat step 3 until the desired number of frames are taken and then press the A button or button when finished Panorama shooting is possible for up to 10 frames The shot images are combined into a single panorama image by the PC software For details on installing the PC software refer to p 43 In addition refer to the PC software help guide for det...

Page 17: ...d and hold H to reverse Press the q button again to return to the shooting screen To play sound recordings To play sound recordings To play sound recorded with an image select the image and press the A button Press FG to adjust volume Index view and close up view Index view enables quick selection of a desired image Close up view up to 10 magnification allows checking of image details 1 Turn the z...

Page 18: ...d as a group during playback Several operations are available for the grouped images such as expanding to view or erase images individually or erasing the grouped images collectively T side Expands Select the image and press the A button to display the images individually Use HI to view the previous next frame A button Playback pauses playback FG Adjusts the volume when playing back images with so...

Page 19: ...18 Image size R 19 Recording date and time R R 20 Grouped image R R R 12 30 13 02 26 13 02 26 12 30 10 10 4 30 4 30 8 7 2 3 4 6 5 19 20 Still image Detailed 4 30 4 30 2 0 2 0 F2 8 F2 8 1 1000 1 1000 AUTO WB AUTO WB 100 ISO 100 ISO 1 MAGIC MAGIC 10 10 12 30 13 02 26 13 02 26 12 30 NORM 100 0004 100 0004 4608 3456 4608 3456 4608 3456 4608 3456 AUTO WB AUTO WB 100 ISO 100 ISO 1 NORM 100 0004 100 0004...

Page 20: ...ay the image you want to erase and press G MENU Erase Back Erase Cancel 4 30 4 30 100 0004 100 0004 2 Press FG to select Erase and press the A button Grouped images are erased as a group Multiple images or all images can be erased at a time p 34 ...

Page 21: ...s the R button again to stop recording Playing back movies Select a movie and press the A button 0 12 0 34 0 12 0 34 During playback Movie 4 30 4 30 OK Movie Play Movie Play 13 02 2612 30 13 02 2612 30 Pausing and restarting playback Press the A button to pause playback During pause fast forward or reverse press the A button to restart playback Fast forward Press I to fast forward Press I again to...

Page 22: ...winding one frame at a time Press I or H to advance or rewind one frame at a time Hold I or H pressed for continuous advance or rewind Resuming playback Press the A button to resume playback To stop movie playback To stop movie playback Press the button To play back movies on the computer the supplied PC software is recommended For the first use of the supplied PC software connect the camera to th...

Page 23: ...pensation 5 ISO sensitivity 7 Image Size 2 Self timer 4 White balance 6 Drive 8 Aspect Using the function menu 1 Use H of the arrow pad to display the function menu 2 Use FG of the arrow pad to select the function to be set 3 Use HI of the arrow pad to select the setting value and then press the A button to enter the setting Example Exposure compensation Exposure Comp P P 0 0 0 0 1 1 2 2 2 2 1 1 A...

Page 24: ... Value Set a larger negative value to adjust darker or a larger positive value to adjust brighter White balance Sets an appropriate color scheme for the light of the shooting scene e WB Auto The camera automatically adjusts the white balance f Sunny Suitable for shooting outdoors under a clear sky g Cloudy Suitable for shooting outdoors under a cloudy sky h Incandescent Suitable for shooting under...

Page 25: ...ng pictures Q 3 2 Change the horizontal to vertical ratio to 3 2 when taking pictures 1 1 Change the horizontal to vertical ratio to 1 1 when taking pictures In certain shooting modes some functions cannot be set Refer to List of settings available in each shooting mode p 57 The image sizes are the examples when the aspect ratio is set to Registering one touch white balance Registering one touch w...

Page 26: ...der 1 Camera Menu 1 5 Settings Menu 1 z Reset Compression AF Mode Digital Zoom AF Illuminat Icon Guide Date Stamp d Memory Format Format Backup Eye Fi USB Connection q Power On Keep z Settings Sound Settings 2 Camera Menu 2 6 Settings Menu 2 z Super Res Zoom d Pixel Mapping s Monitor NTSC PAL Power Save l Language X Date time World Time 3 Movie Menu 7 Settings Menu 3 A Image Size Frame Rate IS Mov...

Page 27: ... button Once a setting is selected the display returns to the Submenu 1 There may be additional operations Power Save Power Save On MENU Settings Menu 2 Pixel Mapping Back World Time World Time NTSC PAL NTSC English X 13 02 26 12 30 5 Press the button to complete the setting 1 Press the button The setup menu is displayed MENU On On Off Camera Menu 1 Date Stamp AF Illuminat Reset Reset Compression ...

Page 28: ...nu 2 Application Fine Shooting at high quality Normal Shooting at normal quality Number of storable pictures still images Recording length movies in the internal memory and cards p 63 64 Selecting the focusing area Selecting the focusing area z z AF Mode AF Mode Submenu 2 Application Face iESP The camera focuses automatically If a face is detected it is shown by a white frame 1 when the shutter bu...

Page 29: ...igital Zoom Digital Zoom Submenu 2 Application Off Disable digital zoom On Enable digital zoom The option selected for Digital Zoom affects the appearance of the zoom bar p 30 Using the assist lamp for shooting Using the assist lamp for shooting a dark subject a dark subject z z AF Illuminat AF Illuminat Submenu 2 Application Off The AF illuminator is not used On When the shutter button is pressed...

Page 30: ...ctures than when using optical zoom with low when using optical zoom with low degrading of image quality degrading of image quality z z Super Res Zoom Super Res Zoom Submenu 2 Application Off Disable super resolution zoom On Enable super resolution zoom Available only if is selected for Image Size Super resolution zoom Digital zoom Image size Zoom bar On Off 16M Super resolution zoom Off On 16M Di...

Page 31: ...ctivated This is recommended for shooting when the camera is fixed in place on a tripod or other stable surface On The image stabilizer is activated Images may not be stabilized if camera shake is too severe Recording sound when shooting Recording sound when shooting movies movies A A R R Submenu 2 Application Off No sound is recorded On Sound is recorded When set to On only the digital zoom can b...

Page 32: ...Submenu 1 Submenu 2 Edit P 1 Use HI to select an image and press the A button 2 Use the zoom lever to select the size of the cropping frame and use FGHI to move the frame Cropping frame MENU Back 3 Press the A button after you have selected the area to trim The edited image is saved as a separate image Adding sound to still images Adding sound to still images q q R R Submenu 1 Submenu 2 Edit R 1 U...

Page 33: ...saved as a separate image MENU Back OK Beauty Fix The Image Size of the retouched image is limited to 3 or lower Beauty Fix Beauty Fix 1 Select a retouching item and press the Q button MENU Off Eye Color Back 2 Press the Q button on the review screen Brightening areas that are dark Brightening areas that are dark due to backlight or other reasons due to backlight or other reasons q q Shadow Adj Sh...

Page 34: ...button The new picture orientations will be saved even after the power is turned off Erasing images Erasing images q q Erase Erase Submenu 2 Application All Erase All images in the internal memory or card will be erased Sel Image Images are individually selected and erased Erase Deletes the image displayed When erasing pictures in the internal memory do not insert the card into the camera Protecte...

Page 35: ...ormat p 36 1 Use HI to select an image Turn the zoom lever to the W end to display an index view Images can be quickly selected using the FGHI buttons 2 Press the A button Press the A button again to cancel the settings 3 If necessary repeat Steps 1 and 2 to protect other images and press the button Setting images to upload to Setting images to upload to Internet using OLYMPUS Viewer 3 Internet us...

Page 36: ... in the internal memory to the card memory to the card d d Backup Backup Submenu 2 Application Yes Backs up image data in the internal memory to the card No Cancels the backup Using an Eye Fi card Using an Eye Fi card d d Eye Fi Eye Fi Submenu 2 Application All Transfers all images Sel Image Transfers only selected image Off Disable Eye Fi communication When using an Eye Fi card read the Eye Fi ca...

Page 37: ...q q Power On Power On Submenu 2 Application No The camera is not turned on To turn on the camera press the n button Yes Press and hold the q button to turn the camera on in the playback mode Saving the mode when the camera Saving the mode when the camera is turned off is turned off d d Keep Keep z z Settings Settings Submenu 2 Application Yes The shooting mode is saved when the camera is turned of...

Page 38: ... before performing pixel mapping If the camera is turned off during pixel mapping be sure to perform it again To adjust the image processing function To adjust the image processing function Press the A button when Start Submenu 2 is displayed The check and adjustment of the image processing function starts Adjusting the brightness of the Adjusting the brightness of the monitor monitor d d s s To a...

Page 39: ...ding to the region where the camera is sold To play back camera images on a TV To play back camera images on a TV Connection via AV cable 1 Use the camera to select the same video signal system as the one of connected TV NTSC PAL 2 Connect the TV and camera 3 Turn on the TV and change INPUT to VIDEO an input jack connected to the camera 4 Turn on the camera and use FGHI to select the image for pla...

Page 40: ...ime hours and minutes and Y M D date order and then press the A button For precise time setting press the A button as the time signal strikes 00 seconds Choosing home and alternate time Choosing home and alternate time zones zones d d World Time World Time You will not be able to select a time zone using World Time if the camera clock has not first been set using X Submenu 2 Submenu 3 Application ...

Page 41: ...cture the editing may not be effective 1 Use FG to select a retouching setting and press the Q button 2 Press the shutter button to take a portrait picture Take a portrait picture The image is not saved 3 Select a retouching item and press the Q button MENU Off Eye Color Back 4 Press the Q button on the review screen to save the image Registration is complete ...

Page 42: ...or later Even if a computer has USB ports proper operation is not guaranteed in the following cases Computers with USB ports installed using an expansion card etc Computers without a factory installed OS and home built computers When the computer does not support SDXC cards a message may appear urging to format the internal memory or card Formatting will completely erase all images so do not forma...

Page 43: ...structions To register the camera must be connected to the computer Connecting the camera p 42 If nothing is displayed on the camera screen even after connecting the camera to the computer the battery may be exhausted Charge the battery and then connect the camera again 3 Install OLYMPUS Viewer 3 Check the system requirements before beginning installation Click the OLYMPUS Viewer 3 button and foll...

Page 44: ...ftware You can register via Registration in OLYMPUS Viewer 3 Help OLYMPUS Viewer 3 Operating System Mac OS X v10 5 v10 8 Processor Intel Core Solo Duo 1 5 GHz or better Core 2 Duo 2 GHz or better required for movies RAM 1 GB or more 2 GB or more recommended Free Hard Drive Space 3 GB or more Monitor Settings 1024 768 pixels or more Minimum 32 000 colors 16 770 000 colors recommended Other language...

Page 45: ...per types loading paper and installing ink cassettes refer to the printer s instruction manual In the setup menu set USB Connection to Print USB Connection p 37 Printing images at the printer s standard settings Easy Print 1 Display the image to be printed on the monitor Viewing images p 17 2 Turn on the printer and then connect the printer and camera USB cable supplied Connector cover Multi conne...

Page 46: ...Print Order is available only when print reservations have been made Print Reservations p 48 5 Use FG to select Size Submenu 3 and press I If the Printpaper screen is not displayed the Size Borderless and Pics Sheet are set to the printer s standard MENU Printpaper Size Borderless Back Standard Standard 6 Use FG to select the Borderless or Pics Sheet settings and press the A button Submenu 4 Appli...

Page 47: ...ithout prints the images without the date File Name With Without Selecting With prints the file name on the image Selecting Without does not print any file name on the image P Proceeds to the setting screen This selects a portion of the image for printing To crop an image To crop an image P P 1 Use the zoom lever to select the size of the cropping frame use FGHI to move the frame and then press th...

Page 48: ...int Reservations In print reservations the number of prints and date imprint option are saved in the image on the card This enables easy printing at a printer or print shop supporting DPOF by using only the print reservations on the card without a computer or a camera Print reservations can be set only for the images stored on the card DPOF reservations set by another DPOF device cannot be changed...

Page 49: ...e A button Submenu 2 Application No This prints the image only Date This prints the image with the shooting date Time This prints the image with the shooting time 6 Use FG to select Set and press the A button Reserving one print each of all images on the card U 1 Follow Steps 1 and 2 in p 48 2 Use FG to select U and press the A button 3 Follow Steps 5 and 6 in Resetting all print reservation data ...

Page 50: ... 4 Use HI to select the image with the print reservation you want to cancel Use FG to set the print quantity to 0 5 If necessary repeat Step 4 and then press the A button when finished 6 Use FG to select the X date print screen option and press the A button The settings are applied to the remaining images with the print reservation data 7 Use FG to select Set and press the A button ...

Page 51: ...e and the monitor turns off if there is no operation for 3 minutes when the camera is turned on No picture is taken even if the shutter button is fully pressed in this mode Operate the zoom lever or other buttons to restore the camera from sleep mode before taking a picture If the camera is left for another 12 minutes it automatically turns off Press the n button to turn the camera on Press the q ...

Page 52: ...s of auto focus as far as it is ready to shoot Error message When one of the messages below is displayed on the monitor check the corrective action Error message Corrective action Card Error Card problem Insert a new card Write Protect Card problem The card write protect switch is set to the LOCK side Release the switch Memory Full Internal memory problem Insert a card Erase unwanted images 1 Card...

Page 53: ...ter or printer correctly No Paper Printer problem Load paper into the printer No Ink Printer problem Refill the ink in the printer Jammed Printer problem Remove the jammed paper Settings Changed 3 Printer problem Return to the status where the printer can be used Error message Corrective action Print Error Printer problem Turn off the camera and printer check the printer for any problems and then ...

Page 54: ...cture of a shadowy subject Using the AF illuminator makes focusing easier AF Illuminat p 29 Taking a picture of subjects where autofocus is difficult In the following cases after focusing on an object by pressing the shutter button halfway down with high contrast at the same distance as the subject compose the shot and take the picture Subjects with low contrast When extremely bright objects appea...

Page 55: ...ened Taking pictures of a white beach or snow scene Select q Beach Snow in the scene mode p 13 Taking pictures using exposure compensation p 24 Adjust the brightness while viewing the screen for taking the picture Normally taking pictures of white subjects such as snow results in images that are darker than the actual subject Use the exposure compensation to adjust in the positive direction to exp...

Page 56: ...in the original image can occur and the image can appear grainy ISO sensitivity p 24 Batteries Making batteries last longer Set Power Save p 40 to On Playback Editing tips Playback Playing images in the internal memory and card Remove the card and display the images in internal memory Inserting and removing the battery and card commercially available p 4 Editing Erasing the sound recorded to a sti...

Page 57: ... a P p Zoom R R R R R R Flash R 1 R 1 1 Self timer R R R R R R R Exposure compensation R R R R White balance R R R R ISO sensitivity R R Drive R R R Image Size R R R 1 1 R Aspect R R R R R R Compression R R R R R R R AF Mode R R 1 Digital Zoom R R R AF Illuminat R R R R R R Icon Guide R R R R R R R Date Stamp R R R R R R Super Res Zoom R 1 Some functions cannot be set ...

Page 58: ...compensation White balance ISO sensitivity Drive Image Size R R R R R R R R R Aspect R R R R R R R R R Compression R R R R R R R R R AF Mode R R R R R R R R Digital Zoom R R R R R R R AF Illuminat R R R R R R R R R Icon Guide R R R R R R R R R Date Stamp R R R R R R R R R Super Res Zoom 1 Some functions cannot be set ...

Page 59: ...posure compensation White balance ISO sensitivity Drive Image Size R R R R R Aspect R R R R R Compression R R R R R AF Mode R R R Digital Zoom R R R R R AF Illuminat R R R R R Icon Guide R R R R R Date Stamp R R R R R Super Res Zoom 1 Some functions cannot be set ...

Page 60: ...le Fish Eye Soft Focus Punk Exposure compensation R R R R White balance R R R Image Size R R R R R Sparkle Watercolor Reflection Miniature Exposure compensation R R R R White balance R R R R Image Size 1 R R R 1 Some functions cannot be set ...

Page 61: ...ing the camera in places where chemical products are handled since this may result in corrosion Using a separately sold USB AC adapter The USB AC adapter F 3AC sold separately can be used with this camera Do not use any USB AC adapter other than the dedicated one When using F 3AC be sure to use the USB cable included with this camera Do not use any other USB AC adapter with this camera Shooting is...

Page 62: ...s camera before first use or after being used with other cameras or computers Checking the image saving location Checking the image saving location The memory indicator shows whether the internal memory or card is being used during shooting and playback Current memory indicator v Internal memory is being used w Card is being used Even if Memory Format Format Erase Sel Image or All Erase is perform...

Page 63: ...e still pictures and recording length are approximate The actual capacity varies with shooting conditions and the card used Still pictures Still pictures 1 1 Image Size Compression Number of storable pictures Internal memory SD SDHC SDXC card 4GB 4608 3456 L 3 400 M 7 750 4 3200 2400 L 7 770 M 13 1 340 3 1920 1440 L 24 2 530 M 49 4 960 7 640 480 L 220 20 670 M 403 41 340 1 The image sizes are the ...

Page 64: ... 33 min 35 min 15fps 37 sec 41 sec 64 min 70 min The maximum file size of a single movie is 2 GB regardless of the capacity of the card Increasing the number of pictures that can be taken Increasing the number of pictures that can be taken Either erase unwanted images or connect the camera to a computer or other device to save the images and then erase the images in the internal memory or card Era...

Page 65: ...ty software Any third party software is subject to the terms and conditions imposed by the owners or licensors of that software under which software is provided to you Those terms and other third party software notices if any may be found in the software notice PDF file stored within the supplied CD ROM or at http www olympus co jp en support imsg digicamera download notice notice cfm The standard...

Page 66: ...ory Internal memory SD SDHC SDXC Eye Fi card No of effective pixels 16 000 000 pixels Image pickup device 1 2 3 CCD primary color filter Lens Olympus lens 4 7 to 23 5 mm f2 8 to 6 5 Equivalent to 26 to 130 0 mm on a 35 mm film Photometric system Digital ESP metering spot metering system Shutter speed 2 to 1 2000 sec Shooting range Normal 0 2 m 0 7 ft to W 0 6 m 2 0 ft to T Super macro mode 0 05 m ...

Page 67: ...LI 50BB Standard voltage DC 3 7 V Standard capacity 925 mAh Battery life Approx 300 full charges varies on usage Operating environment Temperature 0 C to 40 C 32 F to 104 F charging USB AC adapter F 2AC USB AC adapter F 2AC Model No F 2AC 2B F 2AC 1C F 2AC 3C F 2AC 4C F 2AC 5C F 2AC 1D F 2AC 3D F 2AC 4D F 2AC 5D F 2AC 6D Power requirements AC 100 to 240 V 50 60 Hz Output F 2AC 2B DC 5 V 500 mA F 2...

Page 68: ...g this product from the wall outlet before cleaning Use only a damp cloth for cleaning Never use any type of liquid or aerosol cleaner or any type of organic solvent to clean this product Attachments For your safety and to avoid damaging the product use only accessories recommended by Olympus Water and Moisture For precautions on products with weatherproof designs read the weatherproofing sections...

Page 69: ... avoid getting a low temperature burn When the camera contains metal parts overheating can result in a low temperature burn Pay attention to the following When used for a long period the camera will get hot If you hold on to the camera in this state a low temperature burn may be caused In places subject to extremely cold temperatures the temperature of the camera s body may be lower than the envir...

Page 70: ...rom the camera contact an authorized distributor or service center Do not try to remove the battery by force Damage to the battery exterior scratches etc may produce heat or an explosion WARNING Do not wet batteries with fluid such as water or seawater To prevent batteries from leaking overheating or causing a fire or explosion use only batteries recommended for use with this product Insert the ba...

Page 71: ... push the monitor forcibly otherwise the image may become vague resulting in a playback mode failure or damage to the monitor A strip of light may appear on the top bottom of the monitor but this is not a malfunction When a subject is viewed diagonally in the camera the edges may appear zigzagged on the monitor This is not a malfunction it will be less noticeable in playback mode In places subject...

Page 72: ...crease the distance between the camera and receiver Connect the equipment to an outlet on a circuit different from that to which the receiver is connected Consult your dealer or an experienced radio TV technician for help Only the OLYMPUS supplied USB cable should be used to connect the camera to USB enabled personal computers PC Any unauthorized changes or modifications to this equipment would vo...

Page 73: ... limited to lamps ink paper film prints negatives cables and batteries and or f Products which do not contain a validly placed and recorded Olympus serial number unless they are a model on which Olympus does not place and record serial numbers EXCEPT FOR THE LIMITED WARRANTY SET FORTH ABOVE OLYMPUS MAKES NO AND DISCLAIMS ALL OTHER REPRESENTATIONS GUARANTIES CONDITIONS AND WARRANTIES CONCERNING THE...

Page 74: ...duct carefully using ample padding material to prevent damage in transit and either deliver it to the Authorized Olympus Dealer that sold you the Product or ship it postage prepaid and insured to any of our Olympus Service Centers When returning Products for service your package should include the following 1 Sales receipt showing date and place of purchase 2 Copy of this limited warranty bearing ...

Page 75: ...ct or damage that occurs due to transport a fall shock etc after purchase of the product d Any defect or damage that occurs due to fire earthquake flood damage thunderbolt other natural disasters environmental pollution and irregular voltage sources e Any defect that occurs due to careless or improper storage such as keeping the product under conditions of high temperature and humidity near insect...

Page 76: ...rranty Certificate 4 This Warranty applies to the product only the Warranty does not apply to any other accessory equipment such as the case strap lens cap and batteries 5 Olympus sole liability under this warranty shall be limited to repairing or replacing the product and any liability for indirect or consequential loss or damage of any kind incurred or suffered by the customer due to a defect in...

Page 77: ......

Page 78: ...VM800901 ...

Reviews: