background image

-22-

2. Printer Drivers for Windows NT 4.0

(For the PS Printer Drivers)

A

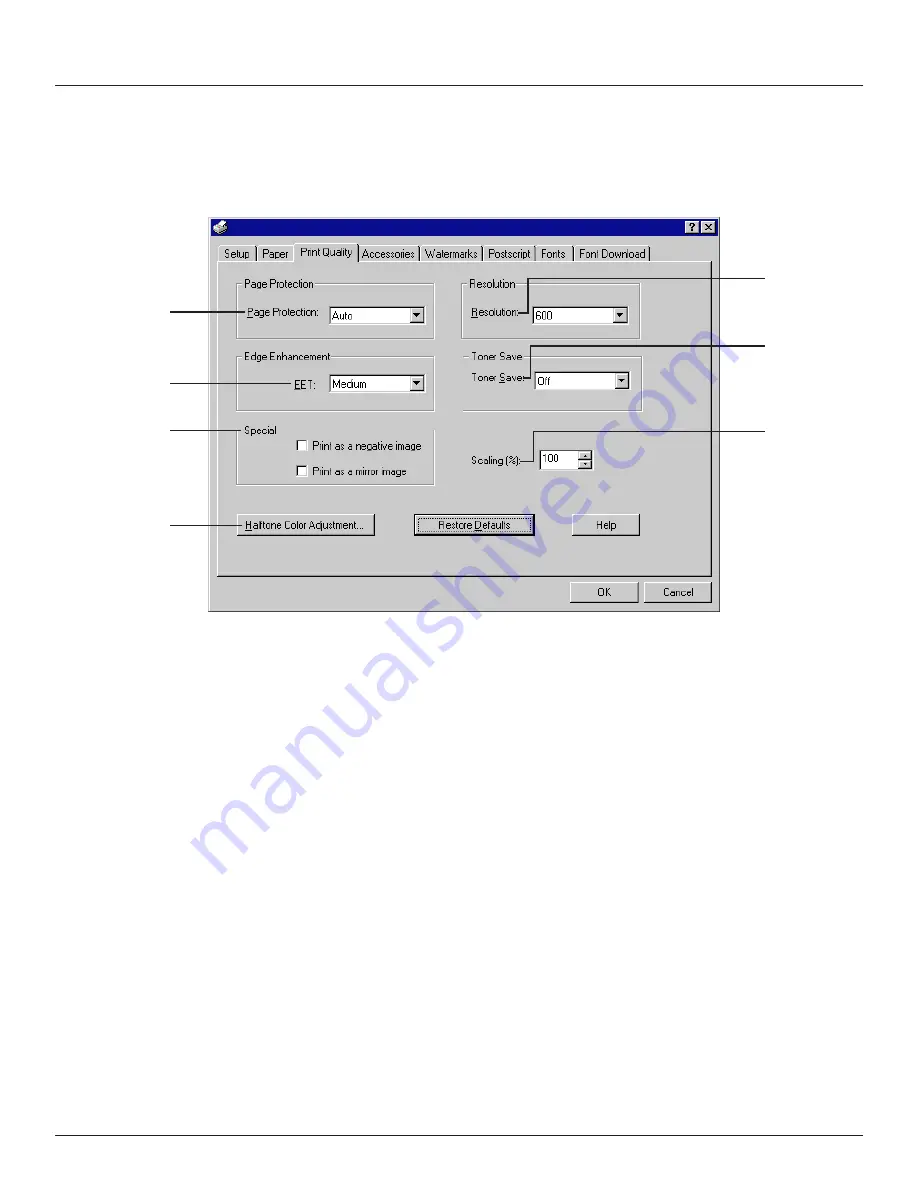
Page Protection field: Displays whether or not a portion of the

printer’s memory has been designated for printing documents that
contain both text and graphics. This option enables the printer to
create an image of the entire page in memory BEFORE paper is fed
into the printer. This ensures that the entire page will be printed and
helps prevent print overrun errors.
It is normally recommended that this setting be left on Auto. On the
other hand, if you experience difficulty with printing documents such as
those that contain complex graphics, it is recommended that On be
selected. However, selecting On will use more memory in the printer.

B

EET field: Displays the currently selected setting for edge

enhancement which enables the clearest reproduction of edges and
curves when printing text and graphics. Click on the arrow (

) to

display a drop-down list, and then choose from that list the desired
setting: LightMediumDark or Off.

C

Special check boxes: Place a check in the appropriate check box in

order to print a negative or a mirror image of the document.

• Print as a negative image: Prints a negative image of the

document. This option is useful for black-and-white or coarse RGB
images.

• Print as a mirror image: Prints a mirror image of the document.

D

Resolution field: Displays the currently selected printing resolution -

600 dpi or 300 dpi. It is normally recommended that this setting be left
on 600 dpi, the highest resolution.

E

Toner Save field: Depending upon the setting made here, toner use

can be reduced. It is recommended that this setting be utilized when
printing documents that contain only text. Click on the arrow (

) to

display a drop-down list, and then choose from that list the desired
setting: LightMediumDark or Off.

F

Scaling field: Displays the currently selected magnification ratio 

(25% - 400%). The desired magnification can be selected by typing it
directly into this field or clicking on the (

) arrows.

* If your application provides a scaling feature, adjust the scaling in the

application rather than in this Printer Driver.

G

Halftone Color Adjustment… button: Click to open a related dialog

box. For more detailed information on that dialog box, refer to your
Windows NT Instruction Manual.

A

B

C

G

D

E

F

Summary of Contents for d-Copia 23

Page 1: ...GO TO THE CONTENTS...

Page 2: ...21 2 6 Accessories tab 23 2 7 Watermark tab 24 2 8 Postscript tab for PS Printer Driver only 26 2 9 Fonts tab for PS Printer Driver only 27 2 10 Font Download tab for PS Printer Driver only 29 2 11 D...

Page 3: ...at the user has a basic understanding of how to work in Windows For further information on using Windows refer to Windows related material and other information from Microsoft Corporation Trademark In...

Page 4: ...upon which PDL you are actually using the explanations settings and illustrations shown in this manual may differ slightly from what will actually appear on your computer screen 1 1 Opening the Prope...

Page 5: ...ut button Click to display information for this Printer Driver such as its name and version number F Restore Defaults button Click to reset all settings back to their factory default values G OK butto...

Page 6: ...this radio button in order to have the paper turned over by its shorter edge during Duplex printing If the 1 or 2 sided Printing options are not available even though the optional Duplex Unit is insta...

Page 7: ...sheet of paper or the printing of 4 pages onto a single sheet of paper using Duplex printing If 4 pages are to printed the resulting print will look like that in illustration A and if 8 or more pages...

Page 8: ...installed on the printer the Transparency setting will not be available D Paper Destination field Displays the currently selected destination for paper to be ejected Click on the arrow to display a d...

Page 9: ...verlaid onto text This option is only available when Raster is selected in the Graphics Mode field D Use Printer TrueType Font check box Enables selection of whether to use the fonts installed in the...

Page 10: ...printing documents that contain both text and graphics This option enables the printer to create an image of the entire page in memory BEFORE paper is fed into the printer This ensures that the entire...

Page 11: ...talled in and on the printer Note If you do not select the appropriate installed accessories here the corresponding settings and options in the various tabs of the Properties dialog box will not be av...

Page 12: ...elect a watermark list A dialog box that will allow you to edit that watermark will be displayed Refer to Dialog box for adding or editing watermarks page 11 for more detailed information on editing w...

Page 13: ...st the desired style Bold Italic or Regular K Darkness Drag the scroll bar slider to change the darkness of the text to that desired L Angle Drag the scroll bar slider to change the angle of the text...

Page 14: ...e it cancels the print job Change the time to that desired by typing it directly into this field or by clicking on the arrows Enter 0 here if you do not want the print job to be canceled in this manne...

Page 15: ...ck on Send Fonts As and refer to 1 Send Fonts As dialog box page 14 If the wrong printer font is selected for any TrueType font the printed document will not appear as it does on your computer screen...

Page 16: ...ze to enter here will vary depending upon the complexity of the font For example at 600 dpi it is more effective to send TrueType fonts as outlines when non ornamental fonts are about 14 points or lar...

Page 17: ...the New Soft Font Directory field C Installed Soft Fonts list Lists those fonts in the New Soft Font list that are actually selected for installation D Open button Click to display in the New Soft Fon...

Page 18: ...which PDL you are actually using the explanations settings and in the illustrations shown in this manual may differ slightly from what will actually appear on your computer screen 2 1 Opening the Pro...

Page 19: ...he right of that field is clicked E About button Click to display information for this Printer Driver such as its name and version number F Restore Defaults button Click to reset all settings back to...

Page 20: ...this radio button in order to have the paper turned over by its shorter edge during Duplex printing If the 1 or 2 sided Printing options are not available even though the optional Duplex Unit is inst...

Page 21: ...rent from the previous page the image of that next page and successive pages will be printed out onto the next piece of paper A B A B 2 2 Booklet The Booklet on XX options wherein XX refers to the siz...

Page 22: ...section If the optional multi bypass is not installed on the printer the Transparency setting will not be available D Paper Destination field Displays the currently selected destination for paper to b...

Page 23: ...the font data downloaded to the printer If this box is NOT checked print out will be accomplished basically as it appears on your computer screen If this box IS checked the printer will use its insta...

Page 24: ...the appropriate check box in order to print a negative or a mirror image of the document Print as a negative image Prints a negative image of the document This option is useful for black and white or...

Page 25: ...n and on the printer Note If you do not select the appropriate installed accessories here the corresponding settings and options in the various tabs of the Properties dialog box will not be available...

Page 26: ...Select a watermark list A dialog box that will allow you to edit that watermark will be displayed Refer to Dialog box for adding or editing watermarks page 25 for more detailed information on editing...

Page 27: ...box is NOT available in the PCL5e and PCL6 Printer Drivers L Outline check box Place a check in this check box in order to have the selected watermark printed out as outlined text This check box is N...

Page 28: ...on Click to immediately send the PostScript header to the printer where it will be retained until the printer is turned off Once this button is clicked the Printer Driver will automatically select the...

Page 29: ...onts As dialog box click on Send Fonts As and refer to Send Fonts As dialog box page 28 If the wrong printer font is selected for any TrueType font the printed document will not appear as it does on y...

Page 30: ...ze to enter here will vary depending upon the complexity of the font For example at 600 dpi it is more effective to send TrueType fonts as outlines when non ornamental fonts are about 14 points or lar...

Page 31: ...list Lists those fonts in the New Soft Font list that are actually selected for installation E Open button Click to display in the New Soft Font list the names of the fonts contained in the directory...

Page 32: ...e Send TrueType fonts to printer according to the font Substitution Table radio button is selected in the Fonts tab In the tree below the Font Substitution Table item select the TrueType font to be re...

Page 33: ...order to install the WinPanel Status Monitor 3 1 Using the WinPanel Status Monitor In order to use the Status Monitor perform the following procedure to run the WinPanel Status Monitor program 1 Star...

Page 34: ...ays the contents of the Help file How to use Help Explains how to use the Help file About Displays the name and version number of the WinPanel Status Monitor D Status icon Indicates the status of the...

Page 35: ...ur computer sent data for printing did not match the speed of the print engine and printing was not accomplished properly Memory Overflow The printer memory has become full during reception of data fo...

Page 36: ...rror The selected paper size is not compatible with the optional Finisher Drawer Size Error The size of the paper loaded in the selected drawer is not an acceptable size Hard Disk Error A mechanical p...

Page 37: ...e appropriate settings in the Configure dialog box Those optional accessories NOT installed will not be displayed in the Installable Options list The actual layout of each dialog box may differ somewh...

Page 38: ...JIS and Envelopes Monarch Com 10 DL C5 When Custom is selected the paper size can be set as desired The acceptable paper width is between 98 4 mm 297 mm metric or 3 88 11 69 inches The acceptable pap...

Page 39: ...vertical flip and image inverting can be selected here Place a check in the check box next to the desired visual effects to select that effect B Printer Options check boxes Place a check in the check...

Page 40: ...e in the From field to what page in the To field you want to print C Paper Source radio buttons To have the paper to be printed onto selected automatically from among all of the available drawers sele...

Page 41: ...ement which enables the clearest reproduction of edges and curves when printing text and graphics Choose from among Default Off Light Medium and Dark in this drop down list G Staple When drop down lis...

Page 42: ...m within the Program Manager double click on the Main group to open the corresponding window and then double click on the Control Manager icon in that window 3 Double click on the Printers icon in the...

Page 43: ...the Program Manager double click on 2310 3010 Tools for inch versions or Mita Vi230 310 Tools for metric versions group to open the corresponding window Then double click on the WinPanel icon in that...

Reviews: