background image

d-Color MF360/280/220

4-15

4.3

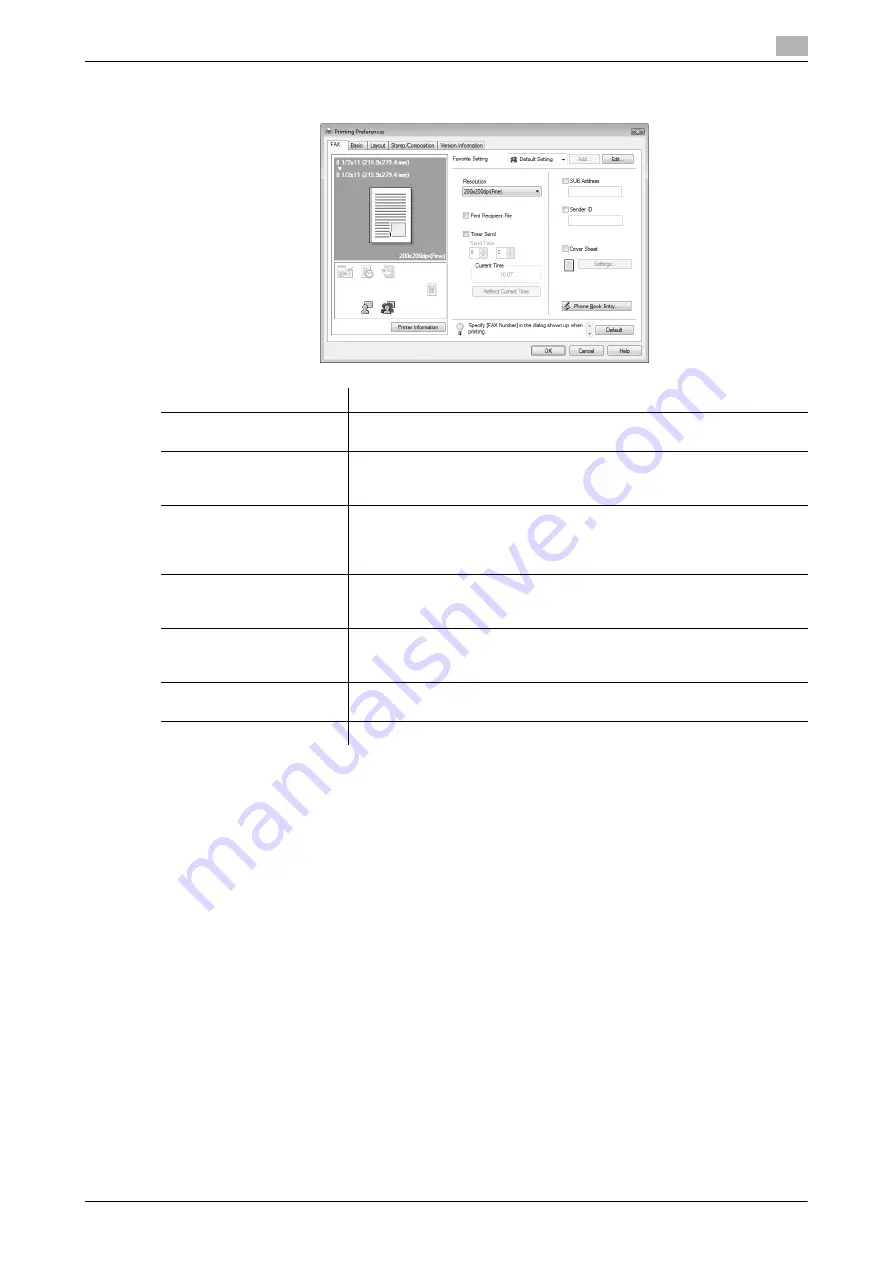
Configuring the [FAX] tab settings

4

4.3

Configuring the [FAX] tab settings

Reference

-

When sending a fax using a timer, make sure that the time set in the computer matches that set in this 
machine. If the sending time is before the current time set in this machine, the fax will be sent on the 
following day.

-

To perform confidential communication with a different model of fax machine using F code, fill in the 
[SUB Address] and [Sender ID] boxes. In the [SUB Address] box, you can enter up to 20 numbers (0 
through 9) 
In the [Sender ID] box, you can enter up to 20 characters including numbers (0 through 9), #, and *. For 
details on the SUB address and sender ID, refer to the [User's Guide Network Scan/Fax/Network Fax 
Operations].

Item Name

Functions

[Resolution]

Select a resolution for the fax. Selecting a higher resolution may take long-
er communication time.

[Print Recipient File]

Select this check box to print the original after sending a fax. This function 
can also be specified as a transmission condition when sending a fax. For 
details, refer to page 4-7.

[Timer Send]

Specify the sending time. Click [Reflect Current Time] to display the cur-
rent time set on the computer in the [Send Time] box. This function can 
also be specified as a transmission condition when sending a fax. For de-
tails, refer to page 4-7.

[SUB Address]

Specify the SUB address when performing confidential transmission using 
F code. This function can also be specified as a transmission condition 
when sending a fax. For details, refer to page 4-7.

[Sender ID]

Specify the sender ID when performing confidential communication using 
F code. This function can also be specified as a transmission condition 
when sending a fax. For details, refer to page 4-7.

[Cover Sheet]

Select this check box to configure the cover sheet for the fax. This item 
can also be configured when sending a fax. For details, refer to page 4-7.

[Phone Book Entry...]

Click this button to edit phone books. For details, refer to page 4-24.

Summary of Contents for d-Color MF280

Page 1: ...FAX DRIVER FUNCTIONS 552907en GB d Color MF220 d Color MF280 d Color MF360...

Page 2: ...uld compromise the conformity attested to above as well as the characteristics of the product incorrect electrical power supply incorrect installation incorrect or improper use or use not in complianc...

Page 3: ...and installation procedure 3 3 3 1 1 Windows Vista Server 2008 3 3 3 1 2 Windows 2000 XP Server 2003 3 4 3 1 3 Windows NT4 0 3 4 3 2 Installation using Add Printer Wizard 3 5 3 2 1 Settings of this m...

Page 4: ...mark 4 20 4 6 2 Editing a watermark 4 20 4 7 Configuring the Configure tab settings 4 22 4 7 1 Selecting the option 4 22 4 7 2 Changing the encryption passphrase 4 23 4 8 Using phone books 4 24 4 8 1...

Page 5: ...1 Introduction...

Page 6: ......

Page 7: ...demarks and licenses please refer also to the Quick Guide Copy Print Fax Scan Box Operations Il lustrations used in this User s Guide may differ from the actual devices 1 1 About this manual 1 1 1 Con...

Page 8: ...e injury or property damage NOTICE This symbol indicates a risk that may result in damage to this machine or originals Follow the instructions to avoid property damage Procedural instruction 0 This ch...

Page 9: ...icates a reference View the reference as required Key symbols Key names on the touch panel or computer screen or a name of user s guide are indicated by these brackets Bold text Key names on the contr...

Page 10: ...About this manual 1 1 6 d Color MF360 280 220 1 1...

Page 11: ...2 Overview...

Page 12: ......

Page 13: ...a computer also uses the printer functions provided by the printer controller 2 1 1 Roles of printer controller Reference To perform fax transmission an optional Fax Kit is required The printer contro...

Page 14: ...t to this machine via the USB interface for USB connection or via Ethernet TCP IP IPX SPX for network connection Then the data is passed from this machine to the printer controller The printer con tro...

Page 15: ...Standard Edition Windows Server 2003 R2 Enterprise Edition Windows XP Professional e64 Edition Windows Server 2003 Standard e64 Edition Windows Server 2003 Enterprise e64 Edition Windows Server 2003...

Page 16: ...ort9100 you use the Add Printer wizard to install the driver For details on other setup procedures refer to the User s Guide Print Op erations 1 Connect this machine to the computer 2 Check that the c...

Page 17: ...3 Installation of Fax Driver...

Page 18: ......

Page 19: ...the network environment you must configure network settings for this machine For details refer to User s Guide Network Administrator Reference For setup procedures using Add Printer Wizard this manua...

Page 20: ...etwork Administrator Reference In Windows NT4 0 to install the printer driver for this machine connected directly to the network using TCP IP protocol you must have the Microsoft TCP IP Printing servi...

Page 21: ...0 d Reference For details on specifying the RAW port number of this machine refer to User s Guide Network Administrator LPD setting of this machine Before using LPR printing enable LPD printing in LPD...

Page 22: ...hen enter a RAW port number initial setting 9100 in the Port Number box 12 Click Next The Install the printer driver page appears 13 Click Have Disk 14 Click Browse 15 Select a desired fax driver fold...

Page 23: ...ew port and then select Standard TCP IP Port as the Port Type 7 Click Next Add Standard TCP IP Printer Port Wizard starts 8 Click Next 9 In the Printer Name or IP Address box enter the IP address for...

Page 24: ...4 Follow the instructions on the pages that follow 5 On the page for specifying how the printer is attached select Local printer 6 Click Next A page for selecting a port appears 7 Click Create a new...

Page 25: ...ng system and language to be used 18 Click OK The Printer list appears 19 Click Next 20 Follow the instructions on the pages that follow If the Digital Signature window appears click Yes 21 After fini...

Page 26: ...then the list of the software supported by this machine appears 5 Select a desired fax driver name and then click Next 6 Follow the instructions on the pages that follow If the User Account Control wi...

Page 27: ...0 1 Connect this machine to the computer using a USB cable and then start the computer NOTICE During startup of the computer do not unplug or plug the cable 2 Insert the printer driver DVD ROM into th...

Page 28: ...e and then click OK 9 In the dialog box for confirming if you are sure to remove the printer click Yes In Windows Vista Server 2008 the dialog box appears to reconfirm if you are sure Click Uninstall...

Page 29: ...4 Fax Driver Setting...

Page 30: ......

Page 31: ...e box select the installed printer with a name like xxxxxxx FAX 4 If necessary click Properties or Preferences and then change the fax driver settings Clicking Properties or Preferences in the Print w...

Page 32: ...of the recipient machine You can specify the fax number registered in the address book of this machine using Add from Ad dress Book For details refer to page 4 6 You can specify the fax number registe...

Page 33: ...ed recipient in the Personal Information list Clicking Find allows you to search for recipients by specifying conditions 3 Select a recipient name from the Personal Information list and then click Add...

Page 34: ...ow follow the Sending operation Steps 1 through 5 For details refer to page 4 3 2 Select Address Book List from the list on the left side of the window to display the desired recipient in the Address...

Page 35: ...box in the FAX Transmission Popup window when sending a fax you can add a cover sheet to the fax You can edit cover sheet contents in the FAX Cover Sheet Settings dialog box which can be displayed by...

Page 36: ...arily You can enter up to 20 characters Pages Specify the number of pages to be sent Comment Enter the text to be displayed in the comment box You can enter up to 640 characters A line break is counte...

Page 37: ...ion about the sender to add to the cover sheet Select check boxes for the items you want to add and then enter the text You can enter up to 80 characters in each item 7 To place images such as a compa...

Page 38: ...80 220 4 1 8 Check the specified contents To confirm the enlarged layout image click Check Clicking Add allows you to save the cover sheet settings with a name You can recall them from the Cover Sheet...

Page 39: ...4 0 To open the Properties page right click the printer icon of the Printers or Printers and Faxes window and select Properties Button Name Functions OK Click this button to enable changed settings a...

Page 40: ...is configured and is grayed out when not Appears when Account Track is used and is grayed out when not Printer Information Click this button to start Web Connection and check the printer informa tion...

Page 41: ...u thentication is enabled on this machine or the account name and pass word when Account Track is enabled on this machine Item Name Functions Combination Select this check box to combine the pages con...

Page 42: ...inters window Verify Authentication set tings before printing Select this check box to verify authentication settings for this machine be fore printing and display the message if they are not satisfie...

Page 43: ...File Select this check box to print the original after sending a fax This function can also be specified as a transmission condition when sending a fax For details refer to page 4 7 Timer Send Specify...

Page 44: ...t Paper Size Select the size of the paper to be sent If it is different from the original size the output image will be automatically enlarged or reduced Zoom Select an enlarge or reduce ratio Authent...

Page 45: ...s for the user name and up to 64 characters for the password If public user access is allowed on this machine the printer can be used by selecting Public User It is necessary to configure server setti...

Page 46: ...rohibited from accessing the printer d Reference If account track is not enabled in the Configure tab Account Track cannot be performed If you are using account track be sure to enable it in the Devic...

Page 47: ...er sizes 1 Click the Layout tab 2 Select the Combination check box and then select a condition from the drop down list To configure settings for Border or Overlap width line click Combination Details...

Page 48: ...Composition tab 2 Select the Watermark check box 3 Select the watermark you want to print from the list 4 6 2 Editing a watermark You can change the format or position of the watermark or register a n...

Page 49: ...Select the vertical and lateral positions You can specify the positions using the scroll bars provided on the right of and under the image Clicking Center returns the position to the center Angle Sele...

Page 50: ...Printers and Other Hardware then Printers and Faxes When Control Panel is displayed in Classic View double click Printers In Windows 2000 NT 4 0 click Start and then select Settings then Printers 2 R...

Page 51: ...ated for the entered text and used for communication with this ma chine d Reference In Encrypt Passphrase enter the passphrase that matches the one that configured in Driver Password En cryption Setti...

Page 52: ...t enter the name with a title in the Name box In each of the Name Company and Department boxes you can enter up to 80 characters In the FAX Number box you can enter the fax number using up to 38 chara...

Page 53: ...ther to save the phone book will be displayed 7 Click Yes The Save As dialog box appears 8 Locate the folder you want to save the file to enter the file name and then click Save The phone book is save...

Page 54: ...hat recipient is deleted from the groups it belongs to Reference If you have added pairs of names and fax numbers using Register To Phone Book when sending faxes they are displayed in the Simple Entry...

Page 55: ...ou want to change and then click Edit To delete a folder select one you want to delete and then click Delete Reference Alternatively you can move a recipient to a folder by right clicking on the name...

Page 56: ...driver settings and up to 20 private driver settings In the Name box you can enter up to 30 characters You can enter a comment using up to 255 characters Only the administrator can select the Sharing...

Page 57: ...ove it to a desired position using Up or Down 3 Click Option select the check boxes for the functions to be recalled and then click OK 4 Click OK Reference You cannot change the settings for the fax d...

Page 58: ...Saving the fax driver settings 4 4 30 d Color MF360 280 220 4 9...

Page 59: ...5 Troubleshooting...

Page 60: ......

Page 61: ...a test page can be sent Print processing on the compu ter finished but transmission does not start The fax driver specified when sending may not be supported by the printer controller Check the speci...

Page 62: ...ctions that can be com bined Cannot send a fax according to the settings you have config ured The settings may not be config ured correctly Check the setting of each item of the fax driver The selecte...

Page 63: ...6 Appendix...

Page 64: ......

Page 65: ...as a gateway to ac cess computers on different LANs DHCP The acronym for Dynamic Host Configuration Protocol The protocol is used for a client computer on the TCP IP network to load network configura...

Page 66: ...floor in the same building or in neighboring buildings Local printer A printer connected to a parallel or USB port of a computer LPD The acronym for Line Printer Daemon This is a platform independ ent...

Page 67: ...iver automatically so that the device becomes operable Preview A function allowing you to view a result image before being actually processed for printing or scanning Print job A print request transmi...

Page 68: ...This is used to identify how many higher order bits of an IP address are used for the network address TCP IP The acronym for Transmission Control Protocol Internet Protocol It is a de facto standard...

Page 69: ...7 Index...

Page 70: ......

Page 71: ...IP address 3 5 L Layout tab 4 13 4 19 Local connection 2 6 LPD setting 3 5 LPR 3 5 N N in 1 4 19 Network connection 2 6 3 3 O Operating environment 2 5 Operating system 2 5 Option 4 22 OS 2 5 Overlap...

Page 72: ...ice Information 4 22 Add from Address Book 4 6 Add from Phone Book 4 5 Add Recipients 4 3 4 5 4 6 Authentication Account Track 4 16 C Combination Details 4 19 G Get Addr Info 4 6 P Phone Book Entry 4...

Page 73: ...you need and the instructions for handling the waste correctly for example location and times of the waste collection centres etc b When you purchase a new device of ours give a used device similar t...

Page 74: ......

Reviews: