background image

6

1

2

3

4

Italiano

English

NORME DI SICUREZZA

SAFETY PRECAUTIONS

  ATTENZIONE - Il tagliasiepi, se ben usato, è uno strumento 

di lavoro rapido, comodo ed efficace; se usato in modo non 

corretto o senza le dovute precauzioni potrebbe diventare 

un attrezzo pericoloso. LA MACCHINA PUÒ CAUSARE GRAVI 

LESIONI. Perchè il vostro lavoro sia sempre piacevole e 

sicuro, rispettare scrupolosamente le norme di sicurezza 

riportate qui di seguito e nel corso del manuale.

  ATTENZIONE! – Regolamenti nazionali possono limitare 

l’uso della macchina.

  1 -   Non utilizzare la macchina prima di essere istruiti in modo 

specifico sull’uso. L’operatore alla prima esperienza deve 

esercitarsi prima dell’utilizzo sul campo.

  2 -   Il tagliasiepi deve essere usato solo da persone adulte, in 

buone condizioni fisiche e a conoscenza delle norme d’uso. 

Non permettere ai ragazzi di usare il tagliasiepi.

  3 -   Non usare il tagliasiepi in condizioni di affaticamento fisico o 

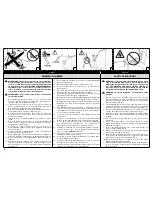
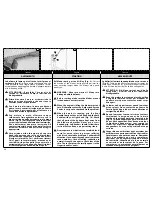
sotto l’effetto di alcool, droghe o farmaci (Fig. 1).

  4 -   Non  indossare sciarpe, bracciali o altro che possa essere preso 

nella macchina o nelle lame. Usare abiti aderenti con 

protezione antitaglio.

  5 -   Indossare scarpe protettive antisdrucciolo, guanti, occhiali e 

cuffia.

  6 -   Non permettere ad altre persone, in particolare bambini, di 

restare entro il raggio d’azione del tagliasiepi durante 

l’avviamento o il taglio (Fig. 2).

  7 -   Non iniziare il taglio finchè l’area di lavoro non sia 

completamente pulita e sgombra. Non tagliare in vicinanza di 

cavi elettrici (Fig. 2).

  8 -   Tagliare sempre in posizione stabile e sicura, specialmente in 

presenza di scale e sgabelli (Fig. 3).

  9 -   Usare il tagliasiepi solo in luoghi ben ventilati, non utilizzare in 

atmosfera esplosiva, infiammabile o in ambienti chiusi (Fig.  4).

10 -   Non toccare le lame o fare manutenzione quando il motore è 

in moto.

11 -  Mantenere tutte le etichette con i segnali di pericolo e di 

sicurezza in perfette condizioni. In caso di danneggiamenti o 

deterioramenti occorre sostituirle tempestivamente 

(Vedi pag. 5).

12 -  Non utilizzare la macchina per usi diversi da quelli indicati dal 

manuale (vedi pag. 14).

13 -  Non abbandonare la macchina con il motore acceso.

14 -  Seguire sempre le nostre istruzioni per le operazioni di 

manutenzione.

15 -  É proibito applicare alla presa di forza della macchina alcun 

dispositivo che non sia quello fornito dal costruttore.

16 -   Controllare giornalmente il tagliasiepi per assicurarsi che ogni 

dispositivo, di sicurezza e non, sia funzionante.

17 -   Non lavorare con un tagliasiepi danneggiato, mal riparato, mal 

montato o modificato arbitrariamente. Non togliere o 

danneggiare o rendere inefficace alcun dispositivo di sicurezza. 

Utilizzare solo lame della lunghezza indicata in tabella 

(vedi pag. 30).

18 -   Non effettuare mai da soli operazioni o riparazioni che non 

siano di normale manutenzione. Rivolgersi soltanto ad officine 

specializzate ed autorizzate. Seguire sempre le nostre istruzioni 

per le operazioni di manutenzione.

19 -   In caso di emergenza rilasciare immediatamente la leva 

acceleratore. 

20 -  Ricordare che il proprietario o l’operatore è responsabile degli 

incidenti o dei rischi subiti da terzi o da beni di loro proprietà.

21 -   In  caso di necessità della messa fuori servizio del tagliasiepi, 

non abbandonarlo nell’ambiente, ma consegnarlo al 

Rivenditore che provvederà alla corretta collocazione.

22 -  Affidare la combinazione delle apparecchiature soltanto a 

persone che conoscono e sanno maneggiare questo modello e 

dare loro sempre ambedue i Manuali.

23 -  Rivolgetevi sempre al vostro rivenditore per qualsiasi altro 

chiarimento o intervento prioritario.

24 -  Conservare con cura il seguente Manuale e consultarlo prima 

di ogni utilizzo della macchina.

25 -  Sostituire sempre immediatamente le lame se vengono 

danneggiate, sono rotte o sono state rimosse.

26 -  Tutte le presenti norme di sicurezza valgono sia per l’accessorio 

utilizzato come tagliasiepi, che come tagliaerba.

  WARNING - If correctly used, the hedgetrimmer is a quick, 

easy to handle and efficient tool; if used improperly or 

without the due precautions it could become a dangerous 

tool. THE MACHINE CAN CAUSE SERIOUS INJURY. For 

pleasant and safe work,always strictly comply with the 

safety rules that follow and throughout this manual.

  WARNING: – National regulations could limit use of the 

machine.

  1 -  Do not operate the machine unless you have received 

specific instruction on its use. First time users must familiarise 

themselves thoroughly with the operation of the machine 

before working in the field.

  2 -  The hedgetrimmer must only be used by adults in good 

physical condition with knowledge of the operating 

instructions. Do not allow children to use the hedgetrimmer.

  3 -   Do not use the hedgetrimmer when you are tired or fatigued 

or if you have taken alcohol, drugs or medication (Fig. 1). 

  4 -   Never wear scarves, bracelets or anything else which could be 

taken up by the machine or blades. Wear close-fitting safety 

clothing.

  5 -   Wear protective non-slip safety shoes, gloves, glasses and ear 

protection.

  6 -   Never allow bystanders, especially children, to remain 

within your working area when starting or cutting with the 

hedgetrimmer (Fig. 2).

  7 -   Do not start cutting until you have a clear work area. Do not 

cut near electric cables (Fig. 2).

  8 -  Always cut from a firm-footed and safe position, particularly 

when using steps and stools (Fig. 3).

  9 -   Only use the hedgetrimmer in well-ventilated places, do 

not operate the hedgetrimmer in explosive or flammable 

atmospheres or in closed environments (Fig.  4).

  10 -  Never touch the blades or attempt to service the hedge 

trimmer while the engine is running.

  11 - All labels with health hazards must be kept in good conditions. 

In  case of damage or deterioration, immediately substitute 

them (see pag.5).

Summary of Contents for EH 24

Page 1: ...24 EH 48 I D F GB E SK OWNER S MANUAL MANUALE USO E MANUTENZIONE BETRIEBS UND WARTUNGSANLEITUNG MANUEL D UTILISATION ET D ENTRETIEN MANUAL DE USO Y MANTENIMIENTO N VOD NA POU ITIE A DR BU Pubbl 58050...

Page 2: ...ymantenimientodeelcortasetos P D Las descripcionescontenidasenelpresentemanualnoseconsideranrigurosamenteobligatorias La empresa se reserva el derecho de aportar eventuales modificaciones sin obligars...

Page 3: ..._____________ 30 DECLARATION OF CONFORMITY____ 32 MAINTENANCE CHART____________ 34 TROUBLE SHOOTING CHART_______ 36 WARRANTY CERTIFICATE__________ 38 INTRODUCCION_________________ 2 COMPONENTES DEL CO...

Page 4: ...ur 10 Graisseur r ducteur lames 11 Fourreau prot ge lames D BAUTEILE DES HECKENSCHNEIDERS RASENTRIMMERS 1 Messer 2 Messerschutz EH 24 3 Schutzabdeckung Untersetzungsgetriebe Messer EH 24 4 Untersetzun...

Page 5: ...number F 1 Lire le manuel avant d utiliser cette machine 2 Porter casque visi re et prot ge oreilles 3 Type de machine TAILLE HAIES 4 Ce symbole indique Attention Danger et Prudence 5 Porter gants de...

Page 6: ...che non siano di normale manutenzione Rivolgersi soltanto ad officine specializzate ed autorizzate Seguire sempre le nostre istruzioni per le operazioni di manutenzione 19 In caso di emergenza rilasc...

Page 7: ...dicaments Fig 1 4 Ne portez pas d charpe de bracelets ou d autres objets qui pourraient se prendre dans la machine ou dans le lames Utilisez des v tements adh rents pourvus de protection anti coupure...

Page 8: ...nas condiciones f sicas y con conocimiento de las normas de uso No permita que los ni os usen el cortasetos 3 No usar el cortasetos en condiciones de fatiga f sica o se encuentre bajo ed efecto de alc...

Page 9: ...roja vysk a 2 No nice na iv ploty m u pou va iba dospel osoby v dobrom fyzickom stave ktor s obozn men s jeho obsluhou 3 Nepou vajte no nice na iv ploty ke ste unaven alebo pod vplyvom alkoholu omamn...

Page 10: ...handle brushcutters Assembly sequence for EH 24 and EH 48 models 1 Loosen the clamp screws A Fig 1 of the brushcutter angle drive and remove the head from the shaft arm together with the guard If the...

Page 11: ...JADAS Se aconseja utilizar como cortac sped el accesorio cortasetos EH 24 Se aconseja utilizar el accesorio cortasetos EH 48 como cortasetos y con desbrozadoras provistas de empu adura Loop Montaje de...

Page 12: ...a check and fix the problem When the motor is running grip the front handle firmly with your left hand and the back handle with your right hand Fig 10 Check that all parts of the body are kept away f...

Page 13: ...uchillas no debe girar De lo contrario en contacto con un Centro de Servicio Autorizado para llevar a cabo un control y solucionar el problema Con el motor en movimiento sujetar siempre fuertemente la...

Page 14: ...not work near electrical cables Work only in conditions offering sufficient visibility and light to see clearly Stop the engine before setting the machine down Be particularly cautious and alert when...

Page 15: ...elo No deje el cortasetos con el motor en marcha sin vigilancia Mantenga la empu adura seca limpia y sin restos de aceite o combustible No trabajar cerca de cables el ctricos Trabajar s lo cuando la v...

Page 16: ...ures or in freezing weather WARNING Faulty blades can increase the risk of accidents Check the cutting attachment Never use blades that are dull cracked or damaged Check that the machine is in perfect...

Page 17: ...s da adas o excesivamente usadas En caso que la cuchilla se quede atascada pare el motor antes de quitar lo que la obstruye ATENCI N No utilice el cortasetos en caso de viento fuerte o precipitaciones...

Page 18: ...allowing the engine to idle If you run the hedge trimmer at full throttle without a cutting load unnecessary wear or damage can occur to the blade and engine If the cutter blades become jammed by thic...

Page 19: ...antes de protecci n individual cuando repare el grupo de corte fig 25 para evitar el riesgo de corte Suelte la palanca del acelerador nada m s terminar el corte y mantenga el motor al m nimo Si mantie...

Page 20: ...position alongside the shaft arm Fig 35 WARNING Under no circumstances must the engine be started when the attachment is in the folded transport position Adjustment procedure 1 Switch off the engine 2...

Page 21: ...o excursi n completa de 180 Fig 34 El accesorio puede plegarse sobre el tubo de transmisi n Fig 35 para facilitar el transporte bloque ndolo en la posici n adecuada ATENCI N No ponga el motor en march...

Page 22: ...required height and cut as appropriate sweeping left and right in a wide arc WARNING Clippings can be composted do not throw them into household refuse bins Fig 44 WARNING Always follow the safety pre...

Page 23: ...os de las hojas Fig 41 Corte horizontal Para conseguir los mejores resultados en el corte incline ligeramente 5 10 la cuchilla en la direcci n de corte Fig 42 Corte elevado utilice el cortasetos Fig 4...

Page 24: ...necessary add5 10ggreasewithmolybdenum bisulphide Efco part n 4174238B and Oleo Mac part n 001000677B Muffler keep it clean and free of debris TRANSPORTATION Fig 51 When you walk with your hedge trimm...

Page 25: ...l nivel de la grasa cada 50 horas de trabajo Fig 50 Si fuera necesario a adir 5 10 g grasa al bisulfuro de molibdeno Efco cod 4174238B y Oleo Mac cod 001000677B Silenciador mantenerlo limpio y libre d...

Page 26: ...as possible Before refi tting the sharpened blades remove filings and then apply grease Do not try to sharpen a damaged blade change it or take it to a Service dealert EXTRA MAINTANANCE ADVISABLE It i...

Page 27: ...la vuelta Quite las rebabas de la hoja con una piedra de amolar Elimine la menor cantidad de material posible Antes de volver a montar las hojas reci n afi ladas l mpielas de limaduras y engr selas No...

Page 28: ...eat sources The procedures for returning the machine to service following winter storage are the same as for starting up during everyday use DEMOLITION AND DISPOSAL Many of the materials used to const...

Page 29: ...cto dir cto con el suelo Para volver a utilizar la m quina despu s de la pausa invernal es suficiente realizar las mismas operaciones que para la puesta en marcha habitual DESGUACE Y DESECHO DEL EQUIP...

Page 30: ...SO LAMA BLADE PITCH ENTRE DENT LAME MESSEREINSTELLUNG PASO CUCHILLA ROZCHOD ZUBOV EPELE mm 35 ANGOLO ROTAZIONE LAME ANGLE OF ROTATION OF BLADES ANGLE DE ROTATION DES LAMES MESSER DREHWINKEL NGULO DE R...

Page 31: ...herheit Incertidumbre Neistota dB A 1 0 Livello potenza acustica garantita Guaranteed sound power level Niveau puissance acoustique assur Garantierter akustischer Schalleistungspegel Nivel potencia ac...

Page 32: ...ione di serie 3 serial identification 3 identification de s rie 3 Serien Identifizierung 3 identificaci n de serie 3 Identifik cia s rie conforme alle prescrizioni della direttiva complies with the re...

Page 33: ...ivel de potencia ac stica medido Nameran rove zvukov ho v konu Livello di potenza acustica garantita Guaranteed sound power level Niveau de puissance acoustique garanti Garantierter akustischer Schall...

Page 34: ...au d usure X X Aff ter X Graisseur V rifier fuites craquelures et niveau d usure X X Toute la visserie accessible V rifier et resserrer X WARTUNGSTABELLE Die folgendenWartungsintervalls gelten ausschl...

Page 35: ...nar fugas fisuras desgaste X X Todos los tornillos y tuercas accesibles Inspeccionar y apretar X TABU KA DR BY Pros m nezabudnite e nasleduj ce intervaly dr by sa vz ahuj iba na norm lne pracovn podmi...

Page 36: ...s de la lame Attention ne jamais toucher la lame lorsque le moteur tourne ST RUNGSBEHEBUNG ACHTUNG Vor Durchf hrung aller in der untenstehenden Tabelle empfohlenen Pr fungen das Ger t immer abstellen...

Page 37: ...orizado 3 Llamar a un Centro de Asistencia Autorizado 4 Aflojar los tornillos de la cuchilla Atenci n no tocar nunca la cuchilla con el motor en funcionamiento RIE ENIE PROBL MOV POZOR jednotku v dy z...

Page 38: ...unsuitable lubricants and fuels have been used non original spare parts and accessories have been fitted work has been done on the machine by unauthorised personnel 5 The warranty does not cover cons...

Page 39: ...sea v lido se han de completar todas sus partes y ha de estar debidamente timbrado por el vendedor 4 La garant a pierde su validez en los siguientes casos Falta evidente de mantenimiento Uso incorrec...

Page 40: ...ww linkedin com company emak s p a I ATTENZIONE Questo manuale deve accompagnare la macchina durante tutta la sua vita GB WARNING This owner s manual must stay with the machine for all its life F ATTE...

Reviews: