background image

D-19

Appendix D: Interface Data

Protocol: Ready/Busy
Ready/Busy-Line (printer): SD

HP 24541B

Printer

Menu Settings

SD.A   9

SD.B  10

CB (CTS)   5

RD.B  18

GND 19

SSD+  3

SSD-  21

SD+    4

SD-   22

RD+   6

RD-   24

RS+     7

RS-    25

CS+     9

CS-    27

DM+ 11

DM-  29

TR+   12

TR-    30

+

+

+

CC (DSR)  6

DTR

Ready/Busy

Serial I/F Option Protocol

Busy Line

DSR Signal

Invalid

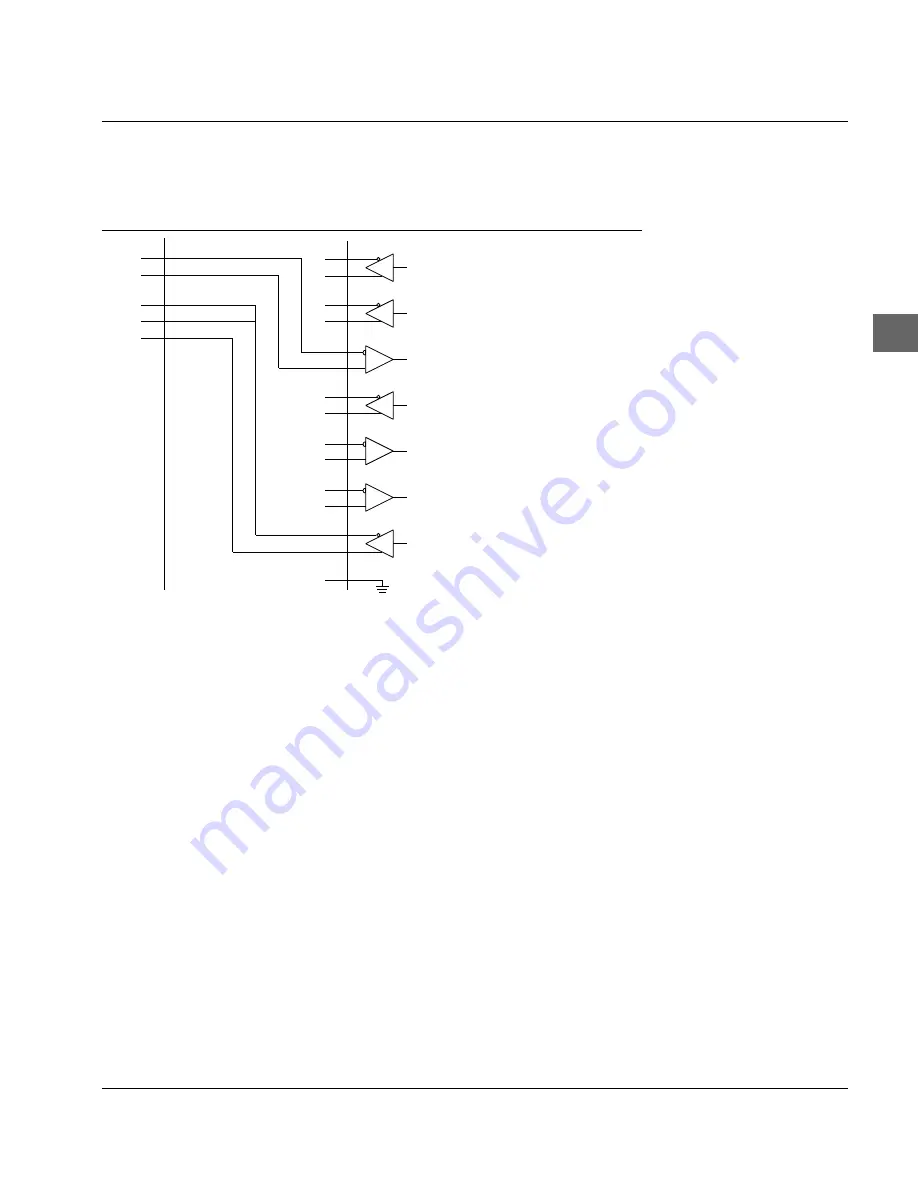
In this circuit (connection of a HP 24541B interface board with RS-
422A-Interface of the printer) the ports SD.A, Pin 9 and SD.B, Pin 10 are
connected to the ports RD+, Pin 6 and RD-, Pin 24 of the printer inter-
face. These are the two lines for the transmission of the print data.

The two lines for the Ready/Busy-Signal are created by connecting
ports CB (CTS), Pin 5 and RD.B, Pin 18 to the ports TR+, Pin 12 and
TR-, Pin 30 of the printer interface. Additionally a connection to CC
(DSR), Pin 6, is established on the host side from CB (CTS), Pin 5.

Looking at the two Ready/Busy-lines please note the following: al-
though the port RD.B, Pin 18 on the host side is specific for the RS-
422A interface, the second line is connected to the ports CB (CTS),
Pin 5 and CC (DSR), Pin 6 of the RS-232C interface. This ensures the
correct transmission of data with many applications, but it cannot
be guaranteed for all applications.

When printer and software status signals X-ON and X-OFF are
evaluated by an application while this circuit example is used, the
correct data transmission with this type of interface board on the
host side is not possible.

Diagram 6

Summary of Contents for ML3390

Page 1: ...User Manual MICROLINE 3390 3391 IBM EPSON compatible People to People Technology...

Page 2: ...r Stand narrow version only Serial Interfaces Cards RS 232C RS 232C Current Loop RS 422A Cut Sheet Feeder CSF 1 Bin 2 Bin narrow wide version Bottom Tractor narrow wide version Tractor feet Pull Tract...

Page 3: ...II...

Page 4: ...ss negligence We make no guarantee that alterations to the soft ware programs and devices of other manufacturers referred to in this manual will not affect the usability of the information con tained...

Page 5: ...ve no or very little technical knowledge Experienced users suppliers and technicians will find additional technical information in the Programming part and in the appendices There are three ways of ac...

Page 6: ...ning 6 Chapter 7 Accessories 7 Chapter 8 Troubleshooting 8 Chapter 9 Packing the printer for transportation 9 Chapter 10 IBM Standard functions 10 Chapter 11 IBM Graphics 11 Chapter 12 IBM Control cod...

Page 7: ...VI...

Page 8: ...al Data A Appendix B Code pages B Appendix C Bar codes C Appendix D Interface data D Appendix E Paper formats and printing areas E Appendix F Index Glossary F Appendix G Trademarks G Appendix H Short...

Page 9: ...r supply 1 3 Setting up the printer 1 3 Removing the transport packing 1 4 Inserting the ribbon cassette 1 5 The paper support 1 5 Fitting the paper support 1 6 Raising the paper support 1 7 Removing...

Page 10: ...ing between continuous paper and cut sheets 3 11 From continuous paper to cut sheets 3 11 From cut sheets to continuous paper 3 13 Setting Top of Form 3 13 Changing Top of Form 3 14 Indicating or chan...

Page 11: ...feed rail 7 5 Installing the cut sheet feeder 7 7 Paper feed 7 8 Automatic paper feed 7 9 Manual paper feed 7 10 Feeding of cut sheets and continuous paper 7 10 Print area 7 10 Selecting the paper tr...

Page 12: ...Functions 10 1 Print quality 10 3 Print modes 10 6 Print attributes 10 7 Multifunction commands 10 10 Tabulators 10 12 Positioning 10 16 Page formatting 10 18 Line spacing 10 18 Paper feed 10 20 Contr...

Page 13: ...14 22 Other commands 14 27 Additional ESC P2 commands 14 27 Step size and character spacing 14 31 Vertical print position 14 33 Print area 14 35 Select font 14 41 Character sets and code pages Chapte...

Page 14: ...pin Bar code C 17 Examples C 18 Zip Code C 20 Setting the print position Appendix D Interface Data D 1 Parallel Interfacing Centronics D 2 Pin Description D 3 Signal levels D 4 Timing D 4 Interface t...

Page 15: ...rface test Appendix E Paper formats and print areas E 1 Continuous paper E 1 Format E 2 Weight E 2 Thickness E 2 Perforation E 4 Further information E 4 Cut sheet paper E 4 Format E 5 Weight E 5 Label...

Page 16: ...light the printer does not come into direct contact with liquids no objects are pushed into the ventilation slots of the printer as you run the risk of an electrical shock or could cause a fire you on...

Page 17: ...rinter or the case that the power cable is removed from the power supply Use only a clean cloth for cleaning Do not use liquids or aerosol cleaners you have removed the plug from the mains outlet to e...

Page 18: ...ates a possible cause of damage Follow all instructions to prevent damage CAUTION risk of injury this symbol indicates a possible source of danger Follow all instructions to prevent injury CAUTION ele...

Page 19: ...of the control panel Brackets highlight a printer function Consumables accessories To ensure that the printer operates perfectly and provides the proper print quality we recommend you use only origin...

Page 20: ...nstall them Do not fit or use the serial and parallel interface cables at the same time Only use a clean cloth to clean the control panel and case The oiling and greasing of moving parts by the user i...

Page 21: ...g so that you can transport the printer safely should the need arise later on Check that the individual items supplied are complete and un damaged Supplied with the printer are Narrow printer model Pr...

Page 22: ...can result in an elec tric shock or other harm Make sure you always remove the plug from the power socket before opening the case Do not alter the printer in any way not described in the manual as th...

Page 23: ...the mains plug from the socket to ensure complete isolation from the power supply The socket provided for this must be located close to the printer and easily accessible Setting up the printer Removi...

Page 24: ...e fabric of the ribbon Warning The use of non original ribbons can result in damage to the print head Use only the manufacturer s original ribbons A transparent ribbon guard is fitted to the front of...

Page 25: ...ob of the cassette in the direc tion of the arrow to tension the ribbon 6 Close the cover of the print er The paper support The paper support with its guide rails enables the paper to be fed precisely...

Page 26: ...and slide it at this angle to its end position 3 Align the guide rails so that they just touch the edges of the paper A mark is provided on the left side of the paper sup port against which you align...

Page 27: ...ngage it from its catching arrangement The paper support must be re fitted after removing the acces sory The paper separator The paper separator prevents paper being drawn back into the printer once i...

Page 28: ...l the print head has cooled down Remove the paper separator by holding it on both sides and pulling it gently to wards the front of the print er Finally fully remove the separator 1 When you wish to r...

Page 29: ...dditional facility This is described in Chapter 7 data on interfacing can be found in Appendix D Some printer models have an interference filter supplied with them This square cable sleeve suppresses...

Page 30: ...two clips 2 Connect the other end of the interface cable to the corresponding socket of your computer Refer to the relevant instructions in your computer manu al Connecting the printer to the power su...

Page 31: ...s Your printer is now ready for operation Emulation printer drivers In the chapter Printer drivers you will find information on how you can best match the emulation language of your printer to the dri...

Page 32: ...panel indicators inform you of the operating status of the printer You can also use it to enter settings and test the printer The platen knob enables you to advance the paper when the print er is SWIT...

Page 33: ...nt head is the part of the printer that contains the printing pins The original ribbon cassette contains the high quality ink necessary for perfect printing The platen advances the paper during the pr...

Page 34: ...The parallel Centronics interface or a serial interface ac cessory are provided for this purpose The socket panel must be broken out in order to fit a serial inter face Power is supplied to the print...

Page 35: ...er jam end of paper SEL The printer is ready ON LINE to receive data from the com puter If this lamp is not lit the printer is in OFF LINE mode and not ready to receive data If the lamp is blinking th...

Page 36: ...to be able to use the Micro Feed Up function SHIFT To be able to use the bottom button functions such as MENU and TOF simultaneously press the SHIFT button and the corresponding button SEL Switches t...

Page 37: ...e to the form tear off position so that continuous paper al ready printed can be torn off How to change the tear off position is described further on PARK You can use this button when continuous paper...

Page 38: ...options and how to use the menu are described in detail in Chapter 4 Print functions Basic print functions can be adjusted by means of the function but tons described below To do this press the appro...

Page 39: ...wiss Bold BOLD is lit Gothic GOTHIC is lit UTILITY In data processing quality printing is faster but the resolution is not as good as letter quality In data processing quality there is no choice of fo...

Page 40: ...ur of the printer 2 9 RESET To reset the printer to the settings selected in the menu switch the printer OFF LINE and simultaneously press the buttons SHIFT and RESET The printer switches to ready to...

Page 41: ...lti part paper paper stickers on backing paper etc Recycled paper can also be used provided it matches the general paper specification There may be a slight loss of quality due to the generally roughe...

Page 42: ...the BOT bottom po sition Cut sheet feeding for feeding cut sheets via ei ther the paper support or the cut sheet feeder the lever must be in the TOP position Continuous paper feeding if continuous pa...

Page 43: ...etween print head and platen must be increased Caution The print head moves and can cause injury to the hands Switch the printer OFF LINE and wait until the print head stops moving Caution The print h...

Page 44: ...cing plate Locking plate 3 Release the locking plate of the print head by moving the plate upwards and side ways 4 Remove the locking plate and place it to one side 5 Remove the print head from its sl...

Page 45: ...front of the print head holder making sure that the plate fits even ly 8 Replace the print head in the slot of the print head car riage 9 Place the locking plate onto the print head holder mak ing sur...

Page 46: ...cassette 12 Close the cover of the printer and switch on the printer By repositioning the distance plate the gap between the print head and the platen is increased You are now able to print onto mater...

Page 47: ...the paper lever on the right of the printer to the TOP position cut sheet 2 Switch the printer on 3 Raise the paper support by lifting it at the back and slid ing it into its locking posi tion Warnin...

Page 48: ...y fed into the printer after the time set in the menu Note The left edge of the paper must be no more than 1 2 cm from the end of the platen 5 Redefine the top of form if necessary by means of the Top...

Page 49: ...tch Remove it from the printer and place it to one side Warning Direct pressure on the platen can cause damage to the print head and pins Make sure the paper guide is correctly adjusted 3 Release the...

Page 50: ...the right sprocket drive place the continuous paper onto the first sprocket pins and close the cover 7 Replace the paper support and switch the printer on The print head will move to the left end of t...

Page 51: ...om In order to be able to use this function you first have to fit the bottom tractor feed to allow the printer to be placed on the built in supports Installation of the bottom tractor feed and paper h...

Page 52: ...ovided 6 The paper is automatically fed in after the time set in the menu If necessary reset the top of form Should you wish to go back to continuous paper when you have finished printing proceed as f...

Page 53: ...he Form Tear Off function you first have to switch this off in the printer menu Should you wish to change the start of printing in the vertical direc tion top of form proceed as follows 1 Transport th...

Page 54: ...iage Should you wish to find out where the next printing position will be simultaneously press the SHIFT and PRINT QUALITY buttons The print head carriage will then move automatically to the new print...

Page 55: ...Activate this function after setting the top of form position by means of the menu item Form Tear Off for the paper path Rear Feed rear of printer or Bottom Feed bottom tractor feed by changing it fro...

Page 56: ...s setting Should you wish to change the setting of the tear off position switch the printer OFF LINE with the Form Tear Off function acti vated Make sure the paper is at the tear off position Change t...

Page 57: ...ollows at the top level the func tions are divided into so called menu groups GROUP Within each group are to be found several menu items ITEM To each menu item in turn can be assigned a menu value SET...

Page 58: ...P in order to make changes to the values there After changing all the items you require you can end menu mode by pressing the EXIT button when holding down the SHIFT button and the changes become effe...

Page 59: ...Below are summarised the functions for buttons in menu mode Button Function SHIFT MENU Pressing both buttons in ON LINE status activates menu mode GROUP Calls the next group SHIFT GROUP Calls the pre...

Page 60: ...I Latin American French Canadian Dutch Swedish II Swedish III Swedish IV Turkish Swiss I Swiss II Publisher Slashed Letter O No Yes Zero Character Unlashed Slashed Code Page USA Canada French Multilin...

Page 61: ...age Length 11 2 3 12 14 16 57 3 3 5 4 5 5 6 7 8 8 5 11 13 6 8 Wait Time Page Length Control 1 sec 2 sec 500 ms by MENU Setting by Actual Page Length 12 14 17 3 3 5 4 5 5 6 7 8 8 5 11 11 2 3 Bottom Fee...

Page 62: ...Yes No Auto LF No Yes Auto CR No Yes CSF Bin Select Bin 1 Bin 2 SI Select Pitch 10 CPI 17 1 CPI 15 CPI SI Select Pitch 12 CPI 12 CPI 20 CPI Time Out Print Valid Invalid Auto Select No Yes Centering Po...

Page 63: ...SD DTR RTS Baud Rate 9600 BPS 4800 BPS 2400 BPS 1200 BPS 600 BPS 300 BPS 19200 BPS DSR Signal Valid Invalid DTR Signal Ready on Power Up Ready on Select Busy Time 200 ms 1 sec Auto Feed XT appears onl...

Page 64: ...16 57 3 3 5 4 5 5 6 7 8 8 5 11 13 6 8 CSF Bin 2 Line Spacing 6 LPI 8 LPI Bottom Margin Valid Invalid Page Length 11 2 3 12 14 16 57 3 3 5 4 5 5 6 7 8 8 5 11 The menu items of group CSF Bin 1 listed be...

Page 65: ...aracters Size You can switch between single font size and combination of expanded horizontal and vertical font Character Set You can select here between IBM character sets Set I and Set II In Epson em...

Page 66: ...t the page width for the paper you are using The standard setting is 13 6 inch Page Length Select here the page length for the paper you are using to ensure the initial printing position is the same f...

Page 67: ...error message when the buffer is set to a large size e g unit error through time out you need to set a smaller buffer The result is that the time intervals during which the printer is not ready to re...

Page 68: ...er selecting Yes the printer automatically adds a line feed each time it receives a carriage return command Check wheth er your computer also adds a line feed If your print outs always have double lin...

Page 69: ...the table below to choose the recommended menu settings for the width of the paper format to be printed Depending on the type of paper it may be that the MODE1 and MODE2 settings can be used with pape...

Page 70: ...case of serial data transmission the data bits of a byte are sent one after the other via a line to the printer For correct transmission it may be necessary to change the interface settings so that t...

Page 71: ...on please refer to Appendix D Busy Line Defines the line to be used for the busy signal Baud Rate Defines the speed of data transmission DSR Signal Activates or deactivates the DSR signal data set rea...

Page 72: ...tput ting the data so called drivers A driver receives generally required outputting instructions from its own program and translates these into the special commands and functions of the printer for w...

Page 73: ...igh Print 4008 N60 Epson LQ 870 1170 IBM ProPrinter X24 4207 Epson LQ 850 1150 IBM ProPrinter XL24 4208 Epson LQ 1500 Epson LQ Some software packages permit modification of the printer driver Such a m...

Page 74: ...racters follow which in conjunction with the Escape character activate or deactivate print functions At positions 32 to 255 are normally to be found printable characters It is often possible to obtain...

Page 75: ...so that binary and graphics files can also be copied without any limitations Example COPY B C AUTOEXEC BAT LPT1 COPY B C TEXTS LETTER TXT LPT1 Similarly one can also copy characters directly from the...

Page 76: ...Com or MS Windows Terminal Remote data transfer programs of this kind are good for testing in terfaces because it is easy to change or adjust the parameters Note also the following points The settings...

Page 77: ...h the following checklist 1 Check whether there is a technical fault on the serial interface RS 232C To do this perform the test described in Appendix D 2 Check the settings of the items in the printe...

Page 78: ...ed as follows Caution The print head moves and can cause injury to the hands Switch the printer OFF LINE and wait until the print head stops moving 1 Switch the printer OFF LINE by pressing the SEL bu...

Page 79: ...e specially de veloped for your printer Among other things this concerns the ink which contains lubricants and the fabric of the ribbon Warning Non original ribbons can damage the print head Use only...

Page 80: ...ing To ensure constant problem free printing clean the printer every six months or after 300 hours of operation Caution The print head moves and can cause injury to the hands Switch the printer OFF LI...

Page 81: ...emove paper dust only with a soft brush such as a paint brush Do not grease or oil any parts within the printer this can cause damage Do not use any solvents or aggressive cleaning agents on the case...

Page 82: ...pply Make sure you also read the safety information at the beginning of this manual Cut sheet feeder A cut sheet feeder feeds single sheets of paper to the printer thus saving the operator having to f...

Page 83: ...paper stands Remove the packing material Keep the original packing material safe so that you can transport the sheet feeder safely at a later date if necessary The metal paper feed rail enables you to...

Page 84: ...rail will now fit the wide printer If on the other hand you are using the narrow print er the rail must not be extend ed Install the feed rail as follows Caution The print head moves and can cause in...

Page 85: ...port see also Chapter 1 3 Remove the ribbed paper separator by first pulling it forwards and then removing it from its catch arrangement see also Chapter 1 4 Fit the feed rail with its mounting bracke...

Page 86: ...it is firmly seated 2 Turn the platen knob so that the gearwheel on the left end of the sheet feeder engages with the gearwheel of the platen 3 Close the printer cover 4 Connect the cable of the cut...

Page 87: ...se may be onto the rail of the paper guide 6 Now insert the front paper stand 7 To ensure that the machine feeds and handles the paper perfectly the paper lever at the right end of the printer must po...

Page 88: ...et the paper set lever at the right end of the cut sheet feeder upwards to the RE SET position The paper tray will open towards the back Warning Direct pressure on the platen can cause damage to the p...

Page 89: ...ition If it is left released the friction rollers cannot grip the paper and if print ing is performed without pa per the print head and plat en can be damaged 1 Make sure the setting of the menu item...

Page 90: ...al feed tray The sheet you have in serted is drawn in automatically after the time set in the Wait Time menu If the Auto Select menu item is set to No it will be necessary to press the SEL button afte...

Page 91: ...n is set to Valid a bottom margin of 1 2 inch 13 mm is preset If on the other hand this menu item is set to Invalid the bottom margin depends on the page length set in the menu The smallest possible b...

Page 92: ...Undo and remove screw A on the inside of the output tray 2 Turn the cut sheet feeder over and place it on a steady level surface The two screws B are now accessi ble 3 Undo and remove the screws B at...

Page 93: ...the items supplied The pull tractor feed You feed continuous paper from the bottom when you wish to print types of paper that are not suitable for feeding around the platen Such types of paper are mul...

Page 94: ...e printer OFF LINE and wait until the print head stops moving Caution The print head may be hot and can burn your hands Wait until the print head has cooled down Installation 1 Switch the printer off...

Page 95: ...the slots at each end of the tractor onto the pins of the holder on the printer arrow 5 Tilt the tractor feed for wards Pull the hooks on the outside of both ends of the tractor until you can hear it...

Page 96: ...continuous paper is placed under the table 1 Switch the printer off 2 Move the paper lever at the right side of the printer for wards to the continuous pa per position REAR the symbol on the cover sh...

Page 97: ...ing lever for the left sprocket feed and move this to the required po sition Fasten the left roller again with the locking lever 5 Open the cover of the left sprocket feed fit the contin uous paper on...

Page 98: ...eft end of the platen and the active indicators on the op erator panel will light 9 Fit the new acoustic cover You can set the values for paper handling as you wish by means of the printer menu in the...

Page 99: ...ould have re ceived depending on the mo del 1 bottom tractor feed narrow or wide 2 tractor feed feet Remove the packing material Keep the original packing material safe so that you can transport the t...

Page 100: ...of the sup port foot into the cutouts provided for this in the bot tom of the printer 4 Press the foot carefully in the direction of the arrow to wards the bottom of the printer so that its edges line...

Page 101: ...rinter will tilt backwards Replace the platen knob To install the tractor feed you need firstly to fold out the two support feet Then proceed as described below Caution The print head moves and can ca...

Page 102: ...both ends onto the retaining pins on the bot tom of the printer arrow 2 Gently push the tractor feed towards the front of the printer 3 The mounting hooks of the tractor must click audibly into place...

Page 103: ...lever position Warning Direct pressure on the platen can cause damage to the print head and pins Make sure the paper guide is correctly adjusted 2 Place a stack of continuous paper underneath the pri...

Page 104: ...d close the cover again Lock the feed again with the lever 6 Make sure the paper is slightly tensioned Fold the support feet back in again 7 Switch the printer on The print head will move to the left...

Page 105: ...the symbol for continuous paper handling from below shows the correct setting for the lever 4 Press the FF LOAD button The continuous paper held in the bottom tractor feed is fed in Redefine the top...

Page 106: ...n the mo del 1 roll paper stand only narrow 1 paper support Remove the packing material Keep the original packing material safe so that you can transport the roll paper stand safely at a later date if...

Page 107: ...onnecting cable will point to the back when this is done 3 Connect the cable plug of the roll paper stand to the socket on the back of the printer The arrow on the plug shows the correct way to plug i...

Page 108: ...aper lever to the rear position Align the left and right edges of the paper with the edges of the paper fed in from the back When the roll paper is aligned properly return the paper lever to the middl...

Page 109: ...erent serial interface cards are available RS 232C RS 232C Current Loop RS 422A This section explains how to install the interface card Caution There is electricity present and therefore a risk of an...

Page 110: ...e printer Secure the cable with the two screws 2 Remove the panel on the right rear side of the printer by breaking it out with a slot head screwdriver or by cutting it out with a knife 3 Take the car...

Page 111: ...nterface cables are not installed or used at the same time as this can result in malfunction 5 Connect the other end of the interface cable to the appropriate socket of your computer Read the correspo...

Page 112: ...urn on the printer The printer may not be connected to the power supply Check whether the power cable is connected to both the printer and an earthed mains socket the ALARM lamp lights The stock of pa...

Page 113: ...tor feed You may have used unsuitable paper Refer to the notes on paper in Chapter 3 If you are still experiencing paper jams proceed as follows Switch off the printer Open the printer cover Caution T...

Page 114: ...heck in the associated manual whether you can alter the initialisation string If this is the case delete the unwanted commands the menu and print function buttons are inoperative The function of the b...

Page 115: ...e cut sheet symbol TOP although continuous paper is being used Transport the continuous paper to the PARK position or choose another means of feeding the continuous paper x A paper jam has occurred Re...

Page 116: ...rial is preventing the carriage from moving correctly staple paper dust etc The print head is not seated correctly on the print head carriage Remember that the print head is sometimes hot Open the cli...

Page 117: ...o blinks when these faults occur the follow ing lamps light permanently in addition 10 cpi 15 cpi 17 cpi 20 cpi PROP UTL PRES BOLD Cause MPU internal RAM Program ROM RAM internal character generator E...

Page 118: ...ction and irregularities with the print out ASCII test on a cut sheet Should you wish to print out a continuous ASCII alphabet hold down the QUIET TOF button when switching on the printer Either inser...

Page 119: ...printer Should you wish to check the data being sent by the computer to the printer use the hexadecimal output All data sent to the printer including text and printer commands will then be printed in...

Page 120: ...as described You will be responsible for cleaning work and repairs in this case Use all of the original packing materi al for transportation 1 Switch off the printer Remove the power cable and interfa...

Page 121: ...ourier n 3 Prestige n 5 OCR B n 7 Orator n 122 Swiss Bold n 124 Gothic n 126 typeface according to menu This command allows you to select a font Courier is the most usual standard font while Gothic gi...

Page 122: ...Prestige Elite 0 86 Prestige Elite 0 100 Prestige Elite 0 164 Prestige Elite 0 221 Prestige Elite 0 155 Roman 0 159 Roman 0 166 Roman 0 167 Roman 0 87 Letter Gothic 0 222 Letter Gothic 0 255 Letter G...

Page 123: ...0 cpi 10 characters can be printed per inch 2 54 cm Each character then occupies 1 10 of an inch The pitch can also be defined via a multifunction command The function of the command SI for condensed...

Page 124: ...following table shows all possible combinations The command Double width printing for one line is especially suita ble for titles and headings as the function is automatically deacti vated at the end...

Page 125: ...g the spacing between the individual let ters varies according to the respective character width With a fixed pitch all characters are created within a matrix of the same width Proportional spacing ho...

Page 126: ...Hex ASCII Start underline 27 45 49 1B 2D 31 ESC 1 Stop underline 27 45 48 1B 2D 30 ESC 0 This command causes all printable characters including spaces to be underlined Graphics and spaces skipped by a...

Page 127: ...on via the menu to print a complete document in italics Multifunction commands Different print functions can be combined in a single escape se quence with multifunction commands Function Dec Hex ASCII...

Page 128: ...being bidirectional i e one line from left to right the next line from right to left etc This quality is suita ble in particular for extensive lists and drafts Letter quality LQ which reaches a speed...

Page 129: ...g double character height 16 Single line spacing current character height 17 Single line spacing normal character height 18 Single line spacing double character height 32 Double line spacing current c...

Page 130: ...mandatory to enter the tab positions in as cending order The parameter n1 indicates the column position of the first tab n2 to nk accordingly the column positions of the other tabs to be set Up to 28...

Page 131: ...efined n1 n64 ESC B NUL deletes all vertical tabs If the command VT is entered without any tab positions being defined a line feed is executed The actual position of a tab mark depends on the actual l...

Page 132: ...the following table n1 dot position n2 256 n2 integer value relative dot position 256 If you want to move the current print position for less than 256 point positions you must replace n1 by the corre...

Page 133: ...BS horizontal tab HT carriage return CR line feed commands form feed FF commands for defining the next print position de lete buffer CAN delete character DEL If the functions Underline or Overscore a...

Page 134: ...ommand the new TOF Top of Form is set at the respective position of the print head However the Top of Form can also be defined via the control panel This is described in Chap ter 2 If Page Length Cont...

Page 135: ...1 n2 n1 n2 n1 n2 n1 left margin 0 to 254 n2 right margin 0 to 255 In this command the parameters n1 and n2 define the left and right margins The margin values are entered in character columns The marg...

Page 136: ...and p2 defines the bottom margin distance from the top of form to the top edge of the bottom margin The unit is n 1440 inch The calculation follows the above listed formula The bottommarginisthedistan...

Page 137: ...ESC A n for a variable line spacing of n 72 inch as signs the desired value to the line spacing variable The newly se lected line spacing only becomes valid when it is activated by the command ESC 2...

Page 138: ...If in the printer menu Auto CR is set at Yes a carriage return is executed and the print position is set the the left margin With a variable line feed of n 360 inch no carriage return is execut ed des...

Page 139: ...hat are not listed in the table will be ignored m1 p1 m2 p2 Function 00 00 no change 48 00 Basis of 1 48 inch 72 00 Basis of 1 72 inch 96 00 Basis of 1 96 inch 120 00 Basis of 1 120 inch 144 00 Basis...

Page 140: ...page documents must be done with the form feed command Function Dec Hex ASCII Select bin 1 27 25 49 1B 19 31 ESC EM 1 Select bin 2 27 25 50 1B 19 32 ESC EM 2 With the two bin selection commands you ca...

Page 141: ...re constructed as 8 bit character sets i e a character is assigned to each bit combination of a byte with control commands being assigned to some values in the range from 0 to 31 The standard ASCII ch...

Page 142: ...ters from the ranges decimal 0 to 31 of IBM character sets I and II and 128 to 159 of IBM character set I can be addressed as printable characters This all character set is called IBM character set II...

Page 143: ...racters in this character set you must use the following instruction LPRINT CHR 27 CHR 88 CHR 2 600 256 2 remainder 88 Function Dec Hex ASCII Select national 27 33 n 1B 21 n ESC n character set With t...

Page 144: ...NUL Code Pages are national variants of the IBM character set Unlike national character sets the differences are in the range 0 to 255 The Code Pages are available as IBM Character Sets I and II and a...

Page 145: ...eek 437 Cyprus 3 243 1012 Turkish 3 244 1014 Polish Mazovia 3 246 1015 ISO Latin 2 3 247 1016 Serbocroat I 3 248 1017 Serbocroat II 3 249 1018 ECMA 94 3 250 1019 Windows East Europe 3 251 1020 Windows...

Page 146: ...make these movements immedi ately the print position is only logically set at the left margin If Auto LF is set to Yes after each carriage return the printer executes a line feed command This command...

Page 147: ...line feed when a carriage return command is received This function can also be controlled via the menu item Auto LF Function Dec Hex ASCII Start unidirectional 27 85 49 1B 55 31 ESC U 1 printing Stop...

Page 148: ...inter with out being stored or printed these data being suppressed In OFF LINE status in contrast data can be transferred to the printer until the receive buffer is full The printer then signals to th...

Page 149: ...s of Pn0 3 Pn0 3 data bytes are ignored which follow the parameter Hp The parameter Pn defines the pitch and parameters Lp and Hp the point size of the font Values from 0 to 255 are permitted for Pn t...

Page 150: ...t size size subscript 8 8 8 36 36 24 9 9 8 37 37 24 10 10 8 38 38 25 10 5 10 5 10 5 2 3 39 39 26 11 11 8 40 40 26 12 12 8 41 41 27 13 13 8 42 42 28 14 14 9 43 43 28 15 15 10 44 44 29 16 16 10 45 45 30...

Page 151: ...3 126 128 Np 32767 64 128 1 no change If the point size assignment of a preceding font scal ing command is still valid this point size is used If the point assignment is deleted i e no point size is s...

Page 152: ...dbl width 61 127 8 dbl width 10 dbl width 10 dbl width 10 dbl hight dbl width Following table shows the relation between selected font and the font used by the printer selected font used by printer f...

Page 153: ...ESC D Set horizontal tabs If proportional spacing is selected the pitch is calculated from the following formula for these commands Pitch 360 INT point size 36 10 5 0 5 cpi Printing in UTILITY If a p...

Page 154: ...SO DC4 double width printing for one line Ifafixedpitchorproportionalspacingisselectedwiththiscommand the PROP lamp lights in the CHARACTER PITCH indicator panel on the control panel This command is...

Page 155: ...of sketches merging of several images or objects and of course printing out in different graphic densities whereby the program converts the graphics on the screen into graphics data which the printer...

Page 156: ...following diagram shows how you determine the decimal va lue of a certain pin pattern Position value Binary value In the diagram the positions with the values 64 16 8 4 and 1 are intended to be printa...

Page 157: ...64 x 1 64 32 32 x 0 0 16 16 x 1 16 Byte 3 87 8 8 x 0 0 4 4 x 1 4 2 x 1 2 1 1 x 1 1 16 x 1 16 Byte 2 118 16 Byte 2 Byte 1 Since the 8 pin modes correspond to the more common standards they are especial...

Page 158: ...he commands available in AGM or com mands with another meaning are identified accordingly Function Dec Hex ASCII High resolution graphics 27 42 m 1B 2A m ESC m only AGM n1 n2 n1 n2 n1 n2 See the table...

Page 159: ...se of 24 pin graphics the parameters n1 and n2 must take account of the number of graphic bytes determined from the number of graphic columns times 3 and the attribute byte The second command ESC m n1...

Page 160: ...ted out incorrectly You can get around this problem by setting the line length to the maximum permissible value of 255 To do this enter one of the following instructions at the beginning of your progr...

Page 161: ...0 0 7 0 0 15 200 DATA 0 0 31 0 0 63 0 0 127 0 0 255 210 DATA 0 1 255 0 3 255 0 7 255 0 15 255 220 DATA 0 31 255 0 63 255 0 127 255 0 255 255 230 DATA 1 255 255 63 255 255 127 255 255 255 255 255 240...

Page 162: ...otal number n2 256 n2 total number graphic characters 256 As with 24 pin graphics of high resolution you also create a bit pat tern in this case as a series of dot columns In doing so each graphic col...

Page 163: ...on contains numerical data which contains the actual image information Each column is represented by a byte containing 8 bits in which a 1 corresponds to a dot to be printed A 0 shows that no dot is t...

Page 164: ...uble density and half speed with a reproduction ratio of 5 6 have a quasi resolution of 120 x 72 dots per inch Dots can be positioned with a horizontal accuracy of 1 120 inch Directly adja cent dots i...

Page 165: ...dots per inch The assignment of bits of a graphic byte to the pins of the print head is shown in the following table bit number of the graphic byte assigned printer pins 7 MSB 01 to 03 6 04 to 06 5 0...

Page 166: ...ands must be separated in each case by a carriage return CR and a line feed LF The length of the graphic lines may not go beyond the right mar gin of the page The time pause between the two commands m...

Page 167: ...3 22 2 or 1 23 0 LSB 24 In order to guarantee the grouping of graphic lines described abo ve the following conditions must be fulfilled The line spacing must be 8 240 inch The command sequences with E...

Page 168: ...g Print alignment If you place great store on vertical alignment over several graphic lines and can accept a low print speed select the setting Unidirec tional in the menu Graphics With this setting p...

Page 169: ...i 18 12 DC2 Start 12 cpi 27 58 1B 3A ESC Start 15 cpi 27 103 1B 67 ESC g Start 17 1 cpi 15 0F SI Start 20 cpi 27 15 1B 0F ESC SI Start double width 27 87 49 1B 57 31 ESC W 1 Stop double width 27 87 48...

Page 170: ...rt overscoring 27 95 49 1B 5F 31 ESC _ 1 Stop overscoring 27 95 48 1B 5F 30 ESC _ 0 Start superscript 27 83 48 1B 53 30 ESC S 0 Start subscript 27 83 49 1B 53 31 ESC S 1 Stop super subscript 27 84 1B...

Page 171: ...riz dot 27 100 1B 64 ESC d position to the right n1 n2 n1 n2 n1 n2 Relative horiz dot 27 101 1B 65 ESC e position to the left n1 n2 n1 n2 n1 n2 Start indication 27 105 1 1B 69 01 ESC i SOH print posit...

Page 172: ...1B 31 ESC 1 Set 1 6 inch line spacing 27 50 1B 32 ESC 2 AGM Menu defined line spacing 27 50 1B 32 ESC 2 without ESC A n Deactivate ESC A n 27 50 1B 32 ESC 2 line spacing Select variable line 27 65 n...

Page 173: ...NUL n Function Dez Hex ASCII Insert single sheet 27 25 73 1B 19 49 ESC EM I Eject single sheet 27 25 82 1B 19 52 ESC EM R Select bin 1 27 25 49 1B 19 31 ESC EM 1 Select bin 2 27 25 50 1B 19 32 ESC EM...

Page 174: ...3 49 1B 35 31 ESC 5 1 feed Deactivate automatic line 27 53 48 1B 35 30 ESC 5 0 feed Start unidirectional 27 85 49 1B 55 31 ESC U 1 printing Stop unidirectional 27 85 40 1B 55 30 ESC U 0 printing Start...

Page 175: ...1B 2A m ESC m only AGM n1 n2 n1 n2 n1 n2 Aspect ratio 27 110 m 1B 6E m ESC n m Activate single density 27 75 1B 4B ESC K graphics n1 n2 n1 n2 n1 n2 Activate double density 27 76 1B 4C ESC L graphics a...

Page 176: ...variety of European languages Character Set Select Select IBM Character Set I ESC 7 Select IBM Character Set II ESC 6 Print 1 character in All Chracter Set ESC n Select All Chracter Set ESC n1 n2 Char...

Page 177: ...7 866 Cyrillic II 866 3 98 869 Greek 869 3 101 895 Kamenicky MJK 3 127 1008 Greek 437 3 240 1009 Greek 928 3 241 1011 Greek 437 Cyprus 3 243 1012 Turkey 3 244 1014 Polska Mazovia 3 246 1015 ISO Latin...

Page 178: ...5 ACK 6 06 F 38 26 F 70 46 f 102 66 BEL 7 07 G 39 27 G 71 47 g 103 67 BS 8 08 H 40 28 H 72 48 h 104 68 HT 9 09 I 41 29 I 73 49 i 105 69 LF 10 0A J 42 2A J 74 4A j 106 6A VT 11 0B K 43 2B K 75 4B k 107...

Page 179: ...8 320 224 340 240 360 97 141 113 161 129 201 145 221 161 241 177 261 193 301 209 321 225 341 241 361 98 142 114 162 130 202 146 222 162 242 178 262 194 302 210 322 226 342 242 362 99 143 115 163 131 2...

Page 180: ...2 n 2 0 1 2 3 6 7 0 1 9 A B F 4 5 E D C 8 7 6 5 4 3 2 _ O i 4 1 1 3 8 9 A B E F C D ESC 7 0 1 2 3 4 5 6 7 8 9 A B C D E F G H I J K L M N P Q R S T U V W X Y Z a b c d e f g h j k l m n o p q r s t u...

Page 181: ...3 2 1 2 3 4 5 6 7 8 9 A B C D E F G H I J K L M N P Q R S T U V W X Y Z a b c d e f g h j k l m n o p q r s t u v w x y z 12 4 1 2 n Pt 3 ESC n 0 1 2 3 6 7 8 9 B C D 0 1 9 A B F 4 5 A E F E D C 8 7 6...

Page 182: ...dish II Swedish III Swedish IV Turkey Swiss I Swiss II i O i O i O i O i O i O i O i O i O i i O i O i O i O i O i O i O i g G 4F 5F S s _ _ _ _ _ _ _ _ _ _ _ _ _ _ _ _ _ IJ ij Value n Character Set H...

Page 183: ...1B 78 00 ESC x NUL Letter quality 27 120 1 1B 78 01 ESC x SOH The printer gives you two different print qualities In data proces sing quality UTL a print speed of 260 characters per second cps is rea...

Page 184: ...documents an at tractive appearance If you need a machine readable font for special applications then select OCR B You can also use the menu mode or the PRINT QUALITY button on the printer s control p...

Page 185: ...uble width 14 or 0E or SO or for one line 27 14 1B 0E ESC SO Stop double width 20 14 DC 4 before end of the line With these commands you can extend characters to double their normal width If the actua...

Page 186: ...e indicated This depends on the pitch selected The following table shows the maximum number of characters per line Characters per line Pitch Narrow printer Wide printer 5 cpi 40 68 6 cpi 48 81 7 5 cpi...

Page 187: ...not have a fixed pitch Precise margin settings in the case of full justi fied text for example is only possible if the word processing pro gram supports proportional spacing Proportional spacing is on...

Page 188: ...ally offset Emphasized and enhanced can be combined to particu larly highlight selected text Function Dec Hex ASCII Start underline 27 45 49 1B 2D 31 ESC 1 Stop underline 27 45 48 1B 2D 30 ESC 0 This...

Page 189: ...nction Dec Hex ASCII Start italics 27 52 1B 34 ESC 4 Stop italics 25 53 1B 35 ESC 5 Italic characters are printed sloping slightly to the right and particu larly highlight individual words sentences o...

Page 190: ...cpi 01 1 10 cpi 00 0 If for example you want to print a section in a document underli ned double width emphasized and enhanced you would normal ly have to send four different control commands to the...

Page 191: ...rs are set automatically every eight columns starting at the ninth column If a tabulator cha racter HT is transmitted the print head moves to the next set tab position before printing the following ch...

Page 192: ...ASCII Skip to next vertical tab 11 0B VT Set vertical tabs 27 66 1B 42 ESC B n1 nk 0 n1 nk 00 n1 nk NUL n 1 to 16 n 1 to 255 No vertical tabs are set when the printer is switched on Up to 16 vertical...

Page 193: ...also define for which channel tabs are to be set by inserting a value between 0 and 7 for the variable n After setting the desired tabs in the respective channel being used you can move to a vertical...

Page 194: ...n2 n1 n2 0 to 255 Using these commands you can position text or graphics exactly on a page Vertical positioning can also be achieved by variable line feed and by line spacing commands With the variab...

Page 195: ...ective dot position is outside the set margins the com mands for absolute or relative dot positioning are ignored There fore use the table below to find the maximum value in number of dots Print quali...

Page 196: ...l justified With this command you define the alignment of text on a line The standard left justified function means that the text is aligned on the left margin while it is ragged on the right With the...

Page 197: ...one of the abo ve commands in inches or in the number of lines For the latter it must nor exceed 50 inches Otherwise the command will be igno red If Page Length Control is by MENU Setting the start p...

Page 198: ...erforation The value for the function Skip Over Perforati on selected as menu item is activated If page formatting is taken over by the software e g a word proces sing program you should switch off Sk...

Page 199: ...ng n 60 inch n 1 to 255 Set variable line 27 51 n 1B 33 n ESC 3 n spacing n 180 inch n 1 to 255 Set variable line 27 91 n 1B 58 n ESC n spacing n 360 inch n 1 to 255 Set variable line 27 43 n 1B 2B n...

Page 200: ...360 inch there is no carriage return regard less of the settings in the printer menu If 0 is set for the parameter n in this command no line feed is executed The preset smallest possible step for the...

Page 201: ...feed command Function Dec Hex ASCII Select bin 1 27 25 49 1B 19 31 ESC EM 1 Select bin 2 27 25 50 1B 19 32 ESC EM 2 With the two bin selection commands you can define from which bin paper is to be fe...

Page 202: ...e found in this range If the Epson character set is activated and the extension deactivated the selected character set is the same as the IBM cha racter set I Are both Epson character set and extensio...

Page 203: ...f national char acter sets for the parameter n n Character set Code Page 0 ASCII 1 French 2 German 3 British 4 Danish I 5 Swedish I 6 Italian 7 Spanish I 8 Japanese 9 Norwegian 10 Danish II 11 Spanish...

Page 204: ...Legal Publisher 66 Ukrainian 67 ISO Latin 6 8859 10 68 Windows Baltic 72 Bulgarian 74 Baltic 774 Chapter 17 and Appendix B give you an overview of Code Pages and character sets Other commands Function...

Page 205: ...t character is printed superscript however the alignment may not be quite exact If the print position is to be reset by several characters a backspace command must be entered for each character to be...

Page 206: ...ckwards short line seeking bidirectional printing In order to improve the alignment of lines lying underneath one another you can stipulate with this function that each line be printed starting from t...

Page 207: ...ls to the system that it cannot accept any more data The data are thus retained Function Dec Hex ASCII Deactivate end of paper 27 56 1B 38 ESC 8 sensor Activate end of paper 27 57 1B 39 ESC 9 sensor W...

Page 208: ...a lower noise level than printing at normal speed Function Dec Hex ASCII Set most significant bit 27 62 1B 3E ESC MSB to 1 Set most significant bit 27 61 1B 3D ESC MSB to 0 Delete MSB default 27 35 1B...

Page 209: ...mand is ignored and the previously fixed basic step size remains valid If the basic step size Lp Hp 256 360 3 inches is set it is fixed at 36 360 1 10 inch If the basic step size goes over the right m...

Page 210: ...t are deleted by this command The basic step size is reset by the following commands and printed with the previously selected or newly set character pitch ESC P ESC M ESC g commands for setting the ch...

Page 211: ...6 Lp page length in basic step sizes Hp 256 Valid values for the basic step size are 1 360 1 180 1 120 1 90 1 72 and 1 60 inch All page lengths in the range 1 360 inch to 22 inches are valid If in thi...

Page 212: ...basic step sizes for the horizontal and ver tical direction can be defined The parameters Ln and Hn specify the number of parameters which follow Hn integer number of characters 256 Ln number of char...

Page 213: ...ith this command the printing position is adjusted absolutely in the vertical direction to the current top of page or to a set top mar gin of the printing area in multiples of the current basic step s...

Page 214: ...able area even due to a set perforation skip causes a paper feed to the next top of page position If this command requires a backwards feed of the paper it is igno red if the current line contains ras...

Page 215: ...Hb Lb Hb Ln 0 to 255 Hn 0 to 255 MSB ignored Lt 0 to 255 Ht 0 to 255 MSB ignored Lb 0 to 255 Hb 0 to 255 MSB ignored This command defines the top and bottom non printable areas of the currently select...

Page 216: ...follows when the menu item Page Length Control is set to the value by Menu Setting 0 inch top area bottom area 22 inches If the areas are set to 0 inches or to values more than 22 inches or these area...

Page 217: ...values of 0 to 255 are permissible the highest value bit however is not taken into account With values 2 Pn 4 this command is ignored For values greater than 4 the character pitch Pn 360 inch is as s...

Page 218: ...Subscript pointsize font Subscript 8 8 8 36 36 24 9 9 8 37 37 24 10 10 8 38 38 25 10 5 10 5 10 5 2 3 39 39 26 11 11 8 40 40 26 12 12 8 41 41 27 13 13 8 42 42 28 14 14 9 43 43 28 15 15 10 44 44 29 16 1...

Page 219: ...all even digits 126 Np 127 63 126 128 Np 32767 64 128 1 No change if the point size assignment of a previous font scaling command is still valid this point size is used If the point size assignment i...

Page 220: ...width dbl hight 49 60 8 dbl width 12 dbl width 12 dbl width 12 dbl hight dbl width 61 127 8 dbl width 10 dbl width 10 dbl width 10 dbl hight dbl width The following table shows the assignment of the s...

Page 221: ...ands use the character pitch set by this com mand ESC I ESC Q set left and right margin BS backspace ESC D setting of horizontal tabs If a proportional font is selected the character pitch for these c...

Page 222: ...this command printing takes place with the selected character pitch and character sizes stated in the table above for the bitmap character sets If no point size is specified in this command Lp and Hp...

Page 223: ...ble characters The address 0 is treated as ASCII NUL code The parameters Ln and Hn specify the number of characters to be printed Hn integer number of characters 256 Ln number of characters Hn 256 If...

Page 224: ...he selectable code pages is listed in the following table Pn2 Pn3 Code page 0 0 italic character set 1 0 PC437 USA 3 0 PC850 Multilingual 7 0 PC860 Portugal 8 0 PC863 Canadian French 9 0 PC865 Norwegi...

Page 225: ...is command the downloadable character set can no longer be selected The printer must be reset so that the standard assignment is valid again The selection of the national character set is not changed...

Page 226: ...printing 15 0F SI or 27 15 1B 0F ESC SI Stop condensed printing 18 12 DC2 Start double width 27 87 49 1B 57 31 ESC W 1 Stop double width 27 87 48 1B 57 30 ESC W 0 Start double width 14 0E SO for one...

Page 227: ...45 49 1B 2D 31 ESC 1 Stop underline 27 45 48 1B 2D 30 ESC 0 Set score type 27 40 45 1B 28 2D ESC 3 0 03 00 ETX NUL 1 n1 n2 01 n1 n2 SOH n1 n2 Start superscript 27 83 48 1B 53 30 ESC S 0 Start subscrip...

Page 228: ...T Set vertical tab 27 66 1B 42 ESC B n1 nk 0 n1 nk 00 n1 nk NUL Select vertical 27 47 n 1B 2F n ESC n tabulator channel Load vertical format 27 98 n 1B 62 n ESC b n m1 mk m1 mk m1 mk 0 00 NUL Function...

Page 229: ...nch line spacing 27 48 1B 30 ESC 0 Set 1 6 inch line spacing 27 50 1B 32 ESC 2 Set variable line 27 65 n 1B 41 n ESC A n spacing n 60 inch Set variable line 27 51 n 1B 33 n ESC 3 n spacing n 180 inch...

Page 230: ...6 0 1B 74 00 ESC t NUL character set Activate character 27 116 1 1B 74 01 ESC t SOH set selected by menu Activate loadable 27 116 2 1B 74 02 ESC t STX character set Activate graphic 27 116 3 1B 74 03...

Page 231: ...et most significant bit 27 61 1B 3D ESC MSB to 0 Delete MSB default 27 35 1B 23 ESC Delete last character 127 7F DEL Function Dez Hex ASCII High resolution graphics 27 42 m 1B 2A m ESC m n1 n2 n1 n2 n...

Page 232: ...DLL character Additional ESC P2 command Function Dez Hex ASCII Set horizontal basic 27 99 1B 63 ESC c step size HMI Lp Hp Lp Hp Lp Hp Setting page length 27 40 67 1B 28 43 ESC C in basic step sizes L...

Page 233: ...unction Dez Hex ASCII Print characters from 27 40 94 1B 28 5E ESC the fully printable Ln Hn Ln Hn Ln Hn character set Daten Daten Daten Assign new code page 27 40 116 1B 28 74 ESC t Ln Hn Ln Hn Ln Hn...

Page 234: ...NUL ESC 7 Graphics character set ESC t SOH ESC 7 Normal character set expansion ESC t SOH ESC 6 n Code Page Select 0 ASCII ESC R NUL 1 French ESC R SOH 2 German ESC R STX 3 British ESC R ETX 4 Danish...

Page 235: ...437 Cyprus ESC R 42 ECMA 94 ESC R 43 French Canadian ESC R 44 Cyrillic I 855 ESC R 45 Cyrillic II 866 ESC R 46 East Europe Latin II 852 ESC R 47 Greek 869 ESC R 49 Windows East Europe ESC R 1 50 Windo...

Page 236: ...65 ACK 6 06 F 38 26 F 70 46 f 102 66 BEL 7 07 G 39 27 G 71 47 g 103 67 BS 8 08 H 40 28 H 72 48 h 104 68 HT 9 09 I 41 29 I 73 49 i 105 69 LF 10 0A J 42 2A J 74 4A j 106 6A VT 11 0B K 43 2B K 75 4B k 1...

Page 237: ...08 320 224 340 240 360 97 141 113 161 129 201 145 221 161 241 177 261 193 301 209 321 225 341 241 361 98 142 114 162 130 202 146 222 162 242 178 262 194 302 210 322 226 342 242 362 99 143 115 163 131...

Page 238: ...7 8 9 A B C D E F G H I J P Q R S T U V W X Y Z a b c d e f g h j p q r s t u v w x y z K L k l _ O _ i i M N m n o O _ 3 ESC t NUL ESC 7 0 1 2 3 4 5 6 7 8 9 A B C D E F G H I J K L M N P Q R S T U V...

Page 239: ...l m n o p q r s t u v w x y z 2 n 2 0 1 2 3 6 7 8 9 B C D 0 1 9 A B F 4 5 A E F E D C 8 7 6 5 4 3 2 _ O i Pt 4 1 1 3 ESC t SOH ESC 6 National Character Set ESC R n 0 1 2 3 4 5 6 7 8 9 A B C D E F G H...

Page 240: ...ica French Canadian Dutch 1 2 3 4 5 6 7 8 9 10 11 12 13 14 15 16 17 18 19 20 Pt S s O i O i O i 5F O O O O O i i i i i O _ i O _ i _ i O O _ i O _ i i O _ i O _ i O _ i O _ i O i _ O _ i O _ i _ _ _ _...

Page 241: ...BEL 151 8 BS 24 CAN 136 BS 152 CAN 9 HT 25 137 HT 153 10 LF 26 138 LF 154 11 VT 27 ESC 139 VT 155 ESC 12 FF 28 140 FF 156 13 CR 29 141 CR 157 14 SO 30 142 SO 158 15 SI 31 143 SI 159 Line Graphics Exp...

Page 242: ...Data Processing Quality UTL at 10 cpi 87 260 at 12 cpi 104 312 at 15 cpi 130 390 at 17 1 cpi 149 223 at 20 cpi 174 260 Dot matrix 35 x 18 points at LQ 10 cpi horizontal x vertical 29 x 18 points at LQ...

Page 243: ...ss Swiss Bold Gothic Prestige Orator special font OCR B1 Barcodes Code 39 UPC A UPC E EAN 8 IAN8 JAN8 EAN 13 IAN13 JAN13 Interleaved 2 5 Code 128 ZIP Code Postnetzbarcode Graphic Resolution Vertical 1...

Page 244: ...10 inches narrow model 76 406 mm 3 16 inches wide model weight 45 90 g m2 12 24 lb Sprocket Paper multi part forms pressure sensitive width 76 254 mm 3 10 inches narrow model 76 406 mm 3 16 inches wid...

Page 245: ...ght 147 mm 5 8 inches 147 mm 5 8 inches depth 404 mm 15 9 inches 404 mm 15 9 inches Electrical characteristics Voltage 230 V 10 14 Frequency 50 60 Hz 2 Power consumption Operation 60 W Standby 12 W En...

Page 246: ...age of printing material text or graphic printing age of ribbon print head life 200 million characters Options Pull Tractor narrow Pull Tractor wide Bottom Tractor narrow Bottom Tractor wide Cut Sheet...

Page 247: ...865 Norwegian B 7 866 Cyrillic II B 7 869 Greek 869 B 8 895 Kamenicky MJK B 8 1008 Greek 437 B 9 1009 Greek 928 B 9 1011 Greek 437 Cyprus B 10 1012 Turkish B 10 1014 Polska Mazovia B 11 1015 ISO Lati...

Page 248: ...0 224 340 240 360 97 141 113 161 129 201 145 221 161 241 177 261 193 301 209 321 225 341 241 361 98 142 114 162 130 202 146 222 162 242 178 262 194 302 210 322 226 342 242 362 99 143 115 163 131 203 1...

Page 249: ...M N O P Q R S T U V W X Y Z a b c d e f g h j k l m n o p q r s t u v w x y z a o 12 4 1 _ i 2 n Pt 3 437 0 Baltic ID 774 IBM 1B 5B 54 05 00 00 00 03 06 00 Epson 1B 52 4A 0 1 2 3 6 7 8 9 B C D 0 1 9 A...

Page 250: ...c x t T Z z s A a E e z Z C S s l C D d N A S s a E S e Z r z U 3 T 852 46 East Europe Latin 2 ID 852 IBM 1B 5B 54 05 00 00 00 03 54 00 Epson 1B 52 2E Multilingual ID 850 IBM 1B 5B 54 05 00 00 00 03...

Page 251: ...I J K L M N O _ Z Y P Q R S T U V W X a b c d e f g h i p q r s t u v w x y z j k l m n o _ 3 855 44 2 B R b r 2 0 1 2 3 4 5 6 7 8 9 A B C D E F 0 1 2 3 4 5 6 7 8 9 A B C D E 0 P p 1 A Q a q 3 4 5 6 7...

Page 252: ...u v w x y z _ i 2 n A E Pt 1 4 1 2 3 860 28 Portugese ID 860 IBM 1B 5B 54 05 00 00 00 03 5C 00 Epson 1B 52 1C 0 1 2 3 6 7 8 9 B C D 0 1 9 A B F 4 5 A E F E D C 8 7 6 5 4 3 2 0 1 2 3 4 5 6 7 8 9 A B C...

Page 253: ...F G H I J K L M N O P Q R S T U V W X Y Z a b c d e f g h j k l m n o p q r s t u v w x y z _ i 2 n Pt 12 14 3 865 27 0 1 2 3 6 7 8 9 B C D 0 1 9 A B F 4 5 A E F E D C 8 7 6 5 4 3 2 9 8 7 6 5 4 3 2 1...

Page 254: ...M N O P Q R S T U V W X Y Z _ a b c d e f g h i j k l m n o p q r s t u v w x y z A E H Y O o 1 2 3 2 3 869 47 I Kamenicky MJK ID 895 IBM 1B 5B 54 05 00 00 00 03 7F 00 Epson 1B 52 37 0 1 2 3 6 7 8 9...

Page 255: ...I J K L M N O P Q R S T U V W X Y Z a b c d e f g h j k l m n o p q r s t u v w x y z _ i 2 n 3 1008 38 Greek 928 ID 1009 IBM 1B 5B 54 05 00 00 00 03 F1 00 Epson 1B 52 27 0 1 2 3 6 7 8 9 B C D 0 1 9 A...

Page 256: ...G H I J K L M N O P Q R S T U V W X Y Z a b c d e f g h j k l m n o p q r s t u v w x y z _ i 2 n 3 1011 41 Turkish ID 1012 IBM 1B 5B 54 05 00 00 00 03 F4 00 Epson 1B 52 1D 0 1 2 3 6 7 8 9 B C D 0 1...

Page 257: ...O _ Z Y P Q R S T U V W X a b c d e f g h i p q r s t u v w x y z j k l m n o z 1 2 1 4 2 n a A S C e E Z Z n N z O z c s 3 1014 22 ISO Latin 2 ID 1015 IBM 1B 5B 54 05 00 00 00 03 F7 00 Epson 1B 52 17...

Page 258: ...C Z Y P Q R S T U V W X a b c d e f g h p q r s t u v w x y z j k l m n o 2 n c 1 2 1 4 Pt S s Z z c i 3 1016 24 Serbo Croatic II ID 1017 IBM 1B 5B 54 05 00 00 00 03 F9 00 Epson 1B 52 19 C 0 1 2 3 4 5...

Page 259: ...l s t u v w x y z 3 M N O _ m n o 1 4 2 1 4 3 Y Y Y 1 Pt x 3 I l 1018 42 Windows East Europe ID 1019 IBM 1B 5B 54 05 00 00 00 03 FB 00 Epson 1B 52 31 2 B R b r n y 0 1 2 3 4 5 6 7 8 9 A B C D E F 0 1...

Page 260: ...S T U V W X Y Z o p a b c d e f g h i j k l q r s t u v w x y z m n 2 U A 3 1 2 3 1020 50 Latin 5 Windows Turkish ID 1021 IBM 1B 5B 54 05 00 00 00 03 FD 00 Epson 1B 52 33 2 B R b r 2 0 1 2 3 4 5 6 7...

Page 261: ...Z Y P Q R S T U V W X a b c d e f g h i p q r s t u v w x y z j k l m n o a B E K M H O X C P A e o c p G A g S s j J a i I 3 1022 52 Hungarian CWI ID 1024 IBM 1B 5B 54 05 00 00 00 04 00 00 Epson 1B 5...

Page 262: ...V W X a b c d e f g h i p q r s t u v w x y z j k l m n o 1 1027 66 ISO Latin 6 8859 10 ID 1029 IBM 1B 5B 54 05 00 00 00 04 05 00 Epson 1B 52 43 2 B R b r 0 1 2 3 4 5 6 7 8 9 A B C D E F 0 1 2 3 4 5 6...

Page 263: ...d e f g h i j k l s t u v w x y z M N O _ m n o Pt 1 4 2 1 2 n 3 1030 60 Hebrew NC ID 1030 IBM 1B 5B 54 05 00 00 00 04 06 00 Epson 1B 52 3C Hebrew OC ID 1031 IBM 1B 5B 54 05 00 00 00 04 07 00 Epson 1B...

Page 264: ...f g h i j k l s t u v w x y z x 3 M N O _ m n o _ 1 4 2 1 4 3 1 F _ 2 1032 62 Windows Baltic ID 1034 IBM 1B 5B 54 05 00 00 00 04 0A 00 Epson 1B 52 44 2 B R b r 2 N a n 0 1 2 3 4 5 6 7 8 9 A B C D E F...

Page 265: ...1B 5B 54 05 00 00 00 04 30 00 Epson 1B 52 48 0 1 2 3 6 7 8 9 B C D 0 1 9 A B F 4 5 A E F E D C 8 7 6 5 4 3 2 9 8 7 6 5 4 3 2 1 0 A B C D E F G H I J K L M N O _ Z Y P Q R S T U V W X a b c d e f g h i...

Page 266: ...R scanner In Letter Quality LQ you can select OCR B1 character sets a deriv ative of the OCR A typeface and easy to read Function Dec Hex ASCII Select OCR B1 27 107 5 1B 6B 05 ESC k ENQ Although the O...

Page 267: ...8 9 B C D 0 1 9 A B F 4 5 A E F E D C 8 7 6 5 4 3 2 0 1 2 3 4 5 6 7 8 9 A B C D E F G H I J K L M N O P Q R S T U V W X Y Z a b c d e f g h j k l m n o p q r s t u v w x y z _ i 2 n Pt 12 14 3 ESC k...

Page 268: ...pes the status of the printer and of the print head the quality of the pins and the pin mechanism use of a multicoloured ribbon its age and colour intensity functionality of the device used Furthermor...

Page 269: ...5 ZIP Code ZIP Code Bar Code With all bar codes except the bar code UPC E it is possible to calcu late and print a checksum Because of the 24 dot matrix printing technique the smallest bar code size t...

Page 270: ...l be ignored 2 n1 and n2 select the type of bar code high order half byte is ig nored n1 n2 Bar Code Type 0 1 EAN8 0 2 EAN13 1 0 UPC A 1 4 UPC E 2 0 Code 39 3 0 Interleaved 2 5 4 0 Code 128 Only the a...

Page 271: ...the character width of Code Interleaved 2 5 The width of the modules are identical with Code 39 and Interleaved 2 5 Refer to Table 6 and Table 7 to determine the width of the individual modules for t...

Page 272: ...ettings of this command are n1 n2 1 0 UPC A n3 n4 0 9 135 180 inch n5 1 1 72 inch n6 1 1 72 inch n7 1 2 5 1 n8 2 LQ Tables 1 through to 7 are used to calculate the width of the bar code If the bar cod...

Page 273: ...165 187 220 char code start code Code 128 71 88 127 153 192 218 257 stop code unit 1 360 inch Table of Module Widths A module is the narrowest element of a bar code With EAN UPC and Code 128 the wide...

Page 274: ...n7 the total width of the black element can be taken from table 3 Type n5 1 2 3 4 5 6 7 Ratio 1 1 5 2 2 5 3 3 5 4 schmales Element 3 4 7 9 12 14 17 n7 1 9 11 17 21 27 31 37 n7 2 11 14 22 27 32 39 47...

Page 275: ...ode Function Dec Hex ASCII Printing a Bar code 27 16 66 1B 10 42 ESC DLE B P1 Pm P1 Pm P1 Pm DATA DATA DATA This command does not select type and size of the bar code Unit used is 360 dpi full printin...

Page 276: ...d for bar code types listed under a to d For the bar code types listed under e through to f you can select any value listed under number 6 If P1 is larger than the above mentioned numbers the command...

Page 277: ...checksum and print the checksum instead of the checksum code However you can calculate and transmit the checksum yourself Calculating the Checksum for EAN8 UPC A Interleaved 2 5 a add all odd numbere...

Page 278: ...all odd numbered data positions starting on the left hand side d b c e d mod 10 f 10 e f is the checksum Example bar code data 123456789012 a 2 4 6 8 0 2 22 b 22 3 66 c 1 3 5 7 9 1 26 d 66 26 92 e 92...

Page 279: ...e Checksum for Code 128 Each of the characters of Code 128 is assigned a reference value When calculating the checksum these values are added after they have been multiplied by a weighting The weighti...

Page 280: ...Remainder 6 Checksum is 6 Reference value in Set A If you calculate this checksum yourself you have to send the char acter HEX 26 to the printer in order to obtain the reference value 6 in Set A Tabl...

Page 281: ...C 3C 28 32 38 29 3D 3D 29 32 39 30 3E 3E 30 33 30 31 3F 3F 31 33 31 32 40 40 32 33 32 33 A 41 A 41 33 33 33 34 B 42 B 42 34 33 34 35 C 43 C 43 35 33 35 36 D 44 D 44 36 33 36 37 E 45 E 45 37 33 37 38 F...

Page 282: ...67 36 37 68 EOT 04 d 64 68 36 38 69 ENQ 05 e 65 69 36 39 70 ACK 06 f 66 70 37 30 71 BEL 07 g 67 71 37 31 72 BS 08 h 68 72 37 32 73 HT 09 i 69 73 37 33 74 LF 0A j 6A 74 37 34 75 VT 0B k 6B 75 37 35 76...

Page 283: ...3 n8 ESC DLE B P1 C Data STOP Code 11 After printing the bar code the print head is positioned at the end of the first printed line 12 If the bar code extends beyond the right margin the command will...

Page 284: ...bar code data 555 The character string 0555 has to be sent to the printer A wrong character string 555 results in 5505 Examples The following are examples of the printing of bar codes and the command...

Page 285: ...Select bar code 1B 10 42 04 31 32 33 40 Print bar code Bar code 128 Set A 0 5 inch high smallest width plain writing LQ 1B 10 41 08 04 00 00 06 01 01 01 02 Select bar code 1B 10 42 0C 41 30 31 32 33...

Page 286: ...ill be performed 7 After printing the bar code the print head is positioned at the end of the first printed line 8 Height of the upper print process is 21 180 inch height of the lower print process is...

Page 287: ...ition A1 even absolute printing position from left margin A2 determines the direction of the relative positioning A2 odd backwards A2 even forward A2 is invalid if A1 is even numbered P1 P4 Set printi...

Page 288: ...el Interfacing Centronics In a parallel interface the bits of one byte are transmitted simultane ously via eight separate lines Additional lines control the flow of data The bytes are transmitted in s...

Page 289: ...CT From printer The High level of this signal indicates that the printer is in the select mode ON LINE 14 AUTOFEED To printer In EPSON emulation a Low level of the signal activates the auto line feed...

Page 290: ...printer buffer On Buffer Clear the printer will be reset at once and the contents of the printer buffer will be deleted Low level 0 0 V to 0 8 V High level 2 4 V to 5 0 V Input circuit of DATA STROBE...

Page 291: ...the printer on POWER ON Write the following test programme 10 LPRINT Everything s okay 20 LPRINT 1 6 inch line spacing 30 LPRINT CHR 12 REM Line Feed Type RUN and press the Return key You will get the...

Page 292: ...ters configuration is of importance For most applications the default settings are sufficient Occasional ly you might have to change some parameters Never change val ues which are not described in you...

Page 293: ...printer Serial signal received by the printer 4 Ready to Send RTS From printer Indicates that the printer is ready to receive data 5 Clear to Send CTS To printer Indicates that system is ready to sen...

Page 294: ...its buffer is full You can set the Busy line to one of above mentioned lines by selecting Busy Line When the printer is ready to receive data the Busy line DTR or RTS is set to high level Space If you...

Page 295: ...2 TD RD 3 3 RD RTS 4 4 RTS CTS 5 5 CTS DSR 6 6 DSR DCD 8 8 DCD DTR 20 20 DTR Signalerde 7 7 Signalerde Printer Protective Ground Protective Ground Signal Ground Signal Ground PC industry standard 25...

Page 296: ...ter Drucker Schutzerde 1 Schutzerde RD 2 2 TD TD 3 3 RD CTS 8 4 RTS RTS 7 5 CTS DSR 6 6 DSR DCD 1 8 DCD DTR 4 20 DTR Signalerde 5 7 Signalerde Signal Ground Signal Ground Protective Ground Printer Pro...

Page 297: ...t plug described below is con nected to the serial interface a test of the serial interface is au tomatically carried out when the printer is turned on The re sult of the test will be printed This pro...

Page 298: ...ust therefore correspond to the system s parameters in this case as well Jumper SP1 The position of jumper plug SP1 should never be changed If the interface s control program is stored in the micropro...

Page 299: ...RS from printer that the printer is ready 9 Clear to Send CS to printer Data transmission starts when printer confirms 27 Clear to Send CS to printer the signal as Space 11 Ready to Send DM to printer...

Page 300: ...the EIA Stand ard RS 422A MARK Polarity 0 2 to 6 0V LOW OFF Logical 1 SPACE Polarity 0 2 to 6 0V HIGH ON Logical 0 Input Circuit equivalent to Am 26LS32 Schwellenpegel Differenzeingang V V 200 mV 200...

Page 301: ...ived SSD 9 V select SSD SSD 9 V select SSD DTR 9 V select DTR RTS 9 V select RTS Baud Rate Which baud rate Bit s BPS is used 19 2000 Baud select 19200 BPS 9 600 Baud select 9600 BPS 4 800 Baud select...

Page 302: ...le in the buffer the code DC3 informs the sender that no more data can be received The code DC3 is transmitted until no more data is transmitted If it is possible to print the buffer within 200 ms or...

Page 303: ...arity of the ports TR and RS see dia gram 2 If the ports SSD and SSD are reversed you have to select the option SSD If the printer prints data which is in no way similar to the data sent by the host t...

Page 304: ...CS 9 CS 27 DM 11 DM 29 TR 12 TR 30 SSD Serial I F Option Protocol Ready Busy Busy Line DSR Signal Invalid Protocol Ready Busy Ready Busy Line printer SSD Host Printer Menu Settings SD SD RD RD RS RS C...

Page 305: ...25 CS 9 CS 27 DM 11 DM 29 TR 12 TR 30 RTS Serial I F Option Protocol Ready Busy Busy Line DSR Signal Invalid Protocol X ON X OFF Printer status line SD Host Printer Menu Settings SD SD RD RD RS RS CS...

Page 306: ...Signal are created by connecting ports CB CTS Pin 5 and RD B Pin 18 to the ports TR Pin 12 and TR Pin 30 of the printer interface Additionally a connection to CC DSR Pin 6 is established on the host s...

Page 307: ...xample HP 24541B interface board connected to the RS 422A interface of the printer the ports SD A Pin 9 and SD B Pin 10 are connected to the ports RD Pin 6 and RD Pin 24 of the printer interface These...

Page 308: ...a self test of the serial interface by using a test loop plug The following plug is required for an interface test of the RS 422A interface If the menu option Diagnostic Test is set to Yes and the tes...

Page 309: ...ter menu The following pages contain information about the correct jumper assignment and the correct menu selections for each mode as well as general technical details and information about transmissi...

Page 310: ...ple RS 232C interface described earlier in this chapter Current Loop Interface Pin Signal Direction Description 1 Protective Ground PG connected to the printer s casing 2 6 not assigned 7 Signal Groun...

Page 311: ...the printer determines whether the Ready Busy protocol or X ON or X OFF protocol is used The Centronics Blocked Duplex transmission protocol can only be selected by setting short circuit jumper SP1 a...

Page 312: ...cked Duplex Protocol setting in menu will not be applied Rearrange the jumpers only when the printer is turned off SP 3 Pin Assignment SP1 Protocol Selection SP4 Power Source Receive Loop SP2 RS 232C...

Page 313: ...ge a parity error is displayed as 4OH Display of Busy Status the minimum interval during which the printer is unable to receive data is selected in the Busy Time menu The interval for the Busy signal...

Page 314: ...a is sent to the printer see note If after 200 ms or 1 s 512 bytes or more memory is available the printer sends the signal DC1 to the sender indicating that it is ready to receive data The signal DC1...

Page 315: ...fangs kreis D D STX ETX ACK Datensende kreis B B Datenblock 2 Datenblock 3 Datenblock 1 STX STX ETX ETX ACK Data Receive Buffer D D Data Send Buffer B B If an error was detected Datenempfangs kreis D...

Page 316: ...used When using only one circuit the receiving and sending circuit of the host and printer must be connected in series It is therefore not possible to receive print data and send status messages simu...

Page 317: ...P5 A B SP5 C A B A B SP3 SP4 A B SP2 A B SP1 A B SP1 Ready Busy XON XOFF Centronics Blocked Duplex Connection 4 wire 3 wire Power source receive loop Printer Power source send loop Printer Host Printe...

Page 318: ...SP4 SP5 A B SP5 C A B A B SP3 SP4 A B SP2 A B SP1 A B SP1 Ready Busy XON XOFF Centronics Blocked Duplex D 9 D 10 B 18 B 19 GND 7 A B A B SP4 SP5 A B SP5 C A B A B SP3 SP4 A B SP2 A B SP1 A B SP1 Read...

Page 319: ...rinter Host Printer Assignment of Short Circuit Jumper Connection 2 wire Power source receive loop none Power source send loop Host Host Printer Assignment of Short Circuit Jumper D 9 D 10 B 18 B 19 G...

Page 320: ...ntegrated in the circuit It is therefore not possible to control the print er status Ready to Receive or Receive Buffer Full This circuit is often used by measuring systems and unit controls to which...

Page 321: ...Printer IBM Asynchronous Printer Assignment of Adapter Short Circuit Jumper A B A B SP4 SP5 A B SP5 C A B A B SP3 SP4 A B SP2 A B SP1 Centronics Blocked Duplex D 9 D 10 B 18 B 19 GND 7 D 9 D 11 B 25...

Page 322: ...tronics Blocked Duplex D 9 D 11 B 18 B 25 This connection is equivalent to circuit diagram 12 A circuit ac cording to diagram 13 is not possible with the IBM Asynchronous Adapter as the voltage suppli...

Page 323: ...n the printer on The printer buffer interface driver and re ceive loop functions on the serial interface are now tested On completion of this test all characters are printed in a test pattern The resu...

Page 324: ...These characters are stored in the buffer and printed This process is repeated until the printer is turned off The printer returns to normal operation when you set the Diagnostic Test menu option to...

Page 325: ...ers of paper including the original when using duplicating paper The width b must be between 76 2 and 254 mm for small print ers and between 76 2 and 406 4 mm for large printers You can use paper leng...

Page 326: ...e or duplicat ing paper with a weight between 34 and 41 g m2 can be used Multiple sets with carbon The weight must be between 38 and 45 g m2 The paper thickness must not exceed 0 36 mm A carbon paper...

Page 327: ...n a range of 1 to 2 mm there must not be any hole at the top or lower edge of the paper Vertical Perforation If a vertical perforation is within the print area adjust the printer so that you do not pr...

Page 328: ...void waves and wrinkles mainly occurring with the first and last sheets of a new paper stack Do not use these sheets If the continuous paper is separated along the horizontal perfo ration the separati...

Page 329: ...e printer The paper length b is between 182 and 356 mm small printer and between 182 and 364 mm large printer You can use paper weights between 45 and 90 g m2 When using cut sheets via the cut sheet f...

Page 330: ...ded The condition of the support paper must ensure that the label is not removed when the paper is turned about 180 around a cylinder with a diameter of 27 mm The labels must not detach during the pro...

Page 331: ...eded The condition of the support paper must ensure that the label is not removed if the paper is turned about 180 around a cylinder with a diameter of 27 mm The labels must not detach during the proc...

Page 332: ...ons ON OFF LINE mode 2 5 Buttons 2 5 C Centronics Interface 2 3 D 1 Changing 7 12 print position 3 14 7 12 Tear Off position 3 16 the menu settings 4 2 the ribbon cassette 6 1 CHARACTER PITCH 2 7 Char...

Page 333: ...erference filter 1 10 Fitting the paper separator 1 8 Fitting the paper support 1 5 Font 4 9 FORM TEAR OFF function 3 15 From continuous paper to cut sheets 3 12 From cut sheets to continuous paper 3...

Page 334: ...3 11 Paper separator 1 7 2 2 Paper support 1 1 1 5 2 1 Parallel I F 4 14 Parallel Interface general D 1 pin description D 2 signal level D 3 P test D 5 timing D 4 PARK 2 6 Platen 2 2 Platen knob 1 1 2...

Page 335: ...pin assignment D 12 signal level D 13 test D 21 transmission protocols D 15 S Safety advice XV SEL 2 4 SEL 2 5 Selecting the Bar code C 3 Serial I F 4 14 Serial interface 2 3 Serial Interface RS 232C...

Page 336: ...p speed corresponds to the data transmission rate having the unit bits per second bps Bidirectional Print In the first line the print head moves from the left to the right in the second line the direc...

Page 337: ...transmitted to the paper See also dot ma trix printer Compatibility Compatibility is the harmony of different systems with each other Compatible sys tems ensure an easy exchange of programs or devices...

Page 338: ...arbon duplicates copies can be made because the printing is performed by stroke Three duplicates for 24 pin printers and four duplicates for 9 pin printers are common Emulation Emulation means that th...

Page 339: ...peface is achieved The print speed is reduced Line A line is a horizontal sequence of characters The width of a line is defined by the right and the left margin beginning of the line The line spacing...

Page 340: ...e data transmission handshake Parameter Most commands require additional variables which are mainly figures These parameters are given either as printable ASCII charac ters or as decimal or hexadecima...

Page 341: ...erface according to an American standard It corresponds to the international ITU standard V 24 in conjunction with V 28 and German standard DIN 66020 Serial Interface A connection for data transmissio...

Page 342: ...emarks of International Business Machines Corporation MS DOS and MS Windows are registered trademark of Microsoft Corporation DR DOS is a registered trademark of Novell Inc Telix is a registered trade...

Page 343: ...r menu Reset top of form Reset printer menu and top of form Print mode Line Feed Form Feed Load paper QUIET TOF LF Micro Feed Down ON POWER PARK FF LOAD Micro Feed Up TEAR LF Micro Feed Down FF LOAD M...

Page 344: ...te Quiet mode Activate Menu mode Menu mode Activate Menu mode Print all menu items Select menu group Select previous menu group Select menu item SEL PARK QUIET TOF SHIFT SEL MENU SHIFT SEL MENU PARK P...

Page 345: ...a menu group Save and exit menu mode Top Of Form Micro feed down Micro feed up Save Top Of Form Reset Top Of Form to default SHIFT FF LOAD Micro Feed Up ITEM TEAR SET TEAR SET SHIFT SHIFT SEL MENU EX...

Page 346: ...Appendix H Short reference H 4 SHIFT PARK SHIFT TEAR Print position Indicate print position Set print position to the left Set print position to the right SEL SHIFT SHIFT PRINT QUALITY...

Page 347: ...Z 1 Declaration of Conformity CE...

Page 348: ...Z 2 Declaration of Conformity CE...

Page 349: ...x 33 1 41240040 OKI Systems Italia S p A Centro Commerciale Il Girasole Palazzo Cellini Lotto 3 05 B 20084 Lacchiarella Milano Italy Tel 39 0 2 90076410 Fax 39 0 2 9007549 OKI Systems Espa a C Goya 9...

Reviews: