background image

- 82 -

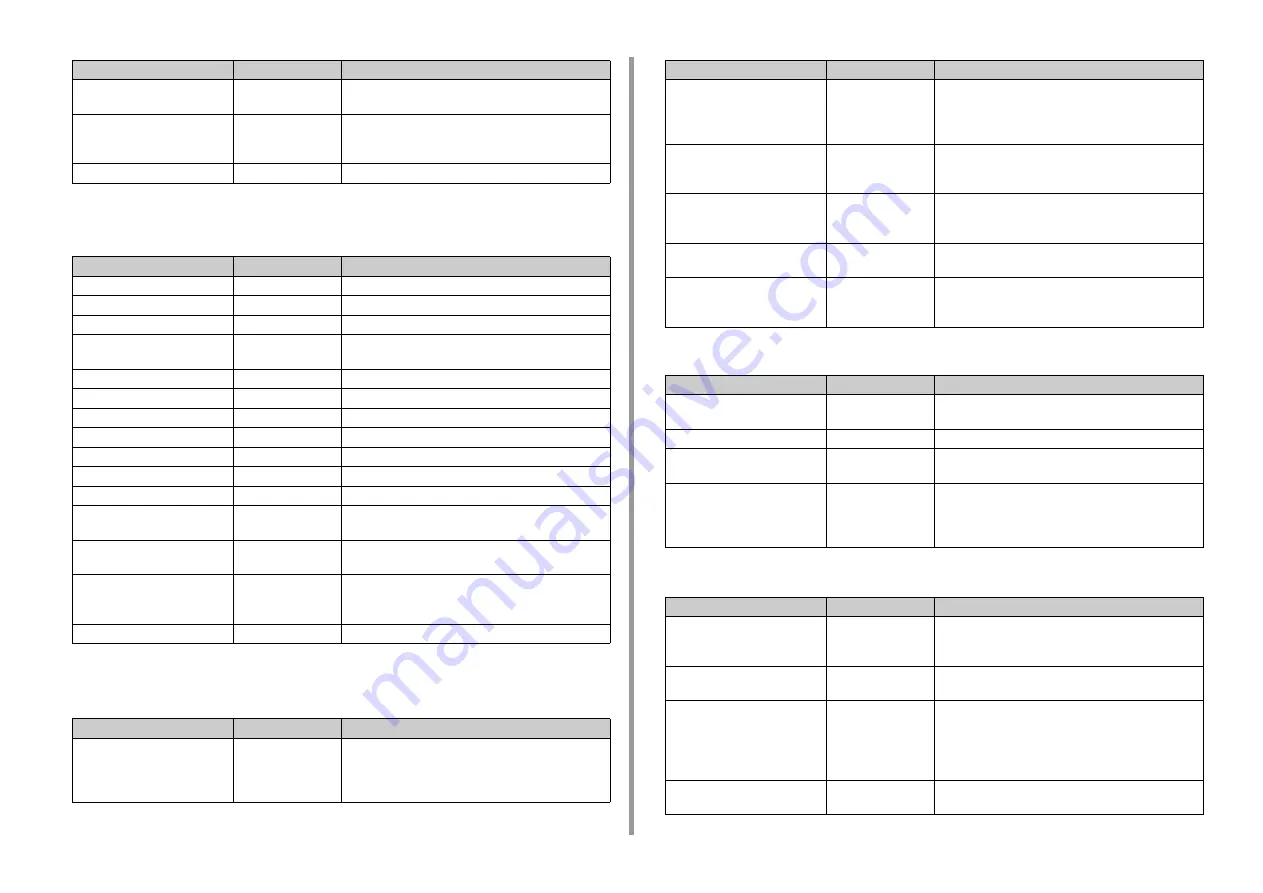
5. Management / Setting the Printer

*1 : Factory default setting values are different according to the country or region.

• EPSON FX Setup

*1 : Factory default setting values are different according to the country or region.

• Private Print Setup

• Color Setup

• Panel Setup

Fit to Letter

Disable or Enable *

1

Sets the printing mode that can fit paper to the printable 
area equivalent to 11 inches (66 lines).

Text Height

Same

Sets the height of a character.
Same: The height stays the same regardless of CPI.
Diff: The height varies according to CPI.

Continuous Paper Mode

Off

Sets to Landscape the edit direction.

Item

Factory Default

Description

Character Pitch

10 CPI

Specifies character pitches.

Character Set

SET-2

Specifies a character set.

Symbol Set

IBM-437

Specifies a symbol set.

Letter O Style

Disable

Specifies the style that replaces 9BH with letter o and 
9DH with a zero.

Zero Character

Normal

Sets the zero to be slashed or unslashed.

Line Pitch

6 LPI

Specifies the line spacing.

White Page Skip

OFF

Selects whether to print blank pages.

CR Function

CR

Select a carriage return from [CR] or [CR+LF].

Line Length

80 Column

Specifies the number of characters per line.

Form Length

11.7 inch or 11 inch *

1

Specifies the length of paper.

TOF Position

0.0 inch

Specifies the distance from the top edge of paper.

Left Margin

0.0 inch

Specifies the distance from the left edge of paper so that 
the print starting point shifts to the right horizontally.

Fit To Letter

Disable or Enable *

1

Sets the printing mode that can fit paper to the printable 
area equivalent to 11 inches (66 lines).

Text Height

Same

Sets the height of a character. 
Same: The height stays the same regardless of CPI. 
Diff: The height varies according to CPI.

Continuous Paper Mode

Off

Sets to Landscape the edit direction.

Item

Factory Default

Description

Verify job option

Disable

Set whether to verify a job before printing.
If enabled, the machine verifies that the job is not altered 
before starting printing. The security is enhanced, 
however it will take longer to start printing.

Item

Factory Default

Description

Erase job option

No overwrite

Sets how to delete a job.
You can overwrite deleted data so that it will not be 
restored.
If enabled, it will take longer to delete.

Keep job for

2 hours

Sets the storage period of jobs.
If the set period elapses after jobs are stored, the jobs 
will be automatically deleted.

Job Limitation

Disable

Sets whether to save a restricted print job.
If [Private Print Only] is selected, print jobs other than 
private print are not accepted.

Verify job password

Off

Sets whether to verify a job password when the access 
control is enabled.

Job Auto Search

On

Sets whether to search a job at the same time as 
unlocking the panel lock when the access control is 
enabled.

Item

Factory Default

Description

Ink Simulation

Off

Sets the ink simulation. This setting is enabled only for 
PS language jobs. (C834/C844/ES8434)

UCR

Low

Adjusts the level of under color removal.

CMY100% Density

Disable

Selects whether to use halftone for C, M, Y 100% 
density.

CMYK Conversion

On

Selects whether to use simple (quick) mode when 
performing CMYK Conversion.
This menu setting is disabled if using the ink simulation 
function. (C834/C844/ES8434)

Item

Factory Default

Description

Near Life Status

Enable

Sets whether to display the warning that informs the 
drum, fuser, or belt is near the end of life on the LCD 
display.

Near Life LED

Enable

Sets the LED lamp control of the warning that informs the 
toner, drum, fuser, or belt is near the end of life.

Paper setup when paper 
exchange

On

Sets to show or hide the message to check paper size in 
each tray.
If set it to [On], the message appears when paper is 
loaded on the MP tray and when paper cassette is 
removed from the tray 1 to 5.

Idle Display

Toner Gauge

Selects the information shown on the display during 
idling.

Item

Factory Default

Description

Summary of Contents for ES8434

Page 1: ...C824 C834 C844 ES8434 Advanced Manual...

Page 2: ...he marks symbols abbreviations and illustrations used in this manual About Marks This manual uses the following marks Mark Meaning Indicates cautions and restrictions for the correct operation of the...

Page 3: ...Reduction Print 51 Enlarging or Reducing to Fit the Specified Paper Size 52 Collating a Multiple Page Document in Units of Copies 53 Dividing a Document to Print on Some Sheets for Making a Poster 54...

Page 4: ...usted Color Settings 137 Saving Color Correction Settings 137 Importing Color Correction Settings 138 Deleting Color Correction Settings 139 Color Swatch Utility 140 Printing Color Swatch 140 Customiz...

Page 5: ...Monitoring Tool 172 Print Job Accounting Client 173 For Windows 173 For Mac OS 175 7 Using from a Mobile Device 176 Printing from a Mobile Device 177 Using the Mobile Print 177 AirPrint C834 C844 ES84...

Page 6: ...f Each Printer Driver Windows PCL Printer Driver Windows PS Printer Driver C834 C844 ES8434 Mac PCL Printer Driver C824 Only Mac PS Printer Driver C834 C844 ES8434 This section describes screens and f...

Page 7: ...ation Specifies the printing direction 7 Color Setting Switches between color printing and monochrome printing 8 Toner saving Decreases the print density to save toner 9 About Displays the version of...

Page 8: ...cription 1 Watermarks Specifies when you want to use stamp print 2 Overlays Sets when printing print formats which are registered to the printer beforehand as overlays 3 Fonts Specifies TrueType fonts...

Page 9: ...nting 3 Page Order Specifies a page order to print 4 Page Format Specifies the number of pages that is printed on a sheet of paper and booklet printing 5 Image layout Displays a sample image for the s...

Page 10: ...eck box a document is printed on paper of a different size 4 Watermarks Specifies when you want to use stamp print 5 Overlays Sets when printing print formats which are registered to the printer befor...

Page 11: ...Selects this option when you want to reverse the page orientation 6 Flip horizontally Selects this option when you want to flip the pages horizontally Item Description 1 Pages to Print Selects the pag...

Page 12: ...escription 1 Paper Source Specifies the paper feed type weight or other settings 2 Duplex Specifies this setting when you want to perform duplex printing 3 About Displays the version of the printer dr...

Page 13: ...color mode when printing in color 2 Toner save Specifies the toner saving Item Description 1 Use User Authentication Select this check box if you set user authentication when printing 2 User Name The...

Page 14: ...14 1 About Screens and Functions of Each Printer Driver Supply Levels panel Item Description 1 Consumables Displays the usage status of consumables...

Page 15: ...yout that is applied when printing multiple pages on a sheet of paper 3 Border Specifies a type of a boundary 4 Two Sided Specifies when performing duplex printing 5 Reverse page orientation Reverses...

Page 16: ...eck box 5 Destination Paper Size Selects the output paper size when the Scale to fit paper size check box is selected 6 Scale down only Only reduces a document to fit the output paper size by selectin...

Page 17: ...Panel Print Options Panel Item Description 1 Grayscale Specifies to use monochrome printing 2 Color Specifies alignment to color mode when printing in color Item Description 1 Quality1 Quality2 Feed...

Page 18: ...ion 1 Use User Authentication Select this check box if you set user authentication when printing 2 User Name The user name for user authentication 3 Password The password for user authentication 4 Aut...

Page 19: ...ions of Each Printer Driver Supply Levels Panel The Supply Levels panel may not appear depending on the environment such as how to connect to the device Item Description 1 Consumables Displays the rem...

Page 20: ...2 Printing on Various Types of Paper Printing on Envelopes Printing on Labels Printing on Custom Size Paper Printing on Long Paper This section describes how to print on various type of paper...

Page 21: ...the 9 0 on the numeric keypad and then press the ENTER button 5 Press the scroll button to select Envelope and then press the ENTER button Select a type of envelope 6 Press the ON LINE button to exit...

Page 22: ...ange other settings if necessary and then click Print If setting details are not displayed in the print dialog click Show Details at the bottom of the dialog For Mac PCL Printer Driver C824 Only 1 Sel...

Page 23: ...hat MPTray Config is displayed 7 Press the scroll button to select Media Type and then press the ENTER button 8 Press the scroll button to select the Labels and then press the ENTER button 9 Press the...

Page 24: ...ed panel 4 Select Landscape from Orientation 5 Change paper weight and the other settings if necessary and then click Print If setting details are not displayed in the print dialog click Show Details...

Page 25: ...tom Size Paper 1 Load paper that can be set to the custom size in the MP tray or tray 2 Press the scroll button several times to select Menus and press the ENTER button 3 Check that Tray Configuration...

Page 26: ...e and then select PostScript Custom Page Size from the drop down list 13 Click OK 14 Change paper weight and the other settings if necessary and then click OK 15 Click Print on the Print screen For Ma...

Page 27: ...on 7 Press the scroll button to select X Dimension and then press the ENTER button 8 Enter the paper width value using the numeric keypad and then press the ENTER button 9 Press the BACK button 10 Pre...

Page 28: ...tab 12 Change paper weight and the other settings if necessary and then click OK 13 Click Print on the Print screen For Mac 1 Open the file to print 2 Select Print from the File menu 3 Select Manage C...

Page 29: ...3 Changing the Finish Adjusting the Color Obtaining Better Print Results This section describes settings to obtain better print results when printing from a computer...

Page 30: ...drum cartridge is replaced or when 500 sheets are printed You can manually adjust color registration from the operator panel if necessary Check that Ready To Print is displayed If it is not displayed...

Page 31: ...n press the ENTER button 7 Press the or select the value you want and then press the ENTER button 8 Press the ON LINE button to exit the menu mode 9 Start printing Repeat the procedure until the color...

Page 32: ...inish using CMYK toners is suitable for printing photographs A black finish using a black toner only is suitable for printing black text or graphics If you use the Office Color function you can also s...

Page 33: ...put devices This section describes the Color Matching function on the printer driver Automatic Color matching is applied according to the document Normally use this setting as a default setting Office...

Page 34: ...such as that of an offset printing press by adjusting the CMYK color data This function is not available with Mac PCL printer driver For some applications this function is not available on Mac OS Thi...

Page 35: ...in the print dialog click Show Details at the bottom of the dialog You can print by separating each color without using any applications This function is not available with the Windows PCL printer dri...

Page 36: ...ENTER button 4 Press the scroll button to select Print Setup and then press the ENTER button 5 Press the scroll button to select Mono Print Mode and then press the ENTER button 6 Select a speed mode...

Page 37: ...registration from the operator panel if necessary 1 Press the Fn key When a printer is in the power saving mode press the POWER SAVE button to restore from the mode 2 Press the 3 0 and 1 on the numer...

Page 38: ...ivers or on Mac PS printer driver For Windows PCL Printer Driver 1 Open the file to print 2 Select Print from the File menu 3 Click Preferences 4 Select the Job Options tab 5 Select the Photo Enhance...

Page 39: ...le menu 3 Select the Print Options panel 4 Select a desired value from Quality in the Quality 1 tab 5 Change other settings if necessary and then click Print If setting details are not displayed in th...

Page 40: ...gs if necessary and then click OK 8 Click Print on the Print screen For Windows PS Printer Driver C834 C844 ES8434 1 Open the file to print 2 Select Print from the File menu 3 Click Preferences 4 Sele...

Page 41: ...Substitution Table 8 Click OK 9 Change other settings if necessary and then click OK 10 Click Print on the Print screen For Windows PS Printer Driver C834 C844 ES8434 1 Open the Printer folder 2 Right...

Page 42: ...one of the following output formats and then click OK Download as outline font Creates font images in the printer Download as bitmap font Creates font images using the printer drivers 7 Change other s...

Page 43: ...Select Image in Print Mode 6 Change other settings if necessary and then click OK 7 Click Print on the Print screen Depending on the conditions of use you can set black to overprint and reduce the whi...

Page 44: ...Print Mode is set to Image on the Windows PCL printer driver this functionis not available For Windows PCL Printer Driver 1 Open the file to print 2 Select Print from the File menu 3 Click on Preferen...

Page 45: ...tings if necessary and then click Print If setting details are not displayed in the print dialog click Show Details at the bottom of the dialog For Mac PCL Printer Driver C824 Only 1 Open the file to...

Page 46: ...Functions Saving toner and paper Various printing functions Changing the printing method Printing Confidential Document Other printing functions This section describes useful functions when printing f...

Page 47: ...sity The density of the image that is printed with this function may vary depending on the printed document If you want to keep the density of the 100 black toner check Do not save 100 black toner Ton...

Page 48: ...enu 3 Select Print Options from the panel menu 4 Select the amount of toner to save from Toner Saving in the Quality2 tab 5 Change other settings if necessary and then click Print If setting details a...

Page 49: ...For C824 C834 the optional Duplex Unit is required For Windows PCL Printer Driver 1 Open the file to print 2 Select Print from the File menu 3 Click Preferences 4 Select Long Edge or Short Edge from 2...

Page 50: ...Printer Driver C834 C844 ES8434 1 Open the file to print 2 Select Print from the File menu 3 Click Preferences 4 Select Pages per Sheet on the Layout tab 5 Select the number of pages to print on each...

Page 51: ...a Booklet Adding Semi transparent Text Watermarks Overlaying Forms or Logos Overlay You can print data formatted for one size page onto a different size page without modifying the print data This fun...

Page 52: ...PS Printer Driver C834 C844 ES8434 1 Open the file to print 2 Select Print from the File menu 3 Click Preferences 4 Select the Resize document to fit printer page checkbox on the Job Options tab 5 Sel...

Page 53: ...uments are printed without using the internal memory of the machine For Mac PS Printer Driver C834 C844 ES8434 1 Open the file to print 2 Select Print from the File menu 3 Enter the number of copies i...

Page 54: ...r Windows PCL Printer Driver 1 Open the file to print 2 Select Print from the File menu 3 Click Preference 4 Click Poster Print from Finishing Mode on the Setup tab 5 Click Options 6 Set values to Enl...

Page 55: ...If this function is not available with the Windows PCL printer driver open the Printer folder right click the OKI C844 PCL6 icon and then select Printer properties the Advanced tab Print processor OKX...

Page 56: ...to print 5 Click New 6 Enter text that is printed as a watermark in Text in Watermarks 7 Set Font Size or other settings if necessary and then click OK 8 Check that the watermark to print is selected...

Page 57: ...ration information on the driver To apply an overlay by specifying the pages select Custom and then enter the pages to which you want to apply the overlay in Custom Pages 11 Click OK For Windows PS Pr...

Page 58: ...tered with the Storage Manager plug in for Configuration Tool in Form Name and then click Add 6 Enter a name of the overlay in Overlay Name 7 Select the pages of the document on which to print the ove...

Page 59: ...dows PS printer driver and Mac PCL printer driver For Windows PCL Printer Driver 1 Open the file to print 2 Select Print from the File menu 3 Click Preferences 4 Click Paper Feed Options on the Setup...

Page 60: ...3 Click Preferences 4 Select Multi Purpose Tray from Source on the Setup tab 5 Click Paper Feed Options 6 Select the Feed paper individually check box and then click OK 7 Change other settings if nec...

Page 61: ...ck Print 7 When the message is displayed on the display screen load paper in the MP tray and press the ON LINE button When printing a multiple page document the same message is displayed every time yo...

Page 62: ...ect Print from the File menu 3 Click Preferences 4 Select Back to Front from Page Order on the Layout tab 5 Change other settings if necessary and then click OK 6 Click Print on the Print screen If Pa...

Page 63: ...ws PCL Printer Driver 1 Open the file to print 2 Select Print from the File menu 3 Click Preferences 4 Select Auto from Source on the Setup tab 5 Change other settings if necessary and then click OK 6...

Page 64: ...printer driver Supported Paper User s Manual Setting Trays for the Auto Tray Switching In the default settings the Tray Usage is Do Not Use When at default settings the MP tray is not supported by th...

Page 65: ...en click OK 8 Click Print on the Print screen For Mac PS Printer Driver C834 C844 ES8434 1 Open the file to print 2 Select Print from the File menu 3 Select Paper Feed from the panel menu 4 Select Aut...

Page 66: ...print 2 Select Print from the File menu 3 Select Secure Print from the panel menu 4 Select Shared Print in the Job Type You can name a print job from Job Type Options 5 Change other settings if necess...

Page 67: ...5 Click Advanced 6 Select Job Spool and select On for Settings and then click OK 7 Change other settings if necessary and then click OK 8 Click Print on the Print screen For Windows PS Printer Driver...

Page 68: ...2 Select Print from the File menu 3 Click PDF in the print dialog box and then select a file format 4 Enter the name of a file select a save destination and then click Save You can download PostScript...

Page 69: ...memory of this machine a message is displayed to inform you that the file system is full and the print job is not executed You cannot use this function with the poster printing function and the bookle...

Page 70: ...etails are not displayed in the print dialog click Show Details at the bottom of the dialog Printing an Encrypted Password protected Document from This Machine Print an encrypted and password protecte...

Page 71: ...dditional Tray You can print out the details of PostScript errors when they occur This function is not available with C824 This function is not available with the PCL printer driver or on Mac For Wind...

Page 72: ...button 6 Press the scroll button to select an emulation mode and then press the ENTER button 7 Press the ON LINE button to exit the menu mode Print attachment file of received E mail PDF v1 7 JPEG an...

Page 73: ...SB Memory and then press the ENTER button 3 When Select Print File is displayed press the ENTER button 4 Press the scroll button or to select the file to print and press the ENTER button 5 To set othe...

Page 74: ...guaranteed Save the settings with a name that you can distinguish 1 Open the file to print 2 Select Print from the File menu 3 Set the printing settings to save 4 Select Save Current Settings as Prese...

Page 75: ...for the settings and click OK 6 Click Cancel To use the saved settings select the name from Presets in the print dialog You can enlarge margins of top bottom left and right respectively on paper by 30...

Page 76: ...e printing position and does not increase accuracy of the writing start position 2 mm 1 Press the Fn key 2 Press the function number of the tray to adjust and press the ENTER button The function numbe...

Page 77: ...5 Management Setting the Printer Checking the Current Settings Changing the Printer Settings User Authentication Access Control Initializing Web Page of This Machine...

Page 78: ...can print and check the printer configurations and a usage report 1 Press the Fn key When the printer is in the power saving mode press the POWER SAVE button to restore from the mode 2 Press the 1 0 a...

Page 79: ...the setting 5 Press the ENTER button 6 Press the ON LINE button to exit the menu mode Network Setup Administrator Setup Menu Item Factory Default Description Enabling Default Gateway When Wireless LA...

Page 80: ...er size of the tray and the page size of the document do not match A4 Letter Override Yes Automatically switches paper to print from A4 to Letter if A4 document is to be printed with A4 paper run out...

Page 81: ...mber of tray 2 for the paper feed destination command ESC l H in PCL5 emulation This menu is displayed only when the tray 5 is installed Item Factory Default Description Item Factory Default Descripti...

Page 82: ...ble Set whether to verify a job before printing If enabled the machine verifies that the job is not altered before starting printing The security is enhanced however it will take longer to start print...

Page 83: ...uto Power Off Auto Config Sets the behavior of Automatic Power Off Peak Power Control Off If it is set to On the machine acts to lower its maximum energy consumption Note that the machine may take lon...

Page 84: ...Timing 2500 Sets the timing for the near life warning for the fuser unit Available range 500 to 5000 count 500 count increments Belt Near Life Timing 2000 Sets the timing for the near life warning for...

Page 85: ...counter from the Admin Setup Trays 2 5 are displayed when corresponding optional trays are installed Tray1 Tray2 Tray3 Tray4 Tray5 A4 Letter Impressions Count Color The total number of color pages to...

Page 86: ...When Enabling Default Gateway is set to Wireless Infrastructure displays the Gateway Address of the wireless LAN MAC Address Displays the MAC Address of the wireless LAN I F IPv6 Address Local Displa...

Page 87: ...he time to switch from the power save mode to the sleep mode Available range 1 minute 2 minutes 3 minutes 4 minutes 5 minutes 10 minutes 15 minutes 30 minutes 60 minutes Auto Power Off Time 4 hours Se...

Page 88: ...ly if the color contrast becomes weak or blots or lines become conspicuous when printing on plain paper If fine blots or lines appear decrease the value If the dark part becomes light increase the val...

Page 89: ...ng temperature when changing from narrow sheets to wide sheets The narrow paper printing change to low speed paper thickness light paper to thick paper Ultra Light Paper Care Mode Off Set to on to red...

Page 90: ...a maintenance report counters that cannot be reset and number of times consumables are replaced that cannot be reset to the Usage Report Disable Prints the counters that can be reset and the number o...

Page 91: ...reless LAN module unmounted model dn series by the factory default Menu Lockout Off When set to On the lists of Administrator Setup menu and User Setting menu are hidden and cannot be selected Only pr...

Page 92: ...r Setup and press the ENTER button 5 Press the scroll button or to select the setup menu on which you want to change a setting and then press the ENTER button 6 Adjust the volume of the selected item...

Page 93: ...fails to Always On or Last State The operation that uses an uninterruptible power supply UPS or inverter is not guaranteed Do not use an uninterruptible power supply UPS or inverter Boot Menu By the f...

Page 94: ...on the following procedure is required to be performed on the Web page by the administrator Register roles for enabling disabling operations Registering Roles There are two types of user authenticatio...

Page 95: ...le Descriptions on the role list Role Description Enter explanation for the role etc Permission Set to Permit Prohibit each operation or Forced prohibit to any operations If Forced prohibit is set ope...

Page 96: ...code PIN Enter the PIN Card ID Enter the IC card information Role Sets the role Several roles can be assigned to a user Group Set the group the user belongs to Group can be used in the Account Managem...

Page 97: ...ication You do not need to enter if you do not use the PIN authentication User Name Sets the attribute key of the user name registered in the LDAP server The default User Name is set to sAMAccountName...

Page 98: ...If Color is selected received attached files are printed in color and monochrome according to their color settings If Mono is set the received attached files are printed in monochrome If the attached...

Page 99: ...al Name and press the ENTER button 3 Enter the user name using the numeric keypad and then press the ENTER button 4 Enter the password using the numeric keypad and then press the ENTER button 5 When y...

Page 100: ...Device Options tab 9 Click OK 10 Change other settings if necessary and then click OK 11 Click Print on the Print screen Setting User Authentication Options Set the user authentication options of prin...

Page 101: ...s user name check box if you use the logon name to Mac as a user name 6 If Authentication Type is displayed select user s authentication destination and authentication type from the list Auto Follows...

Page 102: ...ation this function is not available If Register general user s IC card is set to Disable by the administrator this function is not available Enabling Access Control 1 Log in to the machine using the...

Page 103: ...min Setup and press the ENTER button 2 Enter the administrator password using the numeric 0 9 keys and press the ENTER button The factory default administrator password is 123456 If the administrator...

Page 104: ...ctory default settings This procedure initializes all the network settings 1 Press the scroll button several times to select Admin Setup and press the ENTER button 2 Enter the administrator password u...

Page 105: ...n several times to select Admin Setup and press the ENTER button 2 Enter the administrator password using the numeric 0 9 keys and press the ENTER button The factory default administrator password is...

Page 106: ...tion with IPSec Limiting by Using an IP Address IP Filtering Limiting by Using a MAC Address MAC Address Filtering E mail Alert Using SNMPv3 Using IEEE802 1X Wired LAN Setting IEEE802 1X Wireless LAN...

Page 107: ...About the IP Address of this machine refer to Test Printing from the Printer User s Manual If the IP address includes a value in one or two digits do not enter 0 before the value Communications may n...

Page 108: ...Management New Admin Password 5 Enter a new password in New Password We suggest you to write down the set password not to forget it The administrator password is required when changing the settings et...

Page 109: ...the machine 192 168 0 2 Checking the Machine Status 1 Open the Web page of this machine Open the Web Page of This Machine 2 Log in as the administrator 3 The following screen is displayed You can che...

Page 110: ...e of This Machine 2 Click Export MenuMap 3 Name the file and save it Set the length of idle time before entering Power Save mode 1 Open the Web page of this machine Open the Web Page of This Machine 2...

Page 111: ...uto Power Off 1 Open the Web page of this machine Open the Web Page of This Machine 2 Log in as the administrator 3 Click Admin Setup 4 Click User Install Power Setup 5 Select Enable from Auto Power O...

Page 112: ...lete the existing certificate click Delete Certificate 5 Specify detailed settings by following the on screen instructions 6 Check the settings and then click OK In the case of a self signed certifica...

Page 113: ...ble Since Role Manager of the Configuration Tool is not available restrict access to this machine from the web page The web page of this machine cannot be opened with Web Setting of Network Extension...

Page 114: ...der and select Add a Printer 2 Select Add a network wireless or Bluetooth printer in the Add Printer wizard 3 Select The printer that I want isn t from the list of available printers 4 Select Select a...

Page 115: ...is not registered tries to access the machine it is rejected When you try to access a host that is not registered the attempt is invalid Be sure to configure the machine in advance before configuring...

Page 116: ...the Edit Properties check box and then click Finish Setting Key Exchange 1 Select the General tab in the New IP Security Policy Properties window 2 Click Settings 3 Enter a value minutes in Authentic...

Page 117: ...s those specified in ESP Encryption Algorithm ESP Authentication Algorithm AH Authentication Algorithm and LifeTime in the Phase2 Proposal setting in Setting This Machine 10 Click Next on the IP Traff...

Page 118: ...match 6 Click Submit The new settings take effect when the network function of this machine restarts You can use only IPv4 for IP filtering You can control access to the machine by using a MAC address...

Page 119: ...dow You can check the current settings of up to two addresses in the main window Select the address you want to check from the list box 11 Click Submit The new settings take effect when the network fu...

Page 120: ...hine and the machine is reconnected is to the authentication switch Setting by Using EAP TLS This section describes how to set EAP TLS which is an EAP authentication type 1 Open the Web page of this m...

Page 121: ...nd then click Import 10 Enter the file name of the CA certificate and then click OK Specify the certificate of the certificate authority CA to be used when authenticating RADIUS server You can import...

Page 122: ...OK 11 Select Authenticate Server and then click Import If you select Not authenticate Server go to step 13 12 Select the CA certificate file and then click OK Specify the certificate of the certificat...

Page 123: ...enu Wireless Infrastructure Manual Setup 5 Select Enable for Wireless Infrastructure in Basic Settings Disable is set by default 6 Enter SSID name for wireless access point you want to connect in SSID...

Page 124: ...in Method Anonymous Connects to the LDAP server by Anonymous authentication Simple Connects to the LDAP server by Simple authentication Digest MD5 Connects to the LDAP server by Digest MD5 authentica...

Page 125: ...y if you log in as the administrator of the machine E mail Setup Web Page About Items That Can be Set or Checked Item Description Status Displays the current status of the machine All the warnings and...

Page 126: ...ou to perform IPP print Authentication Sets authentication Google Cloud Print Sets Google Cloud Print information Windows Rally Sets Windows Rally information IEEE802 1X Sets EEE802 1X EAP information...

Page 127: ...rint data in hex To exit this mode restart the machine Color Menu Sets Color settings System Configuration Menu Sets operation modes alarm release and other machine operation settings for each situati...

Page 128: ...tor of the machine E mail Printing Prints a PDF JPEG and TIFF file if it is attached on an e mail that the machine receives Receive Settings Sets an e mail receive settings Item Description Links Disp...

Page 129: ...olor Correct Utility Color Swatch Utility PS Gamma Adjuster Utility Configuration Tool OKI LPR Utility Network Extension Network Card Setup Mac Monitoring Tool Print Job Accounting Client This chapter...

Page 130: ...Utility You can adjust the color density used for photographs when printing from a computer PS Gamma Adjuster Utility Configuration Tool You can set the access control settings of this machine regist...

Page 131: ...f output colors by adjusting the palette color output gamma value hue or saturation of the primary colors Color Correct Utility Network Card Setup You can set a network Network Card Setup Mac Profile...

Page 132: ...s are set 1 Insert the Software DVD ROM into a computer 2 When AutoPlay is displayed click Run Setup exe If the User Account Control dialog is displayed click Yes 3 Select a language from the drop dow...

Page 133: ...tallation is complete click Finish For Mac You can copy a utility by dragging to any location You can also run a utility directly from the Software DVD ROM 1 Insert the included Software DVD ROM into...

Page 134: ...osoft Excel For Windows 1 Click Start and select Okidata Color Correct Utility 2 Select Office Palette Tuning and then click Next 3 Select the machine and click Next 4 Select the name the setting you...

Page 135: ...of the setting you want and then click Print Swatches 6 Click Next 7 Click Print Palette 8 Compare the colors of the color palette on the screen with those of the printed color sample for adjustment C...

Page 136: ...color is used for printing and the slide bar of hue is fixed 6 Click Print Test 7 Check the print result If you are not satisfied with the result repeat steps 5 to 7 8 Click Next 9 Enter a name and th...

Page 137: ...o print 2 From the File menu select Print 3 Click Office Color on the Color panel 4 Select the setting you created with the Color Correct Utility from RGB Color Setting You can save the adjusted color...

Page 138: ...the file and click Open 6 Select the settings to import and click Import 7 Check that the setting is imported properly and then click Finish For Mac 1 Launch Color Correct Utility 2 Select the machin...

Page 139: ...ick Delete 5 On the confirmation screen click Yes 6 Check that the setting is deleted properly and then click Finish For Mac 1 Launch Color Correct Utility 2 Select the machine 3 Click Next 4 Click Ma...

Page 140: ...om the application This utility cannot be used on Mac When the printer driver is installed the color swatch utility software is installed at the same time Printing Color Swatch Customizing the Color S...

Page 141: ...k OK 8 Check that the color is adjusted as you want If you are not satisfied with the printing result repeat from step 1 to 8 1 Open the file you want to print 2 Select the text or graphic to adjust t...

Page 142: ...ck box in the Color tab for the windows print driver or select None for Custom gamma in the Quality2 tab on the Print Options panel for the Mac OS printer driver The Select Printer list of PS Gamma Ad...

Page 143: ...For Windows PS Printer Driver C834 C844 ES8434 1 Open the file to print 2 Select Print from the File menu 3 Click Properties 4 Check the Custom Gamma Adjustment check box on the Color tab 5 Select th...

Page 144: ...Form Overlay Checking the Free Space in Memory Hard Disk Drive Registering a User Name and Password Removing This Machine Descriptions of Screens for Configuration Tool When you install this machine f...

Page 145: ...and information of this machine 1 Click Start and then select Okidata Configuration Tool 2 Select the machine from Registered Device Table 3 Select the Device Info tab If this machine is connected to...

Page 146: ...setting if necessary 5 Click Update Device Settings 1 Click Start and then select Okidata Configuration Tool 2 Select Alert Info from the Plug ins menu 3 Select Setting devices 4 Click Update device...

Page 147: ...he event log you can check whether there are any records about the machine that is registered 1 Click Start and then select Okidata Configuration Tool 2 Select Alert Info from the Plug ins menu 3 Sele...

Page 148: ...ct Network Setting from the Plug ins menu 3 Select Environment Settings 4 Change the search conditions if necessary and then click OK Changing the IP Address You can change the IP address for this mac...

Page 149: ...project files to printer 13 Click OK You can register such as logos to the machine as forms and then print overlays This section describes how to register forms About how to Print Overlays Overlaying...

Page 150: ...ster the machine referring Registering This Machine 7 Click Send project files to printer 8 Click OK 1 Click Start and then select Okidata Configuration Tool 2 Select Storage Manager from the Plug ins...

Page 151: ...user belongs to You can enter PIN optional in the user setting You cannot use admin as a new user name 9 Click OK 10 Click Save to device Changing User Settings 1 Click Start and then select Okidata...

Page 152: ...o device You can remove a registered machine 1 Click Start and then select Okidata Configuration Tool 2 Right click the machine from Registered Device Table 3 Select Remove device 4 Click Yes on a con...

Page 153: ...function of each screen Device Info tab The status and information of the machine are displayed User Setting tab Set the user role and other settings Descriptions of Screens for Configuration Tool Ite...

Page 154: ...the basic Alert Info settings 3 Setting devices Edit the communications settings for each device 4 Filter settings Edit the filter conditions for popup notifications 5 Display log Display the notific...

Page 155: ...155 6 Utility Software Storage Manager plug in Create or edit a file to download to a device...

Page 156: ...LPR Utility Checking the Status of a Registered Device Forwarding Print Jobs to a Registered Device Printing the Same Document from the Registered Multiple Devices Opening the Web Page of the Register...

Page 157: ...Print 1 Start OKI LPR Utility 2 Select Add Printer from the Remote Print menu If the User Account Control dialog is displayed click Yes 3 Select Printer Name Network printers and printers connected t...

Page 158: ...t Redirect from the Job menu and then select the destination device 4 Click OK Forwarding Print Jobs Automatically If you are unable to print because the selected device is busy offline out of paper o...

Page 159: ...ns 7 Click Add 8 Enter the IP addresses of devices from which you want to print at the same time and then click OK 9 Click OK You can open the Web page of this machine from OKI LPR Utility 1 Start OKI...

Page 160: ...network administrator manually changes the IP address of the printer 1 Start OKI LPR Utility 2 Select Setup from the Option menu 3 Select the Auto Reconnect check box and then click OK 1 Start OKI LP...

Page 161: ...ed 3 Select Download from Remote Print 4 Select a file and then click OK The file is sent to the machine You can use OKI LPR Utility to delete unnecessary print jobs 1 Start OKI LPR Utility 2 Select a...

Page 162: ...rator rights 1 Check that OKI LPR Utility is closed 2 Click Start and then select Okidata Uninstall OKI LPR Utility If the User Account Control dialog is displayed click Yes 3 Click Yes on a confirmat...

Page 163: ...gh a TCP IP network Network Extension works in conjunction with the printer driver Do not install only Network Extension Network Extension only functions when the printer driver is connected to OKI LP...

Page 164: ...You can get the composition of options of the connected machine and automatically set the printer driver For Windows PCL Printer Driver 1 Open the Printer Properties screen 2 Select the Device Option...

Page 165: ...are 1 Click Start and then select Control Panel Programs and Features 2 Select OKI Network Extension and then click Uninstall 3 Follow the instructions on the screen and complete the uninstallation Un...

Page 166: ...Setup 1 Start Network Card Setup Installing Software 2 Select this machine from the list 3 Select IP Address Settings from the Operations menu 4 Change other settings if necessary and then click Save...

Page 167: ...d and then click Save 5 Enter the administrator password and then click OK The factory default password is 123456 The password is case sensitive 6 Click OK in a confirmation window Opening the Web pag...

Page 168: ...pdating the printer software Changing the Monitoring Tool Settings Deleting a Printer Problems on Monitoring Tool Register a printer Monitoring Tool monitors 1 Select Start Okidata Monitoring Tool and...

Page 169: ...ecks the printer status and displays the following screen If there are printers with updatable firmware Update recommended is displayed in the Update field Select the checkbox of the device and then c...

Page 170: ...start Monitoring Tool 2 Select Environmental settings from the Settings menu 3 Set the values in each tab and then click Apply Printer communication tab Updating the printer software Changing the Moni...

Page 171: ...wait time for deciding the timeout error when connecting to the web site Communication retries Sets the number of the retry attempts when communication with the web site fails Communication retry inte...

Page 172: ...on The entered administrator password is incorrect Check the administrator password The machine is turned off Check that the machine is turned on then try firmware update again If the Executing Mainte...

Page 173: ...to set the same mode to all the printer drivers you do not need to set the mode again Setting the User Name and Job Account ID You can set the user name and Job Account ID in the printer driver prope...

Page 174: ...software Describe user names and user IDs in an ID file in the following order A login user name a user name that is entered to log in to Windows a user ID a user ID that is tied to the login user na...

Page 175: ...me user ID and user name separated with commas 3 Save the file in a CSV format 4 Start the Print Job Accounting client 5 Select Import from the File menu 6 Select the CSV file you created in step 3 an...

Page 176: ...7 Using from a Mobile Device Printing from a Mobile Device Displaying How to Fix the Error on the Mobile Device Mobile Device Problems...

Page 177: ...s point of the machine or connect to the access point of the machine AP mode directly 2 Register the machine to the app and set the machine as a destination When the machine is already registered set...

Page 178: ...rint Print An overview of AirPrint is provided and the basic settings are described here About AirPrint Print AirPrint Print is a function that enables you to easily print from a Mac You can print fro...

Page 179: ...nt you must configure settings from the terminal side Proceed to Printing with AirPrint Print Registering the Machine in a Computer Mac If you use AirPrint Print for the first time you must add the ma...

Page 180: ...e of the printer model that you used most recently and exists on the same network is displayed If you print for the first time and any model name other than this machine is displayed select this machi...

Page 181: ...P mode Connect this machine and the access point via wireless LAN infrastructure or wired LAN To connect via wireless LAN Infrastructure please set it in advance Connecting to a Wireless LAN User s Ma...

Page 182: ...nt Google Cloud Print is a print service provided by Google that enables you to print from a mobile phone smartphone computer or other network devices An overview of Google Cloud Print is provided and...

Page 183: ...ough this manual describes the procedure for setting the servers from the operator panel it is recommended to set the servers from the Web page of this machine if you can operate from a computer To ch...

Page 184: ...password is 123456 If the administrator password is changed enter the updated password 22 When the Register message is displayed select Yes and press the ENTER button 23 The authentication destination...

Page 185: ...int automatically or you want to print immediately after receiving data 1 Check that the machine is turned on 2 Press the scroll button several times to select Google Cloud Print and press the ENTER b...

Page 186: ...int settings Checking the Use of Cloud Service Settings Check the use status of the Cloud service from the Web page of this machine 1 Open the Web page of this machine Open the Web Page of This Machin...

Page 187: ...ress the scroll button several times to select Google Cloud Print and press the ENTER button 3 Press the scroll button to select Delete Registered Information and press the ENTER button 4 Enter the ad...

Page 188: ...int administrator screen https www google com cloudprint the registration information remains in the machine In such a case delete the registration information from the operator panel of the machine 1...

Page 189: ...o the NFC mark on the machine so that the machine searches the page describing detailed handling methods from the FAQ in the web site and displays the search results on the mobile device 1 NFC functio...

Page 190: ...tion is not available Set it to Enable Is the wireless setting on the mobile device enabled Enable the wireless setting on the mobile device Point to check Solution Reference Is the machine turned on...

Page 191: ...ed on Turn on the machine If the machine is turned on turn it off and then back on and then check whether the problem is solved Turning On the Power User s Manual Turning Off the Power User s Manual I...

Page 192: ...en the ATTENTION Indicator Lights Up Blinks User s Manual Point to check Solution Reference Troubleshooting for IPP Everywhere Point to check Solution Reference Is the power supply of this machine tur...

Page 193: ...le if they are not connected to the Internet Vist Chromebook s website for details Point to check Solution Reference Google Cloud Print Problems Point to check Solution Reference Is the machine connec...

Page 194: ...ver connection error The connection cannot be established due to your network environment Check with your network administrator xxxxxx14 An error with the DNS server has occurred Check the DNS server...

Page 195: ...47095402EE Rev6...

Reviews: