background image

ES3640e MFP User’s Guide

Scanning > 98

(c)

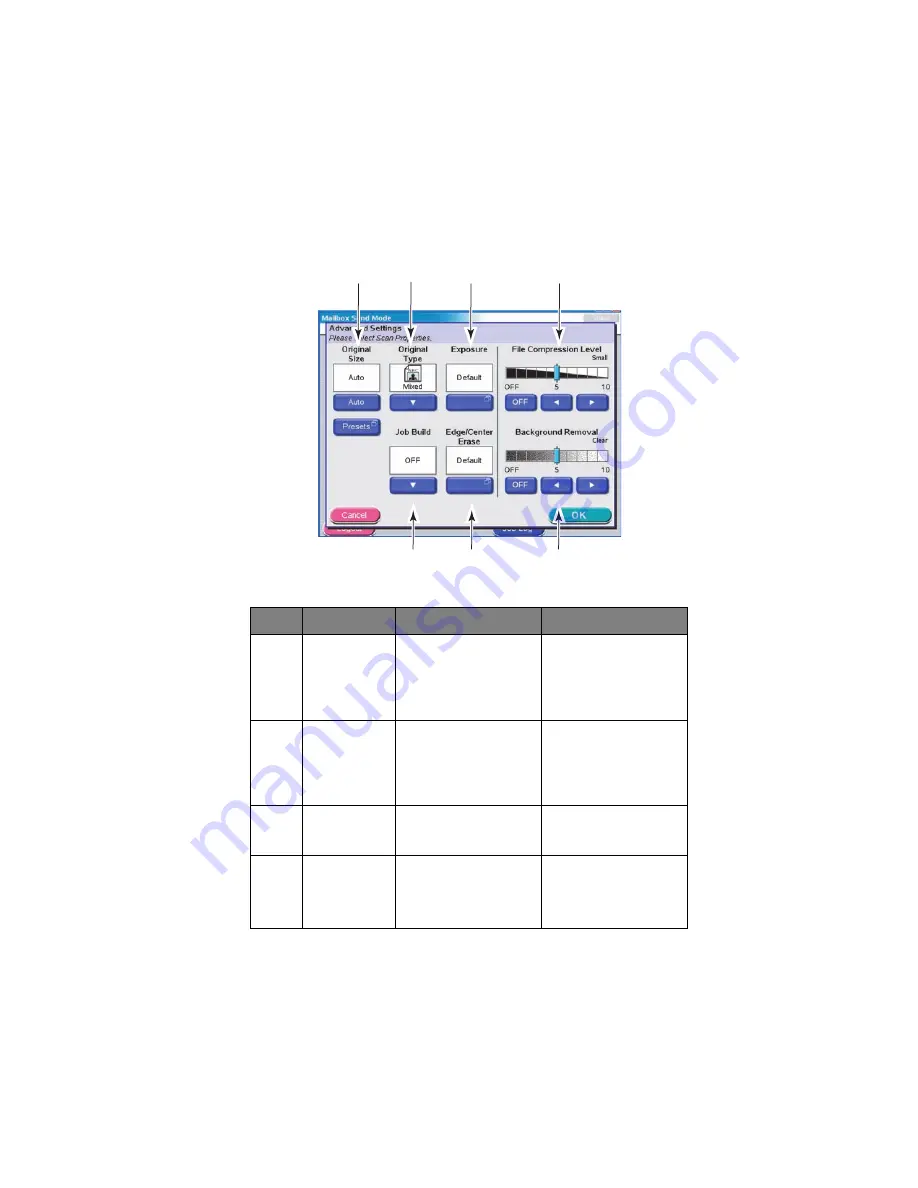
To access advanced settings, press the Advanced 
Settings button (5):

Select from the following features as required:

No

Feature

Options

Description

1

Original Size

Auto, 5.5x8.5, 

5.5x8.5R, 8.5x11, 

8.5x11R, 8.5x13, 

8.5x14, 11x17, A5, 

A5R, A4, A4R, A3, B5, 

B5R, B4

Allows you to select the 

scanned document size.

2

Original Type

Mixed, Text, Photo

Allows you to specify 

the type of images on 

the document. This 

allows automatic (pre-

set) optimization of 

image quality settings.

3

Exposure

-5 to +5 by 1

Allows you to select 

Brightness level and 

Contrast level.

4

Job Build

OFF / ON

Allows you to construct 

a single copy job or 

scan job from multiple 

individual sheets or 

originals.

4

5

1

2

3

6

7

Summary of Contents for ES3640eMFP

Page 1: ......

Page 2: ...herein The most up to date drivers and manuals are available from the Oki web site http www okiprintingsolutions com Copyright 2006 Oki Data Americas Inc Oki and Microline are registered trademarks of...

Page 3: ...ES3640e MFP User s Guide Warning 3 Important safety warnings follow Be sure to read and observe all safety warnings in this User s Guide...

Page 4: ...Printer unit 25 Paper recommendations 25 Paper input and output information 26 Trays and stackers 27 Tray and stacker examples 29 Using the stackers 34 Scanner unit 36 Paper recommendations 36 Loading...

Page 5: ...monitoring 58 Using the Help facility 59 Avoiding incompatibility situations 60 Copying 61 Basic Settings tab 62 Details tab 64 Image Quality tab 66 Finishing tab 68 Scanning 69 E mail send mode 69 Co...

Page 6: ...stalling accessories 121 Troubleshooting 122 General 122 Networking 122 Paper jams 122 Paper jams printer unit 122 Open cover paper jam side cover 125 Open cover paper jam top cover 127 Paper jams dup...

Page 7: ...ochrome pages printed 173 Print Pages 174 Print Information example demonstration page 175 Print Secure Job 176 Menus 176 Tray Configuration 176 System Adjust 181 Menus example 1 Tray 1 transparencies...

Page 8: ...ing up copying parameters 199 Setting up scan properties 200 Administrator setup 201 Generating reports 203 Scanner unit counter readings 204 Setup complete 204 Appendix G Troubleshooting network 205...

Page 9: ...Arts capability Features space saving integrated multifunction system easy to use control panels high speed printing copying and scanning EFI Fiery print control and job management software Graphic Ar...

Page 10: ...the best use of its many features Also included are guidelines for troubleshooting and maintenance to ensure that it performs at its best Additionally information is provided for adding optional acce...

Page 11: ...nd viewing tools provided in Acrobat You can access specific information in two ways In the list of bookmarks down the left hand side of your screen click on the topic of interest to jump to the requi...

Page 12: ...e procedure is 1 From the toolbar select File then Print or press the Ctrl P keys 2 Choose which pages you wish to print a All pages 1 for the entire manual b Current page 2 for the page at which you...

Page 13: ...ES3640e MFP User s Guide MFP Overview 13 MFP Overview Identifying system units 1 Printer unit with high capacity feeder HCF 2 Scanner stand 3 Scanner unit 4 Finisher unit optional accessory 1 2 3 4...

Page 14: ...carefully press the release handle 2 so that the shelf lifts out of the way The stand includes hydraulics for moving the scanner shelf up and down Use extreme caution NEVER ATTEMPT TO RAISE OR LOWER...

Page 15: ...the top cover squeeze the top cover handle 1 to release the catch and raise the cover 3 To close the top cover push gently 1 until the cover stops midway and then push harder 2 to close the cover com...

Page 16: ...t handle of the scanner shelf then press the release handle and carefully lower the scanner shelf making sure it locks in place TO PREVENT ANY POSSIBLE CRUSHING OF FINGERS KEEP YOUR HANDS AWAY FROM TH...

Page 17: ...omponents of your printer unit are identified in the graphics below 1 Paper holding arm 2 Top cover face down stacker 3 MP Tray multi purpose tray 4 Tray 1 side cover 5 Paper size label 6 Paper gauge...

Page 18: ...ES3640e MFP User s Guide MFP Overview 18 11 Power on off switch 12 Face up stacker 13 Duplex unit 14 Interface unit 10 12 11 13...

Page 19: ...nector 16 Parallel interface connector 17 USB interface connector NOTE The three connectors at 17a are for printer unit to scanner unit interconnection 18 Power connector 19 Ventilation openings 20 Im...

Page 20: ...drum cartridge and toner cartridge Magenta 22 Image drum cartridge and toner cartridge Yellow 23 Image drum cartridge and toner cartridge Black 24 Toner cartridge 25 Image drum cartridge 26 Fuser unit...

Page 21: ...ES3640e MFP User s Guide MFP Overview 21 29 Drum basket handle 30 Drum basket 28 29 30...

Page 22: ...ES3640e MFP User s Guide MFP Overview 22 31 High capacity Feeder HCF 3 trays 31...

Page 23: ...er unit The major components of your scanner unit are identified in the graphics below Front view 1 Automatic document feeder ADF front cover 2 ADF paper tray 3 ADF paper support 4 Document cover 5 Co...

Page 24: ...able to connect the ADF to the main unit 3 Display port to connect to printer unit 4 Control port to connect to printer unit 5 ADF port to connect the ADF cable 6 Data port to connect to printer unit...

Page 25: ...obtained when using standard weight 20 24 lb 75 90 g m paper designed for use in copiers and laser printers Suitable types are OKI Bright White 32 lb US Bond HammerMill Laser Print Radiant White 24 l...

Page 26: ...input and output information The following table relates paper parameters to input trays Tray 1 to Tray 4 numbering from the top and MP Tray and to output areas Face down stacker and Face up stacker...

Page 27: ...he multi purpose tray is used for media sizes additional to those of the standard trays heavier media weights and special media The multi purpose tray can handle the same sizes as the standard trays b...

Page 28: ...17 57 lb 64 216 g m Pages printed in reading order page 1 first will be sorted in reading order last page on top facing down Face up stacker The face up stacker should be opened and the tray extensio...

Page 29: ...he paper rear stopper tab 1 and adjust the tab to the required paper size 3 Fan the paper to be loaded then tap the edges of the stack on a flat surface to make it flush 4 Load the paper face down and...

Page 30: ...ce between the paper and the guides and rear stopper Do not overfill the paper tray Capacity depends on the paper type Do not load damaged paper Do not load paper of different sizes or types at the sa...

Page 31: ...verview 31 Using the MP Tray 1 Squeeze the handle 1 and open the multi purpose tray 2 Fold out the paper support section and swivel out the extension supports 2 3 Adjust the paper guides 3 to the size...

Page 32: ...d load the paper into the multi purpose tray with pre printed side up and top edge into the printer unit For two sided duplex printing on letterhead load the paper with pre printed side down and top e...

Page 33: ...ES3640e MFP User s Guide MFP Overview 33 Do not exceed the paper capacity of approximately 230 sheets 100 transparencies or 25 envelopes Maximum stacking depth is 1in...

Page 34: ...ace up stacker 1 on the left side of the printer is closed its normal position paper is ejected to the face down stacker on the top of the printer unit Face up stacker The face up exit path is used fo...

Page 35: ...ES3640e MFP User s Guide MFP Overview 35 2 Flip out the paper support 2 3 Swivel out the paper support extension 3 2 3...

Page 36: ...labels attached or have other surface unevenness are less then 100mm in width or less than 180mm in length Such documents may cause feed errors or skew in the ADF Loading the ADF For documents of siz...

Page 37: ...r s Guide MFP Overview 37 3 With the text face up introduce the document far enough into the ADF to be able to adjust the paper guide 1 to center the document in the ADF 4 Release the document gently...

Page 38: ...ocument face down top of the document toward the user Scan to E Mail Scan to FTP Scan to Mailbox Scan to Hold Queue Remote Tool document face down top of document to left of user 1 Open the document c...

Page 39: ...control panels are complementary to each other and work together as component parts of the overall system For example a message on the scanner unit control panel will redirect you to the printer cont...

Page 40: ...ady light On indicates ready to print Flashing indicates processing print data Off indicates unable to receive data offline 3 Attention light Off indicates normal operation Flashing indicates error s...

Page 41: ...eceive data 10 Cancel button Cancels current print job 11 Help button Provides additional textual or image data to supplement what is displayed on the display panel Display Panel messages There are fo...

Page 42: ...ncluding Restart Available to administrator level users Restricts the changes that general users can make via the user menus System maintenance menu accessed by pressing the Up arrow and Down arrow bu...

Page 43: ...much is left of a selected consumable Many of these menu settings can be and often are overridden by settings in the Windows printer drivers However several of the driver settings can be left at Print...

Page 44: ...elow 1 Menu button Starts ends an LCD image adjustment feature OSD menu to adjust brightness contrast image position etc For further details refer to Appendix H Touch screen setup on page 207 2 Up arr...

Page 45: ...OPY button Pressing this button selects copy mode on the touch screen 6 SCAN TO E MAIL button Pressing this button selects e mail send mode on the touch screen 7 SCAN TO NETWORK button Pressing this b...

Page 46: ...illuminated when the scanner unit is on 15 RESET button Pressing this button returns all settings of a selected function to their default values but does not stop jobs in progress 16 STOP button Pres...

Page 47: ...ng started This section provides information to help you get started with using your MFP Turning Off On Turning Off 1 Printer unit Press and hold down the Shutdown Restart button 1 on the control pane...

Page 48: ...ing started 48 When the scanner unit display shows that shut down has been completed turn off the scanner unit at the power switch 1 3 Use the On Off switch to turn off the printer unit Please wait as...

Page 49: ...r unit at the power switch 1 NOTE If the display panel shows that you can either turn off or restart the printer press Shutdown Restart to turn on the printer 2 If the printer is turned off no power u...

Page 50: ...edly until Configuration is highlighted 6 Press the Enter button to select Configuration 7 Press the Enter button to execute the command and a Configuration document is printed 8 After printing the co...

Page 51: ...same type they appear as 2 3 etc These numbers depend on the order of connecting or turning on each printer unit Ethernet For network cable connection NOTE Interface cables are not supplied with your...

Page 52: ...hen to connect the USB cable when you run the Drivers CD If you are connecting your printer unit directly to a stand alone computer proceed to the section entitled Using the Drivers CD Connecting the...

Page 53: ...the computer If your printer unit is to be installed as a network printer please refer to the relevant section in the Software Installation Guide and Configuration Guide for further details on how to...

Page 54: ...ES3640e MFP User s Guide Getting started 54 Using the Drivers CD For instructions on installing the drivers and other software refer to the Software Installation booklet...

Page 55: ...ES3640e MFP User s Guide Printing 55 Printing For full details of how to use the printer unit and any optional accessories to print jobs efficiently and effectively please refer to the Printing Guide...

Page 56: ...l not be able to use it until you have provided a valid PIN and logged in After using it you will be expected to log out leaving the scanner unit in access control mode unable to be used by unauthoris...

Page 57: ...ormation 57 2 Press the Login button 1 and the default Copy Mode screen appears the scanner unit now being available to use Logging out 1 When you have finished using the scanner unit press the Logout...

Page 58: ...er unit operating information 58 Status monitoring See also Appendix C Scanner Unit Status on page 187 The Status button 1 changes color depending on the status of the MFP Blue ready status Orange war...

Page 59: ...s the Status button to display the status window 2 Press the Close button to close the status window Using the Help facility To obtain help press the HELP button on the scanner unit control panel 1 Se...

Page 60: ...inter unit Tray Selection set at Tray 1 containing A4 media The MFP will detect such situations and issue a message to indicate that your request has been cancelled referring you to this guide To avoi...

Page 61: ...r unit Carry out the following steps 1 Copy Mode is the default function of the MFP If required press the COPY button on the scanner unit control panel to show the Copy Mode screen 2 Place the documen...

Page 62: ...e Auto 5 5x8 5 5 5x8 5R 8 5x11 8 5x11R 8 5x13 8 5x14 11x17 A5 A5R A4 A4R A3 B5 B5R B4 Custom Allows you to select the paper size to match the document size 3 Tray Selection Auto Tray 1 Tray 2 Tray 3 T...

Page 63: ...you to adjust the brightness levels for scanning and printing This is not applied disabled if Auto Exposure is set to ON 6 Color Mode Color B W Allows you to select the color mode of the output If Col...

Page 64: ...omatic pre set optimization of image quality settings 2 N up OFF 2 Up 4 Up 8 Up Allows you to print multiple pages of the document to a single sheet of paper Layout orientation and image order is fixe...

Page 65: ...h the document cover open such as with books and magazines or for other purposes Center Metric 0 50mm in 1mm increments Inch 0 2 0 in 0 1 increments Allows you to block out a centered rectangular area...

Page 66: ...lines when printing 2 Background Removal OFF 1 to 10 by 1 Allows you to block out the color background of the image assuming document has a color background such that the background color is not print...

Page 67: ...Presets is set to Vivid 5 Resolution Normal High Quality Allows you to select an appropriate balance between speed normal and quality high quality 6 Color Presets Normal Vivid Warm Cool Allows you to...

Page 68: ...Position Right Position Allows you to select the punching options and sub options that will be applied to the document 3 Face up down Face up Face down Allows you to select the output placement and st...

Page 69: ...inal document is scanned and the data is saved in the hold queue NOTE Additional features involving for example the Fiery Remote Scan tool or Web Scan Tool for accessing files in the mailbox are descr...

Page 70: ...press START These steps are expanded below 1 Press the SCAN TO E MAIL button to display the E mail Send Mode screen at the Address tab 2 Press the To button 1 and enter an e mail address via one of th...

Page 71: ...ook a Touch on an e mail address to select it b Press the Add button 1 to add this address to the list c Repeat a and b as required to create the address list d Press the OK button 2 to place the list...

Page 72: ...Scanning 72 LDAP a Press the User ID button 1 and enter your user ID via the soft keyboard then press the OK button b Press the Password button 2 and enter your password via the soft keyboard then pr...

Page 73: ...P User s Guide Scanning 73 c Press the Next button 3 d Press either the User Name 1 or Mail button 2 to enter your search value via the soft keyboard then press the OK button e Press the Next button 3...

Page 74: ...d to create a destination list h Press the Complete button 2 to place the list of addresses in the To destination field Soft Keyboard a Enter an address via the soft keyboard b Press the Add button 1...

Page 75: ...n b Press the Recipient Name button 2 enter a recipient name via the soft keyboard then press the OK button c Press the OK button 3 3 Repeat Step 2 as required with the cc and Bcc buttons on the Addre...

Page 76: ...MFP User s Guide Scanning 76 5 Touch the Message Text tab press the Edit Message button 1 enter your e mail message via the soft keyboard and press the OK button 6 Touch the Attachments tab 1 1 2 3 4...

Page 77: ...0 400 600dpi Color Mode 3 Color Grayscale B W File Format 4 JPEG PDF TIFF Sides 5 Single Top Top Top Bottom Allows you to define simplex or duplex and the duplex orientation of front and back sides of...

Page 78: ...s you to construct a single copy job or scan job from multiple individual sheets or originals 5 Edge Center Erase OFF Edge Metric 0 50mm in 1mm increments Inch 0 2 0 in 0 1 increments Allows you to bl...

Page 79: ...n associated with E mail Log Network send mode scan to FTP The main steps in summary are a Press the SCAN TO NETWORK button b Press the FTP Server button set by default c On the FTP Server tab enter t...

Page 80: ...ning 80 1 Press the SCAN TO NETWORK button to display the Net work Send Mode screen 2 Press the FTP Server button 1 set by default and enter an FTP server name via one of the following buttons Server...

Page 81: ...ES3640e MFP User s Guide Scanning 81 Server List a Touch on an FTP server name to select it b Press the OK button 1 to place the name in the FTP Server Name box on the FTP Server tab 1...

Page 82: ...P User s Guide Scanning 82 Soft Keyboard Use the soft keyboard and respective buttons to enter the following host information a Basic Information tab Server name 1 Path 2 User Name 3 Password 4 1 2 3...

Page 83: ...ns tab Port Number 1 Timeout 2 Retries 3 Interval 4 c Proxy Information tab Server Name 1 User Name 2 Password 3 Port Number 4 d Press the OK button 5 to enter the data and place the name in the FTP S...

Page 84: ...the soft keyboard then press the OK button b Use the following features as required Resolution 2 150 200 300 400 600dpi Color Mode 3 Color Grayscale B W File Format 4 JPEG PDF TIFF Sides 5 Single Top...

Page 85: ...1x17 A5 A5R A4 A4R A3 B5 B5R B4 Allows you to select the scanned document size 2 Original Type Mixed Text Photo Allows you to specify the type of images on the document This allows automatic pre set o...

Page 86: ...lock out the peripheral areas of the document where spurious shadows and borders may arise when scanning with the document cover open such as with books and magazines or for other purposes Center Metr...

Page 87: ...l of the remote PC the status returns to Off Line automatically These steps are expanded below 1 Press the SCAN TO NETWORK button to display the Net work Send Mode screen 2 Press the Remote Tool butto...

Page 88: ...ment properties using the Advanced setting features as required e Set your document on the scanner unit property mailbox Hold Queue Description Simple file server in the printer unit hard disk drive A...

Page 89: ...l panel These steps are expanded below 1 Press the SCAN TO MAILBOX button to display the Mail box Send Mode screen 2 Press the Mailbox button 1 set by default 3 On the Mailbox tab enter the Mailbox na...

Page 90: ...o select it c Press the OK button 1 to begin to enter the name in the Mailbox Name box on the mailbox tab d To see a list of the files in the selected mailbox press the File List button 2 e Enter the...

Page 91: ...ning 91 Direct Search a Press the Direct Search button b Use the soft keyboard to enter a mailbox name then press the OK button 1 c Use the soft keyboard to enter the associated mailbox password butto...

Page 92: ...lbox via the soft keyboard then press the OK button c Press the Password button 2 enter a password for the new mailbox via the soft keyboard then press the OK button d Press the OK button 3 4 If you w...

Page 93: ...anned file via the soft keyboard then press the OK button b Use the following features as required Resolution 2 150 200 300 400 600dpi Color Mode 3 Color Grayscale B W Sides 4 Single Top Top Top Botto...

Page 94: ...1x17 A5 A5R A4 A4R A3 B5 B5R B4 Allows you to select the scanned document size 2 Original Type Mixed Text Photo Allows you to specify the type of images on the document This allows automatic pre set o...

Page 95: ...nd magazines or for other purposes Center Metric 0 50mm in 1mm increments Inch 0 2 0 in 0 1 increments Allows you to block out a centered rectangular area of the document where spurious shadows and bo...

Page 96: ...ine your attachment properties using the Advanced setting features as required d Set your document on the scanner unit e Press the START button on the Scanner Unit control panel These steps are expand...

Page 97: ...anned file via the soft keyboard then press the OK button b Use the following features as required Resolution 2 150 200 300 400 600dpi Color Mode 3 Color Grayscale B W Sides 4 Single Top Top Top Botto...

Page 98: ...1x17 A5 A5R A4 A4R A3 B5 B5R B4 Allows you to select the scanned document size 2 Original Type Mixed Text Photo Allows you to specify the type of images on the document This allows automatic pre set o...

Page 99: ...nd magazines or for other purposes Center Metric 0 50mm in 1mm increments Inch 0 2 0 in 0 1 increments Allows you to block out a centered rectangular area of the document where spurious shadows and bo...

Page 100: ...can check how much of each consumable maintenance item is left by using the appropriate menus For example enter the menu system and follow the path Configuration Supplies Life Cyan Toner The percentag...

Page 101: ...tter pagesa 42918922 Toner Yellow 15 000 Letter pagesa 42918921 Image drum Black 30 000 Letter pagesb b Estimated life 3 pages per job will vary depending on number of printed pages per job 42918120 I...

Page 102: ...s You are advised to clean the LED heads any time you replace a toner cartridge a LED lens cleaner is enclosed with each replacement toner cartridge if printing is showing signs of faded images white...

Page 103: ...y press the release handle 2 so that the shelf lifts out of the way The stand includes hydraulics for moving the scanner shelf up and down Use extreme caution NEVER ATTEMPT TO RAISE OR LOWER THE SHELF...

Page 104: ...bles and maintenance printer unit 104 2 With an LED lens cleaner or soft cloth gently wipe each of the four heads 1 Move the cleaner as shown using a clean section of the cleaner with each pass Be car...

Page 105: ...mly on the front handle of the scanner shelf then press the release handle and carefully lower the scanner shelf making sure it locks in place TO PREVENT ANY POSSIBLE CRUSHING OF FINGERS KEEP YOUR HAN...

Page 106: ...printer unit 106 Cleaning the paper feed rollers Clean the paper feed rollers if paper jams frequently occur 1 Remove items like a wrist watch or bracelet then use the Shutdown Restart button followe...

Page 107: ...ES3640e MFP User s Guide Consumables and maintenance printer unit 107 2 Open Tray 1 side cover and pull out the paper guide plate 1 3 Remove Tray 1 completely from the printer unit 1...

Page 108: ...MFP User s Guide Consumables and maintenance printer unit 108 4 Gaining access through the gap left by Tray 1 wipe the 3 paper feed rollers 2 with a soft cloth lightly moistened with water 5 Replace T...

Page 109: ...ES3640e MFP User s Guide Consumables and maintenance printer unit 109 6 Return the paper guide plate to its original position and close Tray 1 side cover 7 Turn on the printer unit...

Page 110: ...g the printer unit casing 1 Turn the printer unit off by using the Shutdown Restart button followed by the On Off switch 2 Wipe the printer unit surface with a soft cloth moistened sparingly with wate...

Page 111: ...unit 111 4 Turn on the printer unit Emptying the punch chip box Punch unit optional accessory When the display panel indicates that the punch chip box is full empty the box as follows 1 Operate the Fi...

Page 112: ...mables and maintenance printer unit 112 2 Pull out the punch chip box being careful to keep it level so as not to spill any chips 3 Discard the chips in an appropriate place 4 Replace the punch chip b...

Page 113: ...0e MFP User s Guide Consumables and maintenance printer unit 113 5 Check that the punch chip box has been replaced correctly then move the Finisher back into position being careful not to trap your fi...

Page 114: ...e may not feed documents smoothly If this occurs follow the cleaning procedure below The stand includes hydraulics for moving the scanner shelf up and down The stand includes hydraulics for moving the...

Page 115: ...ohol 95 2 Press down the ADF release button 1 and open the ADF front cover 2 3 Wipe the feed rollers 3 by moving the swab from side to side TO PREVENT ANY POSSIBLE CRUSHING OF FINGERS KEEP YOUR HANDS...

Page 116: ...r damage the springs near the pad 4 5 Wipe the pad 4 from top to bottom being careful not to hook the springs 6 Close the ADF front cover 2 Your machine is now ready to use Cleaning the Touch Screen D...

Page 117: ...mum image quality and performance Clean the glass as follows 1 Open the document cover 1 2 Moisten a soft clean cloth with isopropyl alcohol 95 3 Gently wipe the document glass 2 and the white sheet 3...

Page 118: ...00 000 pages through the ADF the pad may become worn and you may experience problems with document feeding In this case you are recommended to replace the pad module by a new one Replace the pad modul...

Page 119: ...both arms of the ADF snap in pad module inward with your fingers and pull out the ADF snap in pad module Inserting a new snap in pad module 1 Remove the new snap in pad module from its box 2 Press bo...

Page 120: ...ES3640e MFP User s Guide Maintenance scanner unit 120 3 Push the snap in pad module into the hole until it snaps into place...

Page 121: ...tput Punch unit to extend Finisher functionality Accessory order information Installing accessories NOTE The Finisher and Punch unit must be installed by an authorized engineer For the following acces...

Page 122: ...e 205 Paper jams This section provides information to help you deal with problems that may arise when using the MFP The following paragraphs describe actions to take in the event of a paper jam and ho...

Page 123: ...one of Tray 2 to Tray 4 can appear in place of the tttttt characters in the display panel message In this example Tray 1 is used the procedure being similar for all other trays 1 Squeeze the catch 1 o...

Page 124: ...ES3640e MFP User s Guide Troubleshooting 124 3 Carefully remove the jammed paper 4 Put the paper guide back into position and close Tray 1 side cover...

Page 125: ...640e MFP User s Guide Troubleshooting 125 Open cover paper jam side cover 1 If the MP Tray is open close it so that the side cover 1 is visible 2 Pull the release lever 2 and pull open the side cover...

Page 126: ...ES3640e MFP User s Guide Troubleshooting 126 3 Carefully remove the jammed paper 4 Close the side cover...

Page 127: ...ully press the release handle 2 so that the shelf lifts out of the way The stand includes hydraulics for moving the scanner shelf up and down Use extreme caution NEVER ATTEMPT TO RAISE OR LOWER THE SH...

Page 128: ...e Troubleshooting 128 2 Squeeze the basket handle 2 and raise the drum basket 3 Carefully remove any paper on the belt 4 If paper is jammed in the fuser unit push the lock lever 3 in the direction sho...

Page 129: ...oting 129 Holding the fuser unit 4 by the handle lift it out of the printer unit and place it on a flat surface IMPORTANT The fuser will be hot after printing Allow the fuser to cool for 10 minutes be...

Page 130: ...uide Troubleshooting 130 5 Pull up the jam release levers 5 and remove the jammed paper 6 Carefully replace the fuser unit into the printer unit and turn the lock lever 6 in the direction shown to loc...

Page 131: ...ES3640e MFP User s Guide Troubleshooting 131 7 If paper is jammed near the paper exit open the face up stacker 7 8 Open the side cover paper exit 8 and remove the jammed paper 7 8...

Page 132: ...ES3640e MFP User s Guide Troubleshooting 132 9 Close the side cover paper exit and then the face up stacker 10 Return the image drum basket 9 into position and check it is locked 9...

Page 133: ...ES3640e MFP User s Guide Troubleshooting 133 11 Close the printer unit top cover and ensure it is latched...

Page 134: ...dle 1 of the scanner shelf then carefully press the release handle 2 and carefully lower the scanner shelf making sure it locks into place TO PREVENT ANY POSSIBLE CRUSHING OF FINGERS KEEP YOUR HANDS A...

Page 135: ...jams duplex unit Check duplex unit paper jam 1 If a Finisher unit is attached to your printer unit operate the lever 1 of the Inverter unit to separate the Inverter from the printer 2 Operate the dup...

Page 136: ...ES3640e MFP User s Guide Troubleshooting 136 3 Carefully remove any jammed paper then close the cover 4 Operate the levers 3 and pull out the duplex unit 3 3...

Page 137: ...ES3640e MFP User s Guide Troubleshooting 137 5 Holding the front top cover by the grip 4 push it gently inwards and raise it 6 Remove any jammed paper 4...

Page 138: ...ES3640e MFP User s Guide Troubleshooting 138 7 In similar manner check for and clear any paper jammed under the rear top cover 8 Replace the two top covers...

Page 139: ...ES3640e MFP User s Guide Troubleshooting 139 9 Push the duplex unit back into position 10 If you detached a Finisher unit to gain access to the duplex unit replace the Finisher unit...

Page 140: ...ns Use the Help button on the printer unit control panel to check the number displayed You will need this to be able to clear the paper jam The following paragraphs explain what to do for each of the...

Page 141: ...ES3640e MFP User s Guide Troubleshooting 141 2 Operate the Finisher lever 1 and move the Finisher away from the Inverter 3 Open the Finisher top cover 1...

Page 142: ...ES3640e MFP User s Guide Troubleshooting 142 4 Carefully remove any jammed paper 5 Close the Finisher top cover...

Page 143: ...s Guide Troubleshooting 143 6 Move the Finisher back into position and connect it to the Inverter 594 597 598 644 646 paper jam in Finisher 1 Operate the Finisher lever 1 and move the Finisher away fr...

Page 144: ...ES3640e MFP User s Guide Troubleshooting 144 2 Open the Finisher front cover 2 3 Continue to turn the lower knob 3 clockwise until any jammed paper is completely ejected 2 3...

Page 145: ...ES3640e MFP User s Guide Troubleshooting 145 4 Remove the ejected paper 5 Close the Finisher front cover...

Page 146: ...ES3640e MFP User s Guide Troubleshooting 146 6 Open the Finisher right side cover 7 Carefully remove any jammed paper...

Page 147: ...ES3640e MFP User s Guide Troubleshooting 147 8 Close the Finisher right side cover 9 Move the Finisher back into position and connect it to the Inverter...

Page 148: ...ide Troubleshooting 148 590 paper jam in Finisher Punch unit 1 Operate the Finisher lever 1 and move the Finisher away from the Inverter 2 Move the tab 2 on the right side of the Finisher to align it...

Page 149: ...ES3640e MFP User s Guide Troubleshooting 149 3 Open the Finisher top cover 4 Carefully remove any jammed paper 5 Close the Finisher top cover...

Page 150: ...FP User s Guide Troubleshooting 150 6 Move the Finisher back into position and connect it to the Inverter Check Inverter paper jam 1 Operate the Finisher lever 1 and move the Finisher away from the In...

Page 151: ...ES3640e MFP User s Guide Troubleshooting 151 2 Squeeze the recessed handle 2 and open the left side cover of the Inverter 3 Carefully remove any jammed paper 2...

Page 152: ...ES3640e MFP User s Guide Troubleshooting 152 4 Close the Inverter left side cover 5 Move the Finisher back into position and connect it to the Inverter...

Page 153: ...ES3640e MFP User s Guide Troubleshooting 153 6 Operate the Inverter lever 3 and separate the Inverter from the printer 7 Open the right side door 4 of the Inverter 3 4...

Page 154: ...ES3640e MFP User s Guide Troubleshooting 154 8 Remove any jammed paper 9 Close the right side door...

Page 155: ...ES3640e MFP User s Guide Troubleshooting 155 10 Move the Finisher and Inverter back into position and connect to the printer unit...

Page 156: ...Use appropriate media Decurled media can be used Your print media sheets are not aligned with each other Remove the sheets jog them into alignment and reload them Your print media is not aligned prop...

Page 157: ...a soft cloth The toner is low Replace the toner cartridge The paper is not suitable for the printer unit Use recommended paper Printing is light The toner cartridge is not properly seated Reinstall t...

Page 158: ...ge drum cartridge if the problem is not resolved White area of paper is lightly stained Paper contains static Use paper stored in proper temperature and humidity conditions Too thick paper is used Use...

Page 159: ...of the cover at 3 and carefully pull out the jammed paper Close the document cover 5 Close the ADF front cover 6 Ensure that all jammed paper has been totally removed before proceeding NOTE In the ev...

Page 160: ...Finisher optional accessory Check Finisher Staple Jam When the printer unit display indicates a staple jam has occurred clear the jam as follows 1 Open the Finisher front cover 2 Turn the knob in the...

Page 161: ...ES3640e MFP User s Guide Troubleshooting 161 3 Remove any paper that awaits stapling in the paper ejection area 4 Pull out the staple unit...

Page 162: ...User s Guide Troubleshooting 162 5 Turn the knob in the direction indicated to move the stapler to the front 6 Grip both sides of the staple cartridge pull it up and remove it 7 Raise the staple cart...

Page 163: ...ES3640e MFP User s Guide Troubleshooting 163 8 Remove all staples that are emerging from the staple case 9 Return the staple cartridge gate to its original position 10 Replace the staple cartridge...

Page 164: ...Guide Troubleshooting 164 11 Ensure that the staple cartridge is securely installed back into the staple unit then push the staple unit fully home 12 Close the Finisher front cover being careful not t...

Page 165: ...Paper weight 17 71 lb 64 268 g m Paper output Face down stacker 500 sheets Face up stacker 250 sheets Interfaces Parallel USB 2 0 10Base T and 100Base TX Duty cycle 150 000 pages month maximum Toner l...

Page 166: ...t 100 240V 50 60Hz Output 24V DC 2 09A Operating environment Operating 50 95 F 20 80 RH Off 68 158 F 0 90 RH Scanning speed ADF 35ppm 48ipm 300dpi greyscale Letter LEF Scanning area ADF 4x5 in to 11 8...

Page 167: ...er Inverter is an optional accessory Invalid Data Press ONLINE Button Invalid data has been received by the printer Press the ONLINE button to clear this warning Change Paper in tttttt mmmmmm pppppp P...

Page 168: ...has been detected after a paper jam has been cleared Open tttttt side cover to check for additional paper You can access help details by pressing the HELP button Check Image Drum cccccc Please see HE...

Page 169: ...this can be a parameter that can be set by selecting from a range of values provided or a command that can be executed to display or print a status or setting value Emboldened values followed by an A...

Page 170: ...nnnn Displays total printed pages from Traym where m is in range 1 to 4 MP Tray nnnnnn Displays total printed pages from MP tray Item value Description Staple nnnnnn Displays total pages stapled Punch...

Page 171: ...are given in the Configuration Guide Fuser Remaining nnn Displays the remaining life span of the fuser unit as a percentage xxxx Toner n nK Remaining nnn Displays the remaining life span of xxxx tone...

Page 172: ...ouble Postcard Custom Displays detected paper size of Traym MP Tray Similar to values for Traym Displays detected paper size of the MP Tray Item value Description Serial Number xxxxxxxxxxxxxxx Display...

Page 173: ...Press the Enter button to select this menu 4 Press the Up arrow or Down arrow buttons repeatedly until Print Page Count is highlighted 5 Press the Enter button to select this Item 6 Press the Up arrow...

Page 174: ...ute Prints EFI job log details Color Charts disk only Execute Prints color charts PS Font List Execute Prints PostScript font list PCL Font List Execute Prints PCL emulation font list Demo Page Execut...

Page 175: ...unit is ready to print 2 Enter menu mode by pressing either the Up arrow or Down arrow button and press them repeatedly until the Print Pages menu is highlighted 3 Press the Enter button to select th...

Page 176: ...displayed when there are printable files Print When you select Print Set Collating Amount is displayed to enable you to specify a number of copies After specifying the number of copies press Enter to...

Page 177: ...ts for the direction perpendicular to the direction of paper movement Y Dimension 5 8 11 L 11 7 A 18 inch 148 279 L 297 A 457 mm Sets Custom paper length for Traym Sets for the same direction as paper...

Page 178: ...oid Extra The printer detects A3 Nobi A3 Wide and Tabloid Extra sizes as the same Use this setting to tell the printer which of the three sizes is loaded in Traym Legal 14 Paper Legal 14 Legal 13 5 Se...

Page 179: ...tive Custom Com 9 Envelope Com 10 Envelope Monarch Envelope DL Envelope C5 C4 Index Card Sets paper size for MP Tray X Dimension 3 8 3 A 8 5 L 12 9 inch 76 210 A 216 L 328 mm Sets Custom paper width f...

Page 180: ...edia Weight Auto Light Medium Light Medium Medium Heavy Heavy Ultra Heavy 1 Ultra Heavy 2 Ultra Heavy 3 Sets the media weight for MP Tray Tray Usage Normal Tray Tray selection switching uses this tray...

Page 181: ...e message to automatically clear when a new print job is received Auto Continue ON OFF Sets whether the printer is automatically recovered when Memory Overflow or Tray Request occurs Manual Timeout OF...

Page 182: ...pages once the jam has been cleared OFF Cancels a job including the page currently jammed Print Position Adjust X Adjust 0 00 0 25 2 00 2 00 0 25 mm 0 00 0 01 0 08 0 08 0 01 in Adjusts the position o...

Page 183: ...01 in During the flip side printing of duplex printing adjusts the location of the whole printing image 0 25 mm 0 01 in interval parallel to the direction of paper movement i e vertically xxxx Darknes...

Page 184: ...ng 0 1 2 2 1 Used for micro adjustment when very visible faded print results or light specks or streaks result when printing in Plain Paper Color setting Decrease the value if light specks or streaks...

Page 185: ...Press the Enter button to select this Item 6 Press the Up arrow or Down arrow buttons repeatedly until Tray1 Config is highlighted 7 Press the Enter button to select this Item 8 Press the Up arrow or...

Page 186: ...figuration is highlighted 5 Press the Enter button to select this Item 6 Press the Up arrow or Down arrow buttons repeatedly until MP Tray Config is highlighted 7 Press the Enter button to select this...

Page 187: ...the printer unit A scanner image is also provided to help indicate where a scanner unit problem has occurred In the case of a printer unit problem you are redirected to the printer unit control panel...

Page 188: ...e headings are B 2 sided printing Booklet N N up printing F Fit to page Paper input locations A Auto T1 to T4 Trays 1 to 4 MPT Multi purpose Tray Paper output locations FUS Face up stacker FDS Face do...

Page 189: ...y the MFP Y1 Media ejection possible but no print guarantee Y2 Short Edge Feed SEF only Y3 Media output route is limited by size and an error message may result Y4 Feed direction is determined by the...

Page 190: ...Y Y Y Y Y Y Y Y Legal 13 5in Y Y Y Y Y Y Y Y Y Legal 13in Y Y Y Y Y Y Y Y Y Executive Y Y Y Y Y Y Y Y Y Tabloid Y Y Y Y Y Y Y Y Y Tabloid Extra Y Y Y Y Y Y Y Y Y A3 Nobi Y Y Y Y Y Y Y Y Y A3 Wide Y Y...

Page 191: ...ES3640e MFP User s Guide Appendix D Media support information 191 B5SEF Y Y Y Y Y Y Y Y Y Letter LEF Y Y Y Y Y Y Y Y Y Letter SEF Y Y Y Y Y Y Y Y Y Media size B N F A T1 T2 T3 T4 M...

Page 192: ...edia size FUS FDS A3 Y Y A4 Y Y A5 Y Y A6 Y Y B4 Y Y B5 Y Y Letter Y Y Legal 14in Y Y Legal 13 5in Y Y Legal 13in Y Y Executive Y Y Tabloid Y Y Tabloid Extra Y Y A3 Nobi Y Y A3 Wide Y Y Index card Y N...

Page 193: ...ES3640e MFP User s Guide Appendix D Media support information 193 B5SEF Y Y Letter LEF Y Y Letter SEF Y Y Media size FUS FDS...

Page 194: ...N Letter Y Y Y4 N Y4 N Y4 Y4 Y4 Y4 Y4 Y2 Legal 14 Y Y Y N Y N Y Y Y Y Y N Legal 13 5 Y Y Y N Y N Y Y Y Y Y N Legal 13 Y Y Y N Y N Y Y Y Y Y N Executive Y Y Y N Y N Y Y Y Y Y N Tabloid Y Y Y N Y N Y Y...

Page 195: ...4 Y Y4 Y4 Y4 Y4 Y4 N A4SEF Y Y Y4 N Y4 N Y4 Y4 Y4 Y4 Y4 Y B5LEF Y Y Y4 N Y4 N Y Y Y Y Y N B5SEF Y Y Y4 N Y4 N N N N N N N Letter LEF Y Y Y4 N Y4 N Y4 Y4 Y4 Y4 Y4 N Letter SEF Y Y Y4 N Y4 N Y4 Y4 Y4 Y4...

Page 196: ...setting can be carried out by the user Flatbed document glass Paper type Paper size mm Paper size inch A3 290 x 420 11 69 x 16 54 A4 SEF 210 x 297 8 27 x 11 69 A4 LEF 297 x 210 11 69 x 8 27 A5 SEF a 1...

Page 197: ...a 210 x 297 8 27 x 11 69 A4 LEF 297 x 210 11 69 x 8 27 A5 SEF a 148 x 210 5 83 x 8 27 B4 SEF 257 x 364 10 12 x 14 33 B5 SEF 182 x 257 7 17 x 10 12 B5 LEF 257 x 182 10 12 x 7 17 b 140 x 216 5 5 x 8 5...

Page 198: ...Setting up address books Press the Address Book button 1 to gain access to the following E Mail Address Book Add Edit Delete Search e mail addresses up to 500 entries Import from LDAP Server Search fo...

Page 199: ...r Save Delay Time Set the time after which power save mode will operate 5 15 30 60 240min Sound Control Key Touch Tone Volume Set to OFF Low High Buzzer Volume Set to OFF Low High Press the Save Retur...

Page 200: ...the Setup Main Menu Setting up scan properties Press the Scan Properties Setup button 5 to gain access to the following Original Settings Original Size Define default paper size of original data for S...

Page 201: ...icated by the last 4 digits of ID for Job Accounting The PIN is provided by the Job Accounting Utility Scan to E Mail Enable disable SCAN TO E MAIL Scan to FTP Enable disable SCAN TO FTP Proxy Setting...

Page 202: ...rch by LDAP is carried out Secure Protocol Authentication method for MS Active Directory User ID Password and Domain can be set here in advance or left blank If they are not set here user should set t...

Page 203: ...carried out LDAP security If ON is selected and the administrator password is set the password authentication is carried out before all operations to access LDAP server If OFF is selected the password...

Page 204: ...splay counter values PAD counter Total number of pages handled by the document feeder Document Feeder Simplex The number of pages scanned as single sided Document Feeder Duplex The number of pages sca...

Page 205: ...r search on LDAP server check that the following are configured correctly category Item Comment Printer unit Admin Setup Network Setup Service Setup E mail Setup Enable E mail Services Must be Yes Out...

Page 206: ...tegory Item Comment Printer unit Admin Setup Network Setup TCP IP Setup DNS Setup Must be specified correctly to access DNS server Admin Setup Server Setup System Date Must be adjusted to LDAP server...

Page 207: ...on the scanner unit On the scanner unit control panel press the Menu button 1 to display the OSD then press the Up arrow 2 or Down arrow 3 buttons to reach the required function Press the Menu button...

Page 208: ...ay image horizontally Up arrow button moves image to right Down arrow button moves image to left 7 Vertical Position Moves the display image vertically Up arrow button moves image upwards Down arrow b...

Page 209: ...or light attention 40 ready 40 interface Ethernet 51 52 parallel 50 51 USB 50 52 M maintenance items order details 101 replacing 100 menu Admin Setup 169 Calibration 169 Configuration 169 170 Menus 16...

Page 210: ...scan to FTP 79 scan to hold queue 96 scan to mailbox 88 scanner unit copy settings 61 help 59 log in 56 log out 57 scanning 69 status 58 shutdown restart button 40 software 25 specifications 165 T tro...

Reviews: