background image

Consumables and maintenance – printer unit > 42

E

MPTYING


THE


PUNCH


CHIP


BOX

(Punch unit optional accessory)
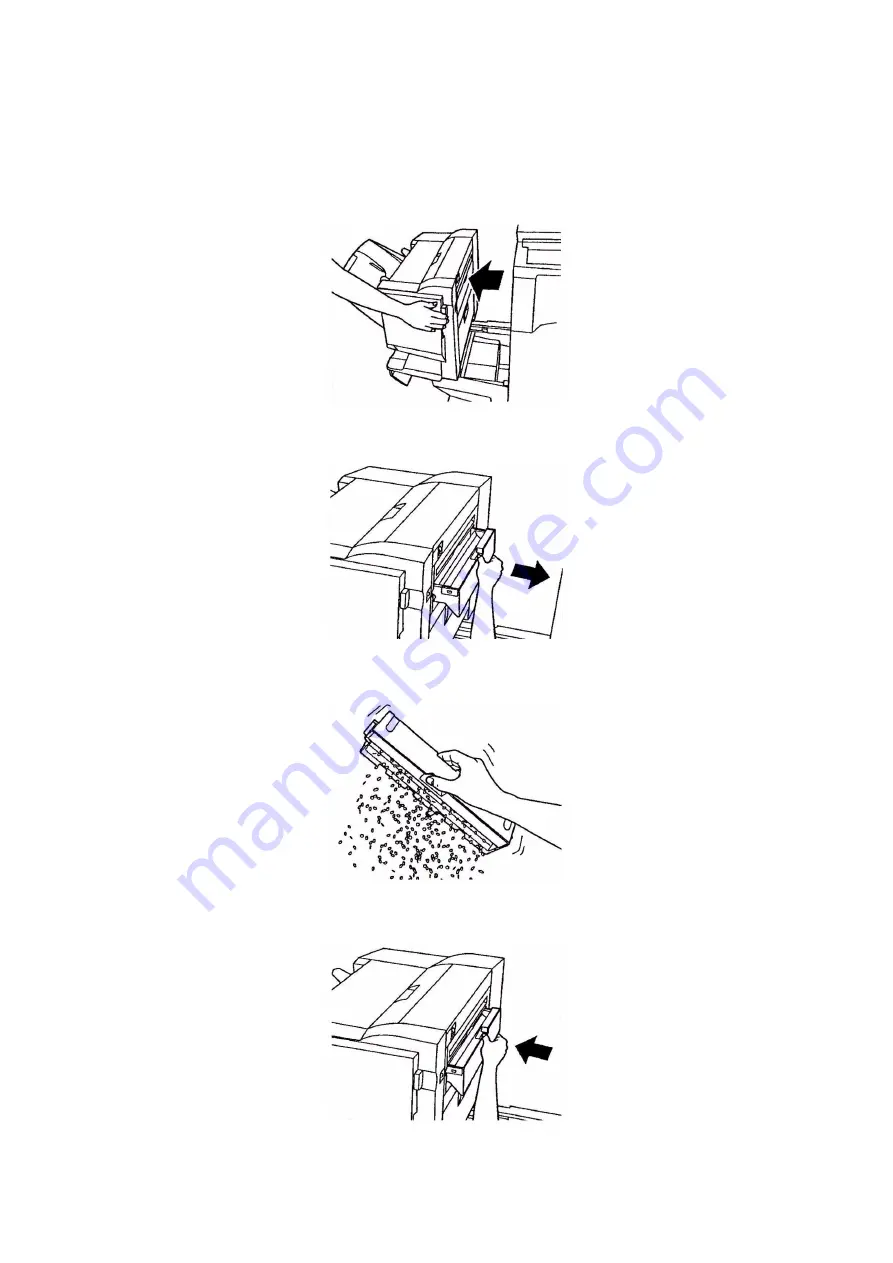
When the display panel indicates that the punch chip box is full, empty the box as follows:

1.

Operate the Finisher lever and move the Finisher away from the printer unit.

2.

Pull out the punch chip box, being careful to keep it level so as not to spill any chips.

3.

Discard the chips in an appropriate place.

4.

Replace the punch chip box carefully into the Finisher.

Summary of Contents for C9850 MFP

Page 1: ...Troubleshooting and Maintenance Guide C9850 Series C9850hdn C9850hdtn C9850 MFP TM C9000...

Page 2: ...re registered trademarks of Oki Electric Industry Company Ltd Energy Star is a trademark of the United States Environmental Protection Agency Microsoft MS DOS and Windows are registered trademarks of...

Page 3: ...er for at least 15 minutes keeping eyelids open Seek medical attention Spillages should be treated with cold water and soap to help reduce risk of staining skin or clothing MANUFACTURER Oki Data Corpo...

Page 4: ...al 34 Fax 34 SendMe 34 Paper jams ADF 34 Dealing with unsatisfactory copying results 34 Consumables and maintenance printer unit 35 Checking consumable maintenance item usage 35 Replacement indication...

Page 5: ...server returns an error message to the sendme software 63 General 64 Admin menu 65 LDAP authentication setup 65 LDAP authentication Test Tab 65 Changing admin password 65 Creating editing deleting loc...

Page 6: ...her toner cartridge may not operate at all even if it is described as compatible and if it does work your product s performance and print quality may be degraded Specifications subject to change witho...

Page 7: ...sumables and optional accessories printed Online Help accessible from control panels printer drivers and utility software PURPOSE OF THIS GUIDE The purpose of this guide is to provide you with suffici...

Page 8: ...clear a paper jam quickly and efficiently Likewise this guide provides guidance on clearing paper jams in the scanner unit Also advice is provided on how to avoid paper jams and how to troubleshoot ot...

Page 9: ...owing paragraphs describe actions to take in the event of a paper jam and how to deal with unsatisfactory print results Display panel messages about paper jams and relevant actions are given in this s...

Page 10: ...he tab 2 turn the paper guide outward 3 Carefully remove the jammed paper 4 Put the paper guide back into position and close Tray 1 side cover Open cover paper jam side cover 1 If the MP Tray is open...

Page 11: ...Troubleshooting printer unit 11 2 Pull the release lever 2 and pull open the side cover 3 Carefully remove the jammed paper 4 Close the side cover 2...

Page 12: ...Raise the scanner unit squeeze the printer unit top cover handle 1 and open the top cover 2 Squeeze the basket handle 2 and raise the drum basket 3 Carefully remove any paper on the belt WARNING Be c...

Page 13: ...lding the fuser unit 4 by the handle lift it out of the printer unit and place it on a flat surface 5 Pull up the jam release levers 5 and remove the jammed paper WARNING Be careful not to touch the f...

Page 14: ...ce the fuser unit into the printer unit and turn the lock lever 6 in the direction shown to lock the fuser unit 7 If paper is jammed near the paper exit open the face up stacker 7 8 Open the side cove...

Page 15: ...15 9 Close the side cover paper exit and then the face up stacker 10 Return the image drum basket 9 into position and check it is locked 11 Close the printer unit top cover and ensure it is latched t...

Page 16: ...paper jam 1 If a Finisher unit is attached to your printer unit operate the lever 1 of the Inverter unit to separate the Inverter from the printer 2 Operate the duplex cover release button 2 and open...

Page 17: ...Troubleshooting printer unit 17 4 Operate the levers 3 and pull out the duplex unit 5 Holding the front top cover by the grip 4 push it gently inwards and raise it 6 Remove any jammed paper 3 3 4...

Page 18: ...Troubleshooting printer unit 18 7 In similar manner check for and clear any paper jammed under the rear top cover 8 Replace the two top covers 9 Push the duplex unit back into position...

Page 19: ...ains Use the Help button on the printer unit control panel to check the number displayed You will need this to be able to clear the paper jam The following paragraphs explain what to do for each of th...

Page 20: ...Troubleshooting printer unit 20 3 Open the Finisher top cover 4 Carefully remove any jammed paper 5 Close the Finisher top cover 6 Move the Finisher back into position and connect it to the Inverter...

Page 21: ...per jam in Finisher 1 Operate the Finisher lever 1 and move the Finisher away from the Inverter 2 Open the Finisher front cover 2 3 Continue to turn the lower knob 3 clockwise until any jammed paper i...

Page 22: ...Troubleshooting printer unit 22 5 Close the Finisher front cover 6 Open the Finisher right side cover 7 Carefully remove any jammed paper 8 Close the Finisher right side cover...

Page 23: ...ition and connect it to the Inverter 590 paper jam in Finisher Punch unit 1 Operate the Finisher lever 1 and move the Finisher away from the Inverter 2 Move the tab 2 on the right side of the Finisher...

Page 24: ...Troubleshooting printer unit 24 4 Carefully remove any jammed paper 5 Close the Finisher top cover 6 Move the Finisher back into position and connect it to the Inverter...

Page 25: ...ter paper jam 1 Operate the Finisher lever 1 and move the Finisher away from the Inverter 2 Squeeze the recessed handle 2 and open the left side cover of the Inverter 3 Carefully remove any jammed pap...

Page 26: ...nit 26 5 Move the Finisher back into position and connect it to the Inverter 6 Operate the Inverter lever 3 and separate the Inverter from the printer 7 Open the right side door 4 of the Inverter 8 Re...

Page 27: ...Troubleshooting printer unit 27 9 Close the right side door 10 Move the Finisher and Inverter back into position and connect to the printer unit...

Page 28: ...Details will be given on the print media packaging your print media is free from creases tears and curls your print media is aligned correctly remove from printer jog into alignment and reload them if...

Page 29: ...When the printer unit display indicates a staple jam has occurred clear the jam as follows 1 Open the Finisher front cover 2 Turn the knob in the direction indicated until the coloured indicator appe...

Page 30: ...Turn the knob in the direction indicated to move the stapler to the front 6 Grip both sides of the staple cartridge pull it up and remove it 7 Raise the staple cartridge gate 8 Remove all staples that...

Page 31: ...ge gate to its original position 10 Replace the staple cartridge 11 Ensure that the staple cartridge is securely installed back into the staple unit then push the staple unit fully home 12 Close the F...

Page 32: ...artridge a few times to evenly distribute any remaining toner If symptoms persist replace the toner cartridge The paper is not suitable for the printer unit Use recommended paper Printing is light The...

Page 33: ...cartridge if the problem is not resolved White area of paper is lightly stained Paper contains static Use paper stored in proper temperature and humidity conditions Too thick paper is used Use thinne...

Page 34: ...ton 1 2 Gently open the ADF front cover 2 3 Carefully pull the paper out of the ADF 4 If there is paper jammed at the ADF exit area open the ADF document cover operate the coloured release lever situa...

Page 35: ...n check how much of each consumable maintenance item is left by using the appropriate menus For example enter the menu system and follow the path Configuration Supplies Life Cyan Toner The percentage...

Page 36: ...ages avg 42918108 Image drum Cyan 30 000 A4 pages avg 42918107 Image drum Magenta 30 000 A4 pages avg 42918106 Image drum Yellow 30 000 A4 pages avg 42918105 Staples 3 x 3000 staples 42937603 ITEM LIF...

Page 37: ...d images white stripes or blurred letters You can use a LED lens cleaner or dry soft cloth for cleaning the LED heads 1 Raise the scanner unit then open the top cover of the printer unit 2 With a LED...

Page 38: ...op cover then lower the scanner unit CLEANING THE PAPER FEED ROLLERS Clean the paper feed rollers if paper jams frequently occur 1 Remove items like a wrist watch or bracelet then use the Shutdown Res...

Page 39: ...2 Open Tray 1 side cover and pull out the paper guide plate 1 3 Remove Tray 1 completely from the printer unit 4 Gaining access through the gap left by Tray 1 wipe the 3 paper feed rollers 2 with a s...

Page 40: ...Consumables and maintenance printer unit 40 5 Replace Tray 1 6 Return the paper guide plate to its original position and close Tray 1 side cover 7 Turn on the printer unit...

Page 41: ...Turn the printer unit off by using the Shutdown Restart button followed by the On Off switch 2 Wipe the printer unit surface with a soft cloth moistened sparingly with water or neutral detergent 3 Us...

Page 42: ...ates that the punch chip box is full empty the box as follows 1 Operate the Finisher lever and move the Finisher away from the printer unit 2 Pull out the punch chip box being careful to keep it level...

Page 43: ...Consumables and maintenance printer unit 43 5 Check that the punch chip box has been replaced correctly then move the Finisher back into position being careful not to trap your fingers...

Page 44: ...ipe the feed rollers 3 by moving the swab from side to side 4 Rotate the rollers forward with your finger and repeat Step 3 until the rollers are clean Be careful not to snag or damage the springs nea...

Page 45: ...t 3 on the lower side of the document cover to remove dust or any toner particles 4 Close the document cover 1 Your machine is now ready for use REPLACING THE SNAP IN PAD MODULE After scanning approxi...

Page 46: ...with your fingers and pull out the ADF snap in pad module INSERTING A NEW SNAP IN PAD MODULE 1 Remove the new snap in pad module from its box 2 Press both arms of the snap in pad module 2 inward using...

Page 47: ...librate the MFP Use the and MENU buttons on the control panel to scroll through the menus 1 Select the CALIBRATION menu and press ENTER 2 Select CALIBRATE and press ENTER 3 Select COPIER SCREEN and pr...

Page 48: ...8 Select YES and press ENTER to begin scanning Once the scan is complete the APPLY CALIBRATION menu is displayed on the control panel 9 Select YES and press ENTER 10 Select YES and press ENTER to sto...

Page 49: ...ing The printer is restarting Wait for a while USB I F Error USB Interface error Press the ONLINE button to clear the error Check Image Drum colour colour image drum cartridge is not installed correct...

Page 50: ...not available Press the ONLINE button for data reception to show READY TO PRINT on the panel Open Cover Paper Jam COVER Paper remains around the displayed cover Open the cover and remove remaining pa...

Page 51: ...The printer is in data processing Wait for a while Open Stacker Face Up Stacker Paper cannot be fed due to the closed face up stacker Open the face up stacker Checking Sectors A hard disk check is bei...

Page 52: ...colour toner cartridge is not installed Install a genuine colour toner cartridge Reset Drum Basket Open the top cover and reinstall the drum basket Reset Drum Basket Waste Toner Transfer Error Open th...

Page 53: ...ble Contact your dealer if the error remains File System is Full Space on the hard disk runs out Normal printing is available File System is Write Protected Invalid attempt to write to the hard disk N...

Page 54: ...inting using a PS driver Try re sending the job If the problem remains contact your dealer No Staple Finisher unit is out of staples Install staples Could Not Staple No Staple Install staples Press th...

Page 55: ...ss the HELP button and follow the instructions Reset Paper MPTray Paper is not fed from the multi purpose tray properly Reload paper Check Paper Different paper is loaded Press the HELP button and fol...

Page 56: ...button to start the printer Improper Lock Lever Position color The color toner cartridge is unlocked Locate the toner cartridge lock lever correctly Improper Lock Lever Position A toner cartridge is...

Page 57: ...es a magenta toner cartridge Indicates a yellow toner cartridge Indicates a black toner cartridge Indicates a cyan image drum Indicates a magenta image drum Indicates a yellow image drum Indicates a b...

Page 58: ...er Paper remaining around the top cover Paper remaining around the top cover Open the side cover of ejection part Paper remaining around the side cover of ejection part Open tray 1 side cover Paper re...

Page 59: ...A paper jam has occurred or paper remaining in the inverter area A paper jam has occurred in the inverter area A paper jam has occurred in the inverter area A paper jam has occurred in the finisher a...

Page 60: ...p E mail Setup Enable E mail Services Must be Yes Outgoing server Must be specified Fiery E mail Address Must be specified Admin E mail Address Must be specified Scanner unit Administrator Setup Scan...

Page 61: ...ey Refer to the Advanced User s Guide Lastly either the local or remote machine may require servicing Try sending a fax to another location to check the local MFP Faxing is possible but the image of t...

Page 62: ...s connected to a PBX but it is not possible to dial out Be certain that the dial prefix is entered before the telephone number for each number dialled or programmed into the MFP Refer to the Advanced...

Page 63: ...MESSAGE TO THE SENDME SOFTWARE MESSAGE COMMENT Email Could Not Be Sent The attachment file exceeds the maximum size limit Please select another delivery method such as FTP desktop share or flash drive...

Page 64: ...ration is not allowed because you have already burned the Bates stamp onto your existing images You can not scan delete insert or edit anymore until you clear all your images using the Start Over butt...

Page 65: ...lid User DN Enter a valid user DN MESSAGE COMMENT Logon Error Please provide a user name and password for authentication Enter a valid user name and password Logon Success No Information Available Aut...

Page 66: ...00 DPI Self explanatory MESSAGE COMMENT There was an error reading the configuration Please contact the administrator of this unit Contact your administrator No configured destinations found Please co...

Page 67: ...ent name and try again Invalid value for s The maximum length for this field is d This index field is on page d Contact your administrator There was an error in uploading the metadata file There was a...

Page 68: ...r details 36 replacing 35 D documentation list 7 E error messages sendme 63 F fax problem checklist 61 M maintenance items order details 36 replacing 35 P paper jams ADF 34 avoiding 28 duplex 16 finis...

Page 69: ...6189 http www okidata co jp Oki Data Singapore Pte Ltd 78 Shenton Way 09 01 Singapore 079120 Tel 65 221 3722 Fax 65 421 1688 http www oki com sg Oki Systems Thailand Ltd 1168 81 82 Lumpini Tower 27th...

Page 70: ...Oki Europe Limited Central House Balfour Road Hounslow TW3 1HY United Kingdom Tel 44 0 208 219 2190 Fax 44 0 208 219 2199 www okiprintingsolutions com 07081101 iss 1...

Reviews: