Oki C823n User Manual Download Page 106

- 106 -

Replacing Consumables and Maintenance Units

4

4.


Maintenance

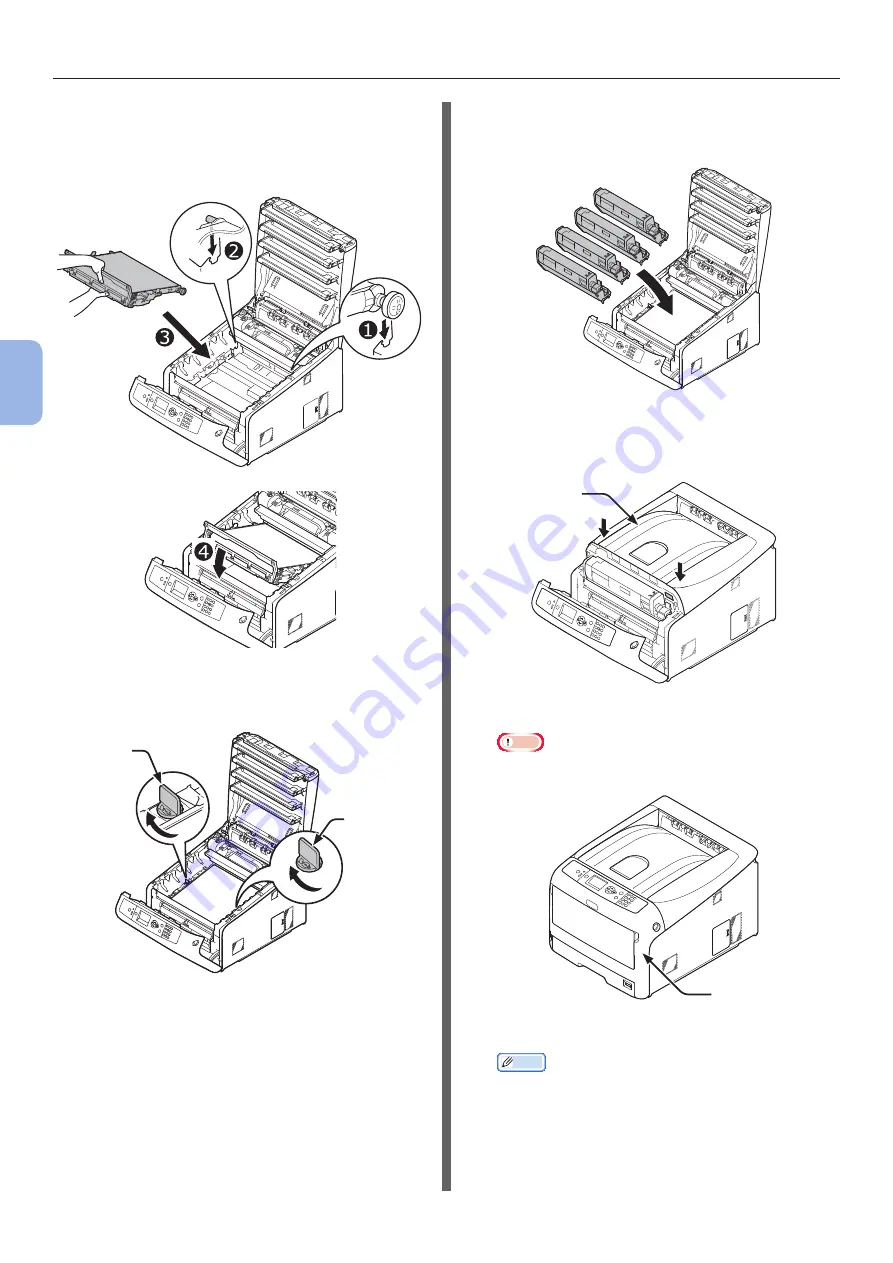
Hold the handle of a new belt unit with 

one hand and support lower part with 

other hand. Place the belt unit into the 

printer.

10 

Turn the blue locks (5) on each side of 

the belt unit in direction of the arrow.

5

5

11 

Return all the four image drums to the 

printer.

12 

Close the output tray (4) by pushing the 

both sides of the cover firmly.

4

13 

Close the front cover (2).

Note


● The front cover cannot be closed if the output tray is 

not closed securely.

2

14 

Please recycle belt unit.

Memo


● If you must dispose of a belt unit, put it in a 

plastic bag or similar container and dispose of it in 

accordance with your municipality’s ordinances or 

guidelines.

Summary of Contents for C823n

Page 1: ...1 C813n C823n C823dn C833n C833dn C843n C843dn ES8433 ES8443...

Page 2: ...gistered trademark of Oki Electric Industry Co Ltd Energy Star is a trademark of the United States Environmental Protection Agency Microsoft Windows Windows Server and Windows Vista are registered tra...

Page 3: ...open Seek medical attention Spillages should be treated with cold water and soap to help reduce risk of staining skin or clothing Manufacturer Oki Data Corporation 4 11 22 Shibaura Minato ku Tokyo 10...

Page 4: ...e to do so may cause electric shock and or fire leading to injuries Unplug the power cord periodically to clean plug blades and base section between the blades If the power plug remains inserted for a...

Page 5: ...rk Reference Indicates where to look when you want to know more detailed or related information WARNING A warning provides additional information which if ignored may result in a risk of personal inju...

Page 6: ...perating system Windows 8 1 Microsoft Windows 8 operating system Windows 8 Microsoft Windows 7 operating system Windows 7 Microsoft Windows Vista operating system Windows Vista Microsoft Windows Serve...

Page 7: ...ts 11 Operator Panel 12 How to Use the Ten Key Pad 12 How to Use the Function Key 13 Names of Components 14 Available Options 15 Checking the Placement Environment 16 Placement Environment 16 Placemen...

Page 8: ...me that Elapses Before Entering the Auto Power Off Mode 65 Setting the Buzzer 66 3 Troubleshooting 67 When an Error Message Appears on the Display Screen When the ATTENTION Indicator Lights Up Blinks...

Page 9: ...Unit 107 Cleaning 109 Cleaning the Surface of the Printer 109 Cleaning Paper Feed Rollers 109 Cleaning LED Heads 111 Moving or Transporting Your Printer 113 Before Machine Disposal 116 5 Appendix 117...

Page 10: ...3 Preparing a Printer Unpacking Removing cushioning materials Installing consumables Loading paper Turning on off the power Installing options Test printing from the printer 4 Connecting to a Computer...

Page 11: ...agenta and cyan Four starter toner cartridges black yellow magenta and cyan Note For the C models the starter toner cartridges are installed in the image drums which are installed in the machine befor...

Page 12: ...ssword can be entered only with a ten key pad 10 Fn key Displays the equipment setting menu screen with a shortcut function 11 CLEAR key Executes the following actions according to the entered items w...

Page 13: ...ay 3 32 Y Dimension Tray 3 Function No Function menu 33 Media Type Tray 3 34 Media Weight Tray 3 40 Paper Size Tray 4 41 X Dimension Tray 4 42 Y Dimension Tray 4 43 Media Type Tray 4 44 Media Weight T...

Page 14: ...ridge Image drum M magenta 13 Toner cartridge Image drum C cyan 14 Fuser unit 15 LED head four heads Note In the case of the ES models toner cartridges are not installed in the Image drums 16 17 26 No...

Page 15: ...r details on how to install the options refer to Installing Options P 23 An SD memory card kit is used for functions such as a storage for spooling when copying sectors saving secure print encrypted p...

Page 16: ...small child s hand reaches Do not install in an unstable place the shaky stand leaning place etc Do not install in a place many humidity dusty and the place where direct rays hit Do not install in th...

Page 17: ...direct sunlight or very bright interior light approximately more than 1500 lux Even under the normal interior light do not leave it for more than 5 minutes Packaging and cushioning material are neede...

Page 18: ...l four image drums back into a printer 6 Turn the blue lever 7 of the toner cartridge backward until its top aligns on the mark Turn the levers of all four 4 toner cartridges 7 7 Close the output tray...

Page 19: ...h the loading paper size Set the dial to A4 when loading the A4 size paper with a landscape orientation 2 3 Slide the paper guide 3 and paper stopper 4 to the size of paper to be loaded 3 4 Note When...

Page 20: ...water pipe a gas pipe and a telephone wire and a lightning rod by any means Make sure to connect with the ground terminal before connecting the power cord to the power supply plug Be sure to plug in a...

Page 21: ...in the operator panel and the power switch indicator blinks every 1 second Then the printer turns off automatically and the power switch indicator goes out Note It may take about 5 minutes to turn of...

Page 22: ...By factory default the time interval before entering the deep sleep mode is set to 15 minutes For how to change the time that elapses before the printer enters the deep sleep mode refer to Setting the...

Page 23: ...optional additional tray unit when you want to increase the paper capacity of your printer You can install up to three additional tray units After installation you need to configure the printer driver...

Page 24: ...ur Your printer supports 256 MB and 512 MB RAM Note Use only genuine Oki Data products The performance cannot be guaranteed when using other products The static electricity may damage parts Discharge...

Page 25: ...nsert the additional RAM 4 into the slot and fix it by pushing it toward the printer Note Be sure to check a direction of an additional RAM The additional RAM has small dents on its connector which ar...

Page 26: ...button 11 Press the scroll button several times to select System and press the ENTER button 12 Press the scroll button several times to select RAM and press the ENTER button 13 Check that the value of...

Page 27: ...tricity in your body by touching grounded metallic parts etc before work You can not use the SD memory card with the protection switch for accidental overwriting locked Make sure to release the lock 1...

Page 28: ...plate 2 1 First insert the upper part of the metal plate 2 in the printer then install the metal plate 2 2 While holding the lower part of the metal plate 2 slide the metal plate downward and secure...

Page 29: ...ard 15 Press the ON LINE button Test Printing from the Printer Check that you can print with the printer Check the detailed settings and status of your printer by printing the contents of the settings...

Page 30: ...bit Version Windows Server 2012 R2 Windows Server 2012 Windows Server 2008 R2 Windows Server 2008 Windows Server 2008 x64 Version Mac OS X 10 8 5 to 10 11 Types of Drivers The types of the drivers tha...

Page 31: ...IP address on the computer or printer If your network administrator or internet service provider specifies an unique IP address for the computer and your printer you need to set the IP addresses manua...

Page 32: ...character you input 5 Press the ENTER button 6 Check that Network Setup is selected and press the ENTER button 7 Press the to select IP Address Set and press the ENTER button 8 If setting the IP addre...

Page 33: ...t mask in the same manner of IP address To move to the next box press the ENTER button 13 Press the BACK button until Network Setup is displayed Press the scroll button to select Gateway Address and p...

Page 34: ...Read Environment advice and then click Next 6 Select Network Wired Wireless in accordance to the connection method of the machine and computer and then click Next 7 Select the model name of the machi...

Page 35: ...d the machine is turned on 2 Insert the Software DVD ROM into a computer 3 Double click the OKI icon on the desktop 4 Drivers PS Double click Installer for OSX 5 Enter the administrator password and t...

Page 36: ...e sure that the machine and a computer are connected and the machine is turned on 2 Insert the Software DVD ROM into a computer 3 Double click the OKI icon on the desktop 4 Drivers PCL C823 Double cli...

Page 37: ...enu USB Connection Perform the following procedure to connect your printer to a computer via USB Connecting a USB Cable 1 Prepare a USB cable 1 A USB cable is not supplied with your printer Prepare a...

Page 38: ...4 Read the license agreement and then click Accept 5 Read Environment advice and then click Next 6 Select USB in accordance to the connection method of the machine and computer and then click Next 7...

Page 39: ...r 3 Double click the OKI icon on the desktop 4 Drivers PS Double click Installer for OSX 5 Enter the administrator password and then click OK Follow the on screen instructions to complete the installa...

Page 40: ...ake sure that the machine and a computer are connected and the machine is turned on 2 Insert the Software DVD ROM into a computer 3 Double click the OKI icon on the desktop 4 Drivers PCL C823 Double c...

Page 41: ...ions If options such as additional tray unit and or SD memory card kit have been installed use following procedures to change printer driver settings For Windows PCL Driver 1 Click Start Devices and P...

Page 42: ...a network connection select Get installed options automatically under Installable Options and then click Setup If using a USB connection select an appropriate number of trays in Available Trays under...

Page 43: ...ize mm inch Paper Weight Plain paper A3 297 x 420 64 to 256 g m2 For duplex print 64 to 220 g m2 Note If the paper size is set at A6 A5 or with a paper width narrower than 148 mm A5 width the printing...

Page 44: ...t or an ink used to color paper is heat resistant 230 C Paper that has same characteristics with light paper and used for an electronic photo printer Paper Recommendations Your printer will handle a v...

Page 45: ...ar the inside of an exterior wall On an uneven surface Where static electricity may be generated In places that are excessively hot or where temperature rapidly changes Near a copier air conditioner h...

Page 46: ...197 x 273 mm Custom Size 300 sheets when paper weight is 80 g m2 Light 64 to 82 g m2 Medium Light 83 to 90 g m2 Medium 91 to 105 g m2 Heavy 106 to 128 g m2 Ultra Heavy1 129 to 188 g m2 Ultra Heavy2 18...

Page 47: ...270 mm 16K 197 x 273 mm Index Card Photo 4 x 6 inch Photo 5 x 7 inch Custom Size Envelope Nagagata 3 Envelope Nagagata 4 Envelope Nagagata 40 Envelope Yougata 0 Envelope Yougata 4 Envelope Kakugata 2...

Page 48: ...3 4 Note When loading A6 size paper move the paper stopper 4 forward and remove it once then install it on the metal part 4 4 Flex paper back and forth and then fan it Straighten the edges of the pap...

Page 49: ...stacks of paper and then load them again Do not put anything other than paper for printing in the MP tray 1 Open the MP tray 1 forward by inserting your fingers into the front recesses 2 2 2 1 2 Pull...

Page 50: ...r an envelope may cause the ink absorbing problem Use paper that is not curled Correct a paper Curling within 2 mm Printing an envelope with an adhesive flap bent cause the ink absorbing problem 7 Clo...

Page 51: ...Config is displayed 15 Press the scroll button to select Media Weight and then press the ENTER button 16 Press the scroll button to select the weight of the loaded paper and then press the ENTER butto...

Page 52: ...rinting For Mac OS X PS Printer Driver 1 From the File menu select Page Setup 2 Select a paper size from Paper Size and then click OK 3 From the File menu select Print 4 Select Paper Feed from the pan...

Page 53: ...inches Length 90 to 1321 mm 3 5 to 52 inches Note Custom is displayed only when Paper Size is set to Custom The available size range for duplex printing is the same as that for tray 2 3 4 1 Press the...

Page 54: ...e following procedures For Windows PCL Printer Driver 1 Click Start and select Devices and Printers 2 Right click the Your Printer icon and select the type of driver you want to specify from Printing...

Page 55: ...7 Open the file you want to print from the application 8 Select PostScript Custom Page Size for a paper size and start printing on the printer driver For Mac OS X Printer Driver Note In the Mac OS X p...

Page 56: ...purpose Tray from Paper Source 5 Click Advanced 6 Click Paper Size and select a paper size from the drop down list 7 Click OK 8 Start printing For Mac OS X PS Printer Driver 1 From the File menu selec...

Page 57: ...not open or close the rear output tray while printing as it may result in a paper jam Using the Output Tray Paper is delivered with the print side face down stacked in the order printed Note Check tha...

Page 58: ...9 11 1 2 3 4 Multipie print Booklet print Poster print Duplex Printing You can print on both sides of a sheet of paper 1 2 Duplex prints Scaling to Pages You can print data formatted for one size pag...

Page 59: ...rinted or preparing for a print When you press the CANCEL button is pressed the following message appears To cancel printing select Yes and then press the ENTER button To proceed to printing select No...

Page 60: ...age Ready To Print appears If the message is not displayed press the ON LINE button 1 Press the Fn key on the operator panel 2 Enter 200 using the ten key pad and then press the ENTER button 3 Press t...

Page 61: ...the message Ready To Print appears If the message is not displayed press the ON LINE button 1 Press the Fn key on the operator panel 2 Enter 201 using the ten key pad and then press the ENTER button...

Page 62: ...nstraints apply to the printer driver and utility functions When the printer goes into the deep sleep mode press the POWER SAVE button on the control panel and check that the screen displays the messa...

Page 63: ...ection is broken after some time passes When receiving e mails is activated Memo If you want to activate the deep sleep mode please deactivate IPSec NetBEUI NetWare EtherTalk receiving e mail Cannot P...

Page 64: ...ll button or on the operator panel 2 Press the scroll button several times to select Admin Setup and press the ENTER button 3 Enter the administrator password using the numeric 0 9 keys The factory de...

Page 65: ...the mode Check if the message Ready To Print appears If the message is not displayed press the ON LINE button 1 Press the Fn key on the operator panel 2 Enter 202 using the ten key pad and then press...

Page 66: ...assword using the numeric 0 9 keys The factory default password is 999999 Press the ENTER button whenever inputting one character 4 Press the ENTER button 5 Press the scroll button several times to se...

Page 67: ...he HELP button on the operator panel When an Error Message Appears on the Display Screen When the ATTENTION Indicator Lights Up Blinks When a printer problem occurs an error message appears on the dis...

Page 68: ...he HELP button is pressed Scroll display upward Scroll display downward Press the HELP button to display a remedy Message on the display screen first line Message on the display screen second line Ple...

Page 69: ...631 632 633 634 page 76 2nd Line Paper Remain 3rd Line TRAY 1st Line Open Cover 637 page 75 2nd Line Paper Remain 3rd Line Front Cover 1st Line Open Cover 638 page 72 2nd Line Paper Remain 3rd Line Ou...

Page 70: ...your finger into the recess on the right side of the printer and pull the front cover open lever 1 to open the front cover 2 forward 1 2 2 Remove the jammed paper gently in the direction of the arrow...

Page 71: ...4 7 Replace the duplex unit 3 to the printer 3 8 Close the front cover 2 2 Error Code 380 401 637 A paper jam has occurred around the front cover 1 Insert your finger into the recess on the right sid...

Page 72: ...Possible to get burned The fuser unit is extremely hot Do not touch it 3 4 3 Remove all four image drums and place them on a flat surface 4 Cover the removed image drums with paper so that the image...

Page 73: ...ot be closed if the output tray is not closed securely 2 Task is complete Error Code 382 383 639 640 A paper jam has occurred around the fuser unit 1 Insert your finger into the recess on the right si...

Page 74: ...rums are not exposed to light 5 Remove the jammed paper remaining inside of the unit 6 Lift the left lock lever 5 of the fuser unit forward 5 7 Hold the fuser unit handle 6 and lift the fuser unit out...

Page 75: ...ing the both sides of the cover firmly 4 13 Close the front cover 2 Note Cannot close the front cover securely if the output tray is not closed 2 Task is complete Error Code 390 637 A paper jam has oc...

Page 76: ...ading paper on MP tray lift the paper set cover 1 and set the paper with the print side face up 1 6 Lower the paper set cover 1 1 Task is complete Error Code 391 392 393 394 631 632 633 634 A paper ja...

Page 77: ...per 3 Return the tray 1 to the printer 1 4 Insert your finger into the recess on the right side of the printer and pull the front cover open lever 2 to open the front cover 3 forward 2 3 5 Close the f...

Page 78: ...ears on the display screen and the ATTENTION indicator on the operator panel lights up or blinks Check the message and replace consumables and maintenance unit Display Screen when the HELP button is p...

Page 79: ...oner cartridge soon after it runs out Otherwise it may cause the damage to an image drum 2nd Line COLOR Image Drums 1st Line xxx Prepare new image drums and replace the old image drums with new ones a...

Page 80: ...Near Life 1st Line xxx page 107 2nd Line Change Fuser Unit 1st Line Install New Fuser Unit 354 page 107 You can continue to print by opening or closing the front cover for a while However replace the...

Page 81: ...lay screen first line Message on the display screen third line Message on the display screen fourth line Please see HELP for details ATTENTION indicator HELP button Message on the display screen secon...

Page 82: ...oner Not Installed COLOR Please see HELP for details Blinks The toner cartridge of the indicated color is not installed correctly Install the toner cartridge correctly 610 Yellow Y 611 Magenta M 612 C...

Page 83: ...full 491 492 493 494 Install Paper TRAY MEDIA_SIZE Please see HELP for details Blinks The indicated tray is empty Load the indicated size paper 491 Tray1 492 Tray2 493 Tray3 494 Tray4 File Erasing Lig...

Page 84: ...and deleted USB Hub Unsupported Please detach it Lights up A USB hub unsupported by a printer is connected Remove the hub Log Buffer is Full Job Rejected Press ONLINE Button Lights up Print data is de...

Page 85: ...ou Cannot Print from the MP Tray If you print from the MP tray without moving down the paper set cover the message Install Paper MPTray appears on the display screen Check the message and deal with th...

Page 86: ...or press the HELP button on the operator panel page 82 The interface setting is disabled Check the setting of the interface being used from the operator panel Advanced Something is wrong with the pri...

Page 87: ...R Utility USB Connection Problems Common to Windows and Mac OS X Cause Remedy Reference Unsupported USB cable is being used Use a USB 2 0 cable A USB hub is being used Connect the printer directly to...

Page 88: ...displayed click Run Setup exe Memo If the User Account Control dialog box is displayed click Yes 3 Select a language from the drop down list 4 Read the license agreement and then click Accept 5 Read E...

Page 89: ...installer or utility as an administrator If you click No the installer or utility does not start The Program Capability Assistant dialog appears If the Program Capability Assistant dialog appears aft...

Page 90: ...operly page 97 The toner is low Replace the toner cartridge page 97 The paper is moist Use paper stored in proper temperature and humidity conditions page 43 The paper is unsuitable Use supported pape...

Page 91: ...idge page 97 Periphery of letters is smudged The LED heads are dirty Wipe the LED heads with soft tissue paper page 111 The paper is unsuitable Use recommended paper The paper is moist Replace it with...

Page 92: ...ght CMY100 Density is set to Disable Press the scroll button or and select Admin Setup Color Setup CMY100 Density and then select Enable Dots appear The paper is unsuitable Use supported paper page 43...

Page 93: ...p the edges and load the paper with the old paper on top page 48 page 49 The paper is loaded at an angle For tray 1 2 3 4 adjust the paper width guide and stopper to the paper For the MP tray adjust t...

Page 94: ...urn off the printer forcibly The printer does not start printing An error is displayed on the panel Check the error code and follow the on screen instructions page 82 The Ethernet or USB cable is unpl...

Page 95: ...gh The printer is cooling off Wait for a while When the printer becomes cooler printing restarts automatically When the print processing is overloaded by printing with the WSD port a computer may stop...

Page 96: ...d gargle with large amounts of water and move the person to the open area for fresh air Follow the doctor s direction if necessary If the toner powder sticks to your skin like your hands wash with soa...

Page 97: ...fe of the toner cartridge differs depending on the usage Note Have a new print cartridge ready as the print quality declines after more than one year following breaking the seal If you replace the ton...

Page 98: ...ng the replacement toner cartridge in its bag gently shake it up and down and side to side and then unpack it 6 Remove the tape 5 from the toner cartridge 5 7 Insert a new toner cartridge 6 by alignin...

Page 99: ...acement for C cyan M magenta Y yellow Toner Cartridges Memo When replacing the K toner cartridge refer to Procedure for Replacement for K black Toner Cartridge P 97 1 Prepare new toner cartridges 2 In...

Page 100: ...t throw a used toner cartridge in the fire They may explode and the toner inside may fly off and cause getting burned 7 7 Unpack the replacement toner cartridge and gently shake it up and down and sid...

Page 101: ...with the image drum depends on how you use it The above guideline may be reduced by more than half depending on the conditions of printing Though opening and closing the output tray may extend the lif...

Page 102: ...fuser unit is extremely hot Do not touch it 3 4 4 Identify an empty toner cartridge by its label color 5 5 5 Remove the image drum 6 from the printer in the direction of the arrow and place the image...

Page 103: ...n step 7 to the image drum 9 by aligning its left side indentation 11 with the protrusion 12 on the image drum and then fix the right side firmly into place 8 12 9 11 11 Turn the blue lever 7 of the t...

Page 104: ...it message appears replace the belt unit The life expectancy of the belt unit is approximately 80 000 pages for A4 simplex printing three pages per job Note The actual number of pages you can print wi...

Page 105: ...3 and open the output tray 4 CAUTION Possible to get burned The fuser unit is extremely hot Do not touch it 3 4 5 Take all the four image drums out of a printer and then place them on a flat surface...

Page 106: ...ection of the arrow 5 5 11 Return all the four image drums to the printer 12 Close the output tray 4 by pushing the both sides of the cover firmly 4 13 Close the front cover 2 Note The front cover can...

Page 107: ...fe has expired the use life will not be correctly displayed Press the scroll button or button Admin Setup Panel Setup Near Life Status is set to Disable the Fuser Unit Near Life message does not appea...

Page 108: ...e left locking lever 5 of the fuser unit to lock 5 9 Close the output tray 4 by pushing the both sides of the cover firmly 4 10 Close the front cover 2 Note The front cover cannot be closed if the out...

Page 109: ...Cleaning Paper Feed Rollers Clean the paper feed rollers if paper jams occur frequently Note You should replace the paper feed rollers if paper jams keep occurring even after cleaning the paper feed r...

Page 110: ...lease the tab 3 of the paper feed roller cover 1 4 3 4 Open the paper set cover 5 until touching the printer 5 5 Wipe the two paper feed rollers 6 with a wet cloth that has been wrung out well 6 6 Ope...

Page 111: ...on by pressing the paper loading part on the MP tray downward 1 Cleaning LED Heads Clean the LED heads if vertical lines appear images are fading vertically or the periphery of letters is smudged in t...

Page 112: ...ipe the lenses 5 of the LED heads with soft tissue paper 5 5 Close the output tray 4 by pushing the both sides of the cover firmly 4 6 Close the front cover 2 Note The front cover cannot be closed if...

Page 113: ...e it weighs about 37 Kg or 40 Kg CAUTION Possible to get burned The fuser unit is extremely hot Do not touch it Note The image drum the green tube is very delicate Handle it carefully Do not expose th...

Page 114: ...t surface 7 Secure each toner cartridge to each image drum with vinyl tape 5 5 8 Return all the toner cartridges and image drums to the printer 9 Close the output tray 4 by pushing the both sides of t...

Page 115: ...t your printer with packing materials 13 Lift your printer and put it in a box Note Use the packing materials attached to your printer when purchased After transporting or when setting up again remove...

Page 116: ...ata local user external user cache LDAP Kerberos 1 Press the MENU button on the operator panel 2 Press the scroll button to select Admin Setup and press the ENTER button 3 Input the admin password 4 S...

Page 117: ...on on the operator panel you can check the status of your printer Checking the Device Status You can check the residual life of the consumables counter information network settings and system informat...

Page 118: ...Cyan Drum Magenta Drum Yellow Drum Black Drum Belt Fuser Network Network Information Printer Name Short Printer Name Enabling Default Gateway When Wireless LAN is installed Wired IPv4 Address Subnet...

Page 119: ...10 X Dimension 210millimeter F11 Y Dimension 297millimeter F12 Media Type Plain F13 Media Weight Light F14 Legal Paper Legal14 Othre Size 16K 184x260mm Tray2 Config When tray2 is installed Paper Size...

Page 120: ...meter Duplex Y Adjust 0 00millimeter Tray2 When tray2 is installed F222 X Adjust 0 00millimeter Y Adjust 0 00millimeter Duplex X Adjust 0 00millimeter Duplex Y Adjust 0 00millimeter Tray3 When tray3 i...

Page 121: ...s 1 Duplex Off Binding Long Edge Media Check Enable A4 Letter Override Yes Resolution 600dp Toner Save Toner Save Level Off Color All Mono Print Mode Auto Default Orientation Portrait Edit Size Casset...

Page 122: ...haracter Normal Line Pitch 6 LPI White Page Skip Off CR Function CR Line Length 80 column Form Length 11 7 inch TOF Position 0 0 inch Left Margin 0 0 inch Fit To Letter Disable Text Height Same Contin...

Page 123: ...ess Phone Setup Business Phone Cooperation Disable Connection IP Address 0 0 0 0 Connection Port No 59000 Settings Reset Settings Save Settings Restore Settings Change Password New Password Verify Pas...

Page 124: ...s LAN is installed Wireless AP Mode Disable Automatic Setup PushButton Manual Setup Connection Setting SSID Password IPv4 Address Execute AP Mode User Setting Don t disclose use Boot Menu Network Fact...

Page 125: ...100A N35101A 110 127 VAC Range 99 140 VAC 50 60 Hz 2 N35100B N35101B 220 240 VAC Range 198 264 VAC 50 60 Hz 2 Power consumption Typical operation 700 W Idle 100 W Peak 1400 W Deep sleep mode Voltage 1...

Page 126: ...x 390 mm 273 x 394 mm 16K 197 x 273 mm 195 x 270 mm 184 x 260 mm Duplex Printing Legal 13 13 5 14 letter executive tabloid A3 A4 A5 B4 B5 B6 8 5SQ Folio 8K 260 x 368 mm 270 x 390 mm 273 x 394 mm 16K 1...

Page 127: ...rature of 2 C Conditions for the guarantee of print quality Operating Range Temperature 10 C humidity 20 to 80 RH Temperature 32 C humidity 20 to 60 RH Humidity 20 RH temperature 10 to 32 C Humidity 8...

Page 128: ...circuit different from that to which the receiver is connected Consult the dealer or an experienced radio TV technician for help This transmitter must not be co located or operating in conjunction wit...

Page 129: ...plus entre le dispositif rayonnant et le corps Europe CE Declaration of Conformity This equipment complies with the essential requirements of the European Union directive 1999 5 EC The telecommunicat...

Page 130: ...130 Specifications 5 5 Appendix Printer Dimensions 449 mm 360 mm 760 mm 400 mm 498 mm 774 mm 138 mm 138 mm 138 mm 1107 mm 255 mm 552 mm 300 mm 420 mm TOP VIEW SIDE VIEW OPTION INSTALLED VIEW TRAY2 3 4...

Page 131: ...er Mac OS X 35 39 Printer Driver Windows 31 38 IP Address 31 M Mac OS X 30 MP Tray 49 O Other Error Messages 82 Output Tray 57 P Paper Jams 68 Paper Size 43 46 53 Paper Tray 46 53 Paper Weight 43 46 P...

Page 132: ...rd Floor ul Domaniewska 42 02 672 Warsaw Poland Tel 48 22 448 65 00 Fax 48 22 448 65 01 Website www oki pl E mail oki oki com pl Hotline 0800 120066 E mail tech oki com pl OKI Europe Limited Sucursal...

Page 133: ...a OTRO 2000 Bishops Gate Blvd Mt Laurel NJ 08054 USA Tel Espa ol 1 856 222 7496 1 856 222 5276 Fax 1 856 222 5260 Email LASatisfaction okidata com Oki Data de Mexico S A de C V Mariano Escobedo 748 Pi...

Page 134: ...46504302EE Rev3 www oki com printing...

Reviews: