background image


© SAMSUNG Electronics Co., Ltd. 


15


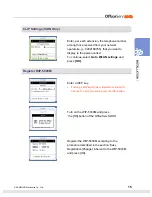
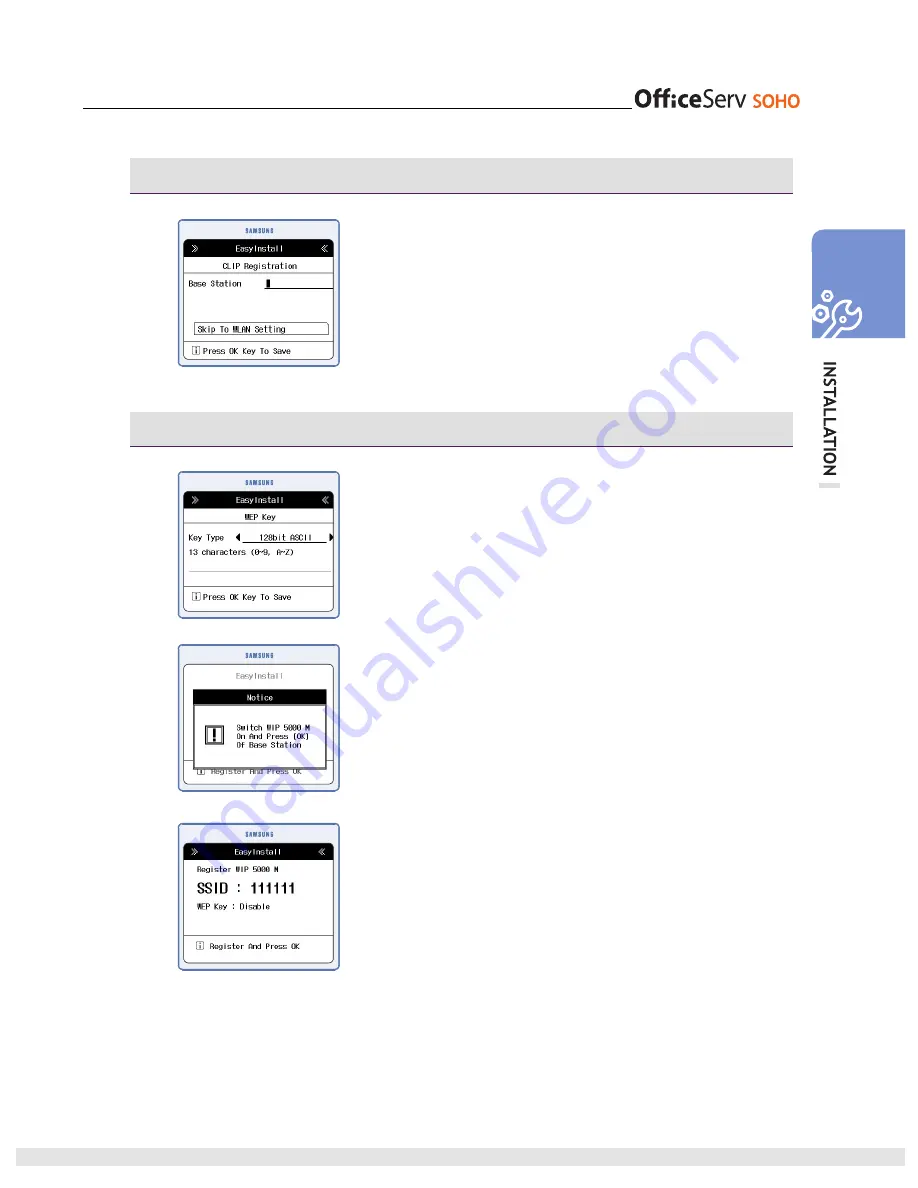
CLIP Settings (ISDN Only)  


    Enter, per each extension, the telephone number, 

  among those received from your network 
 operator(e.g.,: 

0292189765), 

that you want to 

  display to the person called. 
  To continue, select 

Go to WLAN settings

 and 

 press 

[OK]


Register WIP-5000M 


    Enter a WEP key. 


Entering a WEP key(Wireless Equivalence Privacy) is 

optional. To skip this entry, press the [OK] button. 


    Turn on the WIP-5000M and press   

   the [OK] button of the OfficeServ SOHO. 


   Register the WIP-5000M according to the 

procedure described in the section ‘Easy 
Registration(45page)’ inherent to the WIP-5000M 
and press [OK]. 


Summary of Contents for SOHO WIP-5000M

Page 1: ...Quick Installation Guide ...

Page 2: ...ront Panel 6 INSTALLATION 8 OfficeServ SOHO Connection ISDN Type 8 OfficeServ SOHO Connection PSTN Type 10 Easy Installation of OfficeServ SOHO 11 Easy Install 12 Connecting OfficeServ SOHO with Desktop Laptop Computers 16 Connecting Computer to OfficeServ SOHO Wirelessly 16 Connecting Computer to OfficeServ SOHO by LAN Cable 17 MAKING CALLS 19 How to Make a Call 19 Making Intercom Calls 20 Callin...

Page 3: ...ering from OfficeServ SOHO 23 Answer a call addressed to another station Call Pick Up 24 FEATURES 25 Function Used during Calls 25 VoIP 27 SMS 28 AA Auto Attendant 28 Convenient features 29 Web Management 30 MENU 31 Main Screen 31 Main Menu 32 TROUBLESHOOTING 34 OfficeServ SOHO Troubleshooting 34 Specifications of the OfficeServ SOHO 36 ...

Page 4: ...re Specifications 39 Phone Layout 40 Menu Structure 42 INSTALLATION 45 To Turn the Power On 45 Easy Registration 45 To Turn the Power Off 47 Icons 47 MAKING CALLS 48 Calling Method 48 Making Intercom Calls 48 Making External Calls 49 ANSWERING CALLS 50 Answering from WIP 5000M 50 Answer a call addressed to another station Call Pick Up 50 TROUBLESHOOTING 51 WIP 5000M Troubleshooting 51 Specificatio...

Page 5: ...IV SAMSUNG Electronics Co Ltd This page is intentionally left blank ...

Page 6: ...For Basic Telephone Installation Quick Reference ...

Page 7: ... so as to access the various functions and services The installation wizard enables users to easily set the data and telephone network mode as well as to register the Wireless WIP 5000M phones This product supports wireless LAN data services with communication devices PC PDA that include WLAN modules Also a Web interface is available for the programming of functions and data and telephone services...

Page 8: ...p On Do Not Disturb Phone Block Password Internal Calls Call Pick Up System Telephone Services Auto Attendant with selection of the call destination Music for calls on hold Time variable management for call destination Flexible Internal Numbering Call Filter list of prohibited numbers Emergency Numbers Toll Restriction Setup and configuration menu Additional ISDN Telephone Services ISDN Only Multi...

Page 9: ...T port for connecting with a PC or local PDA 1 integrated WLAN with Access Point IEEE 802 11 b g compatible IEEE 802 11 b Software Specifications OS Embedded Linux VoIP SIP Protocols TCP IP ICMP VPN Pass through WMM TAPI 2 1 Internet Connection PPPoE DHCP Static IP Security Firewall Editable Filter NAT Wireless Feature WMM WEP WPA 1 0 WPA 2 0 802 11i MAC Access Control Hardware Specifications CPU ...

Page 10: ... and quantity may be different according to the country WIP 5000M For further information on the WIP 5000M provided with OfficeServ SOHO refer to the WIP 5000M Section WIP 5000M Mobile phone Charger Battery 1 Standard Type User Guide OfficeServ SOHO WIP 5000M LAN Cable OfficeServ SOHO Power Adapter Quick Installation Guide and Quick User Guide ISDN Cable SIT 200EI or Line cables 2EA SIT 200EM Tele...

Page 11: ...ction LCD Screen Display the status phone number menu and various massages M1 M4 Memory Button Frequently used numbers are saved as Memory buttons Dial Button Button used for entering numbers and characters Speaker Button Button used for making calls through the speaker phone Internal Call Button Used for making internal calls ...

Page 12: ...End Button Used when terminating a call during a call Used to exit the menu mode Direction Button OK Button Direction button Used when editing characters numbers or moving a menu item OK button Used when selecting saving the item where a cursor is in the menu mode Send Button Used when making a call Press Send button after entering number Used for checking recent outgoing incoming including no ans...

Page 13: ...MSUNG Electronics Co Ltd INSTALLATION OfficeServ SOHO Connection ISDN Type Before proceeding with the installation of the OfficeServ SOHO please read carefully the instructions below LAN PC ISDN FAX or SLT ...

Page 14: ...ring Device or Single line Telephone to the port of the OfficeServ SOHO by using a phone cable RJ 11 4 PC Connection Connect the LAN port of the PC to the LAN port of the OfficeServ SOHO by using a LAN cable RJ 45 5 LAN Connection Connect the LAN port of the external modem to the WAN port of the OfficeServ SOHO by using a LAN cable This is not applicable to an internal ADSL modem 6 Power Connectio...

Page 15: ...le before installation 1 Handset Connection Connect the handset to the connection port on the left side of the OfficeServ SOHO 2 Single Line Telephone Connection Connect the facsimile Answering Device or Single line Telephone to the port of the OfficeServ SOHO by using a phone cable RJ 11 3 PSTN Line Connection Connect the L1 Line1 L2 Line2 to the analog trunk port of the OfficeServ SOHO by using ...

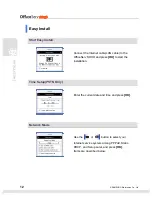
Page 16: ...l of the OfficeServ SOHO blink in turns Within a short time the loading screen and the EasyInstall screen will appear in sequence on the LCD of the OfficeServ SOHO The use of the buttons for menu settings is described below Button Description Button Description The OK button is used after text is entered or to set the menus The direction buttons are used to move the cursor left or right or to sear...

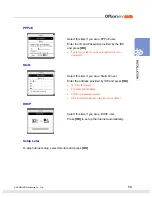
Page 17: ...e LAN cable to the OfficeServ SOHO and press OK to start the installation Time Setup PSTN Only Enter the current date and time and press OK Network Mode Use the or button to select your Internet service system among PPPoE Static DHCP and Setup Later and press OK Items are described below ...

Page 18: ...he ID or password Static Select this item if you are a Static IP user Enter the address provided by ISP and press OK IP Enter IP address SN Enter Subnet Mask GW Enter Gateway address DNS Enter DNS Domain Name Server address DHCP Select this item if you are a DHCP user Press OK to set up the Internet automatically Setup Later To skip Internet setup select this item and press OK ...

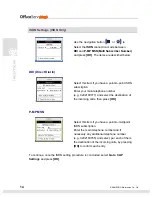
Page 19: ...tion Enter your main telephone number e g 0292189777 and select the destination of the incoming calls then press OK P MP MSN Select this item if you have a point to multipoint ISDN subscription Enter the main telephone number and if necessary any additional telephone number e g 0292189765 and select per each of them the destination of the incoming calls by pressing OK to confirm each entry To cont...

Page 20: ...n called To continue select Go to WLAN settings and press OK Register WIP 5000M Enter a WEP key Entering a WEP key Wireless Equivalence Privacy is optional To skip this entry press the OK button Turn on the WIP 5000M and press the OK button of the OfficeServ SOHO Register the WIP 5000M according to the procedure described in the section Easy Registration 45page inherent to the WIP 5000M and press ...

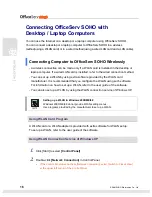
Page 21: ...LAN card manufacturer It is recommended that you configure the WLAN using such software For information on how to set up a WLAN refer to the user guide of the software You can also set up a WLAN by using the WLAN connection service of Windows XP Setting up a WLAN in Windows 2000 ME 98 Windows 2000 ME 98 do not provide WLAN setting menus Use programs provided by the manufacturer to set up a WLAN Us...

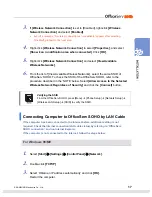
Page 22: ...fficeServ SOHO refer to the procedure described in the NOTE below Select Allow Access to the Selected Wireless Network Regardless of Security and click the Connect button Verifying the SSID From the OfficeServ SOHO press Menu Phone Setup Network Setup Wireless LAN Setup SSID to verify the SSID Connecting Computer to OfficeServ SOHO by LAN Cable If the computer has been connected to the Internet be...

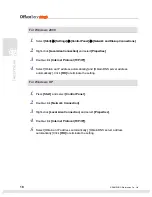
Page 23: ...lect Obtain an IP address automatically and Obtain DNS server address automatically Click OK to terminate the setting For Windows XP 1 Press Start and select Control Panel 2 Double click Network Connection 3 Right click Local Area Connection and select Properties 4 Double click Internet Protocol TCP IP 5 Select Obtain an IP address automatically Obtain DNS server address automatically Click OK to ...

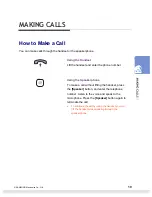
Page 24: ... and enter the phone number Using the Speaker phone To make a call without lifting the handset press the Speaker button and enter the telephone number Listen to the voice and speak to the microphone Press the Speaker button again to terminate the call To continue the call by using the handset you can lift the handset while speaking through the speakerphone ...

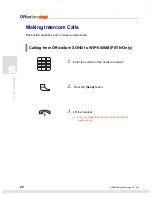
Page 25: ...s This section describes how to make an internal call Calling from OfficeServ SOHO to WIP 5000M PSTN Only 1 Enter the number of the desired recipient 2 Press the Send button 3 Lift the handset Press the Speaker button to speak through the speakerphone ...

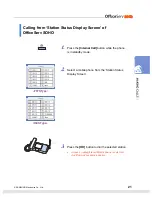
Page 26: ...rv SOHO 1 Press the Internal Call button while the phone is in standby mode 2 Select a mobile phone from the Station Status Display Screen 3 Press the OK button to dial the selected station In case an unregistered Mobile phone is selected the Plug out message appears PSTN Type ISDN Type ...

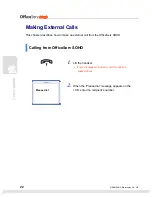
Page 27: ...er describes how to make an external call from the OfficeServ SOHO Calling from OfficeServ SOHO 1 Lift the handset Press the Speaker button to call through the speakerphone 2 When the Please dial message appears on the LCD enter the recipient s number Please dial ...

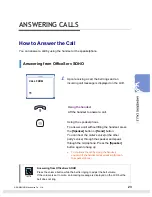
Page 28: ... without lifting the handset press the Speaker button or Send button You can hear the caller s voice or the other party s voice through the speaker and speak through the microphone Press the Speaker button again to hang up To continue the call by using the handset you can lift the handset while speaking through the speakerphone Answering from OfficeServ SOHO Press the volume button while the bell ...

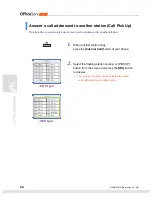
Page 29: ...oming calls addressed to another station 1 When another station rings press the Internal Call button of your phone 2 Select the flashing station number or PICKUP button from the screen and press the OK button to answer The pick up function can be selected to answer a call addressed to any other station PSTN Type ISDN Type ...

Page 30: ...iceServ SOHO User Guide Call Holding or Call Transfer The R key provides a simple method to put a call on hold or to transfer a call 1 Press the R button during a call to put the call on hold The caller on hold can hear background music 2 On the display you can read HOLD Please dial 3 Press the R button to resume the call HOLD Please dial ...

Page 31: ...er PSTN or VoIP Call Only 5 When you answer a call using the handset you can just replace it to transfer the call Replace the handset while the transfer tone is ringing to transfer the call unconditionally For further details For further details on other features used during call refer to the OfficeServ SOHO User Guide PSTN Type ISDN Type ...

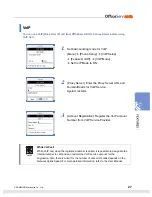
Page 32: ...er URL and Domain Realm for VoIP Service System restarts 3 Account Registration Register the VoIP account Number from VoIP Service Provider While VoIP call While VoIP call when the registered number is called it is possible to designate the internal number to call and can resister the VoIP service account for the origination Also there is a limit for the number of concurrent calls depends on the N...

Page 33: ...ficeServ SOHO User Guide Please be aware that the SMS facility provided by this product may not be supported by your local network provider Please check with your supplier 1 Receiving Messages Menu SMS Inbox Sending Messages Menu SMS Outbox AA Auto Attendant OfficeServ SOHO is supported Auto Attendant function For further details on AA refer to the OfficeServ SOHO User Guide 1 Set Auto Attendant F...

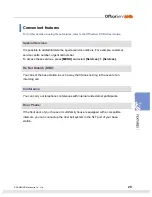
Page 34: ...call number To access these services press MENU and select Services Services Do Not Disturb DND You can set the base station in such a way that it does not ring in the event of an incoming call Conference You can carry out telephone conferences with internal and external participants Door Phone If the front door of your house or multi family house is equipped with a compatible intercom you can con...

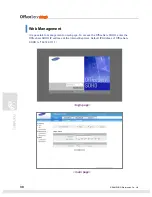
Page 35: ...Ltd Web Management It is possible to management on web page To access the OfficeServ SOHO enter the OfficeServ SOHO IP address at the Internet Explorer Default IP Address of OfficeServ SOHO is 192 168 111 1 login page main page ...

Page 36: ...y entering the item number Main Screen The default background screen of the main screen is shown below The background screen can be changed by pressing the MENU button and selecting Phone Setup My Phone Select Background Icons of the background screen are described below Icon Function Auto Answer Call forward Auto Attendant Mode DND Mute Alarm Message Logical Network connection Physical Network co...

Page 37: ...MS Settings Configuration of the SMS service Service Centre notification Display Find Number Search an item in the phonebook per number name position etc Outgoing calls Lists the outgoing calls and allows recalling the relevant numbers Incoming calls Lists the received calls and allows recalling the relevant numbers Missed calls Lists the calls with no answer and allows recalling the relevant numb...

Page 38: ...es Activate the services provided by Service Provider User can make his her own service phone number list For example customer service center technical support center My Phone Customization of the settings of the Base Station Mobile Setup Customization of the Wireless Terminals settings a b Port Setup Customization of the a b port SLT settings Network Setup Configuration of the IP network system p...

Page 39: ...the CID option at Menu Phone Setup Global Setup Feature On Off CID Detection Check that the CID service has been requested to the telephone company Caller requested the telephone company not to disclose his her ID The call was made from an area where the CID service is not provided e g international calls The call was made from a public phone The information provided by the telephone company is co...

Page 40: ...d the OfficeServ SOHO in a sequence Verify that a software for ADSL connection is installed on the PC Remove the connection software using Add remove programs from the Control Panel and setup again the Internet service Mobile phone cannot be registered Check that the SSID is correct Check that an encryption key WEP or WPA key is set If so refer to the manual registration procedure and register the...

Page 41: ...r of Mobile phones that can be registered 8 Number of wireless devices that can be registered Recommended 6 Temperature C Operating Temperature 0 45 C Storage Temperature 25 70 C Humidity 0 90 Power Supply Input 110 250 V 50 60 Hz o 5 A Output 5 V 3 0 A This is a Class A electronic device In a residential environment this appliance can produce radio disturbances In this case the user can be requir...

Page 42: ...Mobile Station Installation Quick Reference ...

Page 43: ...as data packets Data terminals such as PDA and laptop PC that support wireless connection can be used along with the WIP 5000M Main features and services Basic Telephone Services SMS Alphanumeric general and personal Phonebook Speed Dialling List of outgoing calls List of incoming calls List of no answer calls Number pre selection Phonebook Calculator Time zones Terminal Name Services Menu Setup M...

Page 44: ...ediate conversation Call waiting for busy or no answer destination Camp On Call Park plug change Call duration display or call charge Time and date synchronization Software Specifications OS POSIX based NNOS VoIP SIP Protocols TCP IP Wireless Features WEP WPA1 WPA2 802 11i Hardware Specifications WLAN integrated IEEE 802 11b Internal Aerial 200mt outdoor 50mt indoor CPU T2U Netergy Memory 2MB Flas...

Page 45: ...menu bar upward Main Menu Used when moving the menu bar downward Volume Ring Used when moving the menu bar to the right direction Directory Navigation Buttons Used when moving the menu bar to the left direction Message Message Cancel Button Used when erasing letters or moving to an upper menu End Power Button Used when turning the power on off when returning to the initial screen or when terminati...

Page 46: ...ring characters KeyLock mode Buttons Used when applying the automatic key lock Microphone Microphone Etiquette mode Button Used when applying the etiquette mode Send Button Used when calling or receiving an outside trunk call when transferring a call Menu Button Used when entering the menu mode Volume Button Used when controlling the volume of voice or key tone LCD Screen Display the Menu Call Num...

Page 47: ... Calls 4 Missed Calls 5 New Entry 1 PhoneBook 6 Delete List PSTN Type Model SIT200EM ISDN Type Model SIT200EI 1 Alarm 1 Alarm 2 Scheduler 2 Scheduler 3 Calculator 3 Call Charge 4 World Time 4 Calculator 2 Utilities 5 World Time 1 Inbox 1 Write 2 Outbox 2 Sent 1 New 3 Templates 2 Search 1 No Tone 2 Once 3 Message 4 SMS Settings 1 Alert Time 3 Every 2 minutes PSTN Type Model SIT200EM ISDN Type Model...

Page 48: ...ground 3 Display Time 3 Password 1 English 4 Language 2 Italiano 1 8 sec 2 20 sec 1 Light Time 3 Always Off 5 Back Light 2 Light on off PSTN Type Model SIT200EM ISDN Type Model SIT200EI 1 Disable 2 Always 3 Busy 4 No Answer 1 Disable 1 By Internal 5 Busy No Answer 1 Always 2 Busy 2 Always 2 By Network 3 No Answer 3 Busy 3 Clear CF 4 No Answer 6 Phone Settings 6 Call Forward 5 Busy No Answer ...

Page 49: ...44 SAMSUNG Electronics Co Ltd Menu Submenu 7 LCD Contrast 8 station number 9 Reset 0 Version Info 6 PhoneSettings Phone Lock 1 Search Base 1 Enable 2 WEP key 2 Disable 7 System 3 Register Newly ...

Page 50: ...ster WIP 5000M 1 Press and hold the button and turn on the power of the phone 2 Enter the SSID press and hold the button to enter the code digits instead of characters and press the OK button SSID Enter the SSID into the WLAN connection device See the section Guided Installation of the OfficeServ SOHO or refer to your system administrator to verify the SSID 3 Select Enable or Disable to activate o...

Page 51: ...ave it blank and press OK 6 The telephone has been successfully registered 7 The screen shown on the bottom appears if the registration was not successful Enter the SSID again press and hold the button to enter the code digits instead of characters and press OK Verifying SSID The SSID is generally used with the OfficeServ SOHO From the OfficeServ SOHO press MENU Phone Setup Network Setup Wireless ...

Page 52: ...ntensity weak signal strong signal This turns on when the service is not available Blinks when trying to make a call and turns on when a call is connected The status that indicates an alarm is set When a message is received Etiquette function or vibration function is enabled Indicates that the automatic key lock is enabled Indicates the battery charging level fully charged sufficient insufficient ...

Page 53: ...a call However only the basic function will be introduced in this guide Making Intercom Calls Calling from WIP 5000M to the OfficeServ SOHO or to Another WIP 5000M 1 Select the number of the recipient you require 2 Press the Send button to hear a connecting tone 3 Start your conversation when the recipient answers ...

Page 54: ...UNG Electronics Co Ltd 49 Making External Calls Calling from WIP 5000M 1 Enter an external phone number 2 Press the Send button to hear a connecting tone 3 Start your conversation when the recipient answers ...

Page 55: ...age is displayed on the LCD 2 Press the Send button to answer the call 3 Press the End button to disconnect the call Answer a call addressed to another station Call Pick Up This function is used to answer an incoming call addressed to another recipient When another telephone rings press the MENU button select Soft Menu Pick Up and answer the call ...

Page 56: ...s too low Verify that the phone is not set in vibration mode Adjust the volume at MENU Volume Ring Ring Volume The lamp on the charger flashes yellow Take the battery out from the charger and put the battery in again If the yellow light continues to flash clean the charging phones of the charger If the yellow light continues to flash despite the above measures contact the Samsung Electronics servi...

Page 57: ...g Electronics service centre Phone registration failure Check if the power of the system or AP is on and register the phone again Move to a serviceable area of the system or AP and register the phone again If the problem is not solved contact the Samsung service centre Calls are disconnected frequently Move to another area since the frequency is unstable If calls are still disconnected frequently ...

Page 58: ... 0 45 C Storage Temperature 25 70 C Operating Humidity 0 90 Dimensions mm 43 width x 126 length x 19 thickness Weight 95 g Battery Charge Time 2 Hour 3 7 V Li Ion 1000 mA Battery Duration Call duration 2 Hours 30 Minutes Standby duration 25 Hours This is a Class A electronic device In a residential environment this appliance can produce radio disturbances In this case the user can be required to u...

Page 59: ...54 SAMSUNG Electronics Co Ltd This page is intentionally left blank ...

Page 60: ...ss Speaker Button to answer the call with hands free 2 Conversation 3 Press Speaker Button to terminate the call Change the Ring tone 1 Press Menu 2 Press the dial button 4 1 in sequence 3 Select the call type to change the ring tone 4 Press OK 5 Select the Ring tone type Basic Bell or Melody 6 Press OK 7 Select the Basic Bell type or Melody 8 Press OK Calling the latest call number 1 Press Send t...

Page 61: ...e 2 Press OK 3 Select the SMS 4 Press OK 5 Check the SMS message 6 Press C to return the SMS list menu 1 Press Menu 2 Press dial button 1 1 in sequence 3 Select the SMS message 4 Press OK 5 Check the SMS message 6 Press C to return the SMS list menu Phone Book find by Name 1 Press Menu 2 Press dial button 2 1 1 in sequence 3 Enter the name A 1x B 2x C 3x D 1x E 2x etc 4 Press OK after confirming t...

Page 62: ...ress End to finish the conversation Changing the Ring Type Ring Tone 1 Press Menu 2 Press dial button 5 1 in sequence 3 Select the Ring type Ring Vibrate Vibrate Ring 4 Press OK 5 Press the dial button 2 6 Select the call type to change the ring tone 7 Press OK 8 Select the ring tone type or melody 9 Press OK 10 Press End Calling using the recent call log 1 Press Send 2 Select the number to call i...

Page 63: ...ve the cursor to _ _ 6 Enter the number or select the number for speed dial 7 Press OK Calling using the phonebook 2x 1 Press Menu 2 Press OK 3 Select the Local Global Phonebook 4 Press OK twice 5 Enter the name to search the number 6 Press OK 7 Select the number searched list 8 Press Send Setting the alarm 1 Press Menu 2 Press the dial number 2 1 1 in sequence 3 Select the alarm Period 4 Press OK...

Reviews: