background image


52 

odd-i N700D User Guide


0

External Inputs 


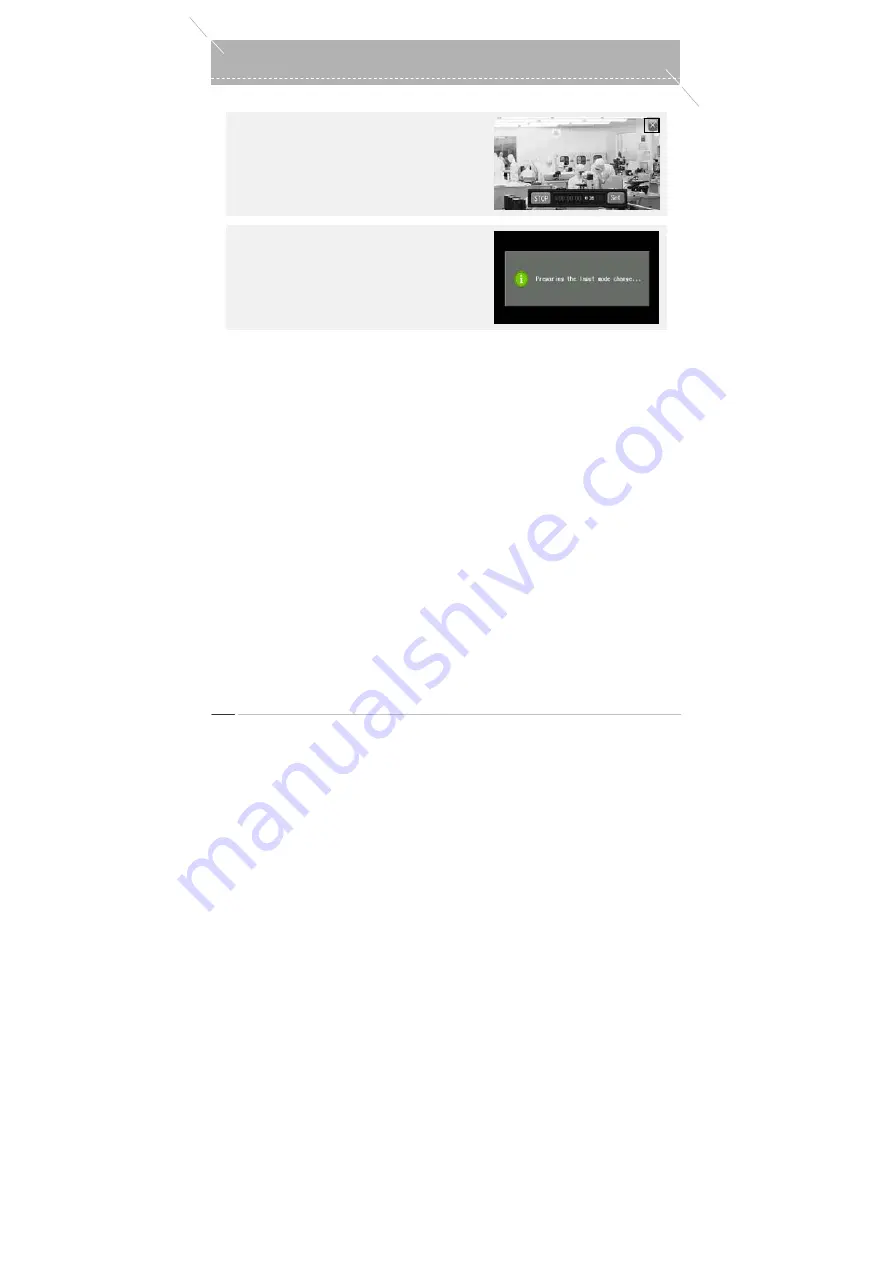
 To Exit the External Input program 

 Press 

the 

‘Exit’

 button at the top right side of the 

screen to exit the External Input program. 

  -  During a Preview: Exit 
  -  During a Recording: Save and Exit 


 To Enter Rear Monitoring Camera 

  When the unit is not in External Input mode (i.e. 

Preview status), if the Rear Monitoring Camera is 
connected, the ‘Changing Mode..’ message appears 
and it enters Rear Monitoring Camera mode. 


Summary of Contents for N700D

Page 1: ...User s Manual odd i N700D...

Page 2: ...ealizing their dreams and who have a different way of looking at things Our starting point is the belief that your way of seeing is special You see the world differently This manual is written to help...

Page 3: ...alling the Product 13 Connecting the Product 15 Turning On Off the Product 18 Using Navigation 19 Using the Overlay Function 20 Firmware Update 22 Using the Menu Functions Movie Player 23 Music Player...

Page 4: ...o not remove the SD card or hard disk drive when the product is turned on It is recommended to exit all programs before shutting the product down Operating or looking at the product while driving is e...

Page 5: ...pact to the product Do not leave the product in a vehicle There is a risk of theft and the product may malfunction due to a sudden change in temperature Asudden increase in the internal temperature of...

Page 6: ...MappyAdopted The odd i N700D has adopted the Mappy for searching and providing Korean nationwide road information It receives information about your current location from GPS satellites in real time...

Page 7: ...nd watch it later MP3 Player and Easy to Use FM Radio Support The odd i N700D supports the MP3 WAV OGG and WMAformats In addition it allows you to listen to FM radio through the FM tuner speakers in y...

Page 8: ...product packaging Parts included may be changed without any advance notice to improve the performance or quality of the product Basic Package Contents for the odd i N700D Main body Vehicle Cradle Ciga...

Page 9: ...ssories The following parts are included in the product packaging Parts included may be changed without any advance notice to improve the performance or quality of the product Cable for AV USB Devices...

Page 10: ...Description of Components 10 odd i N700D User Guide Rear Top Bottom 24 Pin Connector GPSAntenna Speaker Support HDD Operation LED HDD COVER Power Jack...

Page 11: ...on of Components Front Sides Power On Off Key Volume Key LED ILLUMINATION Main LCD Earphone Jack SD Card Slot AV OUT Jack AV IN Jack CAMERAIN Jack USB Device Port USB HOST Port Remote Control Sensor M...

Page 12: ...ide Wireless Remote Control Optional Power Key MODE Cancel Mute Key Up Down Control same as with the joystick NAVI Left Right Control same as with the joystick OK Key MENU Volume Up Movie Key File Man...

Page 13: ...pressing lightly on the bottom of the rear side of the product Note If it cannot be comected in properly do not insert it forcibly Try sliding it into the main body again Be sure to check the directio...

Page 14: ...onto the windshield and pull the lever down 4 If the installation position is not quite right pull the lever up adjust the position and then pull it down again For your safety use the product above th...

Page 15: ...st or device if possible and select Connect or Remove from the Main Menu to connect or remove a USB host or device Make sure to run the Safely Remove Hardware before disconnecting the USB Device cable...

Page 16: ...watch or record video from a TV You can not only connect a TV but also any device supporting CVBS such as a VCR Camcorder etc Connect the cable and select External IN from the Main Menu Refer to Exter...

Page 17: ...priate TV OUT in the Environment Settings Refer to Environment Settings on page 47 To Connect through the CVBS Port To Connect through the S Video Port You should purchase a 24 pin cable separately Co...

Page 18: ...ection status 2 Fold out the GPS antenna on the rear side of the product so that it faces upwards 3 Press and hold the Power button for approximately 1 second 4 The booting screen appears and the Main...

Page 19: ...e vehicle 4 Cancel Wireless Remote Control Registers the current location Registers My Point Navigation Key Map 1 Fold out the GPS antenna on the rear side of the product so that it faces upwards 2 Pr...

Page 20: ...aunch the Movie Player 2 Touch the screen The Control Bar appears 3 Press the NAVI button on the Control Bar 4 The Movie Player screen is decreased and displayed together with Navigation 5 When you to...

Page 21: ...ile into the root directory of the SD card Install the SD card into the N700D again and boot the product in Safe Mode To boot the product in Safe Mode Press the Power key while holding the Menu key do...

Page 22: ...ght long Key Rewind Fast Forward 5 MENU Key Moves to Main Same for all programs 6 NAVI Key Moves to Navigation Same for all programs 7 MODE MODE long Key Switches to another currently running program...

Page 23: ...can select a file from the Filelist and play it To Play a File when Resume from the Last Position is set Select the Resumefrom the Last Position or Play from the Beginning button in the pop up window...

Page 24: ...is launched If you touch the screen again or if it is left untouched for a specified period of time the Control Bar disappears Play Information File Title Exit Button Setup Button 3 Using Movie Playe...

Page 25: ...the PIN function the PIN screen is resized in 3 steps If you touch the screen 3 times the original screen size is restored You can use Rewind Fast Forward Previous Next File Play Pause and Volume Cont...

Page 26: ...Output Video Size Control Bar Display 3 5 10 Seconds Brightness Contrast Chroma Color You can set up the screen quality by setting these items If you press the Default Settings button the settings are...

Page 27: ...Video Settings menu appears Select the Subtitle Settings tab to view or set up the subtitle settings Subtitle Setting You can determine whether to show or hide subtitles Font Size You can set the fon...

Page 28: ...Plays the next track 5 Left long Right long Key Rewind Fast Forward 6 MENU Key Moves to Main Same for all programs 7 NAVI Key Moves to Navigation Same for all programs 8 MODE MODE long Key Switches to...

Page 29: ...tomatically played 2 Playing a Music File In File Management Press the File Management button from the Main Menu The File Management screen appears Select a file from File Management and press the Pla...

Page 30: ...ess the button once again To Play Pause Play a music file in the Music Player Playlist Filelist Press the Pause button during a playback to pause To resume the playback press the Pause button once aga...

Page 31: ...If you press the MODE key you can toggle between other programs that are running 3 Using the Music Player Press the Add button to launch Filelist select files to be added and press the Add button The...

Page 32: ...s the Sound Effect button in the Music Player to view or set up Sound Settings Select a Sound Effect Normal Rock Pop Jazz Classic Dance Heavy Disco Soft 3D Live Hall 6 Sound Effect Setting 7 Play Mode...

Page 33: ...ayer You can view lyrics with music The LRC lyrics file format is supported and lyrics files must be in the folder in which the corresponding music file is saved When lyrics are displayed the equalize...

Page 34: ...r Sub Folder 4 MENU Key Moves to Main Same for all programs 5 NAVI Key Moves to Navigation Same for all programs 6 MODE MODE long Key Switches to another currently running program Same for all program...

Page 35: ...Thumbnail View SlideShow View To view photos in SlideShow Press the Large View button in the List View of PhotoAlbum press the SlideShow button in the Thumbnail View If you click the left arrow button...

Page 36: ...up button in the List View of the PhotoAlbum to set up PhotoAlbum Settings You can set the slide interval for SlideShow 3 5 8 seconds and determine whether to use the automatic rotation function 4 Set...

Page 37: ...Moves Focus Left or Right 4 MENU Key Moves to Main Same for all programs 5 NAVI Key Moves to Navigation Same for all programs 6 MODE MODE long Key Switches to another currently running program Same fo...

Page 38: ...orted in ascending order by date To Sort by Name If you press the File Name button files are sorted by name When you press it once Files are sorted in descending order by name When you press it twice...

Page 39: ...k drive Press the OK button The Information window disappears To Create a Folder Press the button to create a new folder in the current folder 4 Folder Management To Delete a Folder Select a folder to...

Page 40: ...e files by moving the cursor or selecting the check box and press the Copy Move button Asmall filelist window appears Select a destination folder into which the files are to be copied and press the Co...

Page 41: ...MENU Key Moves to Main Same for all programs 5 NAVI Key Moves to Navigation Same for all programs 6 MODE MODE long Key Switches to another currently running program Same for all programs LCD OFF 7 Vol...

Page 42: ...the System Settings screen After setting it press the OK button to finish You cannot change the date while running Navigation 2 Environment Settings System Settings Press the Environment Settings butt...

Page 43: ...t the Screen Brightness in the Screen Settings screen and press the OK button to finish To Move to the Screen Settings Screen Press the Environment Settings button from the Main Menu to open the Envir...

Page 44: ...ettings Safe Drive Mode Setting Set the Safe Drive Mode setting in the Screen Settings screen and press the OK button to finish If Safe Drive Mode is selected no picture is displayed in the Movie or D...
Page 45: ...onment Settings screen Press the Connection Settings button in the Environment Settings screen 4 Environment Settings Connection Settings AV Type Setting Set theAV Type setting in the Connection Setti...

Page 46: ...Settings screen 5 Environment Settings Security Settings Hide Folder Setting Set the Hide Folder setting in the Security Settings screen and press the OK button to finish To Change Password Press the...

Page 47: ...6 Environment Settings FMT Settings To Initialize Press the Initialize button in the Security Settings screen FMT Setting Press the ON button and select a channel from the 3 channels available so tha...

Page 48: ...tings Screen Press the Environment Settings button from the Main Menu to move to the Environment Settings screen Press the PIP Settings button in the Environment Settings screen 7 Environment Settings...

Page 49: ...all programs 3 NAVI Key Moves to Navigation Same for all programs 4 MODE MODE long Key Switches to another currently running program Same for all programs LCD OFF 5 Volume Key Volume Control Mute Pow...

Page 50: ...TOP button The recording is stopped When the window asking you if you want to save the recording appears press the Yes button The recorded file is saved in the hard disk drive If there is no hard disk...

Page 51: ...rogram is terminated 2 External Input Exit External Input Settings If you press the Setup button during a recording you can set up the Preview screen Auto Save and Auto Stop Recording settings Screen...

Page 52: ...de of the screen to exit the External Input program During a Preview Exit During a Recording Save and Exit To Enter Rear Monitoring Camera When the unit is not in External Input mode i e Preview statu...

Page 53: ...r all programs 3 NAVI Key Moves to Navigation Same for all programs 4 MODE MODE long Key Switches to another currently running program Same for all programs LCD OFF 5 Volume Key Volume Control Mute Po...

Page 54: ...s stopped When a window asking you if you want to save the recording appears press the Yes button The recorded file is saved in the hard disk drive only Save Path Record Rearcam RearXXX avi To Run the...

Page 55: ...een 480x224 320x224 pixels for recording Auto Record ON Record and save the recorded file automatically when the program is launched OFF Auto Save ON Saves the recorded file automatically after record...

Page 56: ...AVI Key Moves to Navigation Same for all programs 3 MODE MODE long Key Switches to another currently running program Same for all programs LCD OFF 4 Volume Key Volume Control Mute Power ON OFF 1 Vehic...

Page 57: ...you press a column heading Date Oil Consumption quantity Cost KRW Mileage Km the items are sorted by the column in ascending or descending order To Modify Oil Consumption History Select an item to be...

Page 58: ...ain Menu to move to the Vehicle Management Screen Select Maintenance Management in the Vehicle Management screen 3 Maintenance Management To Search for Maintenance History Select Year Month in the Mai...

Page 59: ...e to the Vehicle Management Screen Select Expenditure Management in the Vehicle Management screen To Modify a Maintenance Management Item Select an item to be modified and press the Modify button in t...

Page 60: ...te the item When the deletion confirmation pop up window appears press the Yes button The corresponding Expenditure item is deleted To Add an Expenditure Item Press the Add button in the Expenditure M...

Page 61: ...tatistics screen the Other Expenditure information appears Select Year Month in the Statistics screen to view the corresponding statistics Maintenance Statistics View If you select the Maintenance ite...

Page 62: ...pply the changes 6 Basic Information Insurance Information Management Press the Insurance Information button in the Basic Information screen to open the Insurance Information screen Fill the fields in...

Page 63: ...nt Expenditure Management or Basic Information screen and press the OK button If you press the Cancel or Previous button in the Number Input Window the number input is cancelled 7 Using the Contents I...

Page 64: ...Removable Hard Disk Type LCD 7 Inch Wide QVGA TFT 480X234 370 nits including Touch Interface SD Memory 2GB for Navigation Only HDD 2 5 inch hard disk drive can be installed Removable Type USB Device U...

Page 65: ...xpressway Mode Announcement Data Search Search by Name using initial letters middle letters Address Search 25 million addresses 500 000 Basic Telephone Number Search 114 Telephone Number Search Detail...

Page 66: ...thout prior notice for the improvement of the product s quality or performance Supported File Formats MPEG1 MPEG4 Xvid DivX 3 X 4 X 5 X 720X480 Max 30 Frames WMV7 8 9 320X240 Max 30 Frames Supported S...

Page 67: ...ats MP3 WMA WAV OGG AC3 Supported Outputs Built in Stereo Speakers Earphones FM Radio Frequency Response Range 20Hz 20KHz Output Power Earphones 40mW 20mW 20mW Built in Speakers 2W 1W 1W Max 2 4W 1 2W...

Page 68: ...r Monitoring Camera Input Function Support Input Signal CVBS NTSC PAL Auto Signal Detection Automatically detect video input and display Function Vertical and Horizontal Flip Function Automatic Record...

Page 69: ...f theAV cable is properly connected 3 Check if the product is turned on I cannot record video from a TV 1 Check if the power adapter is properly connected to the cigar jack 2 Press and hold the Power...

Page 70: ...rrectly 1 Check if the video file name and the subtitle SMI file name are identical and if they are in the same folder 2 Select Movie Player and then Subtitle Settings from the menu and check if Show...

Page 71: ...if the product is turned on 2 Check if the TVAV cable is connected The screen is not displaying anything 1 Check if the recording was made with the AV cable incorrectly connected or connected to the w...

Page 72: ...ils you want us to know about and send it with the PMP to our headquarters by mail 3 You can also visit our headquarters and request after sales service in person How can I get after sales service 1 T...

Page 73: ...d to provide reasonable protection against harmful interference in a residential installation This equipment generates uses and can radiate radio Frequency energy and if not installed and used in acco...

Reviews: