background image

Connecting a monitor and keyboard  

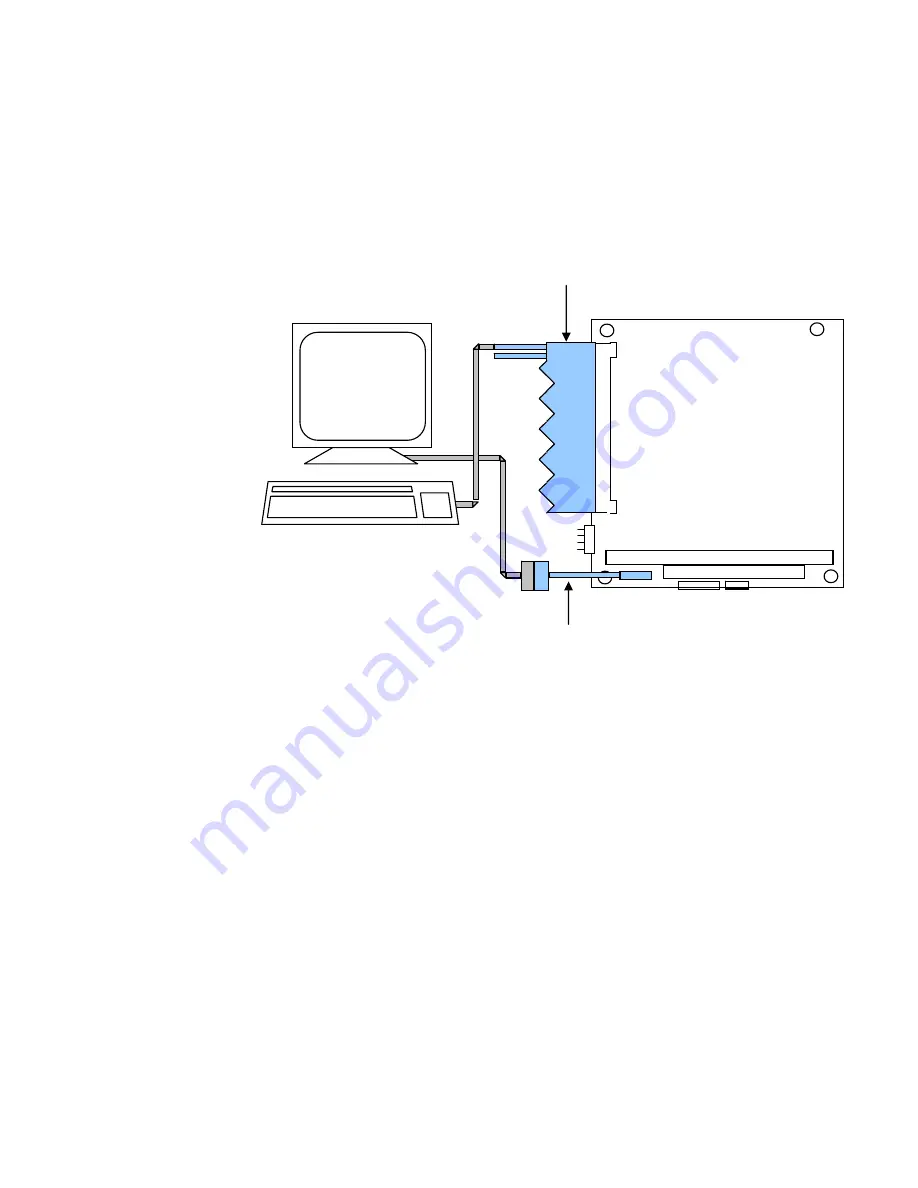
Figure 2–7 shows the 2060 CPU Card with a monitor and keyboard. The following 
sections describe how to connect these items. 

Figure 2–7 

Connecting a monitor and keyboard 


2060 HDC-Multiport Cable, connector J2 on top of board 


Monitor 

The 2060 CPU Card interfaces to a standard VGA monitor through the J5 
connector using a 2 mm VGA–12 cable.   Connect one end of the 2 mm VGA–12 
cable into J5 and connect the other end to a VGA monitor cable. 

Note


The video jumper, W1[5–6], must be installed to use a monitor. This jumper is 
installed by default. 

Keyboard and mouse 

The 2060 CPU Card accepts an AT style keyboard and has a PS/2 type connector, 
located on the HDC-18-SBC-Multiport cable. The mouse port is also on the HDC-
18-SBC-Multiport cable, with a PS/2 type connector.  

Speaker 

The HDC-18-SBC-Multiport cable contains a PC speaker.  

2060 

 
     VGA Monitor 

PS/2 Keyboard

2 mm VGA–12 cable 


31

Summary of Contents for 2060 PC/104

Page 1: ...2060 PC 104 CPU Card Reference manual Manual part 6413 rev F07 CONTACT INFORMATION Front Desk 303 430 1500 Technical Support 303 426 4521 FastHelp octagonsystems com www octagonsystems com 1 ...

Page 2: ...sentation or warranty that such applications will be suitable for the use specified without further testing or modification Octagon Systems Corporation general policy does not recommend the use of its products in life support applications where the failure or malfunction of a component may directly threaten life or injury It is a Condition of Sale that the user of Octagon products in life support ...

Page 3: ...rd to the flat panel display Miswiring can damage both the card and an expensive display Multiple component failures The chance of a random component failure is very rare since the average MTBF of an Octagon card is greater than 11 years In a 7 year study Octagon has never found a single case where multiple IC failures were not caused by misuse or accident It is very probable that multiple compone...

Page 4: ... It is important that a quality power supply be used with the 2060 CPU Card that has sufficient current capacity line and load regulation hold up time current limiting and minimum ripple The power supply for the 2060 must meet the startup risetime requirements specified in the ATX Power Design Guide version 1 1 section 3 3 5 This assures that all the circuitry on the CPU control card sequences pro...

Page 5: ...d operation near the maximum temperature specification is not recommended by Octagon or the CPU chip manufacturer due to well known thermal related failure mechanisms These failure mechanisms common to all silicon devices can reduce the MTBF of the cards Extended operation at the lower limits of the temperature ranges has no limitations 5 ...

Page 6: ...stored in EEPROM for high reliability 16 Watchdog timer added for safety 16 PC 104 interface 16 5 Volt only operation lowers system cost 17 Rugged environmental operation 17 Size 17 2060 CPU Card major software features 18 Diagnostic software verifies system integrity automatically 18 Phoenix software BIOS 18 Octagon BIOS extensions 18 Boot sequence 18 Chapter 2 Quick start 19 Component diagrams c...

Page 7: ... for COM ports 52 Function and use of serial ports 52 Mating receptacle 52 COM1 as serial console device 53 COM ports as RS 232 I O 53 COM2 as RS 422 and RS 485 networks 53 RS 422 53 RS 485 54 Chapter 6 LPT1 parallel port 56 LPT1 parallel port 56 Mating receptacle 56 Printer 57 Installing a printer 57 Floppy disk drive on LPT1 58 Chapter 7 Console devices 59 Description 59 Selecting console device...

Page 8: ... Overview Section 3 System management 84 Chapter 14 Watchdog timer and hardware reset 85 Description 85 Timeout period ranges 85 Booting power down and strobing the watchdog timer 85 Watchdog function definitions using enhanced INT 17h handler 86 Enable watchdog 86 Strobe watchdog 87 Disable watchdog 87 Hardware reset 88 Chapter 15 Serial EEPROM 89 Description 89 Enhanced INT 17h function definiti...

Page 9: ... specifications 106 CPU 106 Bus clock 106 BIOS 106 SDRAM 106 On board flash 106 Floppy drive 106 Hard drive 106 CompactFlash socket 106 USB 106 Serial I O 106 Parallel port 106 Digital I O 106 Speaker Keyboard and Mouse ports 106 Video 107 Watchdog timer 107 Real time clock 107 Expansion 107 Operating systems 107 Bus mastering 107 Power requirements 107 Environmental specifications 107 Size 107 We...

Page 10: ...ure 5 3 Typical RS 422 four wire interface circuit 54 Figure 5 4 Typical RS 485 4 wire interface circuit 54 Figure 5 5 Typical RS 485 2 wire half duplex interface circuit 55 Figure 6 1 LPT1 as a printer port 57 Figure 7 1 Monitor and keyboard as console 60 Figure 7 2 The 2060 CPU Card and a serial console 62 Figure 9 1 2060 CPU Card with floppy IDE device 66 Figure 10 1 Typical digital I O configu...

Page 11: ...el connector on the HDD FP cable 80 Table 16 1 CPU clock speed W3 93 Table 16 2 System configuration jumper W1 94 Table 17 1 BIOS beep codes 101 Table A 1 Mating connectors 108 Table A 2 HDC 18 HDD FP cable description part 6386 108 Table A 3 HDC 18 SBC Multiport cable description part 6387 108 Table A 4 2060 CPU Card DMA map 109 Table A 5 2060 CPU Card I O map 109 Table A 6 2060 CPU Card interrup...

Page 12: ...rovides installation and programming instructions startup options and system configuration program examples The following chapters are included Chapter 1 Overview Chapter 2 Quick start Chapter 3 Setup programs Chapter 4 Save and run programs 12 ...

Page 13: ... flash device for easy updates It is fully compatible with most popular operating systems 2060 CPU Card major hardware features CPU processor The CPU is a high performance low power AMD Geode GX1 processor with a clock speed of 233 or 300 MHz jumper selectable It uses the CS5530A companion chip for some of the peripherals The 2060 CPU Card has an ISA bus speed of 8 33 MHz SDRAM The memory socket c...

Page 14: ...h the 80 pin connector on the top side of the board The Octagon 2060 Multiport cable breaks out the pins into a standard USB connector USB2 is routed through the 80 pin connector on the bottom side of the board and uses the Octagon 2060 HDD FP cable Note that USB devices are hot swappable when a device is plugged into a standard USB connector as pins on the connectors determine the order in which ...

Page 15: ...tible keyboard and mouse as well as a PC speaker and a Reset switch Part number 6387 HDC 18 SBC HDD FP 2060 cable Connects into J500 on the bottom of the board and provides a standard 40 pin hard drive connector USB2 and a 34 pin flat panel interface Part number 6386 2060 COM2 RS 422 485 Cable Connects into J7 to provide RS 422 and RS 485 through a standard serial port interface Part number 6393 2...

Page 16: ...ore Setup information in battery backed CMOS RAM If the battery fails or is replaced during routine maintenance this information is lost Without a keyboard and monitor in embedded applications time consuming re initialization is required The 2060 CPU Card stores the Setup information in EEPROM with 1024 words available to the user Software routines to use this available memory come with the 2060 C...

Page 17: ...bus not required for 2060 CPU Card operation Rugged environmental operation Operating temperature 40 to 85 C 300 MHz 40 to 85 C 233 MHz Nonoperating temperature 55 to 95 C nonoperating Relative humidity 5 to 95 noncondensing Shock 40g 3 axis Vibration 5g 3 axis Size 3 55 in x 3 75 in x 0 80 in PC 104 form factor 17 ...

Page 18: ...is reset or powered up Memory verification does not require software test equipment monitor keyboard disks or test fixtures See the Troubleshooting chapter for a listing of tests and failures and their descriptions Phoenix software BIOS The 2060 CPU Card has a Phoenix Software BIOS with Octagon BIOS extensions The BIOS extensions support the INT17 functions Octagon BIOS extensions On board BIOS ex...

Page 19: ...ables Figures 2 1 and 2 2 show the connectors and their locations on the 2060 CPU Card Figure 2 3 shows the dimensions of the 2060 CPU Card in inches and millimeters The sections immediately following those figures describe the connectors and the high density cables WARNING The 2060 CPU Card contains static sensitive CMOS components To avoid damaging your card and its components Ground yourself be...

Page 20: ...Figure 2 1 2060 CPU Card component diagram top 20 ...

Page 21: ...Figure 2 2 2060 CPU Card component diagram bottom 21 ...

Page 22: ...Figure 2 3 2060 CPU Card dimensions 22 ...

Page 23: ...on on page 20 For information on mating connectors see page 107 For information on the high density and custom cables see the following section Table 2 1 2060 CPU Card connector functions Connector Function J1 CompactFlash J2 Multiport I O J3 Power J4 PC 104 J5 CRT Video J6 Digital I O eight lines J7 COM2 RS 422 RS 485 J500 Hard drive Flat panel XU1 SDRAM SODIMM Table 2 2 2060 CPU Card jumper func...

Page 24: ...rs do not provide power to the drives Table 2 3 and figure 2 4 show the HDD FP cable while table 2 4 and figure 2 5 show the Multiport cable Table 2 3 HDC 18 HDD FP cable description HDC 18 HDD FDD cable Side A Side B IDE drive IDE drive Flat Panel USB2 IDE drives Interfaces to two standard 40 pin IDE devices such as hard drives or CD ROM drives These connectors are on the Secondary IDE channel Th...

Page 25: ...Figure 2 4 HDC 18 HDD FP cable Flat USB2 80 pin connector plugs into J500 on bottom of 2060 CPU Card IDE Drive IDE Drive 25 ...

Page 26: ...a LPT to Floppy Adapter Cable Note that only the LPT to Floppy cable part 6470 can be used with this card as the floppy pin out from the LPT port differs from other cards USB1 Standard USB connector Caution USB devices are hot swappable when a device is plugged into a standard USB connector as pins on the connectors determine the order in which they make contact Devices are not hot swappable when ...

Page 27: ... CPU Card HDC 18 SBC Multiport cable 4 1 3 5 6 2 4 1 3 5 6 2 PS 2 Mouse PC Speaker AT Battery Reset Switch PS 2 Keyboard LPT Floppy 80 pin connector plugs into J2 on top of 2060 CPU Card COM1 COM2 Digital I O USB1 27 ...

Page 28: ...contains static sensitive CMOS components To avoid damaging your card and its components Ground yourself before handling the card and observe proper ESD precautions Disconnect power before removing or inserting a PC 104 expansion board Equipment required To install the 2060 CPU Card you will need the following equipment or equivalent 2060 CPU Card 5V power supply see Power Supply Requirements sect...

Page 29: ...shers must be used to secure the 2060 The standoffs ensure full support of the board WARNING Verify that the washers and standoffs do not touch any of the component pads adjacent to the mounting holes Damage will occur at power up 2 Connect a 5V power source to the 2060 Refer to the Power Supply Requirements section page 30 The power supply connector is located at J3 Refer to Figure 2 6 and Table ...

Page 30: ... a quality power supply be used that has sufficient current capacity line and load regulation hold up time current limiting and minimum ripple The power supply for the 2060 must meet the startup risetime requirements specified in the ATX Power Design Guide version 1 1 section 3 3 5 This ensures that all the circuitry on the 2060 CPU Card sequences properly and avoids system lockup Also select a po...

Page 31: ... 2 mm VGA 12 cable Connect one end of the 2 mm VGA 12 cable into J5 and connect the other end to a VGA monitor cable Note The video jumper W1 5 6 must be installed to use a monitor This jumper is installed by default Keyboard and mouse The 2060 CPU Card accepts an AT style keyboard and has a PS 2 type connector located on the HDC 18 SBC Multiport cable The mouse port is also on the HDC 18 SBC Mult...

Page 32: ...ompactFlash Refer to Figure 2 6 on page 35 for the following 1 Attach the HDC 18 SBC Multiport cable to J2 HDC 18 HDD FP cable to J500 the LPT to Floppy Adapter cable to the LPT port on the HDC 18 SBC Multiport cable and the 2 mm VGA 12 video cable to J5 2 Connect the PS 2 keyboard to the HDC 18 SBC Multiport cable a VGA monitor to the VGA 12 video cable and a floppy drive to the LPT to Floppy Ada...

Page 33: ...Change the LPT setting in the Advanced menu to Floppy Drive 8 Change the boot sequence to floppy drive first 9 Insert the operating system media into the floppy drive 10 Reboot the system The system should boot to the floppy drive 11 Refer to the OS documentation to load the operating system OS on CD ROM onto a hard drive or CompactFlash Refer to Figure 2 6 on page 35 for the following 1 Attach th...

Page 34: ...occurs between the memory test and bootup PhoenixBIOS Setup Utility Main Advanced Boot Exit Item Specific Help System Time System Date Legacy Diskette A Legacy Diskette B Primary Master Primary Slave Secondary Master Secondary Slave Memory Cache Boot option System Memory Extended Memory 00 00 36 01 01 1988 Disabled Disabled None None 3253MB None 640 KB 130048 KB Tab Shift Tab or Enter selects fiel...

Page 35: ...ply CompactFlash installed into CompactFlash socket 2060 VGA Monitor PS 2 Keyboard 2 mm VGA 12 cable CD ROM to IDE connector on HDD FP cable J500 on back of board Hard drive to IDE connector on HDD FP cable J500 on back of board Floppy drive to LPT port on HDC 18 Multiport cable via LPT to floppy cable 35 ...

Page 36: ...is memory for use by other operating systems Setup Setup can be entered by pressing the F2 key during the BIOS POST sequence this occurs between the memory test and boot Also by removing the S jumper W1 1 2 you will force the setup to revert to the factory programmed defaults shown in the following menus This allows the user to reconfigure the setup Note The Setup defaults might vary slightly from...

Page 37: ...drive Note that Diskette A must be enabled before Diskette B is accessible The menu items for Diskette B are then the same as for Diskette A Primary Master Accesses submenu for a Primary Master disk drive Options are None CD ROM ATAPI Removable Other ATAPI User and Auto This channel is hardwired to the CompactFlash and cannot be used for other devices Primary Slave Same as Primary Master This chan...

Page 38: ...d disk drive installed at this connection Auto autotypes hard disk drive installed here CD ROM a CD ROM drive is installed here ATAPI Removable removable disk drive is installed here F1 Help v Select Item Change Values F9 Setup Defaults Esc Exit Select Menu Enter Select Sub Menu F10 Save and Exit Type Specifies types of hard drives Choices are None Auto CD ROM ATAPI removable Other ATAPI and User ...

Page 39: ...enu Enter Select Sub Menu F10 Save and Exit Serial Video Enabled Disabled Enables redirection of video and keyboard to COM1 Baud Rate 9600 19 2K 38 4K 57 6K 115K Selects baud rate for serial console Post Video Mode Text Graphical Selects which video mode to display during POST Secured Setup Configurations Yes or No Yes prevents the operating system from overriding selections you have made in Setup...

Page 40: ...v Select Item Change Values F9 Setup Defaults Esc Exit Select Menu Enter Select Sub Menu F10 Save and Exit Memory speed Low Medium High Configures DRAM performance options High is a 100 MHz memory clock Medium is an 80 MHz memory clock and Low is a 66 MHz memory clock Low is recommended for Industrial Temperature Range Applications Video Resolution Low Medium High Super PS 2 Mouse Disabled Enabled...

Page 41: ...ase I O address 3F8 2F8 3E8 2E8 Interrupt IRQ3 IRQ4 Serial port B Same as Serial Port A Base I O address 3F8 2F8 3E8 2E8 Interrupt IRQ3 IRQ4 Interface RS232 RS422 RS485 Parallel port Disabled Enabled Auto OS controlled Enabled allows user to set configuration while Auto uses the BIOS or OS configuration Mode Output only Bi directional EPP ECP Floppy If Floppy is selected you must also enable Flopp...

Page 42: ...ion submenu reserves the specified block of upper memory for use by legacy ISA devices Options are Available or Reserved PhoenixBIOS Setup Utility Advanced PCI PNP ISA UMB Region Exclusion Item Specific Help C800 CBFF CC00 CFFF D000 D3FF D400 D7FF D800 DBFF DC00 DFFF Available Available Available Available Available Available Reserves the specified block of upper memory for use by legacy ISA devic...

Page 43: ... Values F9 Setup Defaults Esc Exit Select Menu Enter Select Sub Menu F10 Save and Exit PCI PNP ISA DMA Resource Exclusion submenu The PCI PNP ISA DMA Resource Exclusion submenu reserves the specified DMA channels for use by legacy ISA devices Options are Available or Reserved PhoenixBIOS Setup Utility Advanced PCI PNP ISA DMA Resource Exclusion Item Specific Help DMA 0 DMA 1 DMA 2 DMA 3 DMA 5 DMA ...

Page 44: ...ice between Hard Disk or Removable Disk d Remove a device that is not installed F1 Help v Select Item Change Values F9 Setup Defaults Esc Exit Select Menu Enter Select Sub Menu F10 Save and Exit Expanded Boot screen The expanded screen allows you set the order of drives for booting PhoenixBIOS Setup Utility Advanced Boot Order Item Specific Help Removable Devices Legacy Floppy Drives Hard Drive Bo...

Page 45: ... console F9 and F10 are not available you must press down up arrow to get to the proper option then press enter PhoenixBIOS Setup Utility Main Advanced Boot Exit Item Specific Help Exit Saving Changes Exit Discarding Changes Load Setup Defaults Discard Changes Save Changes Exit System Setup and save your changes to CMOS F1 Help v Select Item Change Values F9 Setup Defaults Esc Exit Select Menu Ent...

Page 46: ...an undocumented DOS call is made causing your program to operate erratically We recommend using Microsoft s MSDOS when using programs with undocumented DOS calls Saving programs and support files A disk drive or CompactFlash must contain proper formatting To format the CompactFlash or to add your own operating system please refer to the Compact Flash SDRAM and battery backup chapter WARNING Reform...

Page 47: ...onsole Option 2 1 Press Ctrl C when the system is first starting This halts all batch files 2 Change AUTOEXEC BAT and or CONFIG SYS to not call out your program Option 3 1 Install a floppy 2 Change Setup option Boot Order to Boot 1st Drive A 3 Change Setup to enable the floppy 4 Boot from floppy 5 Change AUTOEXEC BAT on C Option 4 1 Remove CompactFlash from target system 2 Install CompactFlash in ...

Page 48: ...rdware features The following chapters are included Chapter 5 Serial ports Chapter 6 LPT1 parallel port Chapter 7 Console devices Chapter 8 CompactFlash SDRAM and battery backup Chapter 9 External drives Chapter 10 Bit programmable digital I O Chapter 11 CRTs and flat panels Chapter 12 PC 104 expansion Chapter 13 USB 48 ...

Page 49: ...are DB 9 female connectors that plug directly into a 9 pin PC serial cable See pages 26 and 27 for information on the 2060 HDC 18 SBC Multiport cable Use a 2060 RS 422 485 cable for connecting RS 422 and RS 485 devices through the J7 connector Figure 5 1 following page shows two serial devices connected to the 2060 CPU Card It also shows the schematic for connecting RS 422 and RS 485 devices Note ...

Page 50: ...able Table 5 1 Serial port configurations COM Port Address IRQ Interface BIOS Setup for COM2 Connector 2060 HDC 18 SBC Multiport cable COM1 3F8h 2F8h 3E8h 2E8h IRQ4 IRQ3 RS 232 8 wire NA COM1 COM2 3F8h 2F8h 3E8h 2E8h IRQ4 IRQ3 RS 232 8 wire RS232 COM2 COM2 3F8h 2F8h 3E8h 2E8h IRQ4 IRQ3 RS 422 4 wire RS 485 4 wire RS422 485 J7 RS 422 RS 485 default 50 ...

Page 51: ...r 2060 RS 422 485 cable J7 connector DB 9 connector Pin Signal Pin Pin 1 TXD 1 2 TXD 6 nc 2 nc 7 nc 3 nc 8 4 RXD 4 5 RXD 9 3 GND 5 Table 5 4 COM2 jumper W2 W2 COM2 jumper COM Port Interface Jumper Settings RS 422 RS 485 no termination No jumpers on W2 COM2 RS 422 RS 485 with termination W2 1 3 W2 2 4 Default These jumpers terminate the network If the 2060 CPU Card is not at an end of the network l...

Page 52: ... RS 232 Enabled Bi directional 378 IRQ 7 DMA 1 F1 Help v Select Item Change Values F9 Setup Defaults Esc Exit Select Menu Enter Select Sub Menu F10 Save and Exit Function and use of serial ports Mating receptacle Use a 2060 HDC 18 SBC Multiport cable to connect the COM ports to external serial equipment The two COM connectors on the HDC 18 SBC Multiport cable are DB 9 female connectors that plug d...

Page 53: ...85 networks COM2 can be used as RS 422 or RS 485 RS 422 and RS 485 use differential signaling to communicate between the devices on a network Differential signal reduces the effect of environmental noise allowing communication over distances up to 1200 meters The RS 422 and RS 485 receivers provide a marking condition for shorted open or inactive lines Note that RTS is used differently by RS 422 a...

Page 54: ...ork registration and providing housekeeping tasks with other nodes Remotes however cannot initiate a communication They can only respond to messages that are addressed to them from the host The devices at each end of an RS 485 network must be terminated Any node located between the end points should not be terminated The 2060 CPU Card optionally terminates with a 100 ohm resistor Refer to Table 5 ...

Page 55: ... 5 Typical RS 485 2 wire half duplex interface circuit DI DE RO RE Xmitter TX TX ReceiverRX RX DI DE RO RE 100 Ω 100 Ω Receiver Receiver Receiver Xmitter Xmitter Xmitter TX RX RX DI DE RO 120 RE DI DE RO RE 55 ...

Page 56: ...0 HDC 18 SBC Multiport cable to connect the LPT port to external parallel equipment The LPT connector is a DB 25 female connector which plugs directly into a 25 pin parallel cable Table 6 1 shows the pinout for the LPT connector Table A 12 on page 114 shows the pinout for the J2 connector Note See pages 26 and 27 and Appendix A Mating connectors for mating information on the multipurpose connector...

Page 57: ...mode This is done in Setup 2 Connect the 2060 HDC 18 SBC Multiport cable to J2 on the 2060 CPU Card 3 Connect the DB 25 of the 2060 HDC 18 SBC Multiport cable to the printer cable Figure 6 1 LPT1 as a printer port LPT1 connector HDC 18 SBC Multiport cable J2 connector on front of board 2060 57 ...

Page 58: ...Adapter Cable LPT1 as Floppy Disk Port J2 Pin LPT Pin Floppy Pin LPT Signal Name Floppy Signal A1 1 NC STB NC A2 14 2 AFD RWC2 A3 2 8 PD0 IDX2 A4 15 32 ERR HEAD2 A5 3 26 PD1 TRK02 A6 16 18 INIT DIR2 A7 4 28 PD2 WP2 A8 17 20 SLIN STEP2 A9 5 30 PD3 RDD2 A10 18 9 GND GND A11 6 34 PD4 DCH2 A12 19 11 GND GND A13 7 NC PD5 NC A14 20 13 GND GND A15 8 NC PD6 NC A16 21 15 GND GND A17 9 NC PD7 NC A18 22 17 G...

Page 59: ...No console device means no video output either from a monitor or the serial console A local keyboard allows input but is not required Monitor and keyboard console To use a monitor and keyboard as the console you will need the following equipment or equivalent 2060 CPU Card 2060 HDC 18 SBC Multiport cable 6387 2 mm VGA 12 video cable 6392 PS 2 style keyboard VGA monitor To connect a monitor and key...

Page 60: ...9 pin to 9 pin Host computer running HyperTerminal or equivalent Serial cable to connect 2060 COM1 to host computer serial port PS 2 style keyboard optional Refer to Figure 2 1 on page 20 for the location of various connectors and jumpers before installing the 2060 CPU Card 1 Remove the V video jumper W1 5 6 2 Connect the 2060 HDC 18 SBC Multiport cable into J2 3 Connect the null modem adapter to ...

Page 61: ...that exceed terminal width Yes uncheck box 6 Start HyperTerminal You are now ready to establish communications between the host PC and the 2060 CPU Card 7 Power on the 2060 CPU Card Console data will be redirected to COM1 and will be displayed on the host computer 8 If you do not get the proper logon message check the HyperTerminal serial parameters of the host PC to make sure they match the setti...

Page 62: ... CPU Card and a serial console HyperTerm or other terminal emulator COM port Desktop PC HDC 18 SBC Multiport cable J2 connector on front of board Serial cable to PC COM port Null Modem Adapter COM1 on HDC 18 cable 2060 62 ...

Page 63: ...s Secondary IDE devices Note Octagon Systems only recommends Industrial Grade CompactFlash NAND technology that implements ECC error code correction and wear level technology Creating a bootable CompactFlash A CompactFlash as shipped from the factory may or may not be formatted even if formatted it may or may not be bootable The following sequence shows how to create a bootable CompactFlash and ho...

Page 64: ... the Memory Speed in BIOS Setup is set to High you must use PC133 memory sticks Battery backup for real time calendar clock An AT battery can be installed to back up the CMOS real time clock The battery can be installed on the 2060 HDC 18 SBC Multiport cable Installing an AT battery 1 Power off the 2060 CPU Card 2 Install the 3 6V AT clock battery on the 2060 HDC 18 SBC Multiport cable Table 8 1 B...

Page 65: ...DE compatible drives The BIOS supports all IDE devices so no additional software is needed UltraDMA modes are not supported directly by the 2060 These modes require an 80 pin connector and there is no adapter available for the IDE connector used on the 2060 Note The BIOS supports three IDE devices which includes a CompactFlash and two floppy drives however the LPT connector will only support one f...

Page 66: ...60 2060 HDC Multiport Cable connector J2 on top of board 2 mm VGA 12 cable CD ROM to IDE connector on HDD FP cable J500 on back of board Hard drive to IDE connector on HDD FP cable J500 on back of board Floppy drive to LPT port on HDC 18 Multiport cable using LPT to floppy adapter cable 66 ...

Page 67: ...etup programs chapter for more information on the BIOS Setup program 2 Disconnect power to the 2060 CPU Card 3 Connect the HDC 18 Multiport cable to J2 on the 2060 CPU Card see page 20 for location of J2 4 Connect the LPT to floppy adapter cable P N 6470 to the LPT port on the HDC 18 Multiport cable 5 Insert the 34 pin connector on the LPT to floppy cable into the rear of the floppy drive Make sur...

Page 68: ...r location of J500 and see page 25 for an illustration of the HDC 18 HDD FP cable 3 Insert the 40 pin connector on the HDC 18 HDD FP cable into the interface connector of the hard drive Make sure pin 1 on the cable is connected to pin 1 on the drive 4 If you are connecting two IDE devices ensure that one of them is configured as a master and one is configured as a slave see previous section If con...

Page 69: ...sink and source 15 mA Note Ports A and B are on the J2 connector and accessed through the 2060 HDC 18 Multiport cable Port C is on connector J6 and accessed through the 2060 Digital I O cable part 6394 Table 10 1 J2 Digital I O connector J2 20 pin Connector J6 Additional I O Pin Port A Pin Port B Pin Port C B35 17 Bit 0 B27 9 Bit 0 1 Bit 0 B34 16 Bit 1 B26 8 Bit 1 2 5V B33 15 Bit 2 B25 7 Bit 2 3 B...

Page 70: ...e connected to an STB 20 with a CMA 20 cable Parallel I O devices are then connected to the screw terminals on the STB 20 The illustration above shows an STB 20 terminal board connected to the I O Refer to the STB 20 product sheet for more information Table 10 2 STB 20 interface STB 20 Interface Terminal Port A Terminal Port B 17 Bit 0 9 Bit 0 16 Bit 1 8 Bit 1 15 Bit 2 7 Bit 2 14 Bit 3 6 Bit 3 13 ...

Page 71: ...t 6394 connects to J6 Figure 10 2 Organization of banks connectors I O Port addressing Ports A B C and the control register are addressable The base I O address is fixed at 120h Digital I O always uses base through base 3 Ports A B C and the control register are addressable with reference to the base address Table 10 3 Digital I O port address Port I O Address A B C Control Register Base address 1...

Page 72: ...ines are reset as inputs Programming the I O Follow these steps to program the I O chip 1 Configure the I O port bit directions either as inputs or outputs 2 Write to port A B or C with the desired level or read the bit level from the desired port Configuring the I O Follow these steps to configure the I O chip Note In the following examples base for I O always refers to the starting address selec...

Page 73: ...3h 3 control register operation mode Writing and reading from I O Writing to or reading from the desired I O port is accomplished with single program statements 1 To write a bit pattern to the desired I O port OUT 122h FFh All output bits of port C go high all input bits are unaffected 2 To read a bit pattern from the desired I O port PORTC INP 122h The byte read from port C is assigned to variabl...

Page 74: ...ended BIOS is operational If the X jumper is removed and DOS is the operating system the I17HNDLR EXE TSR can be used Once executed the TSR is active but it must be executed each time the system is rebooted Copy the I17HNDLR EXE utility to your boot device and add it to your AUTOEXEC BAT Note The INT17 functions can only be used with DOS operating systems If you use a different operating system th...

Page 75: ...l outputs init data 55h mov cx 0000h port C all inputs mov dx 0ffffh int 17h Write I O Function efh Subfunction 01h Purpose To write a value to an I O port Calling registers AH efh AL 01h DI Port A mask and data Mask Data xxxxxxxx xxxxxxxxB Mask 1 bit to be changed BX Port B mask and data Mask Data xxxxxxxx xxxxxxxxB Mask 1 bit to be changed CX Port C mask and data Mask Data xxxxxxxx xxxxxxxxB Mas...

Page 76: ...m an I O port Calling registers AH efh AL 02h DX ffffh Return registers AL Port A data Ah Port B data BL Port C data Carry flag cleared if successful Carry flag set if error AL Error code Comments This function is used to read from the I O Programming example Inline assembly code for Borland C 3 1 asm mov ax 0efoch mov dx 0ffffh int 17h mov aData al mov bData ah mov cData bl 76 ...

Page 77: ...e following resolutions 640 x 480 x 24 bpp 800 x 600 x 24 bpp 1024 x 768 x 16 bpp Support for plasma and TFT flat panel displays 3V flat panel support 5V requires alternate power source Flat panel power sequencing Connecting a monitor To use a monitor or a flat panel the Video jumper W1 5 6 must be installed This is the default configuration The 10 pin connector at J5 supports an analog VGA SVGA X...

Page 78: ...is installed 2 Plug the VGA 12 adapter cable into J5 on the 2060 3 Plug the DB 15 end of the VGA 12 cable into the VGA cable of the monitor Refer to Figure 11 1 Figure 11 1 The 2060 CPU Card and a VGA monitor VGA Monitor 2060 2 mm VGA 12 cable Table 11 1 J5 CRT connector J5 CRT Connector Pin Pin Name Pin Name Pin 1 RD GR 2 3 BL GND 4 5 5V GND 6 7 HSYNCOUT DDC SDA 8 9 DDC SCL VSYNCOUT 10 78 ...

Page 79: ...to your flat panel or refer to your flat panel information If your flat panel requires a bias voltage refer to the manufacturer s documentation for procedures on supplying the proper bias voltage WARNING Since improper voltage levels can severely damage the flat panel make sure the bias voltage is correct before the flat panel is connected to the 2060 CPU Card Connecting the flat panel to the 2060...

Page 80: ...anel connector Pin Pin Name Pin Name Pin 1 FPCLK FPDATA 3 2 3 FPDATA 12 FPDATA 0 4 5 FPDATA 13 FPDATA 1 6 7 FPDATA 14 FPDATA 2 8 9 SCL 3 3V 10 11 SDA FPDATA 15 12 13 FPDATA 4 FPDATA 16 14 15 FPDATA 5 FPDATA 17 16 17 FPDATA 6 FPDATA 7 18 19 FPDISPEN 3 3V 20 21 FPDATA 8 FPDATA 9 22 23 GND FPVSYNC 24 25 GND FPDATA 10 26 27 FPDATA 11 GND 28 29 FPHSYNC GND 30 31 3 3V GND 32 33 3 3V GND 34 80 ...

Page 81: ...loppy drive to the 2060 CPU Card Note If a monitor and keyboard are not available connect the 2060 CPU Card to your PC by using a remote serial console Refer to the Serial Console section in the Console devices chapter 2 Power on the 2060 CPU Card 3 Select the correct DAT file Example LQ12S31 DAT 4 Run PGMVIDEO Example 2060 C PGMVIDEO 2060 BIOS LQ12S31 DAT 5 Power off the 2060 CPU Card 6 Install t...

Page 82: ...market that violate this practice by loading the bus more heavily Typically it is the IOW IOR MEMW and RSTDRV lines For example if the IOW line is routed to four ICs on the module without a buffer then the loading is equivalent to four PC 104 modules Stacks with three or more expansion modules should be carefully tested under all environmental conditions If possible query the manufacture of the ex...

Page 83: ...rt Cable USB1 and the HDD FP cable USB2 Any USB device can plug into either USB interface or into a multi port hub that then plugs into either USB port An operating system capable of utilizing the USB ports and USB devices is required for USB operation Caution USB devices are hot swappable when a device is plugged into a standard USB connector as pins on the connectors determine the order in which...

Page 84: ...ging the 2060 CPU Card in the areas of internal control and troubleshooting The following chapters are included Chapter 14 Watchdog timer and hardware reset Chapter 15 Serial EEPROM Chapter 16 CPU clock system jumpers user jumper and BIOS recovery Chapter 17 Troubleshooting 84 ...

Page 85: ...or as long as three minutes To ensure that the watchdog does not reset the system accidentally always strobe the watchdog at a rate of at least twice the selected timeout period Booting power down and strobing the watchdog timer When the watchdog is enabled in Setup it sets the timeout period for two minutes The BIOS will strobe the watchdog during the boot process and once more just before bootin...

Page 86: ... code is available in the Examples directory of the Utilities zip file to access the watchdog OS Development Kits are available from Octagon for Linux QNX and Windows CE net that have watchdog drivers for these operating systems Contact Octagon Systems for more information Enable watchdog Function fdh Subfunction 01h Purpose To enable the watchdog Calling registers AH fdh AL 01h BX timeout 0 2 ms ...

Page 87: ...rogramming example Inline assembly code for Borland C 3 1 asm mov ax 0fd02h mov dx 0ffffh int 17h Disable watchdog Function fdh Subfunction 03h Purpose To disable the watchdog Calling registers AH fdh AL 03h DX ffffh Return registers None Comments This function disables the watchdog Once the watchdog is enabled it has to be strobed at least twice per timeout period or until the watchdog is disable...

Page 88: ...cting the two lines the circuit is pulled to ground and resets the system The RESET command accomplishes the same thing as the reset button Refer to the component diagram in the Quick start chapter for the location of the reset button WARNING When using COM1 as the console the CTRL ALT DEL commands on the host system keyboard only reset the host system Use the RESET command to issue a hardware res...

Page 89: ...d Return serial EEPROM size Serial EEPROM Read a single word from the serial EEPROM Function fch Subfunction 00h Purpose To read a single word from the on board serial EEPROM Calling registers AH fch AL 00h BX Word address zero based DX ffffh User area relative address Return registers Carry flag cleared if successful AX Word read Carry flag set if error AL Error code Error code Meaning ffh Unknow...

Page 90: ... a word to the user area of the serial EEPROM Programming example Write 0x1234 to word 3 unsigned int seeData 0x1234 Inline assembly code for Borland C 3 1 asm mov ax 0fc01h mov bx 03h Write word 3 mov cx seeData Get write data from c environment mov dx 0ffffh int 17h Read multiple words from the serial EEPROM Function fch Subfunction 02h Purpose To read multiple words from the on board serial EEP...

Page 91: ...g registers AH fch AL 03h BX Word address zero based CX Word count DX ffffh DS SI Source pointer Return registers Carry flag cleared if successful Carry flag set if error AL Error code Error Code Meaning ffh Unknown error 01h Function not implemented 02h Defective serial EEPROM 03h Illegal access Comments This function writes multiple words to the user area of the serial EEPROM Programming example...

Page 92: ...ror code Error code Meaning ffh Unknown error 01h Function not implemented 02h Defective serial EEPROM 03h Illegal access Comments This function returns the size in words of the serial EEPROM Since the user cannot access all of the serial EEPROM this function determines how much space is available to the user This avoids the user from accessing unavailable addresses Programming example unsigned in...

Page 93: ...are selected with jumper block W1 The S jumper selects whether the card boots from user defined parameters defined in the Setup Programs chapter or the BIOS defaults Removing this jumper allows the user to return to factory programmed defaults The X enables or disables the BIOS extension area The default is enabled which uses the INT17 calls The V jumper enables or disables the on card video allow...

Page 94: ...er your system the user defined parameters in Setup will not be changed unless you enter Setup make the changes and exit saving changes Extended BIOS jumper The extended BIOS jumper is W1 3 4 The extended BIOS memory region D8000h to DFFFFh contains the Octagon INT17 functions When this jumper is removed this memory region is freed up for other uses Note that if you want to use the INT17 functions...

Page 95: ...ed 5 Put the bootable floppy disk from step 1 with the embflash exe and support files in drive A of the host computer and reboot the host computer from the floppy drive 6 Power up the 2060 If you have a post card you can place it on the 2060 PC 104 or PC 104 Plus bus and the system will boot to a post A1 or you can allow about 5 seconds for the system to boot to the boot block recovery state 7 On ...

Page 96: ...ccording to whether or not a jumper is installed Function 0fbh Sub Function 0bh Purpose To read user jumper Calling Registers AH 0fbh AL 0bh DX 0ffffh Return Registers Carry flag cleared if successful AL Jumper data bit 0 user jumper A 1 on 0 off Carry flag set if error AL Error code Comments This function shall be used to read the user jumper Programming example Inline assembly code for Borland C...

Page 97: ...on other operating systems if they attempt to use this memory range Removing the X jumper frees this memory for use by other operating systems No system LED activity If there is no LED activity at CR2 check the following Make sure all PC 104 expansion cards are removed from the 2060 CPU Card This ensures that other cards are not interacting with the 2060 CPU Card Remove the jumper from the S posit...

Page 98: ...s successfully booted you can use the pgmvideo exe utility to either program the desired flat panel VIDEO BIOS into the 2060 CPU Card or program in the CRT DAT file for analog monitor support to recover the system 4 Replace the S and V jumpers and re boot the system Video is present but is distorted If video is present but is distorted check the following Make sure all PC 104 expansion cards are r...

Page 99: ...ee a burst of activity on the oscilloscope screen The voltage level should switch between 8V Garbled serial console screen activity If you do get activity on your console screen but the message is garbled check the following Remove the jumper from the S position at W1 1 2 to ensure the default settings for COM1 Make sure that your terminal emulator such as HyperTerminal on your PC is set up proper...

Page 100: ... different power supply that discharges faster leave the power off until the supply has adequate time to discharge or place a 100 ohm large wattage resistor across the output capacitor Octagon supplies are designed to ramp up fast discharge fast on power down and to regulate properly under a no load condition LED signaling of beep codes The 2060 CPU Card has a bicolor LED that is used by the BIOS ...

Page 101: ... Initialize PCI Bus Mastering devices Initialize keyboard controller BIOS ROM checksum Initialize cache before memory Auto size 8254 timer initialization 8237 DMA controller initialization Reset Programmable Interrupt Controller Test DRAM refresh Test 8742 Keyboard Controller Set ES segment register to 4 GB Auto size DRAM Initialize POST memory manager Clear 512 KB base RAM ROM failure on address ...

Page 102: ...ernal L2 cache size Load custom defaults optional Display shadow area message Display possible high address for UMB recovery Display error messages Check for configuration errors Check for keyboard errors Set up hardware interrupt vectors Initialize Intelligent System Monitoring Initialize coprocessor if present Disable onboard Super I O ports and IRQs Late POST device initialization Detect and in...

Page 103: ... end of POST POST done prepare to boot operating system One short beep before boot Terminate QuietBoot optional Check password optional Initialize ACPI BIOS Prepare Boot Initialize SMBIOS Initialize PnP Option ROMs Clear parity checkers Display MultiBoot menu Clear screen optional Check virus and backup reminders Try to boot with Int 19h Initialize POST Error Manager PEM Initialize error logging I...

Page 104: ...ier it will be for Technical Support staff to help you solve the problem For additional technical assistance try the following Technical Support telephone 303 426 4521 E mail Technical Support support1 octagonsystems com Applications Notes via web http www octagonsystems com Solutions appnotes html FAQ via web http www octagonsystems com pages faqs html 104 ...

Page 105: ...w Section 4 Appendices Section 4 contains a series of appendices which provides additional information about the 2060 CPU Card Appendix A Technical data Appendix B Software utilities Appendix C Accessories 105 ...

Page 106: ... cable Hard drive EIDE hard drive support with on card hard drive controller and BIOS Accessed via 40 pin connector on HDC 18 HDD FP cable Supports up to three EIDE devices CompactFlash appears as an EIDE device CompactFlash socket Supports Type I and Type II CompactFlash devices USB 2 ports USB 1 1 compatible Serial I O Two serial ports IEC1000 level 3 ESD protection specification Contact dischar...

Page 107: ...ws CE net Linux QNX and DOS Note Windows 2000 and Windows XP XP Embedded will run with known issues however new driver development is not supported by the CPU manufacturer Bus mastering Bus mastering is not supported Power requirements 5V 0 25V 2 Amp minimum recommended supply current Note The power supply for the 2060 must meet the startup risetime requirements specified in the ATX Power Design G...

Page 108: ... part 6386 HDC 18 HDD FDD cable Mating Connectors HDC 18 HDD FDD cable Mating Connectors Side B Side A IDE drive Commcon 3704 40G2 Commcon 3704 40G2 Flat Panel USB2 Commcon 3704 34G2 IDE drive 3M 4610 7001 Table A 3 HDC 18 SBC Multiport cable description part 6387 HDC 18 SBC Multiport cable Mating Connectors HDC 18 SBC Multiport cable Mating Connectors Side A Side B Amp 212437 6 PS 2 Keyboard Amp ...

Page 109: ...Controller X200h to X21Fh Off card I O space X238h to X23Bh Mouse X23Ch to X277h Off card I O space X278h to X27Fh LPT1 Setup selectable X280h to X2E7h Off card I O space X2E8h to X2EFh COM 1 or 2 Setup selectable X2F0h to X2F7h Off card I O space X2F8h to X2FFh COM 1 or 2 Setup selectable default COM2 X300h to X377h Off card I O space X378h to X37Fh LPT1 Setup selectable X380h to X3BBh Off card I...

Page 110: ...d for FPU IRQ14 IDE Primary CompactFlash PC 104 IRQ15 IDE Secondary PC 104 Table A 7 2060 CPU Card memory map 2060 CPU Card memory map Address Size Description Shadowing 00000H to 9FFFFH 640KB DOS and extended BIOS RAM A0000H to BFFFFH 128KB Off Card Memory shadowable C0000H to CBFFFH 48KB Video BIOS ENABLED CC000H to D7FFFH 48KB Off Card Memory D8000H to DFFFFH 32KB Extended BIOS Area when X jump...

Page 111: ...nstalled enable on card video Removed disable on card video 5 6 U User jumper 7 8 R Bios jumper Installed normal BIOS operation Removed allows new BIOS to be installed 9 10 default Table A 9 COM2 jumper W2 W2 COM2 jumper COM Port Interface Jumper Settings RS 422 RS 485 no termination No jumpers on W2 COM2 RS 422 RS 485 with termination W2 1 3 W2 2 4 Default These jumpers terminate the network If t...

Page 112: ...ND DD3 2 3 DD4 DD5 4 5 DD6 DD7 6 7 HDCS0 GND 8 9 GND GND 10 11 GND GND 12 13 5V GND 14 15 GND GND 16 17 GND A2 18 19 A1 A0 20 21 DD0 DD1 22 21 DD2 NC 24 25 NC NC 26 27 DD11 DD12 28 29 DD13 DD14 30 31 DD15 HDCS1 32 33 NC IOR 34 35 IOW 5V 36 37 IRQ14 5V 38 39 M S select NC 40 41 RST IORDY 42 43 NC 5V 44 45 ACTLED PDIAG 46 47 DD8 DD9 48 49 DD10 GND 50 51 NC NC 52 active low 112 ...

Page 113: ...4 A15 PD6 CTS2 B15 A16 GND DTR2 B16 A17 PD7 RI2 B17 A18 GND COM2 GND B18 A19 ACK GND B19 A20 GND B7 B20 A21 BUSY B6 B21 A22 GND B5 B22 A23 PE B4 B23 A24 GND B3 B24 A25 SLCT LPT1 B2 B25 A26 GND B1 B26 A27 BATTERY AT Battery B0 B27 A28 NC A7 B28 A29 SPEAKER A6 B29 A30 GND PC Speaker A5 B30 A31 RESET A4 B31 A32 GND Reset Switch A3 B32 A33 MDATA A2 B33 A34 5V SAFE A1 B34 A35 MCLK A0 B35 A36 GND PS 2 M...

Page 114: ...15 7 SD2 NC 12V LA18 IRQ14 8 SD1 0WS LA17 DACK0 9 SD0 NC 12VDC MEMR DRQ0 10 IOCHRDY Key MEMW DACK5 11 AEN SMEMW SD8 DRQ5 12 SA19 SMEMR SD9 DACK6 13 SA18 IOW SD10 DRQ6 14 SA17 IOR SD11 DACK7 15 SA16 DACK3 SD12 DRQ7 16 SA15 DRQ3 SD13 5V 17 SA14 DACK1 SD14 Master 18 SA13 DRQ1 SD15 Gnd 19 SA12 Refresh Key Gnd 20 SA11 BUSCLK 21 SA10 IRQ7 22 SA9 IRQ6 23 SA8 IRQ5 24 SA7 IRQ4 25 SA6 IRQ3 26 SA5 DACK2 27 S...

Page 115: ...OUT 10 Table A 16 J6 Additional digital I O connector J6 Additional I O Pin Port C 1 Bit 0 2 5V 3 Bit 1 4 Bit 2 5 Bit 3 6 Bit 4 7 Bit 5 8 Gnd 9 Bit 6 10 Bit 7 Table A 17 J7 COM2 connector pinouts for RS 422 RS 485 RS 422 RS 485 J7 connector RS 422 RS 485 Pin Signal Pin Signal 1 TXD 1 TXD 2 TXD 2 TXD 3 GND 3 GND 4 RXD 4 RXD 5 RXD 5 RXD 115 ...

Page 116: ...TA16 B14 A15 IDED1 DATA5 B15 A16 IDED14 DATA17 B16 A17 IDED0 DATA6 B17 A18 IDED15 DATA7 B18 A19 GND DISPEN B19 A20 NC 3 3V B20 A21 IDEDR0 DATA8 B21 A22 GND DATA9 B22 A23 IDEIOW GND B23 A24 GND FPVSYNC B24 A25 IDEIOR GND B25 A26 GND DATA10 B26 A27 IDEIORDY DATA11 B27 A28 NC GND B28 A29 IDEDACK FPHSYNC B29 A30 GND GND B30 A31 IDEINTR 3 3V B31 A32 NC GND B32 A33 IDEA1 3 3V B33 A34 PDIAG Flat Panel GN...

Page 117: ...vers and utilities are in a self extracting zip file located at the Octagon Systems web site on the 2060 product page Download this file to a separate directory on your hard drive then double click on it to extract the files Support commands GETVIDEO I17HNDLR EXE PGMVIDEO EXE PHLASH EXE RESET COM 117 ...

Page 118: ...o copy the video BIOS from one CPU card to another or to confirm the current video BIOS settings I17HNDLR EXE Purpose This support command is an alternate way to use the INT 17h functions when the extended BIOS area is disabled i e the jumper at the X position is removed at W1 Also use this support command to reprogram the extended BIOS area with another BIOS Syntax I17HNDLR Remarks This command i...

Page 119: ...tilities zip file and its README TXT file PHLASH EXE Purpose This support command will program a BIOS image from a floppy drive or a subdirectory to the 512K flash EPROM Syntax PHLASH Remarks Phlash exe must have two files that are located the same directory as the Phlash exe file These files are BIOS ROM a 256K BIOS image and platform bin a support file that locates the BIOS ROM file in the 512K ...

Page 120: ... the system Syntax RESET Remarks The RESET command also restarts all the expansion I O cards on the bus This differs from a CTRL ALT DEL reboot of the system which only restarts the system but not the expansion cards The RESET button on the 2060 CPU Card also accomplishes the same thing as the RESET command 120 ...

Page 121: ...able for I O port 10 pin 1743 CMA 26 12 12 cable for I O port 26 pin 2776 CMA 26 24 24 cable for I O port 26 pin 1257 Terminal Boards STB 26 Terminal board 26 position 2905 STB 20 Terminal board 20 position 2904 STB 14 Terminal board 14 position 2902 STB 10 Terminal board 10 position 2901 TBD 100 Terminal board with LED indicators 1183 Opto Modules and Racks G4 IAC5 Input module 90 140 VAC 2395 G4...

Page 122: ...basis without warranty The warranty and remedies set forth above are in lieu of all other warranties expressed or implied oral or written either in fact or by operation of law statutory or otherwise including warranties of merchantability and fitness for a particular purpose which Octagon specifically disclaims Octagon neither assumes nor authorizes any other liability in connection with the sale ...

Page 123: ...TED AND WILL BE RETURNED FREIGHT COLLECT Returns There will be a 15 restocking charge on returned product that is unopened and unused if Octagon accepts such a return Returns will not be accepted 30 days after purchase Opened and or used products non standard products software and printed materials are not returnable without prior written agreement Governing law This agreement is made in governed ...

Reviews: