background image

14

English

Cutting Head

The Nylon cutter is equipped with a nylon string cutting head. 

Do not use any other type of cutting device with this model.

 WARNING

Use only cutters specified or recommended by 

Manufacturer. Wear safety goggles, shoes, gloves, and 

protective clothing whenever operating.

Nylon Cutter

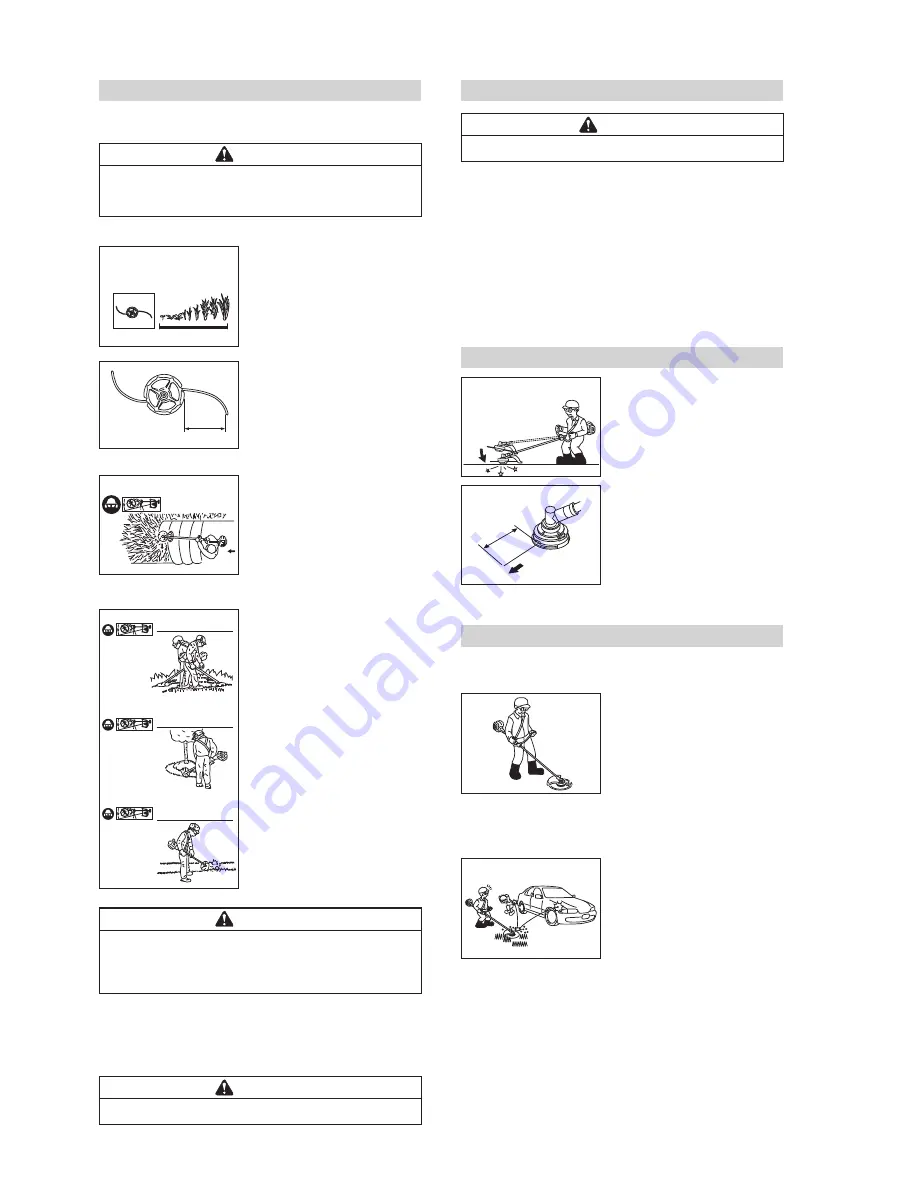
Pull out the nylon cord from the 

cutting head by 10-15 cm.

Working methods

Since cutting head rotates in the 

left direction (as seen from the 

top), it is more efficient to mow 

grass from right to left.

NOTE


The left trimming methods 

done with nylon cutting head.

 WARNING

In case the cutting head hits anything it should not 

(stone or the like), stop the engine and check that the 

head has no cracks. Always check that there is a safe 

distance between the cutting device and your feet. 

NOTE


If the cutting head is clogged or stuck with grass, weeds or 

bushed, immediate stop the engine and remove it. Clean the 

cutting head periodically.

 WARNING

Do not use without Safety Guard. 

Points to Check Before Operating

 CAUTION

Be sure to check the following before starting the engine.


Check the cutting head for any deep scratches and cracks.


Check the cutting head for looseness. Tighten the head if it is 

loose.


Push the button at the center or bottom of the cutting head 

with a finger. Pull both ends of the nylon lines with both hands 

and confirm that each end extends by about 2.5 cm with each 

push of button.


Remove looseness by pulling both ends of the nylon lines. 

Cut them to a length of 10 to 15 cm. Allow the line to be cut by 

the blade on the cutter guard.

Increasing Cutting Line During Operation


Reduce the engine speed to 

low and tap the bottom of the 

nylon line cutter on the ground.


When the speed of the engine 

is increased, the nylon line will 

come out automatically.


If the nylon line does not come 

out, repeat the procedures 

above.


If the nylon line does not 

come out even after repeating 

the procedures above, wind 

the nylon line by following 

procedures in the Nylon Line 

Replacement Section.

Safety Precautions


Do not use the nylon cutter for purposes other than cutting 

grasses. This will protect you and others from accidents and 

injuries.


Always wear protective clothing 

and equipment, such as a 

hat, protective goggles, long-

sleeved shirt, long pants, 

gloves, and boots while 

operating the cutter. This will 

protect you from loose grass, 

flying pebbles, etc.


Reduce the engine speed to low and tap the bottom of the 

Nylon cutter.


Install the cutting attachment safety guard at the appropriate 

part of the nylon cutter.


Pay attention to your 

surroundings during operation. 

Make sure to maintain a distance 

of at least 15 m from anyone and 

anything (e,g., pets and objects) 

nearby.  

This will protect you and others 

from accidents and injuries 

caused by loose grass and 

flying objects.


Be sure to stop the engine before installing the scatter-

blocking cover or the cutting head, or inspecting the nylon 

cutter/cutter parts. This will protect you and others from 

accidents and injuries.


Do not touch the cutting head when the engine is running. 

This will protect you and others from accidents and injuries.


Do not use a cutting head that has scratches or cracks. This 

will protect you and others from accidents and injuries caused 

by flying parts.

1

1

Nylon cutter:

For soft and low weeds

10-15 cm

MOW RIGHT 

TO LEFT

SCYTHING

SCALPING

EDGING

Summary of Contents for DP-10

Page 1: ...STRUZIONI PER L USO ISTRUZIONI PER L USO Espa ol Herramienta de combinaci n MANUAL DEL PROPIETARIO MANUAL DEL PROPIETARIO Nederlands Combigereedschap GEBRUIKSHANDLEIDING GEBRUIKSHANDLEIDING Portugu s...

Page 2: ......

Page 3: ...that causes drowsiness If you get tired while using the production take a break Always wear appropriate protective gear to avoid injury Eye protection in the form of goggles or properly fitted safety...

Page 4: ...and maintenance in accordance with this Owner s Manual No part of this publication may be reproduced stored in a retrieval system or transmitted in any form or by any means electronic mechanical phot...

Page 5: ...ty lithium grease Drive shaft dia mm 7 Drive shaft material High tensile steel Drive shaft type Solid steel Joint type Coupling square hole mm 5 1 5 1 CAUTION Information that the machine cannot be us...

Page 6: ...engine c Gasoline is extremely flammable and explosive Stop engine before refueling d Exhaust gas contains carbon monoxide an odorless and deadly poison Do not run Engine in an enclosed area Dealer Ow...

Page 7: ...ine Oil 1 Pour the 2 stroke engine oil and the gasoline into an appropriate container with the ratio shown above and shake it thoroughly to avoid the separation of them And then pour it into the fuel...

Page 8: ...arted Turn the lift up lever clockwise to switch to the STARTING position NOTE When the engine is already warm or on hot days do not push down the lift up lever Pull the recoil starter grip slowly to...

Page 9: ...speed Turn the engine switch to the STOP position Emergency Stop Turn the engine switch to the STOP position Release the throttle lever Precautions After Operation WARNING To avoid serious injury do n...

Page 10: ...are to be used as a guide Service should be performed more frequently as necessary by operating condition When damage or defect occurs in checked parts replace with a new one Service more frequently u...

Page 11: ...use of solvents can result in fire or an explosion Do not use gasoline or low flash point solvents to clean the fuel filter Clean only in a well ventilated area away from sources of sparks or flame in...

Page 12: ...a toxic substance Dispose of gasoline properly Contact your local authorities for approved disposal methods A B A Muffler B Spark Arrester B A A Lubricator B Plug Hole TROUBLESHOOTING GUIDE If the eng...

Page 13: ...lon cutter close to solid objects such as trees and fence posts Use the left side of blade to cut Hard objects can damage the nylon cutter or be thrown and cause injury The nylon cutter is for cutting...

Page 14: ...11806 EN ISO 22867 EN 12096 handle Front handle ahv eq 10 0 m s2 Uncertainty K 0 3 m s2 Rear handle ahv eq 4 5 m s2 Uncertainty K 0 3 m s2 Sound measurement according to EN ISO 11806 EN ISO 22868 ISO...

Page 15: ...t down firmly so you do not lose control while cranking If not held down properly engine could not pull you off balance or swing the cutting line into an obstruction or your body Keep the unit and att...

Page 16: ...Cutting Line During Operation Reduce the engine speed to low and tap the bottom of the nylon line cutter on the ground When the speed of the engine is increased the nylon line will come out automatic...

Page 17: ...utting down the engine keep fingers and feet away from the cutting head until all rotation stops WARNING To avoid serious injury NEVER use wire in place of the nylon mono filament cutting lines The wi...

Page 18: ...reased noise levels can lead to hearing loss A dull cutting blade is more likely to snag than a sharp blade Observe the maintenance schedule in the Owner s Manual Store the hedge trimmer safely to pre...

Page 19: ...ctive footwear and gloves Frame Serial Number The frame serial number G is the only means of identifying your particular products from others of the same model type The frame serial number is needed b...

Page 20: ...pets and objects nearby This will protect you and others from accidents and injuries caused by loose grass and flying objects Do not touch the blade when the engine is running This will protect you a...

Page 21: ...ockwise oiling quantity will be large And you turn it counterclockwise oiling quantity will be little 3 Tighten the screw B when you finish to adjust the oiling quantity 15m 1 2 3 B A C A Oil Tank Cap...

Page 22: ...type The frame serial number is needed by your dealer when ordering parts OPERATING INSTRUCTIONS Pruning Techniques This attachment is designed for trimming small limbs and branches up to 20 cm diame...

Page 23: ...ide bar clamp bolt Then fix the clamp nut C temporarily 7 Raise the bar end and tighten the chain A by turning the tension adjustment bolt B clockwise To check proper tension lightly lift up the cente...

Page 24: ...tion High quality lithium grease Drive shaft dia mm 7 Drive shaft material High tensile steel Drive shaft type Flexible cable Joint type Coupling square hole mm 5 1 5 1 CAUTION Information that the ma...

Reviews: