background image

4-28

4. Selecting the Printer Settings

1

2

3

1

2

Once you have completed the setting, touch the “Close” key. The
display will return to the [RAM DISK Mode] screen.

5

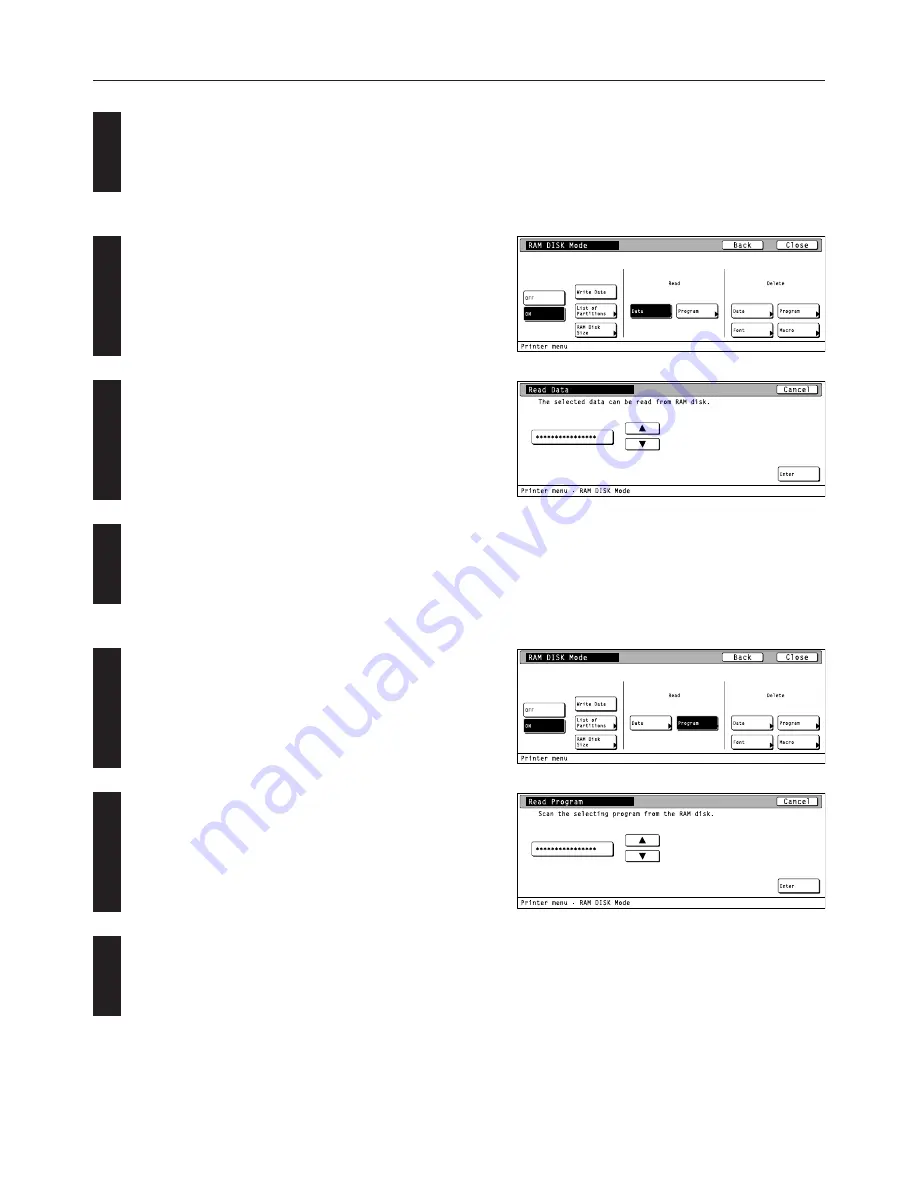
 Reading data

Touch the “Data” key under the “Read” setting.

Use the “

” and “

” cursor keys to select the data that you want to

be read.
• If you want to return to the [RAM DISK Mode] screen, touch the

“Cancel” key.

Touch the “Enter” key. The display will return to the basic printer
screen and the data will be read.
• “Processing” will be displayed in the basic printer screen while the

data is being read.

6

 Reading program data

Touch the “Program” key under the “Read” setting.

Use the “

” and “

” cursor keys to select the program data that you

want to be read.
• If you want to return to the [RAM DISK Mode] screen, touch the

“Cancel” key.

Touch the “Enter” key. The display will return to the basic printer
screen and the program data will be read.
• “Processing” will be displayed in the basic printer screen while the

program data is being read.

3

3

Summary of Contents for OP25

Page 1: ...1 1 1 Océ OP25 35 40 Printing System functions Operations Guide Education Services Océ Operations Guide English version ...

Page 2: ...ed operation 1 Operation Keys 2 Procedure for Making Settings 3 Menu Flow Chart 4 Selecting the Printer Settings 5 Options Chapter 2 Software related operation 1 Procedure for Installing and Printing with a Printer Driver 2 Windows KX Driver 3 Printer Driver for Macintosh ...

Page 3: ...Jet Printer Control Language PCL6 PeerlessPrintXL is a trademark of Peerless Group Redondo Beach CA 90278 U S A Contains UFSTTM and MicroType from Agfa Corporation All other company and product names contained in this Operation Guide are trademarks or registered trademarks of their respective companies The designations and will not be used in this Operation Guide Introduction All rights reserved N...

Page 4: ...NESS FOR A PARTICULAR PURPOSE Some jurisdictions do not allow the exclusion of implied warranties so the above exclusion may not apply to you SUPPLEMENT TO AGREEMENT FOR SOFTWARE BUNDLING AND DISTRIBUTION FOR ALDC 3 Limitation of Remedies IBM s entire liability under this license is the following 1 For any claim including fundamental breach in any form related in any way to this license IBM s liab...

Page 5: ...an or destroy all copies of the Software and Typefaces and documentation as requested 6 You agree that you will not modify alter disassemble decrypt reverse engineer or decompile the Software 7 Agfa Japan warrants that for ninety 90 days after delivery the Software will perform in accordance with Agfa Japan published specifications Agfa Japan does not warrant that the Software is free from all bug...

Page 6: ...when you want to switch the machine to the Printer mode and have the basic printer screen displayed on the touch panel Printer Priority key If data for a print job is received from a computer during print out of copies or of a fax reception press this key and the copy fax print out will be interrupted and priority given to the print job Numeric keys Use to enter values for the various settings of ...

Page 7: ... appear The e MPS key is displayed only when the optional hard disk is installed Select the desired settings that you want to make Refer to 3 Menu Flow Chart on page 3 1 for a list of the various settings 2 3 Change the corresponding settings as desired Refer to 4 Selecting the Printer Settings on page 4 1 for information regarding the various settings 4 5 Press the Printer key to quit the printer...

Page 8: ...3 Selecting the serial interface settings Baud rate 4 4 Data bit length 4 4 Stop bit length 4 4 Parity 4 4 Protocol 4 4 Barcode mode ON OFF 4 4 Selecting the network interface NetWare ON OFF 4 5 NetWare Frame Type 4 5 TCP IP ON OFF 4 5 DHCP ON OFF 4 5 IP address 4 5 Subnet Mask 4 6 Gateway address 4 6 Ether Talk ON OFF 4 7 Network Card Status Page print out 4 7 ...

Page 9: ...et 4 9 KPDL KPDL Error Report print out ON OFF 4 10 KPDL Auto KPDL Error Report print out ON OFF 4 10 Auto emulation switching 4 10 KC GL KC GL Page 4 10 KC GL Pen 4 11 Font selection settings Internal font setting Selecting the font 4 13 Courier 4 14 Letter Gothic 4 14 Font List print out 4 14 Optional font setting Selecting the font 4 15 Font List print out 4 15 ...

Page 10: ... OFF 4 22 EcoPrint ON OFF 4 22 Printing Resolution 4 22 Printing Density 4 22 Paper settings Bypass mode 4 24 Paper Feed Source 4 24 Duplex mode 4 24 Stack select 4 24 A4 Letter 8 1 2 x 11 usage ON OFF 4 24 RAM disk settings RAM disk ON OFF 4 27 Writing data 4 27 Partition List print out 4 27 RAM disk size 4 27 Reading data 4 28 Reading program data 4 28 Deleting data 4 29 Deleting font data 4 29 ...

Page 11: ... data 4 34 Deleting font data 4 34 Deleting program data 4 35 Deleting macro data 4 35 Memory card settings Writing data 4 38 Partition List print out 4 38 Format memory card 4 38 Reading data 4 39 Reading font data 4 39 Reading program data 4 40 Reading macro data 4 40 Deleting data 4 41 Deleting font data 4 41 Deleting program data 4 42 Deleting macro data 4 42 ...

Page 12: ...out 4 44 Reading data 4 44 Additional settings Form Feed Time Out 4 46 Resource Protect mode 4 46 Auto Continue ON OFF and Recovery Time 4 47 Service Maintenance menu 4 47 Service Representative Status Page print out 4 47 Printer Reset 4 48 Dump received data 4 48 ...

Page 13: ...rt e MPS e MPS settings Quick copy print out 4 50 Private print Stored job print out 4 51 Virtual Mailbox data print out 4 52 Virtual Mailbox Data List print out 4 52 Code Job List print out 4 52 e MPS configurations 4 53 ...

Page 14: ... out a list of such items as the printer default settings memory volume etc 1 Status Page print out Touch the Print key The Status Page will be printed out Accessing the Status Page print out screen Touch the Print Status Page key The Print Status Page screen will appear ...

Page 15: ...t for use by your service representative page 4 47 are printed out A more detailed Status Page will be printed out together with the Service Representative Status Page print out Available settings Parallel Serial Network Auto Normal High Speed Nibble high 1200 2400 4800 9600 19200 38400 57600 115200 7 8 1 2 None Odd Even Ignore DTR positive XON XOFF DTR positive DTR negative XON XOFF ETX ACK OFF O...

Page 16: ...Touch the Detail key to display the setting screen corresponding to the selected interface To cancel the setting touch the Back key Selecting the parallel interface settings 2 Parallel TX RX mode Select Parallel and then touch the Detail key The Parallel screen will appear 1 Select the desired TX RX mode and then touch the Close key The display will return to the Printer Menu screen To cancel the ...

Page 17: ...mode ON OFF 8 Select the desired setting for each item and then touch the Close key The display will return to the Serial screen 3 Selecting the network interface Select Network and then touch the Detail key The Network screen will appear Use the and cursor keys to select the desired item and then touch the Change key The setting screen for the selected item will appear Netware Turns NetWare ON OF...

Page 18: ...twork screen To cancel the setting touch the Back key TCP IP ON OFF Select ON or OFF as desired under the TCP IP setting and then touch the Close key The display will return to the Network screen When ON is selected the DHCP settings will be displayed To cancel the setting touch the Back key DHCP ON OFF Select ON or OFF as desired under the DHCP setting and then touch the Close key The display wil...

Page 19: ... the Close key The display will return to the TCP IP screen To cancel the setting touch the Back key Subnet Mask Select ON under the TCP IP setting Use the and cursor keys to select Subnet Mask and then touch the Change key The Subnet Mask screen will appear Enter the Subnet Mask address by following the same procedure as for the IP Address Gateway address Select ON under the TCP IP setting Use th...

Page 20: ...hen touch the Close key The display will return to the Network screen To cancel the setting touch the Back key Network Card Status Page print out Select ON or OFF as desired and then touch the Close key The display will return to the Network screen To cancel the setting touch the Back key ...

Page 21: ... printed out whenever a KPDL error occurs 4 Auto emulation switching Sets the back up emulation mode when the emulation protocol has been set to KPDL Auto 5 KC GL Page Selects the paper format when the emulation protocol has been set to KC GL 6 KC GL Pen Selects the type and width of the pen when the emulation protocol has been set to KC GL Available settings PCL6 Line Printer IBM Proprinter DIABR...

Page 22: ... Select the desired emulation and then touch the Close key The display will return to the Printer Menu screen To cancel the setting touch the Back key 2 Code set Select one of the following emulation protocols and then touch the Detail key The selecting screen for the code set will appear PCL6 Line Printer IBM Proprinter DIABRO 630 EPSON LQ 850 Use the and cursor keys to select the desired code se...

Page 23: ...itching The back up emulation mode can be selected only when the emulation protocol has been set to KPDL Auto Select the desired emulation protocol under the back up emulation setting and then touch the Close key The display will return to the Emulation screen To cancel the setting touch the Back key 5 KC GL Page Select KC GL as the emulation protocol and then touch the Detail key The KC GL screen...

Page 24: ... type of pen under the Pen Adjust setting and then touch the Change key The setting screen for the pen width will appear Use the and or key or the numeric keys to enter the desired width and then touch the Close key The display will return to the KG CL screen To cancel the setting touch the Back key ...

Page 25: ...wnload M Memory card font H Hardware font H RAM disk font O Optional ROM font 2 Courier Allows you to select between Regular and Dark bold 3 Letter Gothic Allows you to select between Regular and Dark bold 4 Font List print out Available settings Regular Dark Regular Dark Remarks The font can be set separately for each interface To select an installed font select Internal To select a font other th...

Page 26: ...elect the desired interface and then touch the Close key The display will return to the Font screen To cancel the setting touch the Back key Select Internal and then touch the Close key The display will return to the Printer Menu screen To cancel the setting touch the Back key 1 Selecting the font Touch the Font ID key The Font ID screen will appear Use the and cursor keys to select the ID that co...

Page 27: ...Close key The display will return to the Printer Menu screen To cancel the setting touch the Back key 4 Font List print out Touch the List of Font key The Font List will be printed out Optional font setting Touch the Change Interface key The Interface screen will appear Select the desired interface and then touch the Close key The display will return to the Font screen To cancel the setting touch ...

Page 28: ...s 1 1 Selecting a font Touch the Font ID key The Font ID screen will appear Select the font ID by following the same procedure as for the internal fonts 4 Font List print out Touch the List of Font key The font list will be printed out 2 ...

Page 29: ...ct mode If Auto is selected here the machine will monitor the data to avoid any Print Overrun Error and if necessary automatically turn Page Protect ON If a Print Overrun Error does happen to occur even then the machine will automatically change the Page protect setting to ON 5 Linefeed LF action 6 Carriage Return CR action 7 Wide A4 ON OFF Increases the printing area on A4 size paper Available se...

Page 30: ...r the desired number of copies to be made and then touch the Close key The display will return to the Page set screen To cancel the setting touch the Back key 2 Printing orientation Use the and cursor keys to select Orientation and then touch the Change key The Orientation screen will appear Touch the Change interface key The Interface screen will appear Select the desired interface and then touch...

Page 31: ...ear Use the and cursor keys to select the desired paper size and the printing size The reduction ratio will automatically be set and displayed Touch the Close key The display will return to the Page set screen To cancel the setting touch the Back key 4 Page Protect mode Use the and cursor keys to select Page Protect and then touch the Change key The Page Protect screen will appear Select Auto or O...

Page 32: ...e and then touch the Close key The display will return to the LF Action screen To cancel the setting touch the Back key Select the desired linefeed action and then touch the Close key The display will return to the Page set screen To cancel the setting touch the Back key 6 Carriage Return CR action Use the and cursor keys to select CR Action and then touch the Change key The CR Action screen will ...

Page 33: ...ired carriage return action and then touch the Close key The display will return to the Page set screen To cancel the setting touch the Back key 7 Wide A4 ON OFF Use the and cursor keys to select Wide A4 and then touch the Change key The Wide A4 screen will appear Select ON or OFF as desired and then touch the Close key The display will return to the Page set screen To cancel the setting touch the...

Page 34: ...our printing needs Item 1 Smoothing mode ON OFF Allows a printing resolution of an interpolated 2400 dpi x 600 dpi through a smoothing process 2 EcoPrint ON OFF Allows printing in a toner saving mode Use this mode for test pages etc when high printing quality is not required 3 Printing Resolution 4 Printing Density Available settings OFF ON OFF ON Fast 1200 mode 300 dpi 600 dpi 1 5 Remarks Allows ...

Page 35: ...he desired item and then touch the Change key The setting screen for the selected item will appear KIR Mode Smoothing mode ON OFF 1 EcoPrint Mode EcoPrint ON OFF 2 Resolution Printing Resolution 3 Print Density Printing Density 4 Select the desired setting for each item and then touch the Close key The display will return to the Print Quality screen To cancel the setting touch the Back key ...

Page 36: ...cted first 3 Duplex mode 4 Stack select Selects where the printing paper will be ejected 5 A4 Letter 8 1 2 x 11 usage ON OFF Allows both A4 and Letter 8 1 2 x 11 size paper to be utilized as though they were the same size Available settings Cassette First Bypass Cassette1 Cassette2 Cassette3 Cassette4 None Short edge bind Long edge bind Inner tray Job separator Finisher main tray Finisher sub tray...

Page 37: ... touch the Change key The setting screen for the selected item will appear Bypass Mode Bypass mode 1 Feed Select Paper Feed Source 2 Duplex Mode Duplex mode 3 Stack Select Stack select 4 Override A4 LT Turns A4 Letter 8 1 2 x 11 usage ON OFF 5 Select the desired setting for each item and then touch the Close key The display will return to the Paper Handling screen To cancel the setting touch the B...

Page 38: ...OFF setting Displayed only when there is appropriate program data in the RAM disk Displayed only when ON is selected under the 1 RAM disk ON OFF setting Displayed only when there is appropriate data in the RAM disk Displayed only when ON is selected under the 1 RAM disk ON OFF setting Displayed only when there is appropriate font data in the RAM disk Displayed only when ON is selected under the 1 ...

Page 39: ...gs Select from among the program partition names that are displayed Select among the macro partition names that are displayed Remarks Displayed only when there is appropriate program data in the RAM disk Displayed only when ON is selected under the RAM disk ON OFF setting Displayed only when there is appropriate macro data in the RAM disk Displayed only when ON is selected under the RAM disk ON OF...

Page 40: ... Write Data key The display will return to the basic printer screen and the machine will enter a waiting for data state When data is received from a computer Processing will be displayed in the Printer Menu screen Once the operation is completed Waiting will be displayed 3 Partition List print out Touch the List of Partitions key A Partition List will be printed out 4 RAM disk size Touch the RAM D...

Page 41: ...display will return to the basic printer screen and the data will be read Processing will be displayed in the basic printer screen while the data is being read 6 Reading program data Touch the Program key under the Read setting Use the and cursor keys to select the program data that you want to be read If you want to return to the RAM DISK Mode screen touch the Cancel key Touch the Enter key The d...

Page 42: ...d the data will be deleted Processing will be displayed in the basic printer screen while the data is being deleted 8 Deleting font data Touch the Font key under the Delete setting Use the and cursor keys to select the font data that you want to delete If you want to return to the RAM DISK Mode screen touch the Cancel key Touch the Delete key The display will return to the basic printer screen and...

Page 43: ... the program data will be deleted Processing will be displayed in the basic printer screen while the program data is being deleted 0 Deleting macro data Touch the Macro key under the Delete setting Use the and cursor keys to select the macro data that you want to delete If you want to return to the RAM DISK Mode screen touch the Cancel key Touch the Delete key The display will return to the basic ...

Page 44: ...hat are displayed Select from among the data parti tion names that are displayed Select from among the fonts that are displayed Select from among the program partition names that are displayed Select among the macro partition names that are displayed Remarks Formats the hard disk only when there is a format error on the disk Displayed only when there is appropriate data on the hard disk Displayed ...

Page 45: ...aiting will be displayed 2 Partition List print out Touch the List of Partitions key A Partition List will be printed out 3 Format hard disk Touch the Format key It is only possible to format the hard disk when there is a format error on the disk In any other case the hard disk will NOT be formatted Touch the Yes key The display will return to the basic printer screen and the hard disk will be for...

Page 46: ... the data will be read Processing will be displayed in the basic printer screen while the data is being read 5 Reading program data Touch the Program key under the Read setting Use the and cursor keys to select the program data that you want to be read If you want to return to the Hard Disk screen touch the Cancel key Touch the Enter key The display will return to the basic printer screen and the ...

Page 47: ...d the data will be deleted Processing will be displayed in the basic printer screen while the data is being deleted 7 Deleting font data Touch the Font key under the Delete setting Use the and cursor keys to select the font data that you want to delete If you want to return to the Hard Disk screen touch the Cancel key Touch the Delete key The display will return to the basic printer screen and the...

Page 48: ... the program data will be deleted Processing will be displayed in the basic printer screen while the program data is being deleted 9 Deleting macro data Touch the Macro key under the Delete setting Use the and cursor keys to select the macro data that you want to delete If you want to return to the Hard Disk screen touch the Cancel key Touch the Delete key The display will return to the basic prin...

Page 49: ...your printing needs Item 1 Writing data If Write Data is selected here the machine will enter a waiting for data state until data is sent from the host computer 2 Partition List print out 3 Format memory card If Yes is selected here the memory card will be formatted 4 Reading data Reads the selected data from the memory card 5 Reading font data Reads all of the font data from the memory card Avail...

Page 50: ... program partition names that are displayed Macro Select from among the data partition names that are displayed Select from among the fonts that are displayed Select from among the program partition names that are displayed Select among the macro partition names that are displayed Remarks Displayed only when there is appro priate program data in the memory card Displayed only when there is appro p...

Page 51: ...nu screen Once the operation is completed Waiting will be displayed 2 Partition List print out Touch the List of Partitions key A Partition List will be printed out 3 Format memory card Touch the Format key ALWAYS format the memory card using this printer Touch the Yes key The display will return to the basic printer screen and the memory card will be formatted Processing will be displayed in the ...

Page 52: ...basic printer screen and the data will be read Processing will be displayed in the basic printer screen while the data is being read 5 Reading font data Touch the Fonts key under the Read setting Touch the Yes key The display will return to the basic printer screen and the font data will be read Processing will be displayed in the basic printer screen while the font data is being read If you selec...

Page 53: ...basic printer screen and the program data will be read Processing will be displayed in the basic printer screen while the program data is being read 7 Reading macro data Touch the Macro key under the Read setting Touch the Yes key The display will return to the basic printer screen and the macro data will be read Processing will be displayed in the basic printer screen while the macro data is bein...

Page 54: ...d the data will be deleted Processing will be displayed in the basic printer screen while the data is being deleted 9 Deleting font data Touch the Font key under the Delete setting Use the and cursor keys to select the font data that you want to delete If you want to return to the Memory Card screen touch the Cancel key Touch the Delete key The display will return to the basic printer screen and t...

Page 55: ...d the program data will be deleted Processing will be displayed in the basic printer screen while the program data is being deleted Deleting macro data Touch the Macro key under the Delete setting Use the and cursor keys to select the macro data that you want to delete If you want to return to the Memory Card screen touch the Cancel key Touch the Delete key The display will return to the basic pri...

Page 56: ...among the data partition names that are displayed Remarks Displayed only when there is appro priate data in ROM option 4 11 ROM option settings About the ROM option settings It is possible to perform ROM option settings for the 2 items shown in the following chart For the most efficient use of the printer functions select the various settings according to your printing needs ...

Page 57: ...rtition List will be printed out 2 Reading data Touch the Data key under the Read setting Use the and cursor keys to select the data that you want to be read If you want to return to the Option ROM screen touch the Cancel key Touch the Enter key The display will return to the basic printer screen and the data will be read Processing will be displayed in the basic printer screen while the data is b...

Page 58: ...nel 5 Printer Reset Resets only the Printer Board without the need to turn off power to the machine 6 Dump received data Data received by the printer is printed out in hex code for program and file debugging purposes This hex dump mode will be released automatically in the following situations Touch the GO key A form feed timeout occurs Available settings 495 seconds OFF Permanent Permanent Tempor...

Page 59: ... then touch the Change key Use the and or key to select the desired length of time before form feed timeout Once you have completed the setting touch the Close key The display will return to the Others screen To cancel the setting touch the Back key 2 Resource Protect mode Use the and cursor keys to select Resource Protect and then touch the Change key Select the desired setting OFF Permanent or P...

Page 60: ...ue recovery time setting will not be available Use the and or key to select the desired recovery time Once you have completed the setting touch the Close key The display will return to the Others screen To cancel the setting touch the Back key 4 Service Maintenance menu Touch the Service key Service Representative Status Page print out Touch the Print Status Page key A Service Representative Statu...

Page 61: ...the Yes key The Printer Board will be reset If you select No here the display will return to the Others screen 6 Dump received data Touch the Print HEX DUMP key Touch the Yes key A hex dump of the received data will be printed out If you select No here the display will return to the Others screen ...

Page 62: ...ck copy jobs temporary protection for code job size permanent protection for code job size Remarks Prints out the print job that is designated for the Quick Copy or Proof and Hold setting in the printer driver Prints out the print job that is designated for the Private Print or Job Storage setting in the printer driver Prints out the print job that is saved in the Virtual Mailbox which is designat...

Page 63: ... cursor keys to select your user name and then touch the Next key Use the and cursor keys to select the desired job Use the and or key or the numeric keys to select the number of pages to be printed Touch the Print key If you want to delete the selected job touch the Delete key Touch the GO key and printing will begin If you want to cancel printing touch the CANCEL key 1 2 3 5 6 4 ...

Page 64: ... cursor keys to select the desired job Use the and or key or the numeric keys to select the number of pages to be printed Touch the Print key If an ID has been set for the selected job the screen for inputting the ID will appear Enter the appropriate ID If you want to delete the selected job touch the Delete key Touch the GO key and printing will begin If you want to cancel printing touch the CANC...

Page 65: ...s been set for the selected job the screen for inputting the ID will appear Enter the appropriate ID Touch the GO key and printing will begin If you want to cancel printing touch the CANCEL key 4 Virtual Mailbox Data List print out Touch the List of VMB key A Virtual Mailbox Data List will be printed out 5 Code Job List print out Touch the List of Code JOB key A Code Job List will be printed out ...

Page 66: ... key Use the and or key to select the maximum number of quick copy jobs that can be registered To cancel the setting touch the Back key Temporary protection for code job size Permanent protection for code job size VMB size Use the and cursor keys to select the desired item and then touch the Change key Use the and or key to select the maximum size for that item To cancel the setting touch the Back...

Page 67: ...optional hard disk is installed in this machine received and rasterized data can be saved onto that disk When printing out multiple sets of the same documents this allows faster printing with the collating function as well as enabling the use of the e MPS function Barcode Reader If the optional barcode reader is installed in this machine the machine can read barcodes that are in the job list and p...

Page 68: ...ftware thereby enabling WYSIWYG printing If you want to staple your printed sets when the optional Finisher is installed be sure to use a Collator driver Three separate driver functions are included in the Universal printer driver for Windows 95 98 and Windows NT 4 0 the standard printer driver a collator driver and a barcode printing driver This driver is compatible with Adobe PostScript 2 A PPD ...

Page 69: ...e CD ROM drive 1 drive Windows NT 4 0 Recommended requirements CPU Pentium 90 MHz or more RAM 32 MB or more HDD 10 MB or more CD ROM drive 1 drive Windows 2000 Recommended requirements CPU Pentium 133 MHz or more RAM 64 MB or more HDD 10 MB or more CD ROM drive 1 drive Windows Me Recommended requirements CPU Pentium 200 MHz or more RAM 64 MB or more HDD 10 MB or more CD ROM drive 1 drive ...

Page 70: ...need of the installer CD ROM Driver for Macintosh cannot be made Network Click to display the PrintMonitor s installation menu Follow the instructions displayed on the screen to install the print monitor Documentation Click to display the manual PDF supplied with the printer driver To open this PDF manual Adobe Acrobat Reader developed to view PDF files is required so make sure that Adobe Acrobat ...

Page 71: ...inter driver for Windows 95 98 Start Windows If any applications are currently running exit them Insert the CD ROM supplied with the printer into the CD ROM drive A start window will appear Click Install Driver in the lower left corner of the window If the start window does not appear even if the CD ROM is inserted double click My Computer on the desktop then double click the CD ROM icon The Set u...

Page 72: ... proceed to step 12 If Network is selected proceed to step 11 Enter the network queue name or the path for the network queue in the box To select another network queue name press Browse If you are going to use a local port for the network queue click the check box displayed below then proceed to step 12 Otherwise proceed to step 13 All available options will be displayed Select the items that you ...

Page 73: ...n be assigned to your printer Specify a new name or select the desired name from the list then click Next Specify whether this printer is to be used as the default printer Click Yes if so or click No if not The settings you have made so far will appear If they are correct click Next Installation of the printer driver will start To exit installation click Finish If you want to add another printer d...

Page 74: ...er driver installer CD ROM into the CD ROM drive on your computer The window shown on the right will appear Click on Driver Tools and then on Remove Drivers from the subsequent menu The Remove Printer Drivers dialog box will appear Select the driver that you want to delete and then click on Uninstall A message to verify whether or not you really want to delete that driver will appear If you DO wan...

Page 75: ...titcher you are using 2 Put a check mark in the RAM Disk checkbox and set the memory size of the RAM disk This setting must coincide with the setting in the printer If the optional hard disk is installed put a check mark in the Hard Disk checkbox Once you have completed these settings click on OK 1 6 Printing The following is an example procedure for printing using a printer driver under the condi...

Page 76: ...n the Collate checkbox 2 Put a check mark in the Staple checkbox 9 10 Printing from the application Use the application that you want to use to open the document that you want to print Select Print in the File menu The Print dialogue box will appear Select the desired number of copies that you want to make and which pages are to be printed Select this printer in the Name field Click on Properties ...

Page 77: ... the actual printer driver Depending upon the model of your copier there may be functions that are not supported or that require optional equipment to be installed Even if the settings for such functions are performed they will not be effective Refer to the Instruction Manual for Windows regarding items that are not explained in this Operation Guide 2 1 Making property settings Click on Start in t...

Page 78: ...ated Select this checkbox by clicking on it and putting a check mark in the box in order to have the image printed upside down Source You can select the source of paper feed according to the desired tray Selection is possible from among the following items If you select Auto Source Selection the printer will automatically choose the tray that contains the most appropriate paper for the job The fac...

Page 79: ... on the registered size to select it and then click on the Edit button If you want to delete a registered paper size click on the desired size to select it and then click on the Remove button Type into the Name field the name you want to use for this custom size of paper It is the name that you register here that will actually be displayed under the Page Size setting Select the desired unit of mea...

Page 80: ...ox by clicking on it and putting a check mark in the box in order to perform Duplex 2 sided printing You can then select the desired image direction for each side of the paper Flip on Short Edge Select this option when making duplex prints in order to have the image on the two sides of the paper printed in the opposite direction from each other as though the paper was turned over along its shorter...

Page 81: ...e image brighter than the actual original drag the slider towards the plus sign or type in a positive number directly into the field at the right of the slider bar Conversely when you want to print the image darker than the actual original drag the slider towards the minus sign or type in a negative number directly into that field Contrast Adjusts the contrast of the image When you want to print a...

Page 82: ...t 600 dpi and 300 dpi Depending upon the emulation protocol being used the 1200 dpi Fast setting may not be available Kyocera Image Refinement Turning this setting On allows the jaggies that appear around the edge of text and graphics to be evened out through the smoothing process EcoPrint Saves on toner use use this setting when quality printing is not needed such as with test prints ...

Page 83: ... a registered file from the list and click on the Add button the following settings will become available None Unassigned Print without using registered files Beginning of the Print Job The data for the selected file will be transmitted once and embedded at the beginning of the print job data End of the Print Job The data for the selected file will be transmitted once and embedded at the end of th...

Page 84: ... into the optional Mailbox Mailbox Face Up Copies will be ejected face up into the optional Mailbox If you designate a setting other than Inner Tray as the location of ejection it is necessary to first perform the setting for that optional equipment under Device Options on page 2 15 Copies Specifies the number of prints to be made Select between 1 and 999 copies by clicking on the arrows at the ri...

Page 85: ...Punch When the optional Finisher is equipped with a Punch Unit it is possible to have holes punched into the finished copies In order to use the Hole Punch function it is first necessary to perform the following settings 1 Installable Options setting in the Device Settings Tab Select Finisher or Booklet Stitcher and select the type of Punch Unit For more details on how to select the Punch Unit ref...

Page 86: ... the printer s hard disk and used to make subsequent copies Storing the print data on the hard disk speeds up printing minimizes spooling from the PC and lessens network load and enables the use of Quick Copy and other functions For example with Quick Copy you can make additional copies using data on the hard disk without requiring PC drive The optional hard disk must be installed in order to use ...

Page 87: ...copies from the printer operation panel without going through the PC Proof and Hold This mode prints out only one copy of a multiple copy print job so that you can check the content and quality of the printout first Then if there are no problems you can print out the remaining copies from the printer operation panel Private Print This mode requires a password to print data This helps maintain conf...

Page 88: ...ut from the printer s operation panel whenever needed Up to 255 mailboxes can be created and used The documents are retained in the mailboxes even when power to the printer is turned OFF To use the Virtual Mailbox function you must make settings as follows Virtual Mailbox setting Open the Hard Disk Settings dialog box in the Device Settings Tab Type a name in the Mailbox Name field and input a num...

Page 89: ... Virtual Mail Box VMB Click on the Selection button The Virtual Mailbox Selection dialog box will appear Select a mailbox from Defined Names list and click on the OK button Select Application Defined or Custom under Job Name If you selected Custom input a user name Click on the OK button Printing using the virtual mailbox function will now be possible ...

Page 90: ...ck on the OK button Barcode printing will now be possible 4 Put a check mark in the checkbox for Barcode and make detailed settings in regards to printing using barcodes When you are finished with making all settings click on the OK button Print on first page only Prints a barcode on the first page of the document Print on all pages Prints a barcode on all pages of the documents Print Barcode ID T...

Page 91: ...ternal Finisher Perform this setting when the optional Finisher is installed Job Separator Perform this setting when the optional Job Separator is installed Finisher Perform this setting when the optional Finisher is installed Booklet Stitcher Perform this setting when the optional Booklet Stitcher is installed Mailbox Perform this setting when the optional Mailbox Unit is installed In order to pe...

Page 92: ...tting below Memory Specifies the amount of memory installed in the printer If you make a mistake in the setting here it is possible that printing will not be accomplished properly RAM Disk Specifies the amount of memory to be used for the RAM disk This setting will only be available when you have selected RAM Disk in the Device Options list User Click on this button when you want to register a use...

Page 93: ...e Management Code field here and that registered in the printer itself do not match printing will not be possible If Copy Management is turned ON and this setting does not match the setting made in the printer itself it will not be possible to make test prints Thus when you install the printer driver you will need to check the Copy Management settings and make a test print AFTER the installation p...

Page 94: ...een may be different by a version of utilized software to some extent A Install Drivers Click to start installation of the printer driver Follow the instructions displayed on the screen to install the printer driver B Documentation Click to display the manual PDF file supplied with the printer driver To open this PDF manual Adobe Acrobat Reader developed to view PDF files is required so make sure ...

Page 95: ...e of use dialog box will appear 2 3 4 5 Double Click on the copy machine product name of use Installer icon The window shown on the right will appear Click on Continue A dialog box will appear Click on Install A dialog box will appear Click on Yes 6 Installation was finished Click on Restart and start again ...

Page 96: ... Status Page from the printer s operation panel A dialog box for selecting the appropriate options will appear Select the option that are currently installed in or on your printer Once you re finished with the settings click on OK the chooser will be displayed again Make sure that the name of this printer is selected highlighted in the Select a PostScript Printer list and close the Chooser Once in...

Page 97: ...o what page in the To field you want to print Paper Source You can select the source of paper feed according to the tray or the desired type of paper Selection is possible from among the following items If you select Auto Select the printer will automatically select the tray that contains the most appropriate paper for the job The factory default setting is Auto Select It is necessary to perform t...

Page 98: ...ht button is selected the pages are laid out from right to left Border Sets the type of line to appear around the page Print on Both sides When this checkbox is selected the printer will print on both sides of the paper Binding Enable selection of the desired the binding orientation If left button is selected the binding orientation is along the side of the paper Available only when the optional D...

Page 99: ...to select Auto Size Select here or there is a possibility that printing will be accomplished onto paper that is difference the expected Job Storage Sets the printer driver type for code jobs under the Job Storage function Paper Destination Specifies the location of ejection Depending upon which option you have installed you can select between the Job Separator and the Finisher Inner Tray Copies wi...

Page 100: ... and the available options and settings may differ somewhat depending upon the application and the version of LaserWriter that you are using For the user using Mac OS 7 6 1 we strongly recommend that you update the LaserWriter8 3 2 to Laser Writer 8 5 1 Format for Use this pop up menu to select the Printer that you want to use Paper Select in this pop up list the desired paper size Orientation Ena...

Page 101: ... upon the application and the version of LaserWriter that you are using Visual Effects Visual effects such as horizontal and vertical flip and image inverting can be selected here Place a check in the check box next to the desired visual effects to select that effect Image Text Place a check in the check box next to the desired printing options to select that option ...

Page 102: ...ffer somewhat depending upon the application and the version of LaserWriter that you are using New button To create a new custom page size click this button The acceptable paper width is between 9 81 29 7 cm metric or 3 86 11 69 inches The acceptable paper length is between 14 82 43 18 cm metric or 5 83 17 inches Edit button To edit the selected custom page size click this button Delete button To ...

Reviews: