background image

Océ |   Operating the Arizona T220

5-50 

3010100686-A

5.5.7

Evaluating the Diagnostic Stripe

The Diagnostic Stripe is an option that can be turned on in the Print Parameter menu. If 

the option is turned on, then on the first swath of printing a stripe is printed on the away 

side of the image. The stripe is printed every time the gantry has stepped approximately 

250mm. The stripe can yield a lot of information regarding the position and condition of 

the heads.

Each head has a row of 128 nozzles. The outer nozzles are not fired in the image or in 

the Diagnostic Stripe. Due to the nature of the head, adjacent nozzles can’t be fired at 

the same time. Nozzles are labeled in the following order:
Outer Nozzle A B C A B C ……….. A B C A B C Outer Nozzle
                 1 


 .………...


• •

  128

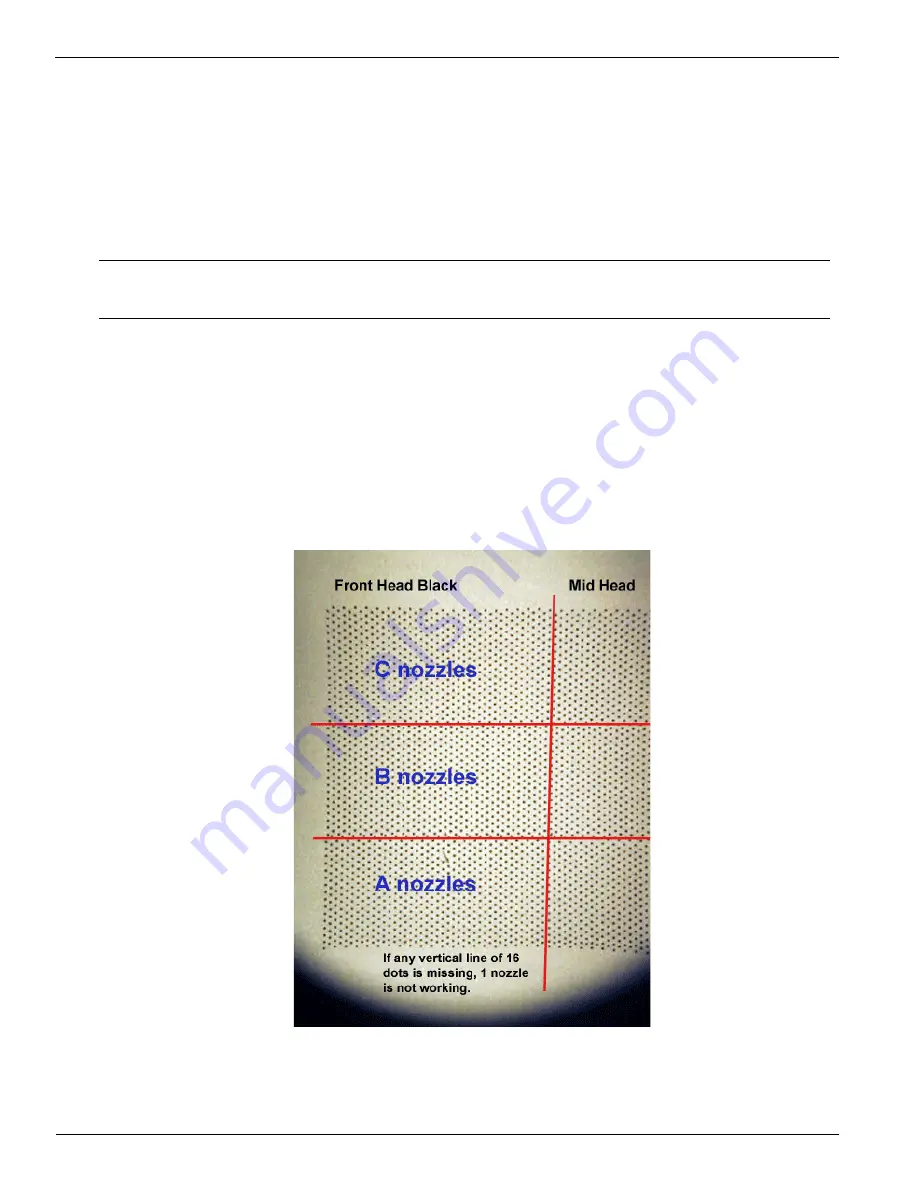
In the Diagnostic Stripe all the ‘A’ nozzles are fired first, then the ‘B’ nozzles and finally 

the ‘C’ nozzles. Each nozzle is fired 16 times. Refer to Figure 24 below.

Figure 24  Detail From Diagnostic Stripe

Note:

Make sure the media is large enough to allow the stripe to print on the away 
side.

Summary of Contents for Arizona T220

Page 1: ...Oc Arizona T220 User Guide Revision A March 2003...

Page 2: ...Oc Display Graphics Systems 2002 All Rights Reserved...

Page 3: ...wer Requirements 2 Vacuum Pump Power Requirements 3 Safety Information 4 Safety Labels 6 2 Ink System Management Oc Ink 9 Solvent 9 Changing an Ink Bottle 10 Refilling the Solvent Bottle 12 Emptying t...

Page 4: ...tem 47 Maintaining Print Quality 48 Gradual Degradation in Print Quality 48 Start of Day Post Maintenance 48 Printing with High Heat 48 Ineffective Drying at Start of Image 48 Banding 49 Other Recomme...

Page 5: ...e strip butts up against the media 21 Arizona T220 Control Panel 23 Key Pad Display Screen and Status LEDs 24 Maintenance Menu Tree 27 Sample Nozzle Print 30 Print Parameters Menu 32 Units Menu 33 Set...

Page 6: ...Oc iv 3010100686...

Page 7: ...Arizona T220 or for information on other Oc Display Graphics Systems products please contact Oc Display Graphics Systems 13231 Delf Place 501 Richmond British Columbia Canada V6V 2C3 Phone 604 273 773...

Page 8: ...e provided with telephone technical support Outside of office hours you can leave a message and your call will be returned the next working day When you call identify yourself as an Arizona T220 custo...

Page 9: ...ch interference when operated in residential and commercial environments Operation of this equipment in a residential area may cause interference in which case the user at his own expense is required...

Page 10: ...Oc vi 3010100686 A...

Page 11: ...occurs as the gantry moves from one end of the table to the other The printer uses solvent based inks An infrared heater attached to the gantry provides curing of the ink on the media The Arizona T220...

Page 12: ...the printer must pass through an Air Preparation Unit that contains the following Air Filter 5 micron element c w auto drain Coalescing Filter 99 97 efficiency c w auto drain and Regulator c w gauge 1...

Page 13: ...S maximum steady state Power 7kW max Circuit Breaker 15 Amps 190 Volts 50 Hz Voltage 190 VAC 10 3 Phase Current 16 5 AMPS maximum steady state Power 7kW max Circuit Breaker 20 Amps 380 Volts 50 Hz Vol...

Page 14: ...91 Magenta 75 3470 3038 1 T2281 Light Magenta 75 3470 3041 5 T2292 Yellow 75 3465 0408 9 CGS80 Solvent Personal Safety The operator should wear butyl rubber gloves a protective apron an NIOSH approved...

Page 15: ...Inhalation remove person to fresh air If not breathing get immediate medical attention and give artificial respiration If breathing is difficult get immediate medical attention If swallowed call a ph...

Page 16: ...ly at the Home end of the gantry Area is heated by electricity and is a potential shock hazard DANGER High Voltage Remove power before servicing Located inside the electronics enclosure AC power cable...

Page 17: ...d Setup Grounding Warning WARNING HIGH LEAKAGE CURRENT EARTH CONNECTION ESSENTIAL BEFORE CONNECTING SUPPLY Located above the AC power cable Pinch Point Located on the bracket endplate and the plate en...

Page 18: ...before servicing Located on the endplate of the gantry where the carriage rests on the capping station Warning Moving Gantry German Translation WARNUNG BEWEGLICHE MASCHINENTEILE Located on the table...

Page 19: ...32 ounce bottles The Oc ink part numbers which are necessary for ordering more ink are provided in the following table 2 2Solvent The T220 use CGS 80 part 3000 0057 solvent as a maintenance solution I...

Page 20: ...me To replace an ink bottle 1 Unscrew the lid on a new ink bottle and remove the silver sealing foil 2 Unscrew the lid on the empty ink bottle and unplug the coupler Note that the lid stays attached t...

Page 21: ...the residual ink to top up the ink in another bottle as this will introduce contaminants that collect at the bottom of the bottle Warning Oc Display Graphics Systems accepts no liability when non Oc...

Page 22: ...if the printer is to be left unattended longer than overnight To refill the solvent bottle 1 Unscrew the lid and remove the coupler Remove the solvent bottle from the Ink Station Tray before filling T...

Page 23: ...es that the waste bottle is almost full To empty the waste bottle 1 Remove the drainage tube from the lid of the waste bottle 2 Remove the waste bottle from the bracket and pour the waste into a suita...

Page 24: ...ly a tray supporting 24 solvent saturated foam pads one for each printhead The tray also provides drainage for excess ink and solvent Excess ink and solvent are collected under the capping tray and fu...

Page 25: ...the Blotting cloth The blotting cloth is supplied in a roll When the blotting cloth requires replacing a message is displayed for the operator on the control panel To change the blotting cloth 1 Leave...

Page 26: ...ndle engage properly with the notched core Figure 7 Mounting the Old Cardboard Core 5 Remove the strip of backing tape from the start of the new roll and stick the new roll to the old core Note Make s...

Page 27: ...or media up to 47mm 1 85 thick For media between 47mm 1 85 and 50 8mm 2 0 the pre fire stripe must be printed on the media itself or on a border next to the media of equivalent media thickness The hei...

Page 28: ...100686 A Figure 9 Spit Catcher Adjustment The perforated metal surface of the pre fire stripe catcher should be cleaned daily as ink will build up on the top surface See Cleaning the Pre fire Stripe C...

Page 29: ...th Poly Wipe 3 1 1Recovering From a Carriage Collision If the flip encoder sensor on the side of the carriage detects that something on the table is higher than the media a carriage collision is about...

Page 30: ...edia with the media holder strips 3 16 4 8mm thick material should be used Directions for use 1 Place the media on the table with a minimum offset of 2 50mm 2 Turn on the vacuum 3 Push the strips up a...

Page 31: ...warping The strips can be printed on if a bleed is required in the image If the strips are used for a bleed and the media thickness is more than 2mm greater than the strips overspray and nozzle dropo...

Page 32: ...Oc Media 3 22 3010100686 A...

Page 33: ...ists of a two line display screen a key pad status LED s and an emergency stop button A bar code wand used for scanning ink bottle labels is stored under the control panel The Arizona T220 operator co...

Page 34: ...or flashing green status LED Allows the operator to exit lower menus and return to the top level menu CANCEL L SCHEN Allows the operator to cancel a print in Progress Allows the operator to exit lowe...

Page 35: ...erator control panel displays the online screen whenever it is not displaying the menu system or presenting error messages If you are in the menu system and you press the ONLINE button the panel displ...

Page 36: ...rints Print Parameters Units Set Clock and About Printer The details of these submenus and how to access them are provide here Maintenance The Maintenance Menu consists of various commands that suppor...

Page 37: ...Menu Structure 3 10 03 4 27 Figure 14 Maintenance Menu Tree...

Page 38: ...manually fills one or more ink reservoir with ink This is generally only used if ink fill is turned Off and the user wants to manually ensure that the ink reservoirs are full of ink The system stops t...

Page 39: ...rint NOZZLE PRINT The Nozzle Print menu provides you with information to calibrate and adjust your print heads Follow these steps to print the Nozzle Print 1 Press the MENU button once at the online s...

Page 40: ...r 2x 6 Press ACCEPT You then see NOZZLE PRINT XXX pass Use the buttons to select the number of passes 1 100 and press ACCEPT The printer begins printing the Nozzle Print You can choose between 1 100 p...

Page 41: ...et the write direction and press ACCEPT You then see COLOR BARS position left center or right 5 Use the buttons to set the print origin and press ACCEPT You then see COLOR BARS print width 8 0 59 9 6...

Page 42: ...r side of the media or the Diagnostic Strip See The Pre Fire Stripe on page 17 for more information The Print Parameters menu also lets you set Enable Job Parameter Changes If this is set to ON you ca...

Page 43: ...the Operator submenu Figure 17 Units Menu Setting the Units Follow these steps to set the type of Units used in the control panel 1 Press the MENU button two times at the online screen 2 Press the ACC...

Page 44: ...imes at the online screen 2 Press the ACCEPT button You then see MAIN MENU operator 3 Press MENU repeatedly until you see OPERATOR set clock 4 Press ACCEPT You then see SET CLOCK set date 5 Press ACCE...

Page 45: ...you to view the current printer specifications through the printer control panel Record this data for future use in case a configuration print was not run at installation or in case this submenu is n...

Page 46: ...ot rom X XX 9 Press ONLINE You then see MAIN MENU 4 3 3Configure I O Menu The Arizona T220 printer can accept input through three types of ports Centronics parallel low voltage differential LVD SCSI 2...

Page 47: ...hen see SCSI PORT SCSI address X 5 This option specifies a two digit SCSI address that identifies the printer to the host system 6 Press ACCEPT to accept the current address or use the buttons to ente...

Page 48: ...st PC This parameter should be set to On so that the host PC and the printer can negotiate the speed If the cable is too long causing transfer problems this parameter should be set to Off 7 Use the ke...

Page 49: ...with the printer mechanisms Position the power cord so that it does not pose a hazard when walking around or accessing the doors on the printer The Arizona T220 has an AC power circuit breaker switch...

Page 50: ...is dependent on the present environmental conditions Typically allow 15 to 30 minutes to warm up printer Once the Ink Warm Up routine has been completed and the gantry has returned to the parked posi...

Page 51: ...which is the Operator menu b Press MENU or BACK to return to the Print Queue menu c Press the or keys to cycle through all avaliable print jobs d Press ACCEPT to confirm that you want to pr0ceed with...

Page 52: ...associated screen is displayed in the following order Printing Direction Press or to change the printing direction Options are Single or Bidirectional single means that the nozzles will print only in...

Page 53: ...When the digit you want is displayed press ACCEPT and the underline moves to the next digit When you are at the last digit press ACCEPT to choose the number of copies that is displayed The display wi...

Page 54: ...reased using the or keys When the digit you want is displayed press ACCEPT and the underline moves to the next digit When you are at the last digit pressing ACCEPT advances to the heat setting menu di...

Page 55: ...The following screen allows you to change first the horizontal and then the vertical offsets Use the ACCEPT key to move through the displayed digits The selected digit has an underline indicating it c...

Page 56: ...e media As a precaution against damaging the printheads there is a flipper arm in front of the printheads used to detect the media height If a wrong media height is detected the flipper arm will cause...

Page 57: ...The first zone is always available while the other three must be selected by the operator Turn on the vacuum pump by pressing the VACUUM button on the control panel This causes any media placed over...

Page 58: ...age to access position initiate Operator Maintenance Pump Solvent command and verify that solvent flows along all the channels in the capping tray to suitably soak all of the foam pads If there is air...

Page 59: ...check the foam capping pads for any debris Keeping the table surface clean and ensuring the media is clean and dust free is highly recommended The alignment and delays of the print heads have been ca...

Page 60: ...the position and condition of the heads Each head has a row of 128 nozzles The outer nozzles are not fired in the image or in the Diagnostic Stripe Due to the nature of the head adjacent nozzles can t...

Page 61: ...finally by syringing the affected head until the curtain of solvent exiting the head is continuous i e no spray in the wrong direction or gaps Figure 25 One Nozzle Not Firing Properly Figure 26 shows...

Page 62: ...r during the image or during the pre post print automated maintenance If the nozzles do not recover then further maintenance will be required Figure 27 Black Head Poorly Positioned Figure 28 shows a m...

Page 63: ...Maintaining Print Quality 3 10 03 5 53 If left untreated the overspray from this head may cause similar problems with other heads nearby Figure 28 Poorly Operating Magenta Head...

Page 64: ...at requires the power to be turned off for more than an hour If there is a marked deterioration in print quality over a period of time Parts Required 3010100747 Assy Syringe 60ml 24x 0401 0116 Plug Lu...

Page 65: ...int it upwards during use to expel the air this will prevent any solvent from leaking out over the carriage when disconnecting the syringe 6 Repeat for all colors 7 Syringe all of the Print Heads for...

Page 66: ...diately syringe each Print Head once more 10 Reconnect all the Print Heads to the Ink Reservoirs 11 Perform 3 Long Purges and Swab the Print Heads Flushing Individual Heads This procedure can be used...

Page 67: ...Maintaining Print Quality 3 10 03 5 57...

Page 68: ...shes guidelines for periodic maintenance the optimum maintenance schedule depends on operator observation of the printer over a period of use 6 1 1Who Should Do Maintenance If your site has a technici...

Page 69: ...eserve the capping station foam pads during operation of the printer The operator replaces or refills the cleaning solution container located on the ink supply tray when the printer senses the bottle...

Page 70: ...bout 2 minutes then wipe again with the cloth until all the ink is removed Let the table dry before placing new media Method 2 Lacquer thinner Use a poly wipe cloth and commercially available lacquer...

Page 71: ...nt 4 Use the syringe to saturate the top surface of the perforated plate with solvent at the end of each printing day Wait 2 minutes to allow the solvent to dilute the ink and make cleaning of the per...

Page 72: ...ompartment is good for multiple cleanings 4 Use the Access Carriage command from the control panel to automatically move the carriage to the blotting station 5 Open the gantry doors and lower the blot...

Page 73: ...for each color Remember to use a clean swab for each color 10 Close the gantry doors and use the Park Carriage command from the control panel to automatically move the carriage back to the capping st...

Page 74: ...ply solvent to a lint free cloth and gently wipe away any ink buildup on the underside of the carriage Important Be careful not to touch any of the print head nozzle surfaces 5 Close the gantry doors...

Page 75: ...matically move the carriage to the blotting station see Figure 14 on page 27 2 Open the gantry doors to access the capping station 3 Use protective butyl gloves in case of contact with ink or solvent...

Page 76: ...oth to remove all visible debris that has accumulated next to the bearing shields It is only necessary to clean the outside bearing shields When removing debris always wipe away from the shields 4 Pow...

Page 77: ...ditions exists continue to step 4 and replace the coalescing filter Otherwise replace once per year 3 Unscrew the threaded collar and carefully remove the bowl Clean using mild soap and water only and...

Page 78: ...Linear Encoders Table and Gantry Items Required Clean Dry Cloth Iso Propyl Alcohol Procedure 1 To clean wipe with a clean dry cloth If necessary wipe with a wetted cloth soaked sparingly with iso prop...

Page 79: ...Oc Printer Maintenance 6 68 3010100686 A...

Reviews: