background image

15

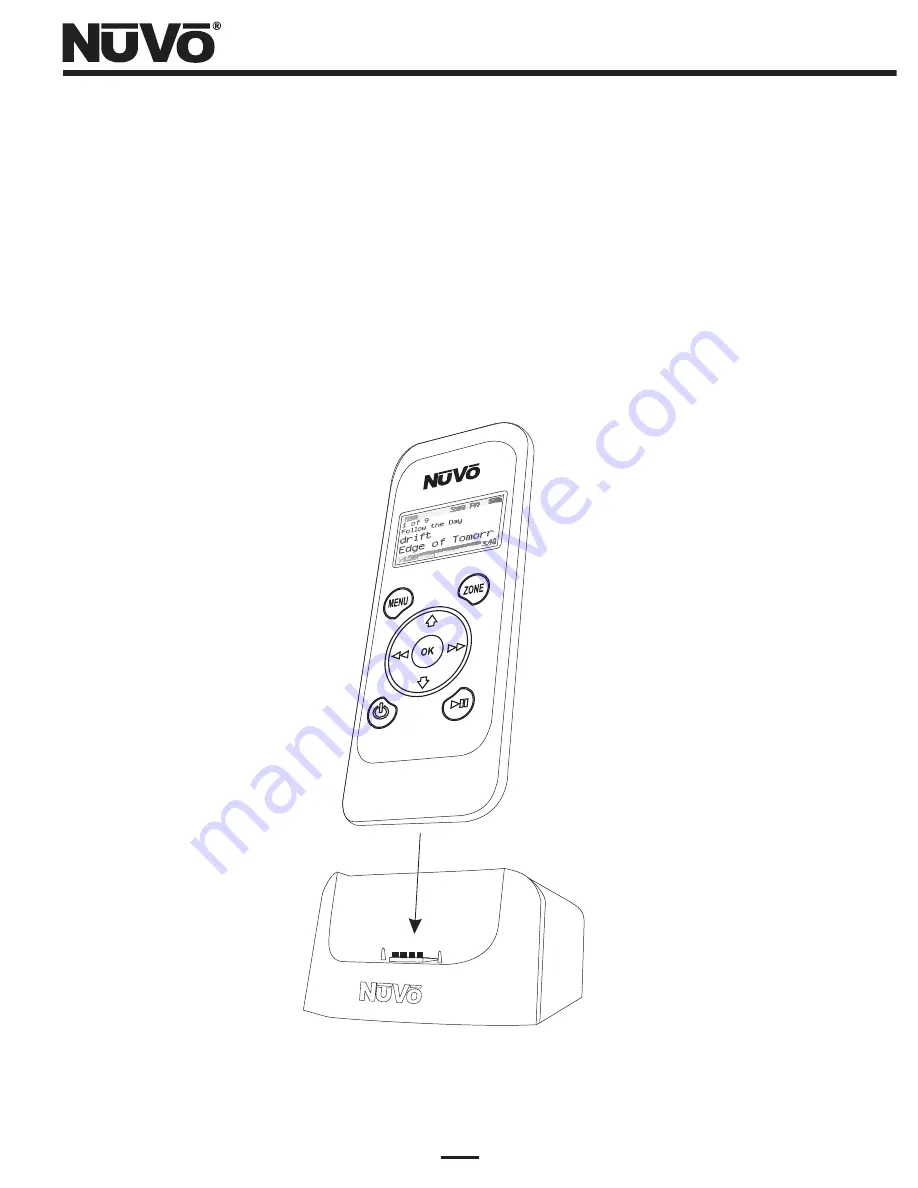
Recharging the Wireless Control Pad (Fig. 9)

Recharging the battery occurs when the Wireless Control Pad is placed in the dock. A 
battery indicator shows the current charge level with three bars indicating a full 
charge. In continuous operation, battery life is 10 hours. An internal motion sensor will 
turn off the Wireless Control Pad when it senses no use. In its off position, battery life 
is 50 hours.

Figure 9 –  Recharging the Wireless Control Pad

Summary of Contents for NV-WCPS

Page 1: ...NV WCPS Wireless Control Pad System Installation and User Guide...

Page 2: ......

Page 3: ......

Page 4: ...arinstallation Ifthisequipment does cause harmful interference to radio or television reception which can be determined by turning the equipment off and on the user is encouraged to try to correct the...

Page 5: ...e of Contents Quick Start Guide Page 3 Wireless Control Pad Features Page 5 I Setting Up the Wireless Control Pad System in the E6G and I8G Configurator Software Page 7 II Installing the Wireless Cont...

Page 6: ...ced in a central location in the home The CAT5 connection to the NuVo System s EZ Port or Allport can extended up to 150 feet 3 Install the Coordinator by plugging it into the NuVo System EZ Port or A...

Page 7: ...utton on coordinator Then Press OK will appear on the display Follow the instructions by pressing the SETUP button on the Coordinator followed by the OK button on the Wireless Control Pad When communi...

Page 8: ...ED Organic Light Emitting Diode It shows album artist and track for personal music and channel and frequency information for broadcast music In menu mode the display goes to eight lines of text 3 Prog...

Page 9: ...ton This button is used to confirm the selection of a menu item or scroll through the available sources 10 Forward and Back Arrows In NuVoNet communication these buttons will track forward and back or...

Page 10: ...ress Each Wireless Control Pad up to five should be assigned to a zone that is not intended for an in wall Control Pad This can be any unused zone number Fig 1 Important The additional zones available...

Page 11: ...Systems Tab It is also important to check the Using NV WCP Wireless Control Pad box in the System Settings tab Fig 2 This allows future firmware updates to the NuVo System to also update the installe...

Page 12: ...nto NuVoNet the blue power LED will light provided the NuVo amplifier is plugged into an AC outlet and its power button is engaged Note that an external power supply should not be used with the Coordi...

Page 13: ...f another Peripheral Device such as the NV NNA NuVoNet Adapter is being used each of the devices must have an independent setting 1 4 The R selection is for repeater use see Section IV Using the Coord...

Page 14: ...gurator software Fig 5 see the NuVo Prozone NuVo University or the Grand Concerto or Essentia E6G Installation Guide for complete zone setup instructions It is important to note if the Wireless Contro...

Page 15: ...ss Control Pad finds a Coordinator the display will read Press SETUP Button on Coordinator Then Press OK At this prompt press the SETUP button on the Coordinator and then press the OK button on the Wi...

Page 16: ...ess Control Pad setup It is best to name zones in the Configurator software for Wireless Control Pad use Setting the Zone Address is done by moving the highlight to the desired zone name or number and...

Page 17: ...ting when communication has been restored As soon as the Wireless Control Pad has gathered enough information from the Coordinator the display will return to the currently selected source s metadata W...

Page 18: ...dock A battery indicator shows the current charge level with three bars indicating a full charge In continuous operation battery life is 10 hours An internal motion sensor will turn off the Wireless C...

Page 19: ...the Coordinator and into an AC outlet If desired the Repeater can be powered by NuVoNet To initially establish a connection to the coordinator plug in the NV WCPR in close proximity to the System s Co...

Page 20: ...LED should flash slowly four up to 20 seconds and then turn off This indicates that a message was successfully sent to the Coordinator If the LED continues flashing move the Repeater to a location clo...

Page 21: ...ure the Repeater is within range of the Coordinator and the Coordinator is powered on Otherwise it is possible that factory defaults have been restored on the Coordinator and it is no longer allowing...

Page 22: ...t with a strong link will work well for the Repeater OK MENU ZONE drif 66 M3A 1 of 9 C Follow the Day 255 3 09 PM 3 48 1 28 Edge of Tomorr Figure 11 Signal Strength Indicator Press the Arrow Up and Do...

Page 23: ...optimal measurement to 127 The RSSI measurement is based on the peak highest energy level detected by the Coordinator on the current frequency Remember that signal energy at a given frequency can com...

Page 24: ...Reset button while still holding the Zone button until the Wireless Control Pad display reads Restoring Factory Defaults Restoring the Coordinator to factory default is done by pressing and holding t...

Page 25: ...ured Wireless Control Pad This occurs if a Wireless Control Pad is out of range or shut down for a prolonged period of time or possibly a new configuration is loaded into the NuVo System After pressin...

Page 26: ...ar on the display The zone control selection is made by moving the highlight up or down with the Up or Down arrow buttons to the desired zone Once a zone is highlighted pressing the OK button makes th...

Page 27: ...tton is pushed they move the selection highlight up and down through the selected menu Play Pause Button This is used as the standard toggling play pause function associated with personal music device...

Page 28: ...g the Up or Down arrows to highlight the desired selection Once the selection is highlighted press the OK button Main Menu There are four Main Menu items that are consistent to all source selections a...

Page 29: ...ic Port or NuVoDock for iPod to global favorites is done in the M3 Options Source Options or iPod Options menu depending on the selected source Fig 16 This menu item automatically resides with the M3...

Page 30: ...Third party sources can be defined with a source name in the Grand Concerto and Essentia Configurator software or they are labeled by the system as a generic source number The NuVoNet sources have a p...

Page 31: ...ontrol Pad s zone for a specified amount of time Fig 21 Once the time selection is made the system will gradually ramp down in volume and the zone will turn itself off at the end of the selected time...

Page 32: ...k Zone Figure 20 Advanced Zone Control Lock Zone Off Adv Zone Control Party Mode Do Not Disturb Lock Zone Sleep Figure 21 Sleep Mode 90 Minutes 120 Minutes Sleep Off 15 Minutes 60 Minutes 30 Minutes L...

Page 33: ...vorites 1 12 Twelve global favorites can be defined for easy access from within the Main Menu or from the twelve numeric favorites from the NuVo Remote Control Any favorite which includes M3 Music Por...

Page 34: ...eral default settings available in this menu Volume Reset is turned on or off by pressing the OK button and controls whether the zone turns on at its previous volume level or to a preset level Fig 26...

Page 35: ...d Concerto has an internal clock that allows each Control Pad to display the current time Within this menu you can easily set Year Month Day Hour and Minute 24 Hour Time Display This is a simple on of...

Page 36: ...f all zones Off All Off Menu In this mode a tap of the power button turns the zone off and a second menu appears that gives the choice to turn off that zones group if it is assigned to a source group...

Page 37: ...tage Input 85 265VAC 50 60Hz Voltage Output 5V DC 5 Rated Current X Amp max Connectors USB Mini B power only 4 pin male docking connector Height 1 26 in 32 mm Width 2 756 in 70 mm Depth 2 165 in 55 mm...

Page 38: ......

Page 39: ......

Page 40: ...NuVo Technologies 3015 Kustom Dr Hebron KY 41048 859 817 7200 www nuvotechnologies com WCP 0909...

Reviews: