3
STEP 5:
Connect the speaker wires to the subwoofer wires
using the supplied waterproof wire-nuts.
–
Right channel
○
Red (+) to red (+)
○
Black (-) to black (-)
– Left channel
○
Red (+) to white (+)
○ Black (-) to green (-)
.
STEP 6:
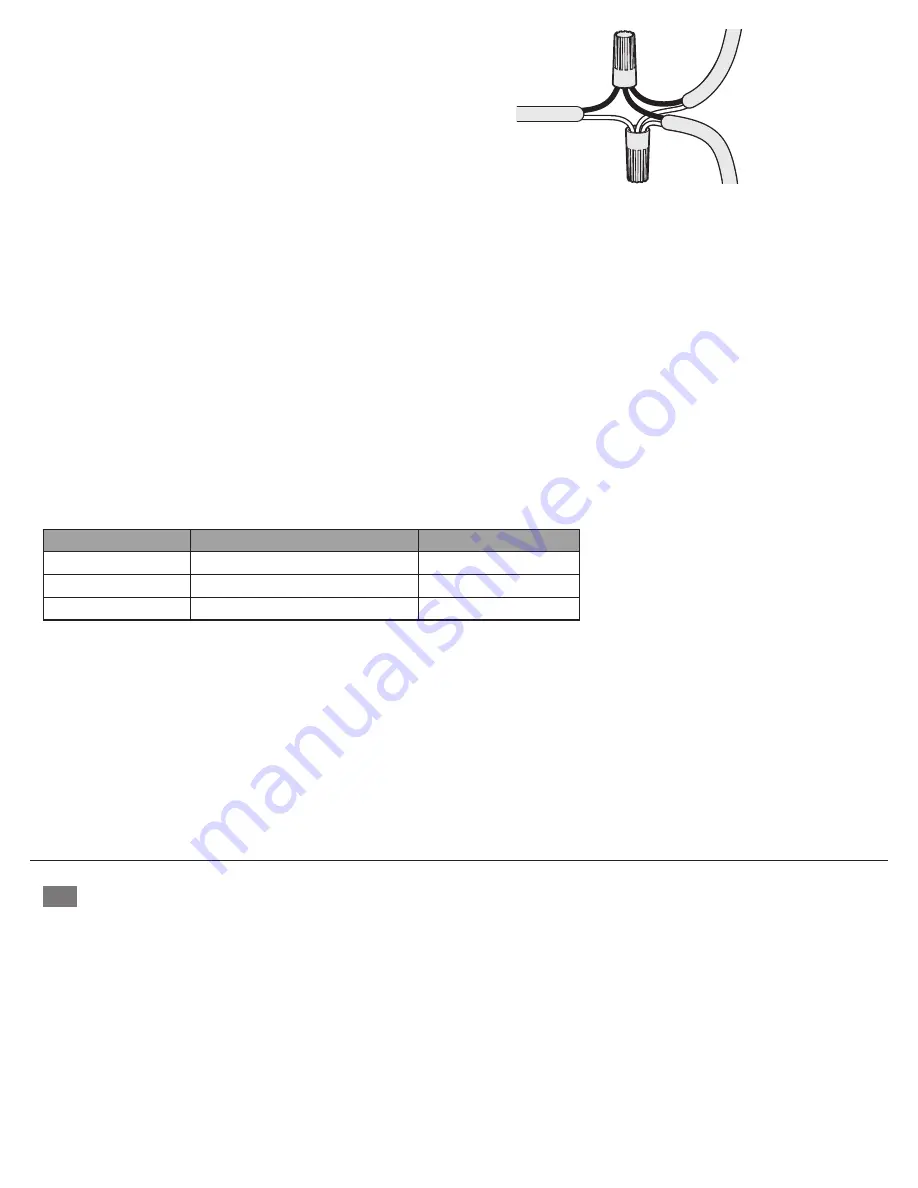
From the subwoofer, pull the two-conductor speaker wires to the first pair of satellite speakers. Wire each set of satellite speakers in parallel.
(Fig. 4)
–
Grasp the red wire from the subwoofer, the red wire from the first satellite speaker on the right channel, and the red wire leading to the remaining
satellite speakers.
–
Pull the three wires together and connect them using a waterproof wire-nut (provided).
–
Grasp the black wire from the subwoofer, the black wire from the first satellite speaker on the right channel, and the black wire leading to the
remaining satellite speakers.
–
Pull the three wires together and connect them using a waterproof wire-nut (provided).
–
Repeat these steps for the first satellite speaker on the left channel.
STEP 7:
Repeat the three-wiring process for each satellite speaker pair, connecting them in parallel. The final set of satellite speakers will have no
remaining speaker wire to attach, so there are only two wires to connect: red to red and black to black.
Note:
Expanding beyond two pairs of satellite speakers
WILL
affect impedance ratings. To understand the impedance ratings of the amplifier, and the
implications of daisy-chaining additional pairs of satellite speakers to a single amplified zone, check the amplifier specifications for the Ohm load capability.
Impedance Chart
System Type
Description
Impedance
4.1
4 satellite speakers and 1 subwoofer
8 Ohm
6.1
6 satellite speakers and 1 subwoofer
6 Ohm
8.1
8 satellite speakers and 1 subwoofer
4 Ohm
STEP 8:
Connect the speaker wire to the amplifier.
STEP 9:
Test the system by turning on the amplifier.
STEP 10:
Once the system is working properly, fill in the holes and trenches.
Note:
Do not fully bury the subwoofer. Cover the subwoofer base housing up to the top cover only.
STEP 11:
Push the satellite speaker brackets about 4" to 6" into the ground.
Note:
If necessary, use a rubber mallet to gently tap the bracket into place.
STEP 12:
Secure each satellite speaker housing to the screw post on the appropriate bracket. Pivot the satellite speaker housing to adjust the angle, as
needed.
Cette fiche d’instructions couvre l’installation du système de haut-parleurs Landscape série 2 Nuvo. Ce système de haut-parleurs d’extérieur délivre
un son puissant par quatre haut-parleurs satellites et un caisson de basses planté dans le sol. Cette fiche d’instructions couvre l’installation du
système de haut-parleurs Landscape série 2 Nuvo. Ce système de haut-parleurs d’extérieur délivre un son puissant par quatre haut-parleurs
satellites et un caisson de basses planté dans le sol. Le système de haut-parleurs Landscape série 2 Nuvo peut être agrandi à un total de huit
haut-parleurs satellites en y ajoutant des paires de haut-parleurs satellites NV-2LS3-SAT2-BK.Les haut-parleurs satellites ont des haut-parleurs de
graves de 3,5" (8,89 cm) en polypropylène et un haut-parleur d’aiguës de 0,5" (1,27 cm) en UFLC. Le caisson de basses fonctionne avec un moteur
en polypropylène de 8" (20,32 cm) puissant. Optimisés pour les demandes d’une installation extérieure, les haut-parleurs Landscape sont cotés IP67
et MIL-STD-810 pour résister aux rigueurs des environnements les plus hostiles. Compact et élégant, ce système se fond dans le décor naturel. Le
système de haut-parleurs Landscape série 2 Nuvo offre une qualité de son supérieure qui résonne à travers votre espace en plein air pour offrir la
meilleure expérience d’écoute.
From Amplifier
De l’amplificateur
Vom Verstärker
Dall'amplificatore
A partir do amplificador
Del amplificador
To Subwoofer
Au caisson de basses
Zum Subwoofer
Al subwoofer
Para o subwoofer
Al subwoofer
To Satellite Speakers
Aux haut-parleurs satellites
Zu den Satelliten-Lautsprechern
Ai diffusori satellite
Para as colunas satélite
A los altavoces satélite
Fig. 4 / Fig. 4 / Abb. 4 / Fig. 4 / Fig. 4 / Fig. 4
FR
Summary of Contents for NV-2LS3-SAT2-BK
Page 13: ...1507274 Rev A 20170830 ...


