background image

37

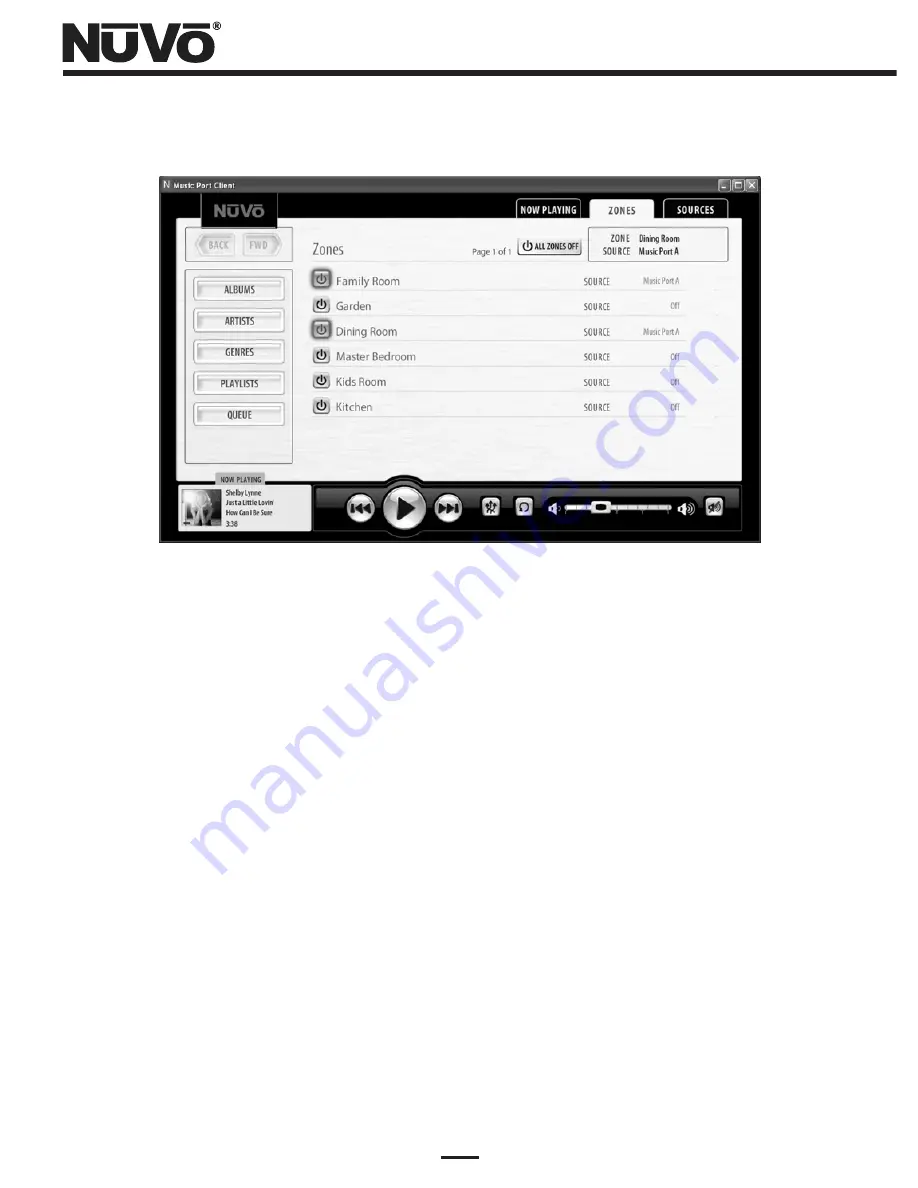
Figure 36 - Music Port Client Zones Tab

Sources (Fig. 37)

The same RS232 connection used for Zones communication also applies to the NuVo 
System’s configured sources. The “Sources” tab will contain a list of the sources in the 
order in which they are configured for the system. Clicking on the source name will 
change the selected zones listening choice. Other NuVoNet sources such as the M3 
Audio Server, T2 Dual Tuners and the NuVoDock for iPod will allow minimal control. Full 
metadata for the selected source will appear along with arrow forward and back 
control, but full menu function is only possible through the NuVo System’s Control 
Pads. Keep in mind that IR controlled sources will appear in the Sources tab as they are 
configured in the Configurator software, but the Client interface is not capable of IR 
control.

Summary of Contents for Music Port NV-MP

Page 1: ...NV MP Music Port Installation Guide...

Page 2: ......

Page 3: ...arinstallation Ifthisequipment does cause harmful interference to radio or television reception which can be determined by turning the equipment off and on the user is encouraged to try to correct the...

Page 4: ...put source for a NuVo system The second primary function of the Music Port is to enable any desktop PC laptop PC or portable tablet PC that is connected to the home network to serve as a controller fo...

Page 5: ...3 5mm audio jack The Music Port allows access to stereo 5 1 or 7 1 surround audio cards on the host PC as multiple independent stereo audio streams Use a 3 5mm to RCA cable to connect the PC s audio o...

Page 6: ...c Port Client to access specific Zone and Source control through NuVoNet When this serial cable is connected Zone and Source buttons will appear at the top of the PC Interface application From those b...

Page 7: ...s Use Display Name ignore name sent by NuVoNet Device the Music Port will automatically place a name in the Source menu Create a three character abbreviation for each of the Music Port sources in the...

Page 8: ...eed to registration Registering Media Control Server Fig 5 To register your product simply complete the Name Organization and Email Address fields in the Customer Registration window Click next to con...

Page 9: ...7 Figure 4 Installing the Media Control Server Figure 5 Registering the Media Control Server...

Page 10: ...accessible to the NuVo distributed audio system The installer has the ability to disable one or both of the applications Most installations require that both applications are installed To complete the...

Page 11: ...9 Figure 7 Setup Figure 8 Completing the Media Control Server Installation...

Page 12: ...r MCS Configuration Control Server Tab Fig 9 The Control Server tab displays the status of the MCS The Media Control Server status in the upper right hand side of the tab should indicate that the MCS...

Page 13: ...chiving software and is included with XP Vista or Window s XP Media Center operating systems That will appear by default under the Select Media Source header If you have downloaded iTunes it will appe...

Page 14: ...ble audio outputs on the 5 1 surround card select 5 1 within the Advanced Speaker Settings A 7 1 surround card would represent four stereo audio streams for the NuVo System Once you have selected the...

Page 15: ...13 Figure 11 Configure Playback Devices Figure 12 Renamed Sources...

Page 16: ...contains the outputs established in the previous Media Sources tab This tab is used to inform the MCS how the audio cables are connected between the PC and the NuVo System Next to each NuVo input sel...

Page 17: ...15 Figure 13 NuVo Bridge Figure 14 Registration...

Page 18: ...ty Scrolling through the music menu is done with the up and down arrows The OK button selects the highlighted choice All of the artist album and genre information is supplied by NuVoNet and is automat...

Page 19: ...nstructed to do so by Autonomic Controls support If the Music Port Client will be accessing the host PC through a hardware firewall through the internet then you must configure the firewall to forward...

Page 20: ...manually re configure the Windows Firewall to allow communication on this port Remember the Windows Firewall is effective even when communicating within your LAN Media Control Server Status The Media...

Page 21: ...his eliminates the need for a monitor and allows adding CD content to the Host PC with little effort on the part of the user Vista Operating System Fig 16 To setup the Host PC to automatically rip CD...

Page 22: ...n the desktop Right Click on the CD drive and select Properties Within the Properties window select the AutoPlay and select Music CD from the drop down menu Choose rip music from CD using Windows Medi...

Page 23: ...nd setting the compression rate for the best possible audio reproduction Windows Media Player Fig 18 With Windows Media Player open direct your cursor over the Rip tab and click on the down arrow Sele...

Page 24: ...p Within the On CD Insert drop down menu select Import CD and Eject Below this is another drop down menu Import Using Within that menu select MP3 Encoder In the Setting drop down menu select Custom Th...

Page 25: ...s across the home s network We refer to these as Client PCs Find the Host PC s Name Fig 20 If you are using Vista right click on the My Computer icon on the Host PC desktop and click Properties The co...

Page 26: ...ype control userpasswords2 in the text box and click OK Highlight the user name and deselect Users must enter a user name and password to use this computer Once the password requirement is deselected...

Page 27: ...xt labeled Network and Sharing Center This will bring up a new screen with a drop down menu Password Protected Sharing Within this menu select Turn off password protected sharing and click Apply This...

Page 28: ...usic Properties window will appear Within that switch the selection to Share this folder Click on the Permissions button This will bring up a Permissions for My Music window Fig 25 Everyone should be...

Page 29: ...27 Figure 24 File Sharing in XP Figure 25 XP File Sharing Permissions...

Page 30: ...not a shortcut Choose New and select Shortcut Type the shared link noted from the previous section into the text box Fig 26 Click Next and give the shortcut a name It will appear as an icon on that co...

Page 31: ...29 Figure 27 Shared Music...

Page 32: ...computer on the home s wired or wireless LAN From the Client the user has full browsing access to the host PC music library as well as zone and source selection capability On any client PC click the S...

Page 33: ...t Documents and then select NuVo Within the NuVo folder you will see a NuVo icon labeled Music Port Client Setup Fig 29 Double click on the Music Port Client Setup and follow the prompts This will ins...

Page 34: ...32 Figure 29 Music Port Client Setup Figure 30 Music Port Client interface...

Page 35: ...selecting Programs then select NuVo Music Port Client When the Client is opened a connection window will appear as communication is established Once connected the Now Playing window is the default Ma...

Page 36: ...es of buttons to the left of the current album art Clicking on Albums Artists or Genres will take you to the music library Fig 34 Navigation through the library features the ability to quickly access...

Page 37: ...35 Figure 33 Music Port Client Now Playing Window Figure 34 Music Library Navigation...

Page 38: ...ab allows access to the NuVo System zones through the RS232 port on the Music Port box and the DB9 input on the NuVo System These correspond to the zone addresses assigned to each Control Pad This is...

Page 39: ...ange the selected zones listening choice Other NuVoNet sources such as the M3 Audio Server T2 Dual Tuners and the NuVoDock for iPod will allow minimal control Full metadata for the selected source wil...

Page 40: ...Two additional check boxes are intended for touch screen applications Hide Mouse Pointer eliminates the pointer from view Note that this is intended only for touch screen control and should not be use...

Page 41: ...en a music selection is made the artist track and album information appear on the OLED Organic Light Emitting Diode display The Arrow and buttons as well as the Play Pause button emulate the same func...

Page 42: ...ol Pad for the Music Port is Manage Queue When that is selected three sub choices appear Edit Queue allows you to open the current queue list and by highlighting a selection and touching the OK button...

Page 43: ...41 Figure 40 NuVo Control Pad Queue Management MENU OK Main Menu Edit Queue Clear Queue Queue Mode...

Page 44: ...Music Port Software 1 NV NC1 CAT5 Network Cable 10 feet 2 NV RS232 RS232 Cable 9 position Male to Female 6 feet Power Requirements Power supplied via NuVoNet connection Voltage 20 24VDC Power Consumpt...

Page 45: ......

Page 46: ...NuVo Technologies 3015 Kustom Dr Hebron KY 41048 859 817 7200 www nuvotechnologies com MP 0835...

Reviews: