22/33
frame rate is reached.
•
After that, the next press of the button returns back to the original fastest rate. The default, fastest frame rate in Night Mode is 25fps. Pressing the Brightness button cycles
through the other frame rate settings, with the third press returning to the default again: 25fps>15fps>8fps>25fps>etc.
•
In Day Mode, the default frame rate is 30fps. The frame rate cannot be changed in Day Mode, therefore the Brightness button will have no effect. The display is a color LCD, and
images will appear in color in daytime use, or in strong artificial lighting conditions.
Record button (F)
The Record button is used to capture still photos or videos of the image being viewed, dependent on the setting of the Photo/Video switch. The photos and/or videos are stored on a
(user supplied) micro SD card, with up to 32GB capacity. The unit has no internal memory.
•
When the unit is in Photo Mode, pressing the record button will take a single photo of the displayed image, standard .jpg format, at a resolution of 2592x1944 or 640x480
(adjustable) pixels.
•
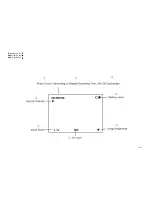
When the unit is in Video Mode, pressing the record button will start a new video recording. The Record icon in the display will begin flashing, and the Video Time display will
increase as the recording continues. Video is captured in .avi format at a resolution of 1280x720/ 640x480 (adjustable) pixels per frame (VGA). To stop recording in Video Mode,
press the Record button again.
Battery and Memory Installation
Load Batteries
Turn the battery compartment cover
(K)
in counter-clockwise direction to remove it, and insert 4 AA LR06 batteries as indicated inside the battery compartment. Lithium AA batteries
are recommended for maximum running time, but alkaline o rechargeable NiMh may be used as well.
Note: Do not mix battery types, or new and old batteries. Remove the batteries if the unit will be stored for a month or longer between uses.
Inserting the SD card
The unit is also equipped with a MicroSD card slot
(i)
capable of accepting up to 32GB MicroSD card (not supplied). Once your device has a Micro SD card, it will be possible to take
photos or videos. The possible number of photos or video recording time will appear on the top left of your display. If no SD card is inserted, the status display will indicate “
No card
”
and the unit will not operate.
A MicroSD card drawing with an inscription "IN" will appear on the top left of your display to prompt you to insert one.
To insert the MicroSD card, proceed as follow:
•
Open the cover, and insert the MicroSD card in the MicroSD card slot
(i)
completely and oriented correctly as shown by the icon above the slot.
•
To remove the SD memory card, depress the SD card and pull out the card gently.
•
MicroSD cards must be clean (no images from other sources). If the MicroSD card has been used in another device, please make sure to format the MicroSD card in your computer
prior to use in your night vision monocular. New cards are ready to use straight from the package.
Note: When you format a MicroSD memory card, the operating system erases all information and files on the card. Formatting also removes all Hidden System files as well.


