background image


Chapter 1 - Getting Started


At a Glance


2


At a Glance


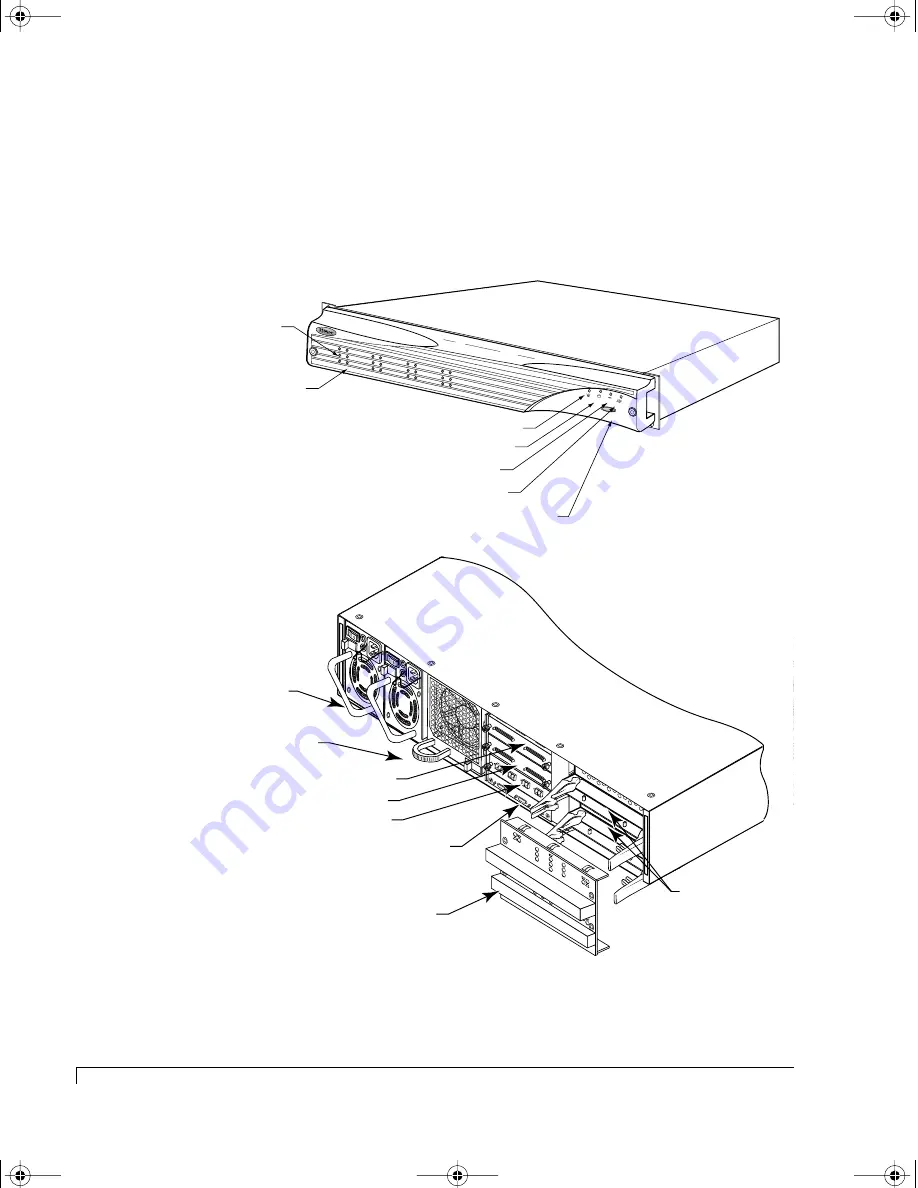
The following illustrations show the featured components of the NexStor 4100FS 

Series Storage System. Familiarize yourself with its components prior to installing 

and using the storage system.


Component Views

P-1

Tx

Rx

P-2

Tx

Rx

P-1

SA

F-T

E

CT

RL 1

CT

RL 2

Tx

Rx

P-2

Tx

Rx

JP1

ADD JUMPE

R

TO DISABLE

TERMINA

TION

ADD JUMPE

R

TO SUPPL

Y

TERM PO

WER

JP3

JP2

JP4

JP1

ADD JUMPE

R

TO DISABLE

TERMINA

TION

ADD JUMPE

R

TO SUPPL

Y

TERM PO

WER

JP3

JP2

JP4

350-watt hot-pluggable

independent power supplies

Dual in-line 80-CFM hot

swappable cooling fans

SAFTE Disk I/O Card

Host SCSI I/O Card

Host I/O Card

SAF-TE Service & Controller

Service Ports

Contro

ller 2

Controller 1

Controller

Cover Plate

Optional Dual 
FC-to-Ultra160 SCSI
RAID Controllers

Chan

nel 1

Chann

el 3

CH 3

Chan

nel 0

CH 0

Chan

nel 2

RESET A

LARM

Drive Status LEDs

(left column of LEDs)

Power On LED

Channel Status LED

Power Supply Status LED

Fan Status LED

Alarm Reset Button

Drive Activity LEDs

(right column  of LEDs)


4100FS.book  Page 2  Tuesday, July 8, 2003  4:35 PM

Summary of Contents for 4100FS

Page 1: ...U S E R S G U I D E NexStor 4100FS S T O R A G E S Y S T E M S 4100FS book Page 1 Tuesday July 8 2003 4 35 PM...

Page 2: ...4100FS book Page 2 Tuesday July 8 2003 4 35 PM...

Page 3: ...U S E R S G U I D E NexStor 4100FS S T O R A G E S Y S T E M S 4100FS book Page 3 Tuesday July 8 2003 4 35 PM...

Page 4: ...Cedro Road Carlsbad CA 92009 Copyright 2003 nStor Corporation Inc All Rights Reserved nStor AdminiStor NexStor the NexStor logo and the nStor logo are trademarks or registered trademarks of nStor Corp...

Page 5: ...rvice Ports 14 Control and Monitoring 15 Status Indicator LEDs 16 Drive LEDs 16 Audible Alarm 17 2 Theory of Controller Operation 19 Operating Modes Overview 19 Stand Alone Mode 21 Active Active Mode...

Page 6: ...nfiguration Not Supported 80 True LUN Sharing 80 5 Accessing the RAID Controllers 81 Accessing the Disk Array Administrator Software VT 100 82 Menu System 84 Updating RAID Controller Firmware 86 6 Mon...

Page 7: ...t I O Card 129 Replacing a RAID Controller 132 Replacing a Killed Controller When in Active Active Active Passive Mode 133 Replacing the Enclosure 134 A Technical Information 137 Specifications 137 B...

Page 8: ...Table of Contents iv 4100FS book Page iv Tuesday July 8 2003 4 35 PM...

Page 9: ...disk drives all in a 2U 3 47 inch form factor enclosure Full component redundancy is provided through hot pluggable cooling fan module and independent power supplies RAID functionality is provided thr...

Page 10: ...Channel to Ultra160 RAID storage system enclosure Hot pluggable Fibre Channel to Ultra160 RAID Controllers Supports up to 48 drives in RAID configurations Designed to fit standard 19 inch rack enclos...

Page 11: ...nced disk utilities array verification and recovery and spare pooling Firmware can be upgraded either in band over the SCSI bus or out of band via the RS 232 service port Continuous runtime diagnostic...

Page 12: ...About this Manual Features viii 4100FS book Page viii Tuesday July 8 2003 4 35 PM...

Page 13: ...section identifies and gives a complete description of each major component The Monitoring section describes the enclosure s LEDs and the manner in which the normal and abnormal conditions are presen...

Page 14: ...T O D I S A B L E T E R M I N A T I O N A D D J U M P E R T O S U P P L Y T E R M P O W E R J P 3 J P 2 J P 4 350 watt hot pluggable independent power supplies Dual in line 80 CFM hot swappable coolin...

Page 15: ...l the signals to the front panel through a smart interconnect Power is applied to the front bezel through a smart interconnect edge connector where a control circuit monitors the bezel for a proper co...

Page 16: ...be illuminated indicating that power has been applied Each power supply also incorporates an amber general Fault LED If the power supply is installed and power is not applied to the power supply or th...

Page 17: ...tus LED will change from a green state to a solid amber state in the case of a fan failure or to a blinking amber green state in the case of an over temperature condition In both cases an audible alar...

Page 18: ...irmware based VT 100 interface which provides an option to manage fan speed This option provides a whisper mode fan operation for noise sensitive environments When enabled default and based on a set o...

Page 19: ...d the SCSI switch settings and configures the system for the appropriate addresses It then executes instructions from firmware performing a self test diagnostics The firmware is flash upgradeable usin...

Page 20: ...matic termination JP8 for Channel 1 and JP7 for Channel 2 The default position is the jumper is offset or unjumpered that is automatic termination is enabled In daisy chain configurations you will be...

Page 21: ...SCSI drive ports Host SCSI I O Card The Host SCSI I O cards are configured with automatic termination and do not require any external terminators Jumpers on the card are provided to configure Term Pow...

Page 22: ...per second or 2 125 Gb per second Fibre Channel Host I O Card The card has a jumper installed to allow the user to set the Fibre Channel Loop speed With the jumper JP5 installed it c0onfigures the lo...

Page 23: ...f three different modes Stand Alone Active Active or Active Passive In the Stand Alone mode the controller operates autonomously In the Active Active Active Passive mode the two controllers operate as...

Page 24: ...pull towards you The type B model uses a similar mechanism to the type A except it rotates about a pivot point Use the edge of your finger tip or the finger nail to engage the ejector and pull towards...

Page 25: ...D D J U M P E R T O S U P P L Y T E R M P O W E R J P 3 J P 2 J P 4 J P 1 A D D J U M P E R T O D I S A B L E T E R M I N A T I O N A D D J U M P E R T O S U P P L Y T E R M P O W E R J P 3 J P 2 J P...

Page 26: ...ntenance service monitoring of the SEPs This port is labeled SAF TE The two RAID Controller service ports which are labeled CTRL 1 and CTRL 2 provide an interface to each RAID Controller They provide...

Page 27: ...ommunicate that data to the front bezel LEDs third party configuration and monitoring software and the VT 100 Disk Array Administration firmware based software interface for management and monitoring...

Page 28: ...ondition of the power supplies The LED will illuminate steady green when both power supplies are functioning normally and will change to amber if one power supply should fail or is turned off Fan Stat...

Page 29: ...of the enclosure s component condition changes to an abnormal state To silence the alarm press the Alarm Reset button located on the front bezel The corresponding alarms LED will remain illuminated u...

Page 30: ...Chapter 1 Getting Started Audible Alarm 18 4100FS book Page 18 Tuesday July 8 2003 4 35 PM...

Page 31: ...g mode and the NexStor 4120FS with its dual RAID controllers supports the active active or active passive operating modes Either mode can function in single or dual port configurations Operating Modes...

Page 32: ...s a single controller system and Active Active or Active Passive designates a dual controller system The Single Port or Dual Port component of the name convention refers to the number of enabled Host...

Page 33: ...h ports are connected to the same host the host will see a given array twice unless it does special processing to detect duplicate paths to array A host device driver may provide this functionality Ho...

Page 34: ...the failed controller This failover process occurs without user intervention In the Active Active Dual Port mode both FC Host ports are active and each controller normally presents the LUNs it owns on...

Page 35: ...messages to its partner controller If a controller does not receive a heartbeat message within a set time period it will kill the other controller assuming that it has malfunctioned After killing the...

Page 36: ...I O Disk CH1 Drives 7 12 Drives 1 6 Disk CH2 Disk CH0 Disk CH3 FC2 FC1 P1 P2 CH 1 CH 2 P3 P4 Active HOST I O Passive RAID Controller Controller 2 B Disk CH1 Disk CH2 Disk CH0 Disk CH3 FC2 FC1 Passive...

Page 37: ...ive RAID Controller Controller 2 B Disk CH1 Disk CH2 Disk CH0 Disk CH3 FC2 FC1 Active Active T T T T Controller Disk Ports SEP T T Host SCSI I O CH 0 CH 3 HUB HUB Host I O Connectors Drive I O Connect...

Page 38: ...es not contain a valid mirrored configuration you must manually configure the replacement controller The correct host target ID must be set and the Active Active operating mode must be enabled The Act...

Page 39: ...is means that half the cache memory can be dedicated to writes and half to reads This is the same allocation used in Stand Alone mode Each controller sends heartbeat messages via the SCSI buses to its...

Page 40: ...CH1 Drives 7 12 Drives 1 6 Disk CH2 Disk CH0 Disk CH3 FC2 FC1 P1 P2 CH 1 CH 2 P3 P4 Active HOST I O Active RAID Controller Controller 2 B Disk CH1 Disk CH2 Disk CH0 Disk CH3 FC2 FC1 Passive Passive T...

Page 41: ...ature is not active Active Active mode where both controllers are operating normally Each controller uses its own local configuration Active Active mode where one controller boots and the other contro...

Page 42: ...uptime Adding a RAID subsystem can increase the uptime to 99 9 The goal of clustering is 99 99 availability Beyond clustering fault tolerant systems can provide 99 9999 uptime At the high end continuo...

Page 43: ...may only see a 1 4 1 6x improvement Although clusters seem to be relatively simple they involve complex technology that can be implemented in a variety of ways The number of nodes supported and type o...

Page 44: ...lity Downtime per Failure Downtime per Year in minutes Continuous Processing 100 00 None 0 Fault Tolerant 99 9999 Cycles 0 5 5 Clusters 99 9 99 999 Seconds to minutes 5 500 High Availability 99 9 Minu...

Page 45: ...ck cabinet The second section is Enclosure Configuration which describes setting the SAF TE Disk I O card switch settings and the enclosure to enclosure cabling The SAF TE card switches settings deter...

Page 46: ...er the location of the enclosure s in relationship to each other to ensure that the cables will easily reach between enclosures CAUTION The power supplies should be removed prior to installing the enc...

Page 47: ...the rack cabinet a Position the enclosure in the cabinet at the desired location b Secure the left and right front chassis ears to the rack cabinet s front vertical members using the supplied screws...

Page 48: ...install the power supplies Do this by aligning the power supply with its open bay and slide the power supply in The power supply will fit flush and the latch will reset as the power supply reaches it...

Page 49: ...ove the two rear mounting rails Grasp and pull each rail from the chassis NOTE The mounting rails were installed in the slots at the factory for the purpose of shipping 6 Remove the tower stand case f...

Page 50: ...and 38 12 Using the remaining two sets 4 of 10 32 pan head screws secure the top and bottom slide rails as indicated in the illustration C below Inserting and Securing the Chassis Mounting Screws Moun...

Page 51: ...nd ensure the release latch resets indicating the fan module has completely seated 14 Re install the power supplies Slide each power supply into its open bay and ensure the release latch resets indica...

Page 52: ...the disk drive fits very tight so it requires some force to push the drive into its bay Ensure that the drive seats completely Repeat this step to populate all the drive slots Installing Disk Drives c...

Page 53: ...Continue The next section Enclosure Configuration includes steps and diagrams for setting the SAF TE Disk I O card switches and attaching the required SCSI data cables for each drive configuration Loc...

Page 54: ...switches on the card and set them as described in the following switch setting diagrams The switch settings will assign specific SCSI IDs to the drive slots as indicated and reserve IDs 6 and 7 for th...

Page 55: ...the AdminiStor software guide or the VT 100 software guide for instructions on setting up and configuring the disk arrays R D A 0 1 2 3 4 5 6 7 8 A 1 S 0 S 1 B D D L R M Switch Settings UP 1 DOWN 0 S...

Page 56: ...cessors Switch Setting Primary RAID Enclosure NexStor 4110FS 4120FS J P 7 A D D JU M P E R T O D I S A B LE T E R M I N AT I O N JP8 C N F G 1 C N F G 2 R A ID S P A R E 1 S P A R E 2 B A U D S E L D...

Page 57: ...ocate and add the two jumpers JP7 and JP8 refer to the illustration on the previous page Add a jumper installed on both pins to JP8 for Channel 1 and JP7 for Channel 2 This will ensure that the automa...

Page 58: ...Host Cabling on page 57 and Powering On the Storage System on page 70 Also refer to the AdminiStor software guide or the VT 100 software guide for instructions on setting up and configuring the disk...

Page 59: ...ors Switch Setting Primary RAID Enclosure NexStor 4110FS 4120FS J P 7 A D D JU M P E R T O D I S A B L E T E R M I N A T I O N JP8 C N F G 1 C N F G 2 R A I D S P A R E 1 S P A R E 2 B A U D S E L D L...

Page 60: ...as described Locate and add the two jumpers JP7 and JP8 refer to the illustration on the previous page Add a jumper installed on both pins to JP8 for Channel 1 and JP7 for Channel 2 This will ensure...

Page 61: ...ons properly 9 Re install the SAF TE Disk I O card into the second daisy chain enclosure Slide the card into the slot and ensure that it seats completely Secure the card by tighten the two thumb screw...

Page 62: ...in the NexStor 4110FS 4120FS enclosure J P 7 AD D JU M PE R TO DI SA BL E TE RM I N AT I O N AD D JU M PE R TO SU PP LY TE RM PO W ER J P 6 JP5 C N F G 1 C N F G 2 R A ID S P A R E 1 S P A R E 2 B A...

Page 63: ...lso refer to the AdminiStor software guide or the VT 100 software guide for instructions on setting up and configuring the disk arrays SAFTE Disk I O SCSI Data Cable SCSI Data Cable SCSI Data Cable Ch...

Page 64: ...sors Switch Setting Primary RAID Enclosure NexStor 4110FS 4120FS J P 7 A D D JU M P E R T O D I S A B L E T E R M I N A T I O N JP8 C N F G 1 C N F G 2 R A I D S P A R E 1 S P A R E 2 B A U D S E L D...

Page 65: ...escribed Locate and add the two jumpers JP7 and JP8 refer to the illustration on the previous page Add a jumper installed on both pins to JP8 for Channel 1 and JP7 for Channel 2 This will ensure that...

Page 66: ...rly 9 Re install the SAF TE Disk I O cards in each enclosure Slide the card into the slot and ensure that it seats completely Secure the card by tighten the two thumb screws 10 Second Third Daisy chai...

Page 67: ...alled in the NexStor 4110FS 4120FS enclosure J P 7 AD D JU M PE R TO DI SA BL E TE RM I N AT I O N AD D JU M PE R TO SU PP LY TE RM PO W ER J P 6 JP5 C N F G 1 C N F G 2 R A ID S P A R E 1 S P A R E 2...

Page 68: ...on setting up and configuring the disk arrays SAFTE Disk I O SCSI Data Cable SCSI Data Cable SCSI Data Cable Chl 1 CTRL 1 CTLR 2 SAF TE Chl 2 Power Supply Power Supply Cooling Fans SAFTE Disk I O NexS...

Page 69: ...annel data cables Refer to the topology described for your installation on the following pages and cable your system based on the diagrams shown a Connect the required Fibre Channel data cable s to th...

Page 70: ...s as described in the following diagrams Logical Diagram Single Host with a Single HBA Hubs Disabled Host Cabling Diagram Single Host with a Single HBA Hubs Disabled Host System 1 HBA 1 Host I O Conne...

Page 71: ...FC Host Ports RAID Controller T SEP T T Location of internal termination T T Controller 1 A SAF TE Disk I O Disk CH1 Disk CH2 FC2 FC1 P1 P2 CH 1 CH 2 P3 P4 Active HOST I O Active Controller Disk Port...

Page 72: ...ion of internal termination T T Controller 1 A SAF TE Disk I O Disk CH1 Disk CH2 Disk CH0 Disk CH3 FC2 FC1 P1 P2 CH 1 CH 2 P3 P4 Active HOST I O Active T T Controller Disk Ports SEP T T Host SCSI I O...

Page 73: ...k CH0 Disk CH3 FC2 FC1 P1 P2 CH 1 CH 2 P3 P4 Active HOST I O Active T T Controller Disk Ports SEP T T Host SCSI I O CH 0 CH 3 Host System 1 HBA 1 Host System 2 HBA 1 Host System 3 HBA 1 Host System 4...

Page 74: ...gle Host with Single HBA Hubs Enabled Host Cabling Diagram Single Host with Single HBA Hubs Enabled Jumper Cable Host System 1 HBA 1 Host I O Connectors RAID Controller SEP T Location of internal term...

Page 75: ...ation T T Controller 1 A SAF TE Disk I O Disk CH1 Disk CH2 Disk CH0 Disk CH3 FC2 FC1 P1 P2 CH 1 CH 2 P3 P4 Active HOST I O Passive RAID Controller Controller 2 B Disk CH1 Disk CH2 Disk CH0 Disk CH3 FC...

Page 76: ...T Controller 1 A SAF TE Disk I O Disk CH1 Disk CH2 Disk CH0 Disk CH3 FC2 FC1 P1 P2 CH 1 CH 2 P3 P4 Active Passive HOST I O RAID Controller Controller 2 B Disk CH1 Disk CH2 Disk CH0 Disk CH3 FC2 FC1 Ac...

Page 77: ...r 1 A SAF TE Disk I O Disk CH1 Disk CH2 Disk CH0 Disk CH3 FC2 FC1 P1 P2 CH 1 CH 2 P3 P4 Active HOST I O Passive RAID Controller Controller 2 B Disk CH1 Disk CH2 Disk CH0 Disk CH3 FC2 FC1 Passive Activ...

Page 78: ...1 HBA 2 Host System 2 HBA 2 Host System 1 HBA 1 Host I O Connectors RAID Controller SEP T Location of internal termination T T Controller 1 A SAF TE Disk I O Disk CH1 Drives 7 12 Drives 1 6 Disk CH2 D...

Page 79: ...s Enabled Host Cabling Diagram Single Host with Dual HBAs Hubs Enabled Host System 1 HBA 2 Host System 1 HBA 1 Host I O Connectors RAID Controller SEP T Location of internal termination T T Controller...

Page 80: ...ntroller 1 A SAF TE Disk I O Disk CH1 Disk CH2 Disk CH0 Disk CH3 FC2 FC1 P1 P2 CH 1 CH 2 P3 P4 Active HOST I O RAID Controller Controller 2 B Passive Disk CH1 Disk CH2 Disk CH0 Disk CH3 FC2 FC1 Passiv...

Page 81: ...ction to find the new configuration that supports the number of enclosures drives you will be adding Set the enclosure SAF TE Disk I O card s switch settings for the new configuration and cabling the...

Page 82: ...his step for each of the attached storage system enclosure s All enclosures will perform a power on self test during their initial start 3 Next power on the host computer s which is connected to the s...

Page 83: ...mode Note that when a controller fails the surviving controller continues to present its LUNs to its Host Port 0 and changes to present the failed controller s LUNs to its Host Port 1 The Fibre Chann...

Page 84: ...Channel hardware other than the cables Host 2 FC HBA FC HBA Host 1 FC HBA FC HBA See s LUN 1 LUN 2 See s LUN 1 LUN 2 See s LUN 1 LUN 2 See s LUN 1 LUN 2 LUN 1 LUN 1 Active Active Active Active LUN 2...

Page 85: ...1 LUN 2 See s LUN 1 LUN 2 See s LUN 1 LUN 2 See s LUN 1 LUN 2 LUN 2 LUN 1 Active Active Active Active LUN 2 LUN 2 NexStor 4120FS JFS RAID Controller SEP T Location of internal termination T T Control...

Page 86: ...on a loop Host 2 FC HBA FC HBA Host 1 Switch 1 Switch 2 FC HBA FC HBA See s LUN 1 LUN 2 See s LUN 1 LUN 2 See s LUN 1 LUN 2 See s LUN 1 LUN 2 LUN 1 LUN 1 Active Active Active Active LUN 2 LUN 2 NexSto...

Page 87: ...2 FC HBA FC HBA See s LUN 1 See s LUN 2 See s LUN 1 See s LUN 2 LUN 2 LUN 1 Active Active In Active In Active LUN 2 LUN 2 NexStor 4120FS JFS RAID Controller SEP T Location of internal termination T T...

Page 88: ...llustration depicts two single ported hosts connected to the two controllers via a single switch Host 2 FC HBA Host 1 Switch FC HBA Host Link 1 Host Link 2 LUN 2 Active LUN 2 Passive LUN 1 Active LUN...

Page 89: ...bric and that one image of the LUNs would disappear if one controller failed Depending on the host software being used it may be more desirable to run in Active Active Single Port mode since a control...

Page 90: ...Dual Port mode you must manage the multiple images of the same LUN Host 2 FC HBA Host 1 Hub FC HBA Host Link 1 Host Link 2 LUN 1 Passive LUN 1 Active LUN 2 Passive LUN 2 Active NexStor 4120FS JFS RAI...

Page 91: ...dware other than cables Host 2 FC HBA Host 1 FC HBA Host Link 1 Host Link 2 Jumper Cable LUN 1 Passive LUN 1 Active LUN 2 Active LUN 2 Passive NexStor 4120FS JFS RAID Controller SEP T Location of inte...

Page 92: ...Active Active controllers a good question is Why not just present all LUN on all ports The answer is that LUN sharing greatly increases complexity and sacrifices performance In order to do LUN sharing...

Page 93: ...rray Administrator software provides a VT 100 terminal interface which is accessed by directly attaching to either one or both controllers service ports The ports are located on the rear of the enclos...

Page 94: ...r access the arrays and utilities through the CTRL1 port Configure your host system or terminal RS 232 port to use the following settings Set the communications parameters for the terminal program as...

Page 95: ...2 Following the Boot and POST screens the System Menu is displayed System Menu Screen 3 You can now perform all of the functions described in the following chapters All steps start from the System Me...

Page 96: ...y Status Drive Status Abort Initialization Verify Function Expand Function Add Spare Delete Spare Change Array name Trust Array Switch Array Owner Partition Menu Add a Partition Delete a Partition Ver...

Page 97: ...tings SEP LUN Disk Configuration Write Back Cache SMART Enclosure Services Config Internal Hubs Connect I Hubs on FO Drive Utilities Menu Blinik Drive LED Clear Metadata Down Drive Test Unit Ready Dis...

Page 98: ...is a female to female DB 9 null modem serial cable 2 Connect the other end of the cable to either a host system s serial communication port or a VT 100 type terminal 3 On a host system run a terminal...

Page 99: ...troller Firmware 87 FLASH Loader Screen 7 Select option 3 xmodem by pressing the 3 key FLASH Loader Waiting for Transfer Selection Screen 8 Using the mouse click on the pull down menu Transfers and se...

Page 100: ...re any time during the transfer until it has been completed The upload does not overwrite the firmware during the upload process it writes the new code into unused EEPROM space until completed then co...

Page 101: ...on on enclosure components such as fan status disk drive status controller status and array monitoring The One Touch Annunciation Configuration Display provides information about switch settings I O c...

Page 102: ...ion It will also indicate a failed controller by alternately blinking green and amber when a failure does occurs Power Supply Status The Power Supply Status LED indicates the condition of the power su...

Page 103: ...ontrollers and SAF TE card switch settings Refer to One Touch Annunciation on page 95 for more information Front Bezel LED and Component Identification Drive Status LEDs There are twelve Drive Status...

Page 104: ...The LitePipes present the some of the information provided by the front bezel Drive LEDs that is drive activity information and drive fault failure or data rebuilding notifications when the front bez...

Page 105: ...Soft Boot Reset Steady Green for inserted drives Steady Green Short Beep Duplex Mode Single Controller Reset Steady Green for inserted drives Steady Amber until the controllers are recognized then see...

Page 106: ...e Rebuilding Steady Amber Steady Amber N A Pool Spare Ready Not assigned to a specific Array Blinking Green N A N A Pool Spare Rebuilding Steady Amber Steady Amber Continuous Beep Array Failure Failed...

Page 107: ...Card Switch 6 Baud Rate Not Applicable SAF TE Card Switch 2 SAF TE Card Switch 7 Delay Start Controller 1 Status Press and Hold to display settings SAF TE Card Switch 3 RAID Addressing SAF TE Card Swi...

Page 108: ...for the host bus adapter and SCSI ID 15 for the SAF TE processor Drive Slot 5 Off Indicates that Switch 6 is in the DOWN position which sets the BAUD rate for the SAF TE RS 232 serial port to 9 600 Dr...

Page 109: ...t Drive Slot 10 On Switch 3 RD is in the UP position which enables RAID addressing and is used when configuring RAID mode NexStor 4110FS or NexStor 4120FS Drive Slot 11 On Switch 8 is in the UP positi...

Page 110: ...f the enclosure Connecting the Serial Cable The cable is a female to female DB 9 null modem cable 2 Connect the other end of the cable to either a host system s serial communication port or a VT 100 t...

Page 111: ...e of the thermal sensors cooling fan status power supply status and statistics on enclosure up time Enclosure Environment Status Screen NOTE System degradation will occur if the display is left in the...

Page 112: ...is option is enabled the software will control the RPM of the cooling fans based on enclosure temperature parameters and its installed components For example if any one or a combination of the followi...

Page 113: ...ent operating temperature is at or above 30 C 86 F thus ensuring that maximum available cooling is being provided Cooling Fan Module The jumpers JP1 and JP2 are by default are offset which enables the...

Page 114: ...interface allows the user to scroll back through the buffer data or select the Transfer Capture Text to save the buffer captures to a text file SAFTE Commands Debug Screen NOTE Options 2 SAFTE Comman...

Page 115: ...o female DB 9 null modem cable 2 Connect the other end of the cable to either a host system s serial communication port or a VT 100 type terminal 3 On a host system run a terminal emulation program or...

Page 116: ...will appear Enclosure Terminal Utility Screen 6 Select option 5 Firmware Upload by pressing the 5 key Upload Firmware Screen 7 Press the u key lower case to start the upload Using the mouse click on...

Page 117: ...y time during the transfer until it has been completed The upload does not overwrite the firmware during the upload process it writes the new code into unused EEPROM space until completed then copies...

Page 118: ...100 the following screen will appear Update Confirmation Screen After the confirmation is complete the following screen will appear Update Status Screen 10 Verify the new firmware has successfully loa...

Page 119: ...s not connected properly Power not available at the outlet Power switch not in the proper position Faulty power cord Faulty power supply Verify that the power cord is properly connected to the power...

Page 120: ...on the SCSI bus you will need to perform some fault isolation If all the drives on one bus are offline start with the daisy chain storage system Disconnect the data cable If the remaining drives retu...

Page 121: ...d rate mismatch between the terminal emulator and the controller The default baud rate is 115 200 Follow these steps if you set your terminal emulator to this rate and still get garbage characters 1 I...

Page 122: ...nflict with any other devices on the host SCSI channel If you have a long SCSI cable try a different or shorter cable Only one array is displayed during host SCSI BIOS scan Check to ensure that LUN su...

Page 123: ...cts 2 Check the enclosure s to make sure everything is properly connected 3 If the enclosure s and the drive work properly replace the controller The system hangs during a drive scan Follow these step...

Page 124: ...supply missing Loss of AC power to the power supply Replace the suspect faulty power supply Ensure that all the power supply switches are in their On position Replace the missing power supply and turn...

Page 125: ...in the battery pack and or charging interface has been detected Replace the controller Refer to Replacing a Controller in the VT 100 or AdminiStor software guides REPLACE BATTERY The battery is approa...

Page 126: ...ge 137 UNWRITABLE CACHE The SDRAM cache has battery backed up data and the arrays assigned to this data are not present Either determine which drives are missing and reinstall them or select Yes when...

Page 127: ...a medium error unrecovered read error recommended reassignment Sense Key Descriptions Sense Key Description 0h No sense 1h Recovered error 2h Not ready 3h Medium error 4h Hardware error 5h Illegal req...

Page 128: ...ot be corrected with retries will result in another critical event describing the affected disk array if any Disk Detected Error Example ASC and ASCQ Descriptions ASC ASCQ Description 0C 02 Write erro...

Page 129: ...Full 32 Target has been reserved by another initiator 40 Controller aborted an I O request to this target because it timed out displayed as I O Timeout 41 I O request was aborted because of a channel...

Page 130: ...Chapter 7 Troubleshooting Disk Channel Errors 118 4100FS book Page 118 Tuesday July 8 2003 4 35 PM...

Page 131: ...components as well as the entire storage system enclosure Removing the Front Bezel 1 Using a Phillips screwdriver unlock the two front bezel fasteners Unlocking the Front Bezel Rotate the fasteners c...

Page 132: ...Maintenance Removing the Front Bezel 120 2 Grasp and pull the front bezel from the enclosure Refer to the illustration below Removing the Front Bezel Reset Alarm 4100FS book Page 120 Tuesday July 8 20...

Page 133: ...D I S A B L E T E R M I N A T I O N A D D J U M P E R T O S U P P LY T E R M P O W E R J P 3 J P 2 J P 4 J P 1 A D D J U M P E R T O D I S A B L E T E R M I N A T I O N A D D J U M P E R T O S U P P L...

Page 134: ...being replaced 4 Align the cooling fan module with the open fan bay and push the module into the enclosure until it completely seats The latch will reset when the module is completely seated The fron...

Page 135: ...R M P O W E R J P 3 J P 2 J P 4 J P 1 A D D JU M P E R T O D I S A B L E T E R M I N A T I O N A D D JU M P E R T O S U P P LY T E R M P O W E R J P 3 J P 2 J P 4 Controller 1 Controller 2 Controller...

Page 136: ...latch resets 5 Turn the On Off switch to the On position on the replacement power supply NOTE The front bezel Power Supply Status LED will return to a normal state steady green 6 Using the packaging...

Page 137: ...e Be careful of the P factor effect when removing a disk drive which is the twisting of the drive in your hand as a result of the spinning disk Allow the drive to completely spin down before removing...

Page 138: ...ent disk drive a Align the drive carrier with the rail grooves in the drive bay b Ensure that the drive seats completely The drive carrier tension clips ensure that the disk drive fits very tight so i...

Page 139: ...E R M I N A T I O N JP8 C N F G 1 C N F G 2 R A ID S P A R E 1 S P A R E 2 B A U D S E L D L Y S T R T R M T S T R T A D D JU M P E R T O D I S A B L E T E R M I N A T I O N C H A N N E L 1 C H A N N...

Page 140: ...on the enclosure Refer to Powering On the Storage System on page 70 12 Using the packaging materials from the replacement card repackage the failed card and return it per your RMA instructions J P 7 A...

Page 141: ...rom the SFP cage Each transceiver model has a slightly different mechanism for ejection Refer to the illustration below and note the model you have a The A model uses a pivoting mechanism Use the edge...

Page 142: ...atch that of the faulty card being replaced 11 Insert the replacement card by aligning it into the rail guides and pushing the card until it fully seats Tighten the two thumb screws Do not overtighten...

Page 143: ...O N 1 G I G O F F 2 G I G J P 5 P4 Tx Rx P3 Tx P1 Tx Rx P2 Tx Rx J P 7 AD D JU M PE R TO DI SA BL E TE RM I N AT I O N AD D JU M PE R TO SU PP LY TE RM PO W ER J P 6 JP5 C N F G 1 C N F G 2 R A I D S...

Page 144: ...he latches as handles carefully pull the controller from the enclosure 4 Install the new replacement controller into the enclosure Secure the controller by pressing the latches until the lock into pla...

Page 145: ...artner controller 7 Using the packaging materials from the replacement controller repackage the failed controller and return it per your RMA instructions Replacing a Killed Controller When in Active A...

Page 146: ...n page 70 for the enclosure NOTE Mark or make a notation of the location of the data cables prior to disconnecting or removing these items To facilitate correct installation you may want to tag the ca...

Page 147: ...nstallations Follow the installation procedures in Chapter 3 Installing the Storage System into the Tower Stand on page 33 11 Re install the SAF TE Disk I O card Host SCSI I O and Host I O card Set th...

Page 148: ...on page 70 17 Verify that all systems are operating normally 18 Access the AdminiStor software or the Disk Array Administrator software using a VT 100 terminal verify the replacement RAID Controller...

Page 149: ...power supplies and 2 controllers 38 55 lbs w o drives 58 00 lbs with twelve drives Altitude 200 to 10 000 feet Number of Drives Supported 12 per enclosure Total Capacity 876 gigabytes 73 GB Drives Ho...

Page 150: ...c Ultra2 80MB sec Ultra160 160MB sec Advanced RAID features Active active host independent failover failback in the 2x4 configuration Write back data cache memory bus 800 MB sec bandwidth On line capa...

Page 151: ...ive Active mode Domain validation and CRC data protection with Ultra160 Configuration and management Fibre Channel or RS 232 serial interface to ANSI terminal or terminal emulator Menu based text inte...

Page 152: ...g 5o C to 45o C 0o C to 5o C and 45o C to 50o C 40o C to 100o C Humidity Operating Non Operating 10 to 85 noncondensing 5 to 90 noncondensing Air flow 10 0 cubic ft min CFM Technical Specifications fo...

Page 153: ...tors On each SAF TE Disk I O and Host SCSI I O cards are two VHD CI SCSI connectors These connectors provide the input output interface from the storage enclosure bus to the host system VHD CI Connect...

Page 154: ...17 TERMPWR 18 TERMPWR 18 RESERVED 19 RESERVED 19 GROUND 20 GROUND 20 ATN 21 ATN 21 GROUND 22 GROUND 22 BSY 23 BSY 23 ACK 24 ACK 24 RST 25 RST 25 MSG 26 MSG 26 SEL 27 SEL 27 C D 28 C D 28 REQ 29 REQ 2...

Page 155: ...GROUND 50 GROUND 50 TERMPWR 51 TERMPWR 51 TERMPWR 52 TERMPWR 52 RESERVED 53 RESERVED 53 GROUND 54 GROUND 54 ATN 55 ATN 55 GROUND 56 GROUND 56 BSY 57 BSY 57 ACK 58 ACK 58 RST 59 RST 59 MSG 60 MSG 60 S...

Page 156: ...ots are two RAID Controller service ports They provide the serial interface to each RAID Controller allowing for firmware updates and access to the firmware based Disk Array Administration software us...

Page 157: ...d to connect a terminal to the SAF TE service port or the RAID Controller service ports is a DB 9 female to DB 9 female null modem type Below is a pin out for this cable DB 9 to DB 9 Null Modem Cable...

Page 158: ...transceivers are available in a few different models which are determined by the type of ejector mechanism These transceivers install into SFP cages mounted on the Host I O card SFP Optical Transceiv...

Page 159: ...Enclosure Model Number NSR 12R1 FS NSR 12R2 FS to which this declaration relates is in conformity with the Title 47 of the US Code of Federal Regulations Part 15 covering Class A personal computers an...

Page 160: ...ed to correct the interference at his own expense nStor Technologies is not responsible for any interference caused by unauthorized modifications to this equipment It is the user s responsibility to c...

Page 161: ...ese Statement CE Notice Marking by the CE symbol indicates compliance of the device to directives of the European Community A Declaration of Conformity in accordance with the above standards has been...

Page 162: ...unding type attachment plug rated 15A 250V configuration 6 15P at the other end For 230 Volt Operation Europe Use a cord set marked HAR consisting of a H05VV F cord that has a minimum 0 75 square mm d...

Page 163: ...atus LEDs 91 Fan Status LED 16 90 Front Bezel 3 Optical SFP Transceiver 12 Power Supply 4 Power Supply Status LED 16 90 Power On LED 16 90 RAID Controllers 11 Problems with 112 Controller Operation Th...

Page 164: ...On LED 16 90 Product Identification v R Rack Cabinet Installation 34 RAID 12 Drive Configuration 42 RAID 24 Drive Configuration 44 RAID 36 Drive Configuration 47 RAID 48 Drive Configuration 52 RAID Co...

Page 165: ...ontroller 138 NexStor 4100FS Series 137 Terminal screen problems 109 Tower Stand 37 Transceiver 146 Troubleshooting Common Problems 112 Interpreting the LEDs 112 SCSI BIOS hangs 108 SCSI Bus Problems...

Page 166: ...Index 154 4100FS book Page 154 Tuesday July 8 2003 4 35 PM...

Page 167: ...4100FS book Page 155 Tuesday July 8 2003 4 35 PM...

Page 168: ...Corporate Office www nstor com 91 9 94518003 Y1 June 2003 nStor Corporation Inc 6190 Corte Del Cedro Road Carlsbad CA 92009 760 683 2500 4100FS book Page 156 Tuesday July 8 2003 4 35 PM...

Reviews: