13
English
• If disinfectant, water, or saline, etc. becomes attached to the Control Unit, Motor Handpiece, or
Foot Control, turn the power OFF. Then wipe wipe them clean with a damp cloth, and wipe them
well with a dry cloth.
CAUTION
8-2 Cleaning the Control Unit, Motor Handpiece, and Foot Control
1) Turn the power of the Control Unit OFF.
2) Remove the Power Cord from the Control Unit.
3) Wipe the surface of the Control Unit, Motor Handpiece, and Foot Control with a damp cloth, and then wipe
them with a cloth dampened with rubbing alcohol, etc.
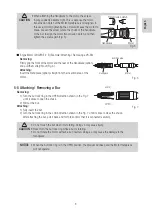
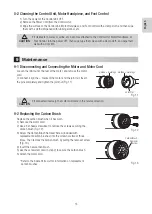
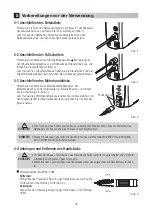
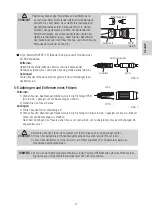
9-1 Disconnecting and Connecting the Motor and Motor Cord
Loosen the joint nut at the rear of the motor, and remove the motor
cord.
To connect, align the + marks of the motor and the joint nut. Insert
the pins completely and tighten the joint nut (Fig. 11).
• If connected inversely, the motor will rotate in the reverse direction.
CAUTION
9-2 Replacing the Carbon Brush
Replace the carbon brush when it has worn.
1) Remove the motor cord.
2) Use a flat-head screwdriver to remove the screws securing the
carbon brush (Fig. 12).
3) Screw the Carbon Brush Remover Screw (included with
replacement carbon brushes) into the screw hole two or three
times. Then remove the carbon brush by pulling the remover screw
(Fig. 13).
4) Insert the new carbon brush.
5) Use the screws removed in step 2) to secure the carbon brush.
6) Attach the motor cord.
* Refer to the Spare Parts List for information on replacement
carbon brushes.
9
Maintenance
markings markings
Joint Nut
Fig. 11
Fig. 12
Fig. 13
Carbon Brush
Remover
Screw


