9
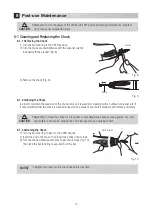
Fig. 6
Fig. 7
English
5-5 Attaching / Removing a Bur
Removing:
1) Turn the bur lock ring in the OPEN direction shown in the Fig. 7
until it clicks to open the chuck.
2) Pull out the bur.
Attaching:
1) Fully insert the bur.
2) Turn the bur lock ring in the LOCK direction shown in the Fig. 7 until it clicks to close the chuck.
After attaching the bur, pull it back and forth to confirm that it is connected securely.
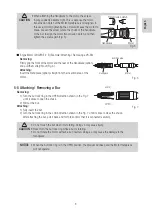
E-type Motor (VOLVERE i7 E) (Example: Attaching / Removing a VR-EB)
Removing:
Firmly grip the front of the motor and the rear of the Handpiece (option),
and pull them straight out (Fig. 6).
Attaching:
Insert the Handpiece (option) straight into the insertion area of the
motor.
• Do not touch the bur when it is rotating. Doing so may cause injury.
• Never turn the bur lock ring while a bur is rotating.
• Do not rotate the motor without a bur inserted. Doing so may cause the damage to the
Handpiece.
CAUTION
• When attaching the Handpiece to the motor, the screw-
in may suddenly become tight. This is because the motor
transmission clutch of the Motor Handpiece is misaligned. In
this case, forcibly tightening the screw will cause the motor to
break. Loosen the screw, rotate the chuck of the handpiece
or the bur to align the motor transmission clutch, and then
tighten the screw again (Fig. 5).
CAUTION
Transmission clutch
Handpiece
Motor
Fig. 5
Insertion area
Handpiece
Motor
• When the bur lock ring is in the OPEN position, the product will beep and the Motor Handpiece
will not operate.
NOTICE


