


28
Novell eDirectory 8.8 Installation Guide
no
vd
ocx
(e
n)
6 Ap
ril 20
07
6
Specify or confirm the installation path, then click
Next
.
7
Specify or confirm the DIB path, then click
Next
.
8
(New installations only) Select an eDirectory installation type, then click
Next
.
Install eDirectory into an Existing Tree
incorporates this server into your eDirectory
network. The server can be installed into any level of your tree.
Create a New eDirectory Tree
creates a new tree. Use this option if this is the first server
to go into the tree or if this server requires a separate tree. The resources available on the
new tree will not be available to users logged in to a different tree.
9
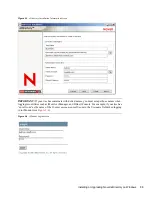
Provide information in the eDirectory Installation screen, then click
Next
.
If you are installing a new eDirectory server, specify a Tree name, Server object context,
and Admin name and password for the new tree.
If you are installing into an existing tree, specify the Tree name, Server object context, and
Admin name and password of the existing tree.
If you are upgrading an eDirectory server, specify the Admin password.
NOTE:
In eDirectory 8.8 and later, you can have case sensitive passwords for all the
utilities. Refer to
Novell eDirectory 8.8 What's New Guide
(http://www.novell.com/
documentation/edir88/index.html)
for more information.
For information on using dots in container names, see
“Installing into a Tree with Dotted Name
Containers” on page 32
.
10
(New installations only) In the HTTP Server Port Configuration page, specify the ports to use
for the eDirectory administrative HTTP server, then click
Next
.
IMPORTANT:
Make sure that the HTTP stack ports you set during the eDirectory installation
are different than the HTTP stack ports you have used or will use for Novell iManager. For
more information, see the
Novell iManager 2.5 Administration Guide
(http://www.novell.com/
documentation/imanager25/index.html)
.
11
(New installations only) In the LDAP Configuration page, specify which LDAP ports to use,
then click
Next
.
For more information, see
“Communicating with eDirectory through LDAP” on page 29
.
12
Select the NMAS
TM
login methods you want to install, then click
Next
.
See
“Installing NMAS Server Software” on page 32
and
“Installing NMAS Client Software”
on page 32
for more information.
13
Click
Finish
to complete the eDirectory installation.
2.7.2 Server Health Checks
With eDirectory 8.8, when you upgrade eDirectory, a server health check is conducted by default to
ensure that the server is safe for the upgrade.
Section B.3.2, “Partitions and Replica Health,” on page 143
Based on the results obtained from the health checks, the upgrade will either continue or exit as
follows:
If all the health checks are successful, the upgrade will continue.
Summary of Contents for EDIRECTORY 8.8 SP1
Page 4: ...novdocx en 6 April 2007 ...
Page 22: ...22 Novell eDirectory 8 8 Installation Guide novdocx en 6 April 2007 ...
Page 34: ...34 Novell eDirectory 8 8 Installation Guide novdocx en 6 April 2007 ...
Page 112: ...112 Novell eDirectory 8 8 Installation Guide novdocx en 6 April 2007 ...
Page 128: ...128 Novell eDirectory 8 8 Installation Guide novdocx en 6 April 2007 ...
Page 132: ...132 Novell eDirectory 8 8 Installation Guide novdocx en 6 April 2007 ...
Page 136: ...136 Novell eDirectory 8 8 Installation Guide novdocx en 6 April 2007 ...


