NovaJet PRO 42e Quick Start Manual Download Page 20

NovaJet PROe Series

20    Quick Start

To perform color calibration:

1

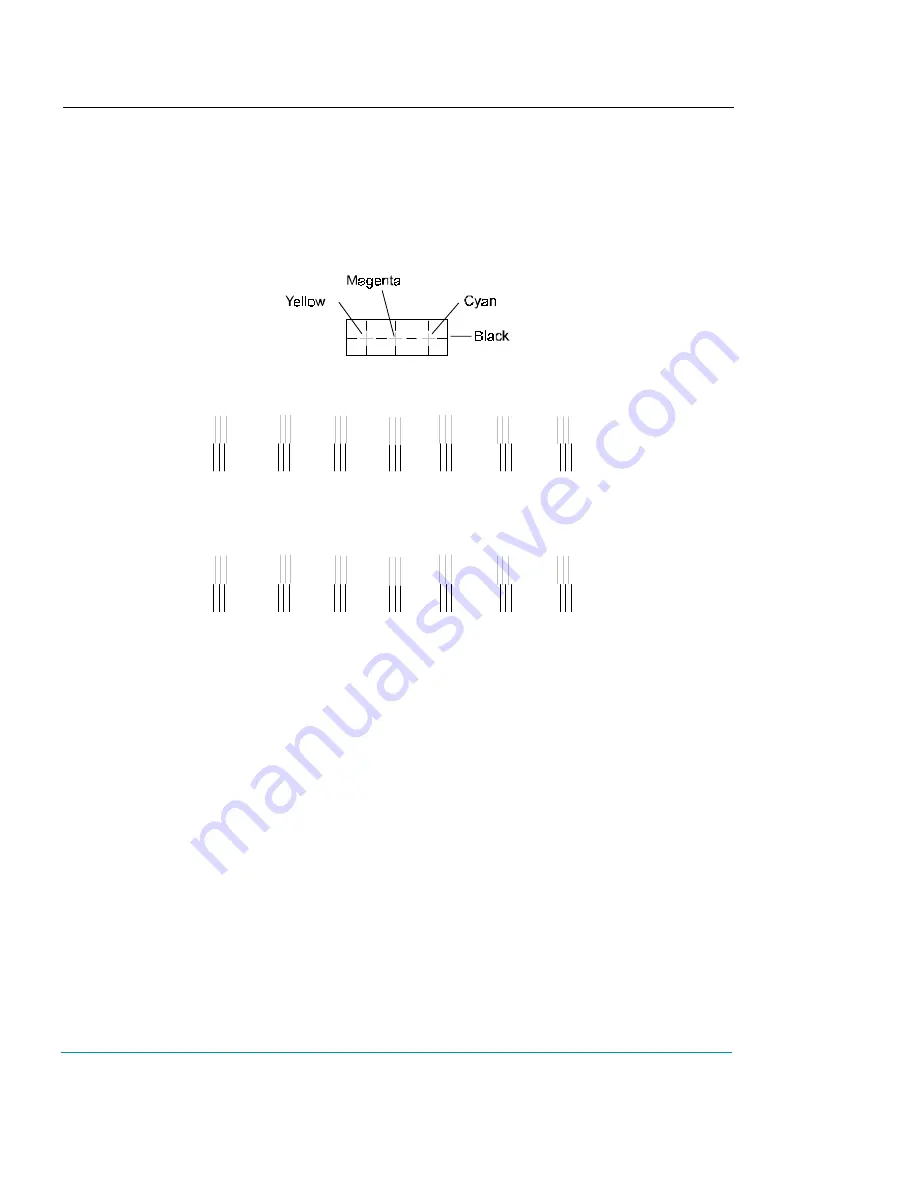
With paper loaded, press Utility/Color Calibration Menu/Calib Print Test.

The test patterns print as shown below.

Current heads test pattern

...   -3            -2          -1          0          1           2            3  ...

Horizontal head-to-head test pattern

...   -3            -2          -1          0          1           2            3  ...

Vertical head-to-head test pattern

2

Press Cyan Adjust - Vertical.

3

Examine the printout and enter the number that represents the best color
alignment for cyan-vertical.

4

Repeat for each color and for horizontal alignment as well.

Cartridge recognition

The PROe is designed to use only ENCAD PROe Series cartridges. To eliminate
potential damage to the printer, a Cartridge Recognition feature checks to ensure that
ENCAD PROe Series cartridges are installed, and that they are installed properly.
Cartridge recognition is performed when a print request is received (i.e., image data,
prime, etc.).

If the system detects a problem, the following error message is displayed on the
control panel: “Unrecognized Cartridge(s)” and the printer will beep three (3) times.

Summary of Contents for PRO 42e

Page 1: ...property of their respective owners No part of this manual may be copied or distributed transmitted transcribed stored in a retrieval system or translated in any human or computing language in any fo...

Page 2: ...rs 7 Using the control panel 9 Choosing menu functions 10 Setting the language 10 Loadingmedia 10 Moving the carriage 12 Installing the cutter 12 Priming the ink delivery lines 15 Priming the ink cart...

Page 3: ...oirs Accessories box which includes the following Quick Start Guide Users Guide on CD ROM 4 ink reservoirs 8 cartridge tube needles screwdriver stand screws loopback cable 2 spare PROe series ink cart...

Page 4: ...the leg and remove the tiewrap holding the connector in place Attach the connector to the connector on the bottom of the print head Orient the stand legs so that the roller brackets are facing the cen...

Page 5: ...e dryer connector into the receptacle on the right stand leg 8 Check to be sure that the media sensor is plugged in to the connector on the right stand leg You can swing the sensor mounting bracket aw...

Page 6: ...roller into the right support 10 Slide the media guide into the media core and secure it by tightening the locking mechanism If you moved the sensor mounting bracket before loading the roll media be...

Page 7: ...e Details on using the driver are included in the Docs folder on the CD ROM System Requirements Microsoft Windows 3 x Windows 95 or Windows NT v4 0 or higher Intel 80386 compatible computer or better...

Page 8: ...OK ForMacintosh System Requirements PowerPC class Macintosh computer 4MB RAM min 2MB hard disk space 1 With the CD ROM in the disk drive navigate to Drivers Macepu language and double click the Insta...

Page 9: ...ert the CD ROM into the disk drive 2 Navigate to Color Windows Disk1 3 Double click setup exe 4 The color management files are installed in C Windows System Color and have a file extension of lnk Usin...

Page 10: ...s and messages in English German French Italian Portuguese Spanish Japanese Chinese or Korean To change the language 1 Press Setup User Setup Language and select the language you want 2 Press OK Loadi...

Page 11: ...roll media 2 If you are going to use the takeup roll be sure that a media core is installed on it Attach the leading edge of the media to the takeup roll at the left right and center of the core Use a...

Page 12: ...injury Cutting media with a worn cutter can cause the media to jam and create a ragged cut line To install the cutter 1 Press Utility Access Cartridge button to move the cartridge carriage to the cent...

Page 13: ...cted to the same color fitting 5 Repeat for the remaining reservoirs then close the cover Filling and connecting the PROe series ink cartridges The printer is designed to use only ENCAD PROe series 10...

Page 14: ...ridges Note Before starting you may want to have paper towels handy and wear disposable gloves included in the accessory box Leave the blue tape over the jet area until you are ready to prime the jet...

Page 15: ...h of the four ink delivery lines to establish ink flow through the lines and ink cartridges The NovaPrime is provided for this purpose This procedure only needs to be done the first time you set up th...

Page 16: ...2 Insert the needle into the small hole on the NovaPrime 3 Press the button on the NovaPrime to activate the vacuum and draw ink through the line 4 When ink is visible in the NovaPrime sight tube remo...

Page 17: ...en the inkjet plate and the pump for an addi tional 5 seconds When removing the NovaPrime use the silicone tip to wipe and clean the jet plate Remember to clean the silicone tip of ink before moving t...

Page 18: ...long unat tended jobs During multi pass printing the printer will automatically compensate for jets found to be electrically damaged The only intervention needed is to verify that there are no clogge...

Page 19: ...before starting your job Aligning the ink cartridges Color calibration aligns the inkjets of the cartridges to each other Misalignment can result from small tolerance variations in cartridges during m...

Page 20: ...r alignment for cyan vertical 4 Repeat for each color and for horizontal alignment as well Cartridge recognition The PROe is designed to use only ENCAD PROe Series cartridges To eliminate potential da...

Page 21: ...Access Cartridges to move the carriage to the position which allows replacement of the ink cartridges 2 Verify that four ENCAD PROe Series cartridges are installed Replace any invalid cartridges 3 Pre...

Page 22: ...44 PHOTO SEMI GLOSS 7 MIL 42 X 100 208143 PHOTO SEMI GLOSS 4 MIL 60 X 100 208144 PHOTO SEMI GLOSS 4 MIL 42 X 100 208146 PREMIUM MATTE 60 X 100 208147 PREMIUM MATTE 42 X 100 208148 CLEAR FILM 60 X 100...

Reviews: