


Nokia RoofTop™ Wireless Router Installation Guide
30
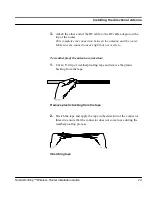
Installing the directional antenna
3.
Apply the tape tightly in a counter clockwise direction starting at least
2 inches from the connector.
Move along the cable towards the connector so the tape covers the
bottom of the antenna and the top of the connector without gaps and
with a layer of overlapping.
Covering the directional antenna connection with weatherproof tape
Summary of Contents for RoofTop R240
Page 6: ......
Page 9: ...Contents APPENDIX D Tool requirements 62 APPENDIX E D connector specifications 66 ...
Page 13: ...4 Nokia RoofTop Wireless Router Installation Guide ...
Page 25: ...16 Nokia RoofTop Wireless Router Installation Guide ...
Page 65: ...55 Nokia RoofTop Wireless Router Installation Guide ...
Page 69: ...59 Nokia RoofTop Wireless Router Installation Guide ...
Page 73: ...65 Nokia RoofTop Wireless Router Installation Guide ...
Page 75: ...67 Nokia RoofTop Wireless Router Installation Guide ...