


Nokia RoofTop™ Wireless Router Installation Guide
38
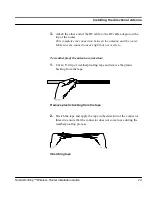
Connecting the multiwire cable
To connect the wires and install the NPU:
NOTE:
Do not push the pin connector down onto the pins inside the NPU
before all the wires have been punched down.
1.
Connect the wires into the pin connector slots according to the
following chart.
NOTE:
To punch down the wires, use the
Molex punchdown tool (see Appendix
C for details). Standard punc-down tools are too small for the NPU.
The numbering in the below diagram only indicates the order of pins in
the NPU.
N o t e : T h e b r o w n w i r e i s n o t c o n n e c t e d a n d i s c u t o f f
N P U W i r i n g
8
7
6
5
4
3
2
1
9
1 0
1 1
1 2
1 3
1 4
E T -
E R -
E R +
L D A
L D B
L D C
P N A +
P N A -
E T +
G N D
D C -
D C -
D C +
D C +
W h i t e / o r a n g e
O r a n g e
G r a y
W h i t e / g r a y
W h i t e / b r o w n
G r e e n
W h i t e / g r e e n
W h i t e / b l u e
B l u e
B l u e
R e d / b l u e
O r a n g e
R e d / o r a n g e
Summary of Contents for RoofTop R240
Page 6: ......
Page 9: ...Contents APPENDIX D Tool requirements 62 APPENDIX E D connector specifications 66 ...
Page 13: ...4 Nokia RoofTop Wireless Router Installation Guide ...
Page 25: ...16 Nokia RoofTop Wireless Router Installation Guide ...
Page 65: ...55 Nokia RoofTop Wireless Router Installation Guide ...
Page 69: ...59 Nokia RoofTop Wireless Router Installation Guide ...
Page 73: ...65 Nokia RoofTop Wireless Router Installation Guide ...
Page 75: ...67 Nokia RoofTop Wireless Router Installation Guide ...