


Nokia RoofTop™ Wireless Router Installation Guide
22
Installing the wireless router with an integral antenna
3.
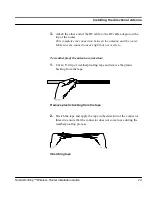
Plug the D-connector into the bottom of the wireless router. Guide the
connector very carefully onto the pins on the router. Using too much
force may damage the pins.
Before attaching the D-connector, make sure that the cover of the
wireless router is off. Attach the cover only after you have secured all
the connections on the router.
4.
Tighten the two screws on the sides of the connector and slide the
rubber sleeve over the connections to keep them dry.
Be careful not to overtighten the screws as you can damage the router
case.
Attach multiwire connection
Summary of Contents for RoofTop R240
Page 6: ......
Page 9: ...Contents APPENDIX D Tool requirements 62 APPENDIX E D connector specifications 66 ...
Page 13: ...4 Nokia RoofTop Wireless Router Installation Guide ...
Page 25: ...16 Nokia RoofTop Wireless Router Installation Guide ...
Page 65: ...55 Nokia RoofTop Wireless Router Installation Guide ...
Page 69: ...59 Nokia RoofTop Wireless Router Installation Guide ...
Page 73: ...65 Nokia RoofTop Wireless Router Installation Guide ...
Page 75: ...67 Nokia RoofTop Wireless Router Installation Guide ...