


4
Perform periodical inspection to check that the aforementioned storage procedures have been taken properly, and that the storing methods
are correct.
(1) Return the product to normal conditions from those taken for storage (such as for the amount of special oil).
(2) Since bearings may partially run out of grease resulting from the grease hardening during long-term storage, be sure to turn the motor
shaft by hand from the fan side before operation, and check that there are no problems.
(3) Since exposed parts of rubber and/or resin parts in the oil seal, O-ring, and oil gauge, etc., may become deteriorated due to environmental
influences, such as temperature, humidity, and/or ultraviolet rays, check those parts before resuming operation. If any deterioration is
found, replace with new ones.
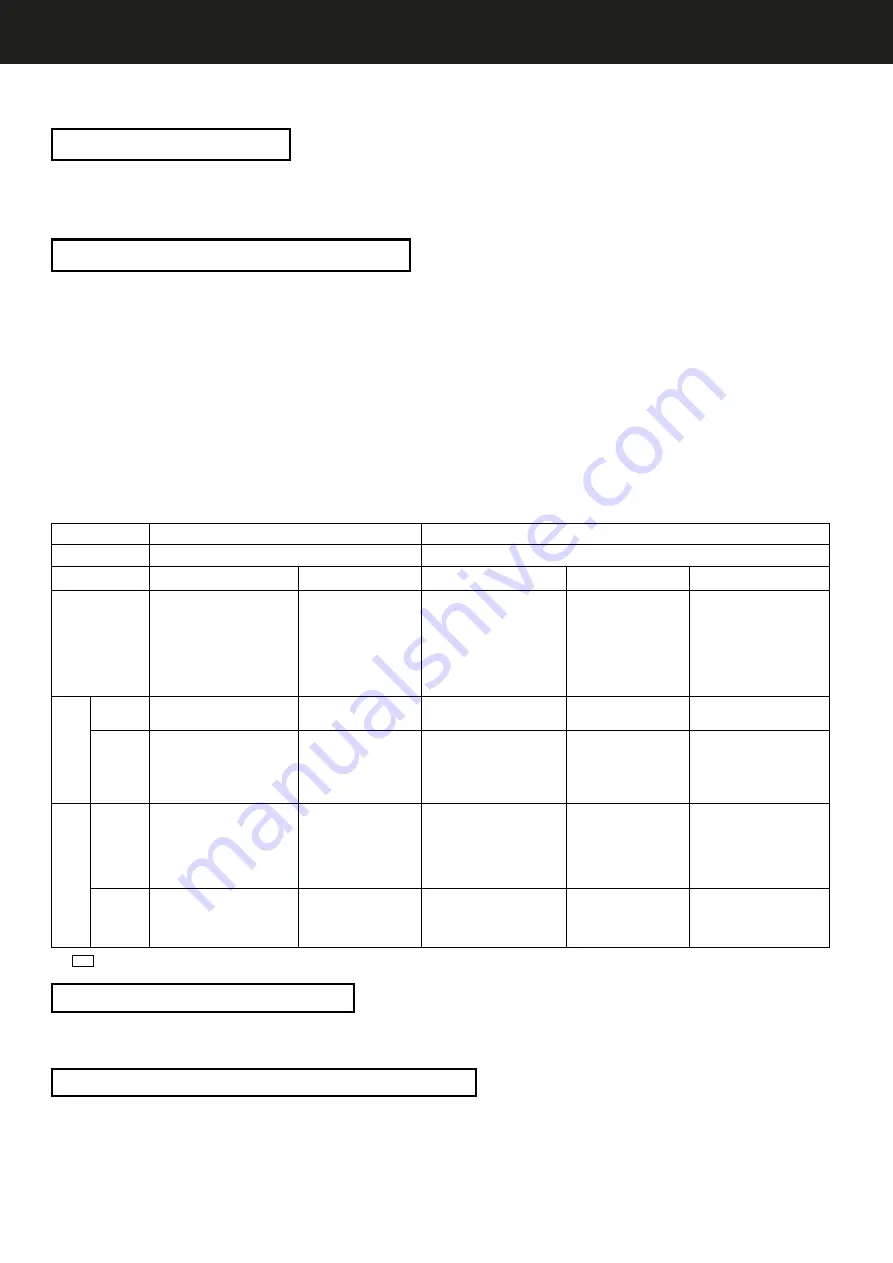
Rust-proofing interval
Within one year (our shipping standard)
Over one year to less than three years (our recommendation)
Instructions at ordering
No particular instructions are necessary
“Special rust-proofing specifications” need to be instructed
Rust-proofing area
Rust-proofing procedures at factory
shipping
Rust-proofing oil agent
Rust-proofing procedures at
factory shipping
Rust-proofing oil agent
Procedures after shipping
Exposed parts of the
product, input/output
shafts, and flange
section
Input/output shafts
After rinsing, wrap plastic tape
around.
Flange section
After rinsing, apply the rust-
proofing oil agent to it, and pack
the whole part with a plastic bag.
J
IS K2246 NP-2
Idemitsu Daphne Evercoat PL,
or equivalent
Input/output shafts
After rinsing, apply the rust-
proofing oil agent to them, and
wrap plastic tape around.
Flange section
After rinsing, apply the rust-
proofing oil agent to it, and pack
the whole part with a plastic bag.
Equivalent to JIS K2246 NP-19
Taiyu Sabiden SAP D-15K, or
equivalent
Check the condition of the rust-
proofing one year after shipping,
and re-apply the rust-proofing
oil, if necessary.
After that, carry out the same
procedure every year.
Inside
of the
product
Grease
Special grease supplied at shipping
-
Special grease supplied at shipping
-
No special procedures are
necessary
Oil
Special oil supplied at shipping
(The air breather has been sealed)
-
Add special oil thoroughly
inside the housing.
(The air breather has been sealed)
-
Take the same procedures as in
the left, two years after shipping.
When starting operation, replace
with new oil, and fill to the
specified level.
Supplied
oil
cooler
pump
unit
Water-cooled
system
Operate with special oil, and drain
oil at shipping.
(The air breather has been sealed)
Eliminate water from pipes
completely, dry, and seal the cooling
water openings.
-
Add special oil thoroughly inside
the unit.
(The air breather has been sealed)
Eliminate water from pipes
completely, dry, and seal the
cooling water openings.
-
Take the same procedures as in
the left, two years after shipping.
When starting operation, replace
with new oil.
Air-cooled
system
Operate with special oil, and drain
oil at shipping.
(The air breather has been sealed)
-
Add special oil thoroughly inside
the unit.
(The air breather has been sealed)
-
Take the same procedures as in
the left, two years after shipping.
When starting operation, replace
with new oil.
Storing Precautions
If you do not plan to use the product immediately after purchase, store it under the following precautions.
To store temporarily
To store for a long period of time
Inspection during storage
Inspection before resuming operation
(1) Store the product in a clean and dry place.
(2) If you store the product outdoors or in a humid place, put it in a box, seal the box, and cover with plastic sheets.
(3) When storing, attach a red rubber stopper into the air release plug, or set a plug stopper to prevent humidity from entering the product.
1) When storing the product in outdoor areas subject to a lot of rain and/or humidity after installing on the site
(1) Cover the whole product with a water-proof sheet, and fix the sheet securely to prevent it from coming off due to strong wind, as well as
to avoid entering rain and/or dust from clearance gap.
(2) If moisture is expected to evaporate from the ground, put the water-proof sheet underneath to prevent exposure to humidity from the
evaporation, filling inside the sheet.
(3) When storing, attach a red rubber plug into the air release plug, or set a plug stopper to prevent humidity from entering the product.
(4) Set the cover on the motor terminal box, and seal the lead wire openings to avoid humidity from entering through the terminal box to the
inside of the motor.
2) When storing the product indoors
When there is less humidity, cover the product with a plastic bag, etc., and follow the procedures described in (3) and (4) above.
3) When storing the product for a long period of time, over a year, special rust-proofing specifications are required in addition to the above
procedures.
4) Rust-proofing intervals and procedures
Note : Only when the export rust-proofing specifications or instructions are given, rust-proofing oil is applied to the input/output shafts even in less than one year.
Summary of Contents for RINDCODE NRX Series
Page 25: ......
Page 26: ......
Page 27: ......
Page 28: ...Address 1 Terada Kohtari Nagaokakyo city Kyoto 617 0833 Japan Phone 81 75 958 1298...


