background image

How to Customize Your Radio Presets

You can program up to 30 presets for the three radio bands: 12
stations can be set for the FM bands (6 for FM1 and 6 for FM2), 6
stations can be set for the AM band, and 12 stations can be set for
the SAT bands * (6 for SAT1 and 6 for SAT2).

* Only available if an optional satellite receiver and antenna are installed, and an XM

®

or

SIRIUS™ satellite radio service subscription is active.

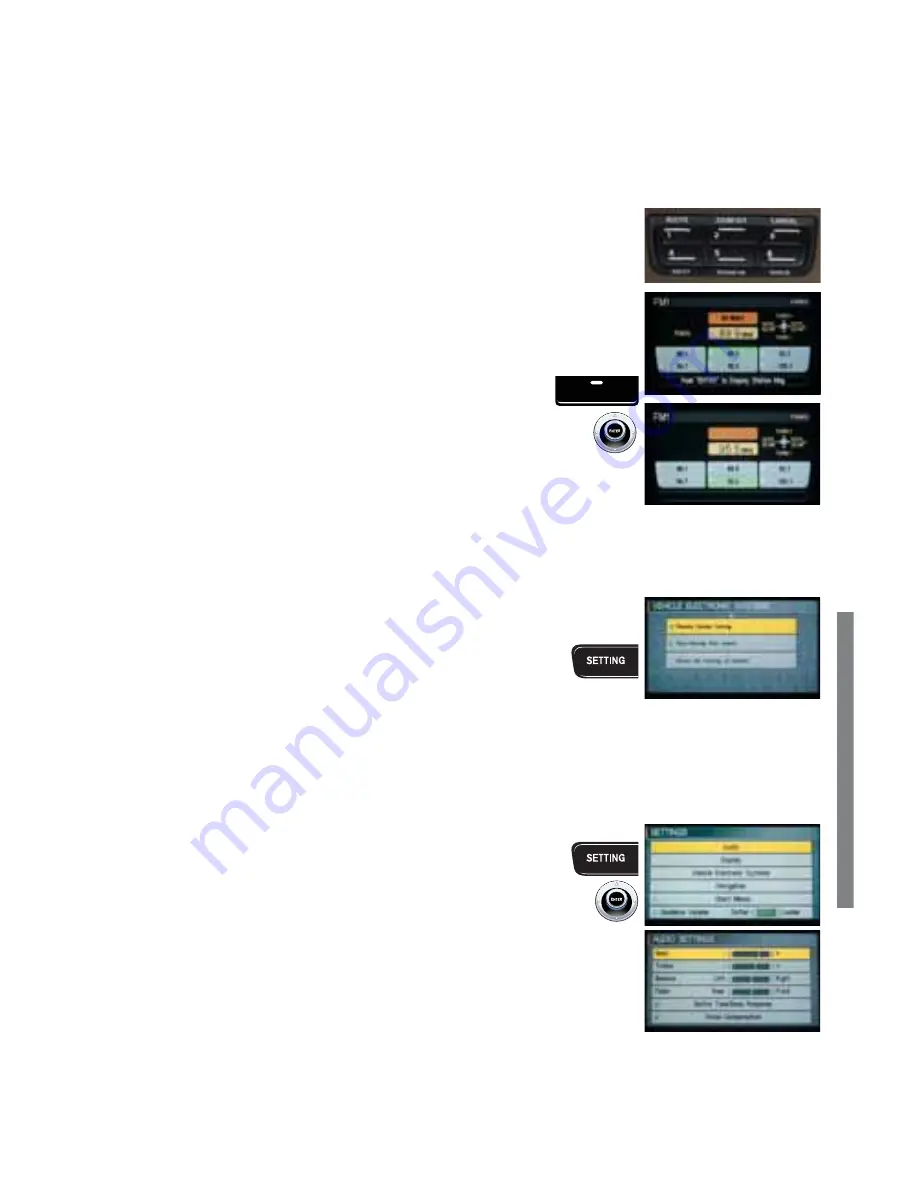
To Set the First 6 FM Band Stations:

1

Press the 

RADIO

button until “

FM1

” is seen on the

Audio display.

2

Tune to the desired FM station moving the joystick 

UP

or

DOWN

.

3

Press and hold the desired 

Multi-function Audio Control

button 

(1-6) until you hear a “beep” sound.

Note: A “beep” sound will be heard if Button Tone / Beep Response is turned 

ON

in

the 

SETTINGS/AUDIO

screen. See 

HOW TO CUSTOMIZE YOUR TONE SETTINGS

below for more details.

4

Repeat the two steps above to program the remaining 5 FM1 station memory buttons.

Note: Repeat all the above steps to program up to 30 stations for the remaining FM2, AM, SAT1 and SAT2 bands.

Presets Customized to Electronic Keys

A different group of Radio Presets can be “customized” to 

each

of

your Electronic Keys.

1

Press the 

SETTING

button.

2

Highlight 

Vehicle Electronic Systems

, then press ENTER.

3

Highlight 

Remote Custom Setting

.

4

Press ENTER to select 

ON

. The indicator light will illuminate 

ON

when Remote Custom

Setting is 

ON

.

When you program radio presets with Remote Custom Setting 

ON

, the presets are customized

to the Electronic Key in the ignition at that time. Do the same for Electronic Key #2.

How to Customize Your Tone Settings

1

Press the 

SETTING

button.

2

Highlight 

AUDIO

, then press ENTER.

3

Highlight each of the settings listed below and adjust the
levels 

UP

or 

DOWN

by moving the joystick 

LEFT

or 

RIGHT

:


Bass


Treble


Balance


Fader


Button Tone / Beep Response. Pressing ENTER when this
selection is highlighted will turn the Beep Response 

ON

or

OFF

. This is the beep response heard when programming Radio Presets, etc.


Bose AudioPilot ™ NOISE-COMPENSATION. To maintain the audio sound quality
and speech clarity (for Infiniti Voice Recognition), highlight 

Noise Compensation

,

then press ENTER. The indicator light will illuminate 

ON

.

4

Press the 

MAP

button to return to the Map screen.

media center

14

RADIO

Summary of Contents for Q 2006

Page 1: ...Q 06 Quick Reference Guide ision of ca Inc y 2006 0U0 CG...

Page 2: ...comfort and convenience However this guide is not intended as a substitute for your vehicle s Owner s Manual For comprehensive product and vehicle safety information please refer to your Owner s Manua...

Page 3: ...eed Sensing Comfort Heater and Air Conditioner Dual Zone Automatic Temperature Control Defroster Front and Rear Media Center Audio System Bose Controls Audio Steering Wheel How to Customize Radio Pres...

Page 4: ...button for more than 3 seconds and continue pressing until the windows are completely down Trunk Release Open In addition to using the Trunk Release Open button on the Electronic Key you can also rele...

Page 5: ...s The hazard indicators will flash once and the horn will chirp once to confirm the operation is complete To Deactivate Again press and hold down the LOCK and UNLOCK buttons together for at least 3 se...

Page 6: ...e ignition switch ON Keep the transmission in P PARK 2 Adjust the seat steering wheel and outside mirrors to the desired positions 3 Press the SET button The indicator lights on both Memory button 1 a...

Page 7: ...the ignition and turn to the ON position 2 Rotate the knob LEFT or RIGHT to select the driver side or passenger side mirror 3 Move the shift lever to R REVERSE Anti Glare Inside Rear View Mirror with...

Page 8: ...ver 5 Headlight Fog Light and Turn Signal Switch 6 Audio Steering Wheel Controls 7 Infiniti Voice Recognition System TALK Button 8 Steering Wheel Power Tilt Telescopic Knob 9 Windshield Wiper and Wash...

Page 9: ...senger s seat is occupied and the passenger meets the conditions outlined in the Owner s Manual the will not illuminate to indicate that the front passenger air bag is operational When the system dete...

Page 10: ...atic Headlights Off Delay To Activate the Autolight System Turn the headlight switch to the AUTO position To Deactivate the Autolight System Turn the headlight switch to the OFF or position Autolight...

Page 11: ...ed on the windshield by a sensor located near the inside rear view mirror The rain sensor sensitivity level can be adjusted by rotating the outer knob of the wiper lever FORWARD or BACKWARD Speed Sens...

Page 12: ...ode vs DUAL Mode Standard AUTO Mode allows the driver to control temperature for self and passenger DUAL Mode allows the driver and passenger to control their own cabin temperatures Press the 4 button...

Page 13: ...ng or AUTO PASS temperature control knob in DUAL setting to set the desired temperature The temperature of the cabin will be automatically maintained to the set temperature Air flow distribution and f...

Page 14: ...Press the Front Window Defroster button again to turn it OFF and return to the previous temperature control setting To Turn the Rear Defroster ON OFF 1 Press the Rear Window Defroster button to turn i...

Page 15: ...isplays CD functions 5 RADIO Button Activates and displays radio functions Press to switch between AM FM and SAT Bands The band sequence is AM FM1 FM2 SAT1 SAT2 Notes When a band is selected as noted...

Page 16: ...e than 1 5 seconds to rewind or fast forward through the tape To stop the rewind or fast forward press UP or DOWN again for more than 1 5 seconds For CD ONLY when more than one CD is in the player Pre...

Page 17: ...2 bands Presets Customized to Electronic Keys A different group of Radio Presets can be customized to each of your Electronic Keys 1 Press the SETTING button 2 Highlight Vehicle Electronic Systems the...

Page 18: ...fic and or weather reports In addition sometimes more detailed information called RADIO TEXT for FM stations and CATEGORY TEXT or just TEXT for SAT stations may be available for some data transmitting...

Page 19: ...the previous command say Go back or Correction To cancel a Bluetooth Voice Recognition session say Cancel or Quit or press the button To increase or decrease the volume of the voice prompts press the...

Page 20: ...When prompted say the phone number For example say five five five one two one two The system will repeat the phone number and prompt you for the next command 8 When you have finished entering the phon...

Page 21: ...niti Navigation System Owner s Manual System Operating Tips Close all windows Surrounding noises may interfere with system operation Operate the system when vehicle interior is relatively quiet Set th...

Page 22: ...REV Previous Button Press to return to previous function shown on the center Display Screen 11 Joystick ENTER Button Use to navigate UP DOWN and ACROSS the center Display Screen and select items 12 Ta...

Page 23: ...ddresses in Your Address Book 1 Press the SETTING button 2 Highlight Navigation then press ENTER 3 Highlight Edit Address Book then press ENTER 4 Highlight 1 HOME None location in the address book the...

Page 24: ...Volume then move the joystick LEFT or RIGHT 5 Press the MAP button to return to the Map screen Switching Map View You can switch between two Navigation Map views PLAN VIEW or BIRDVIEW Voice Recogniti...

Page 25: ...N when a route priority is chosen 10 Highlight OK and press ENTER to set the destination calculate the route and begin route guidance Programming a Destination Point of Interest POI 1 Press the DEST b...

Page 26: ...book Voice Recognition command Navigation Save Current Location OR 1 Press the SETTING button 2 Highlight Navigation then press ENTER 3 Highlight Save Current Location then press ENTER A confirmation...

Page 27: ...button A confirmation message will display on the screen asking Do you want to cancel the route guidance along with three screen choices All Destinations Waypoint 1 and Do not Cancel 2 Highlight All D...

Page 28: ...the right to make changes at any time without notice in prices colors materials equipment specifications and models and to discontinue models or equipment Availability and delivery time for particula...

Reviews: