background image

To use MyNextbase Player  to edit your recorded files, you need to ensure that the file you wish to edit is

currently playing in the Playback Window. You can do this by double clicking the file as it appears in the File
List window. When the file is playing, click on the ‘Edit’ button to begin the 6 step editing process.

1.   Join Videos (Optional)

     The first step allows you to join multiple videos together. Please note that the videos you join together
     must all be the same resolution. Your video will appear in the centre of the screen, with buttons on either
     side to add additional videos before or after the chosen video file. Clicking either of these buttons will
     open up the list of files in your library that can be added. Once added, these will appear next to your
     original video file.
     The order of the video files can be altered by clicking and dragging a video. To remove a video, hover
     over the chosen file and a ‘Remove Video’ option will appear. Click to remove this video.
     Once you are happy with the video(s) selected, click on the continue button to move to step 2.

2.  Trim Video

     Trimming the video allows you to shorten your selected clip to only include the incident or event that
     you are interested in. To the left of the Playback Timeline is a green marker, indicating the beginning of
     your video. To the right of the Playback Timelime is a red marker, indicating the end of your video. These
     can be dragged to a point on the Timeline of your choosing; when exporting, MyNextbase Player will
     create a single video file from the footage located between the markers. The white marker indicates your
     current playback position.

3.   Annotate Video (Optional)

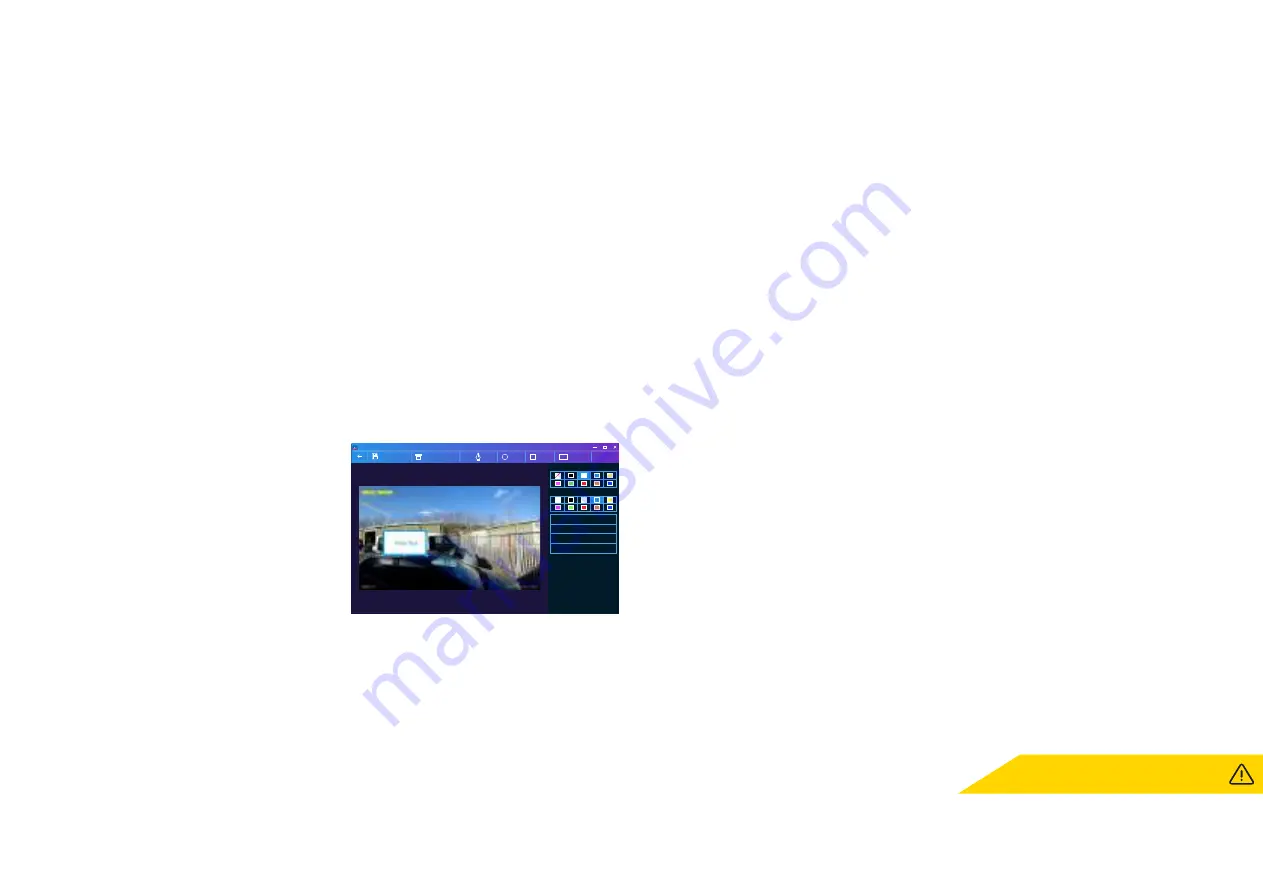
     During the video there may be an object or incident
     that you wish to highlight, annotating you video will
     allow you to do this. When you annotate a frame,
     your video will pause at the specified frame and
     display any annotations that you have added.
     The video will resume after 4 seconds.

     To begin adding annotations, find the frame you
     wish to annotate (using the white marker, and
     left/right arrows to scroll through frames), and click
     on the ‘

Add Annotation

’ button to open the annotation

     screen. Along the top of the annotation screen you will see the annotation tools; Draw, Circle, Square,
     Rectangle, and Text. Clicking any of these options will add an editable annotation to that frame.
     This shape/text can be moved, resized, and rotated using the handles on the sides and corners of the
     selected annotation. 

     When you have finished your annotation, click ‘

Save and Close

’ to return to the Add Annotation screen,

     where more annotations can be added. When you have finished adding annotations, press ‘

Continue

     to proceed.

4.   Add Title Screen (Optional)

     Add a title screen to your video. The title will be displayed for 4 seconds at the start of your video. To add
     a title, click inside the white rectangle and type the desired title. Press ‘

Continue

’ to proceed.

5.   Output Settings (Optional)

     The final step in the editing process allows you to specify the quality of your video file and the data
     included.

     The Video Resolution determines the quality of the video footage; by default the Video Resolution will
     be set to output at the same quality as the original files. Lowering the Video Resolution will produce
     lower resolution files but will also reduce the size of the file and lower the time it takes to produce the file.
     Stamps for GPS, number plate, and time can also be removed, as well as the audio and GPS data from
     the video by ticking the corresponding box. Once the data has been removed it cannot be added back
     into the edited video. This will not affect the original file.

     Lastly, you can specify the name of the file being created and the location that you would like it saved.
     When you have chosen your output settings click on the ‘

Confirm

’ button and MyNextbase Player will

     begin processing your video.

6.   Process Video

     During step 6, MyNextbase Player will process your video clip(s) and edits, and produce a single file in
     the location specified. This can take some time and will depend on the number and length of video files
     being joined and video resolution. Once the video has been processed, it will be added to your
     MyNextbase Player file list.

Video Sharing

Videos can be shared to social media and insurers through the ‘

Share Video

’ button. When a destination

is selected (i.e Facebook), the target web page will open in your default browser. You will then be asked
to sign into your account, and once you are logged in, the browser will close and a pop up will show
your upload’s progress. When the file is finished uploading you will see an option to view your uploaded
file. Videos can also be upload to the Nextbase  server; you will be e-mailed a secure link to view or

download your video. This link can be sent to your insurer, without the need to  transfer a large video file.
Videos will be  automatically deleted 30 days after upload.

More Features

When a video is being played back in the Playback Window, press ‘

Crtl + i

’ to open a window displaying

all of the metadata for that video including information such as: file name and size, resolution and frame
rate, max and average speeds, GPS information, and more.

38

Some functions, such as GPS data, are available
only on select models.

MyNextbase Player - Editing Videos

Annotation window

MyNextbase Player

Bring to Front

Fill Colour

Text

Bring Forwards

Bring Backwards

Send to Back

Abc

Rectangle

Square

Circle

Draw

Delete Annotation

Save and Close

Stroke Colour

Summary of Contents for 622GW

Page 1: ...User Manual...

Page 2: ...1 Tips for capturing best video footage 1 1 Position the Dash Cam in the centre of the windscreen and ideally behind the rear view mirror so it is not a distraction to the driver 1 2 Ensure that the a...

Page 3: ...SOFTWARE DASH CAM RANGE FUNCTIONS 29 30 31 32 33 34 35 36 37 38 39 40 41 42 43 44 45 46 47 48 49 50 51 02 03 04 05 06 07 08 09 10 11 12 13 14 17 18 19 20 21 22 23 24 25 26 27 28 INTRODUCTION TO USING...

Page 4: ...with a soft dry cloth for tough dirt apply some neutral detergent diluted in 5 to 6 parts water to a soft cloth Please note that alcohol thinner benzene etc could cause damage to the paint or coating...

Page 5: ...When installing the device in a vehicle do not place the device where it obstructs the driver s view of the road or interferes with vehicle operating controls such as the steering wheel foot pedals or...

Page 6: ...forming the relevant authorities of who controls the data For use in a commercial environment in non UK countries please refer and adhere to local regulations and requirements For non UK operation spe...

Page 7: ...outlet on a circuit di erent from that to which the receiver is connected Consult the dealer or an experienced radio TV technician for help This appliance and its antenna must not be co located or op...

Page 8: ...Shenzhen Co Ltd Address 1 F Fukangtai Building West Baima Rd Songgang Street Baoan District Shenzhen Guangdong People s Republic of China 518105 Contact Name Philo Zhong Tel 86 755 8355 1033 802 Email...

Page 9: ...e a Nextbase branded SD card 8GB MicroSD 20 minutes of recording 16GB MicroSD 45 minutes of recording 32GB MicroSD 90 minutes of recording 64GB MicroSD 180 minutes of recording 128GB MicroSD 360 minut...

Page 10: ...eck the contents of your Nextbase Dash Cam product Cable Tidy Tool Your Dash Cam to record the road ahead Charge your Dash Cam in car using the Car Power Cable Connect your Dash Cam to a PC Quickly ge...

Page 11: ...rding stopping the le from being over written This can also be performed manually by pressing the protect button Individual les can also be protected when viewed within playback mode Inbuilt GPS and w...

Page 12: ...t and 30 seconds after is written to the Protected folder Screen 3 Inch High Resolution Screen Tap the centre of the screen to take a photo This applies while recording and while in video mode If a Re...

Page 13: ...s to force a hard restart of the Dash Cam 8 9 10 Power Button Press and hold for 2 seconds to turn the Dash Cam On Off Short press acts as a back button when in the Menus MicroSD Card Slot Insert the...

Page 14: ...dust cover from the Dash Cam Remove the dust cover that is located on the front of the Dash Cam to gain access to the mounting point To remove the dust cover lift the cover away from the body of the...

Page 15: ...t available for Phone Sat Nav charging The Nextbase Hardwire Kit includes the necessary 12 24Vdc to 5Vdc convertor and battery protection circuitry See page 9 10 of the Nextbase Accessories Manual for...

Page 16: ...Ensure that the Dash Cam is horizontal and faces straight out of the windscreen Ensure that objects on the Dash Cam display appear level and adjust as required 8 Attach the Dash Cam to the windscreen...

Page 17: ...equired Ensure that the road ahead is at the centre of the image in the central third of the display If too much of the sky is visible it may risk underexposing details on the road ensure that the roa...

Page 18: ...accessories can be purchased for your Nextbase Dash Cam including a rear window camera Dual USB charger and a rear facing camera Some of these products can effect where you should position your camera...

Page 19: ...ace a piece of plain white paper 2 on your dashboard 3 under the rear view mirror With your camera turned ON you will see the reflection 4 of the paper in the LCD screen of the Dash Cam Look at the re...

Page 20: ...f necessary clean with a warm clean cloth Ensure that the Mount and Dash Cam do not obstruct the driver s view Removing Adhesive Residue If you wish to remove the adhesive mount from your windscreen u...

Page 21: ...e has been a Firmware Update applied to the Dash Cam and Keep User Settings has been set to OFF If It is set to ON your Dash Cam will start normally with your settings intact 3 After the Dash Cam s se...

Page 22: ...Select a Location to designate your Time Zone Selecting Other allows you to choose a Time Zone manually EUR UK Ireland Belgium Denmark Finland France Germany USA Eastern Central Mountain Pacific Alask...

Page 23: ...the QR Code on iOS use your camera for Android users download a QR Scanner from the Play Store or search MyNextbase Connect on the appropriate app store Once the app is succesfully installed press OK...

Page 24: ...is set to Maximum Audio Turn On Off the microphone for video recording Options On and Off Default On Menus Press the Menu button top left of the Dash Cam display to enter the Dash Cam s menu system 1...

Page 25: ...Off Default On GPS Stamp Turn On Off the location data stamp shown on recorded files Options On and Off Default On Model Stamp Turn On Off the Dash Cam model stamp shown on recorded files Options On a...

Page 26: ...Default Off Alerts Turn On Off the ascending descending beeps that sound when a recording starts stops the tone when there is an SD Card error and the chime that sounds when a file is protected Optio...

Page 27: ...her details about what3words Turning what3words Off will hide the button that appears on your Dash Cam s Live View Screen Options On and Off Default On 31 32 33 Driver Assistance Keep User Settings Tu...

Page 28: ...app to begin monitoring key sensors in your smartphone such as GPS accelerometers and the pedometer The camera and app will notify you that it has begun monitoring your smartphone s sensors with on sc...

Page 29: ...ment Emergency Services call user s registered phone number Emergency Responders sent to user s location User Does Not Answer user is assumed to be unconscious unable to answer User Answers Talk with...

Page 30: ...nd tell the operator that the crash detection feature sent an alert and that you missed the call back Can I set it off inadvertently What happens if I receive a call and don t need an ambulance In the...

Page 31: ...n your Live View screen as shown in the image left Status Select to turn Alexa Voice Control ON and OFF Setup Phone You will be prompted to download the Alexa app using one of the two QR codes above P...

Page 32: ...l save 2 photos one from the Front Facing camera and one from the Rear Facing camera Folder Selection Screen When you select Playback Mode you will have a choice of viewing your protected videos your...

Page 33: ...used press to edit the video See next page for more details 3 4 5 6 7 8 9 33 3 6 1 7 4 2 8 Preview Mode Pause Press to pause the video playback Fast Forward Press during playback to scroll through x2...

Page 34: ...icator End point of your new file Timeline and Position Indicator White Shows your current position in the recording When you reach the point where you want to start your new file press Trim Start 1a...

Page 35: ...a file is protected a red padlock icon will appear in the top left of the screen You cannot protect or unprotect a video during playback When a file is protected unprotected it will remain in its orig...

Page 36: ...afety Portal Upload a video of an incident directly to police services across the UK Home Button Select to return to your home screen Dash Cam See videos that are stored on your connected Dash Cam Eme...

Page 37: ...ostics register your Dash Cam contact us and about Playback Window Displays Dash Cam videos playing in MyNextbase Player Map Displays your journey if the video playing has GPS data Zoom Use to zoom in...

Page 38: ...notations press Continue to proceed 4 Add Title Screen Optional Add a title screen to your video The title will be displayed for 4 seconds at the start of your video To add a title click inside the wh...

Page 39: ...se Secure Server is a free online video sharing service for owners of Nextbase Dash Cams Once your video has nished uploading you will be e mailed a secure link to watch your video online or download...

Page 40: ...in App to sign in to Alexa using Amazon login You must accept all permissions to for Alexa to work Once your Dash Cam is successfully paired with the Alexa app on your smart phone you can begin using...

Page 41: ...rvice taxi or friend When the Dash Cam is in Video Mode either recording or not recording and your vehicle is parked and at a standstill press the what3words button to the right of the Dash Cam screen...

Page 42: ...e SD card when in Access Files mode is not possible Access Files Mac When this option is selected the Dash Cam will function as a card reader for your MAC The Nextbase external USB disk icon will appe...

Page 43: ...ork on a Mac Connect your Dash Cam to PC via USB select Firmware Update and open up MyNextbase Player available to download for free from nextbase com Select Update Dash Cam A pop up will appear on yo...

Page 44: ...The screen on the Dash Cam will be blank as the video image is now being sent to the external device the red power LED on the Dash Cam will be lit indicating the unit is turned on You can then proceed...

Page 45: ...base SD card All our Dash Cams are tested using Nextbase branded SD cards therefore we cannot attest to the compatibility of other manufacturer s products For best results we always recommend using Ne...

Page 46: ...ack The Codecs upon your PC may not be compatible or the latest standard Download the latest Codecs from www nextbase com Video has no sound Ensure that Audio setting is turned ON within the Video Men...

Page 47: ...to your PC and delete unnecessary files or Format the SD card from within the Dash Cam setup menu When connected to a TV monitor via HDMI cable there is no image on the TV monitor The Dash Cam is not...

Page 48: ...ances where you sell or transfer the relevant device to another person please see below for more details a limited license to use the software embedded in this device the Software in binary executable...

Page 49: ...In no event shall Nextbase be liable in a claim for breach of warranty for any incidental special indirect or consequential damages whether resulting from the use misuse or inability to use this produ...

Page 50: ...es and Software MyNextbase Cloud MyNextbase Connect MyNextbase Player Dash Cams Eyes on the Road Nextbase offers a wide range of Dash Cams to best suit your driving needs Rear View Cameras Ready for t...

Page 51: ...Emergency Response Parking Mode Alexa Built in 622GW 4K 30 FPS 1440P 30 FPS 1440P 30 FPS Alexa Built in Alexa Built in Alexa Built in 1080P 60 FPS 1080P 30 FPS 720P 30 FPS Yes Front 4K 1440p 1080p Re...

Page 52: ...NBDVR622GW ENG R1...

Reviews: