


8
Pack Description Quantity
AA
5/32-in. x 10-mm Truss Head Screw 26 pcs.
BB
5/32-in. Locking Washer
26 pcs.
CC
1/4-in. x 15-mm Truss Head Screw
47 pcs.
DD
1/4-in. Locking Washer
47 pcs.
EE
5/32-in. x 15-mm Ladder Bolt
1 pc.
FF
Lighting Rod
1 pc.
GG
Battery / AAA
1 pc.
HH
1/4-in. Washer
3 pcs.
Before beginning assembly, make sure all parts are present. Compare parts with package contents list
and diagram above. If any part is missing or damaged, do not attempt to assemble, the product. Contact
customer service for replacement parts.
•
Estimated Assembly Time: 50 minutes
•
Tools Required for Assembly:
Phillips Screwdriver (not included) and Wrench (not included)
•
Note: The right and left sides of the grill are designated as if you are facing the front of the grill.
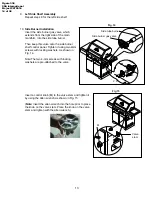
1.
Caster Assembly
Mount the casters onto the bottom panel (B) using sixteen
1/4-in. x 15-mm truss head screws (CC) and sixteen 1/4-in.
locking washers (DD).
The swivel caster
with brake
(K) should be positioned
under the left rear of the cart bottom and the swivel caster(J)
should be positioned under left front as shown in Fig. 1.
The two stationary casters (L) should be positioned under
the right side.
NOTE:
Turn over the bottom panel for assembling casters.
2.
Side Panel Assembly
Use three 1/4-in. x 15-mm truss head screws (CC)
and three 1/4-in. locking washers (DD) to connect
the bottom of the left side panel to the bottom panel
(B). Make the left side panel (F) flush with the rear
of bottom panel and tighten the screws.
Repeat for the right side panel (G).
HARDWARE CONTENTS
PREPARATION
ASSEMBLY INSTRUCTIONS
Fig. 1
K
Fig. 2
F
B
G
B
J
16x
6 X
L
AA
BB
CC
DD
EE
FF
GG
HH
Phillips Screwsdriver
Wrench
Figure 338
CSA International
Project 2075516
9 of 38


