


NVS User’s Manual
25
If users are using
a dynamic IP address and wish to synchronize the IP to a
static domain name, enter DDNS Setup menu and enable DDNS function.
Then enter a preferred host name and DDNS port, select <Yes> next to
<Submit/Next>, and click <Apply>. Alternatively, users can also select <Yes>
next to <ezDDNS> and click <Apply> to ask the NVS to auto determine host
name for users. Once the setting is completed, the DDNS address will be like:
http://hostname.ddns.iview-ddns.com
. For example, if the host name is “NVS”,
the address will be:
http://NVS.ddns.iview-ddns.com
.
If the NVS enabled the UPnP function, the NVS can be found in an UPnP
enabled PC’s <
My Network Places
>
folder, when the PC is in the same LAN.
Then the PC can simply connect to the NVS via clicking the NVS icon. In
addition, select <Yes> for the UPnP NAT traversal function and the NVS will
take care of router setting if the NVS connects to the internet via a router.
4.7.2
Camera Setup
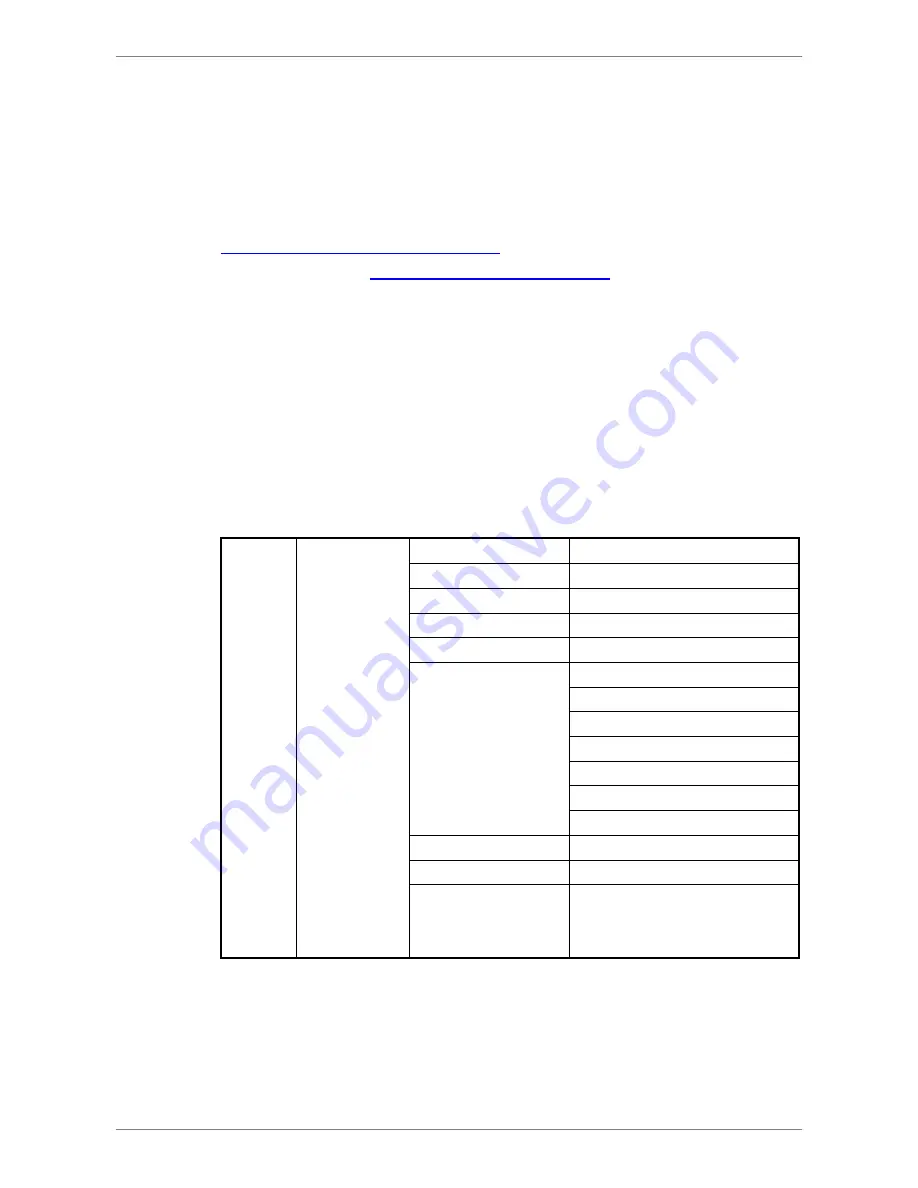
Under Camera Setup menu, the menu items are listed as below:
Camera
Setup
CH1 ~ CH8
IP Camera Name
-
IP Camera Hidden
-
Device Search
-
Hostname/IP -
Model -
Connection Setup
Account
Password
Management Port
Main Stream Setup
Dual Stream Setup
IP Dome Protocol
IP Dome ID
Device Setup
-
Activated -
Status
Model/ Streaming Format/
Resolution/ PPS/
Bandwidth/ Pkg. lost rate
The NVS connects cameras via plug and play, so the setting should be all set
once cameras are connected. The Camera Setup menu allows users to see
each camera’s setting details. First, select a channel and refer to below for
details of each menu item.


