background image

20 


Police post 


“Police post” 

User area 


"User area is ahead" 


15.  Setting mode 

15.1. How to enter into the SET mode 

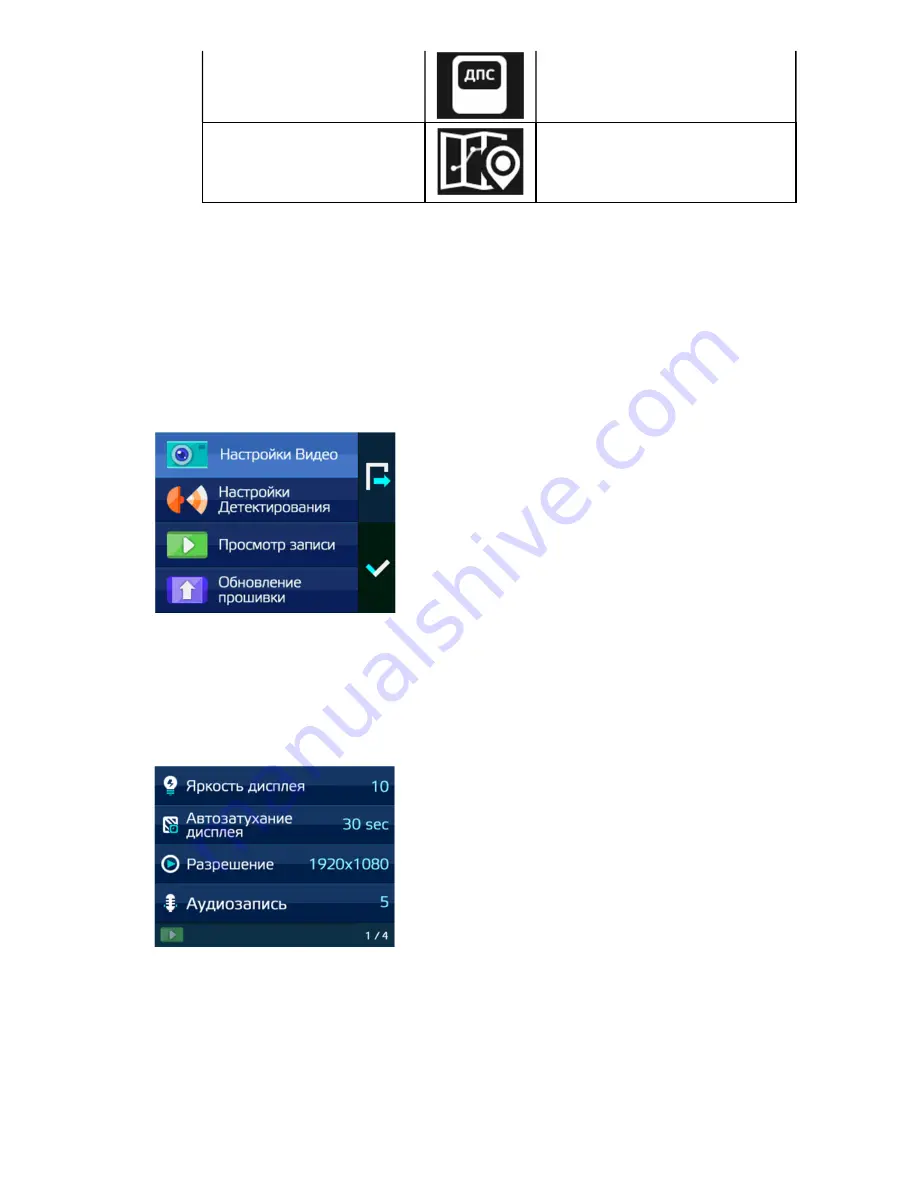
Press “Menu” button shortly at power On condition and it enters into the Setting mode. 

At setting mode, settings for Video / Detection / Play / Firmware update are available. 

The following is the initial screen of setting mode. 


If you want to get out of the setting mode without saving the settings, please press Menu (Exit) button. 


15.2. Video Settings 

  Select button – choose the sub settings 

  Up, Down button – move between the settings 

  Menu button – back to the main menu 

Summary of Contents for X-COP 9100

Page 1: ...inch IPS LCD helps user to see the video easily and the Radar and GPS alert screen effectively The GPS Glonass module is equipped so that it catches the fixed and moving speed cameras in addition to...

Page 2: ...fined 8 13 Radar alert 18 14 GPS alert 19 15 Setting mode 181 16 X COP Player 30 Features Full HD Car Black box with Radar Laser detection and GPS Glonass Alert 2 0 inch IPS LCD display Blue LED indic...

Page 3: ...ius setting for GPS POI alerting GPS POI Detection distance setting Legal Over speeding setting Maximum over speed Support PC Viewer Detectable X K Ka Laser Strelka Undetectable by VG 2 12V 24V usabil...

Page 4: ...Ultra X and Ultra K Band X Band 10 525GHz 50MHz K Band 24 150GHz 100MHz KA Band 34 70GHz 1300MHz Laser Band 800nm 1100nm Strelka detection with signal strength level indication 24 150 GHZ 3 GPS specif...

Page 5: ...the packaging X COP 9100 unit Wind shield mounting holder with suction cup Optional Wind shield mounting Power holder with 3M Tape Cigarette power cord DC12V 24V All times power cable DC12V 24V Option...

Page 6: ...dshield and then connect the unit At this moment the camera lens must be directed to the front at horizontal position 1 2 2 Power holder with 3M Tape Attach the 3M tape side of the holder to windshiel...

Page 7: ...cord clips to fix the cable during installation 2 2 All times power cable Connect the cable to the fuse box as like the following picture How to connect it to fuse box is as follows Connect the BATT...

Page 8: ...n they are operated as volume Up and Down 1 2 2 Press these buttons shortly at the Menu they are operated as move buttons 1 2 3 Press and hold Up Down button for two seconds at the Menu it moves the n...

Page 9: ...will be captured This captured screen will be stored at the Event folder of SD card and the image resolution is 1920 1080 pixels 1 5 RESET Button X COP 9100 uses a battery so that there may be a case...

Page 10: ...No Speed display It shows the current car speed No GPS status It shows the GPS connection disconnection status GPS Connection GPS Disconnection 3 1 No Time It shows the current time 3 2 No City Highw...

Page 11: ...s and display the battery charge level 3 3 1 Recording status During recording the icon is blinking Blinking At no recording status the icon is not blinking If there is no SD Card the icon is not indi...

Page 12: ...ll be added When car is within silence zone press menu button and the pop up message will be appeared And then press select button Yes and the silence zone will be deleted If car is within silence zon...

Page 13: ...tting time If Car does not move for the setting time it enters into the parking mode If Car moves it gets out of the parking mode In case of Parking mode entrance time 0ff it does not enter into the p...

Page 14: ...n and mute on off function is operated In Mute On there is no voice alert and beep sound and automatically Mute Off in 4 seconds after finishing the alert 7 Auto mute At Auto mute On the volume level...

Page 15: ...BlackBox The name of the firmware file must start with X COP 9100 and the file format must be Bin For example X COP9100 RevM23 bin If the file name and format are not correct the upgrade is not availa...

Page 16: ...for Firmware upgrade and the upgrade starts If there is no firmware file text will be shown on the screen The power of X COP 9100 will be Off and then On automatically once the Firmware upgrade is com...

Page 17: ...t display is as follows 13 1 Band identification The following each radar band is displayed when any of radar band is detected X Band K Band KA Band Strelka Laser 13 2 Signal strength meter The receiv...

Page 18: ...d control 13 3 2 Voice message for Strelka alertS Radar Strelka 14 GPS alert The kinds of POI are as follows Fixed camera Redlight camera Redlight speed camera Speed camera Police post Speed restricti...

Page 19: ...it passes through the Camera start point Distance display Blinking averaging speed 14 2 3 The voice messages and Displays for various types of POI are as follows Km means the announcement of speed lim...

Page 20: ...Setting mode At setting mode settings for Video Detection Play Firmware update are available The following is the initial screen of setting mode If you want to get out of the setting mode without savi...

Page 21: ...rding Setting the Audio recording On or Off Setting value On Off 15 2 5 Video quality Setting the quality of recording video Setting value Super Fine Fine Nomal 15 2 6 Sharpness Setting the sharpness...

Page 22: ...ngine is off it enters into the parking mode immediately Setting value Off On 1min 5min 10min 15min 20min 25min 30min 15 2 14 Recording time Driving Setting time for recording video file at the drivin...

Page 23: ...ed stamp Setting On the Speed will be indicated on the recording screen Setting Off there is no indication 15 2 21 Speed stamp under 100Km h If this setting is On there will be no speed indication on...

Page 24: ...2 25 Factory set It initializes the setting value of Video settings Detection settings Initialized each setting values are as follows X COP Mode Volume Level 7 LCD brightness 10 LCD backlight time 1 m...

Page 25: ...rm On GPS Priority On Radius of silence zone 200m Radius of User Area 600m Legal overspeeding 0 Maximum Speed Setting Off POI detection distance by setting Set by DB X Band Off K Band On Ka Band Off L...

Page 26: ...t Radar GPS voice alert Setting value On Off 15 3 4 Beep Beep On Radar GPS beep alert is heard Beep Off No Radar GSP beep alert is heard Setting value On Off 15 3 5 GPS alarm Setting value On Off 15 3...

Page 27: ...is getting lower than set value Setting Values OFF 80Km 90Km 100Km 150Km 15 3 13 GPS POI detection distance setting GPS POI detection distance can be adjusted by setting range When distance is set by...

Page 28: ...by this PLAY function Select PLAY icon at the Menu and the following screen will be appeared Select Event and you can see the videos of Event Select Driving and you can see the normal recorded videos...

Page 29: ...is locked Do you want to delete Yes or No If user choose Yes the following message would be shown again Delete this file Yes or No 17 4 3 limitation of Locked files For the operating stability of the...

Page 30: ...r program and can change the setting value as well 16 1 X COP Player installation 16 1 1 Install the file X COP Player exe after downloading it from web 16 1 2 Run X COP Player exe file 20 1 2 1 Selec...

Page 31: ...31...

Page 32: ...32 16 2 X COP Player screen Please click the X COP Player ICON at the basic screen for the program start The basic screen of PC Player is as follows X COP Player s each screen is as follows...

Page 33: ...nd Volume Indicating Speed Indicating the location of the current play on the map Showing the recorded file list For Print Capture and Setting function Refer to No 17 Screen setting for Setting functi...

Page 34: ...34 The end...

Reviews: