


TABLE OF CONTENTS
SYMBOL EXPLANATION
2
SAFETY INSTRUCTIONS
2
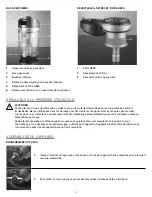
APPLIANCE AND ACCESSORY OVERVIEW
4
BEFORE INITIAL USE
5
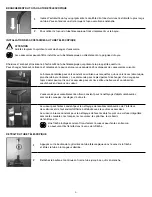
ASSEMBLING THE APPLIANCE
5
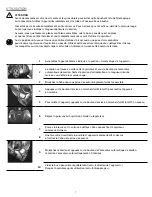
USE
7
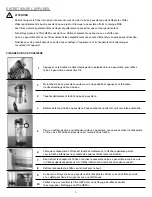
CLEANING THE APPLIANCE
8
STORAGE 10
TROUBLESHOOTING 11
TECHNICAL DATA
11
DISPOSAL 11
ONE-YEAR LIMITED WARRANTY
12
SYMBOL EXPLANATION
All safety instructions are marked with this symbol. Read these instructions carefully and follow them to avoid injuries
or damage to property.
Tips and recommendations are marked with this symbol.
SAFETY INSTRUCTIONS
INTENDED USE
• This appliance is designed for vacuum cleaning household dust.
• Never use the appliance for vacuuming the following:
liquid or wet substances; embers, lit cigarette butts, matches, etc.; hot, flammable or explosive materials; pointed objects,
stones, coins or small metal objects.
• Vacuuming these substances could cause damage to the appliance or personal injuries: glowing ash or other hot material
could cause the filter to catch fire, liquids could cause a short-circuit, very fine dust may clog up the filters and sharp pointed
objects may damage the filters.
• This vacuum cleaner is for personal use only and is not intended for commercial use.
• It must only be used as described in this guide. Any other use is prohibited and would void the warranty.
RISK OF INJURY
• Keep fingers, hair, loose clothes and face away from the tube when the vacuum cleaner is on.
• Pay close attention when the vacuum cleaner is used in the presence of children.
• Use caution when vacuuming stairs.
• Keep the cord at a distance to avoid tripping.
2


