9
8.2. Assembly with outward opening window
A. Mark the centre line of the frame in pencil on both moveable and fixed parts (Fig. 1).
B. Place the motor support bracket along the edge of the fixed part of the frame in line
with the centre line marked out previously and mark the positions for the four holes
for the fixing screws (Fig. 2).
C. Drill holes into the frame and screw in the motor support bracket, making sure that
all screws are fitted tightly (Fig. 3 and 3bis).
D. Line up the front bracket along the centre line on the moveable part of the frame and
mark out the three holes required for the screws (Fig. 4).
E. Drill the holes and screw in the front bracket, making sure that all screws are fitted
tightly (Fig. 5 and 5bis).
F. Assemble the clamp screws onto the motor support bracket and screw in lightly.
G. Insert the dove-tailed section of the actuator into the clamp screws. Make sure the
shaped part of the base fits neatly into the slot to ensure the actuator runs smoothly
along its axis.
H. Now position the actuator so the eyebolt head is inserted into the front bracket
support. Insert the M6x25 screw into the bracket and into the eyebolt and tighten the
self-locking bolt with two 10 spanners.
I. Manually move the actuator along its axis to close the frame and make it weather
tight. Tighten the clamp screws previously only placed and set the actuator in line
with the frame. Suggested tightening torque is 5÷7 Nm.
J. Plug the actuator in and carry out a test to check opening and closure of the frame.
Make sure the frame closes fully and is weather tight. The limit switch for the
actuator is automatic on reentry.
K. The equipment will exert a pressure to guarantee even the largest of frames is
completely weather tight.
8.3. Assembly for cupolas or dormer windows
Follow the instructions set out in “Assembly for outward opening windows”.
8.4. Assembly for transom windows
A. Mark the centre line of the frame in pencil on both moveable and fixed parts (Fig. 1).
B. Place the motor support bracket along the edge of the moveable part of the frame in
line with the centre line marked out previously and mark the positions for the four
holes for the fixing screws (Fig. 2).
C. Drill holes into the frame and screw in the motor support bracket, making sure that
all screws are fitted tightly (Fig. 3 and 3bis).
D. Line up the front bracket along the centre line on the fixed part of the frame and
mark out the three holes required for the screws (Fig. 4).
E. Drill the holes and screw in the front bracket, making sure that all screws are fitted
tightly (Fig. 5 and 5bis).
F. Assemble the clamp screws onto the motor support bracket and screw in lightly.
10
G. Insert the dove-tailed section of the actuator into the clamp screws. Make sure the
shaped part of the base fits neatly into the slot to ensure the actuator runs smoothly
along its axis.
H. Now position the actuator so the eyebolt head is inserted into the front bracket
support. Insert the M6x25 screw into the bracket and into the eyebolt and tighten the
self-locking bolt with two 10 spanners.
I. Manually move the actuator along its axis to close the frame and make it weather
tight. Tighten the clamp screws previously only placed and set the actuator in line
with the frame. Suggested tightening torque is 5÷7 Nm.
J. Plug the actuator in and carry out a test to check opening and closure of the frame.
Make sure the frame closes fully and is weather tight.
K. The limit switch for the actuator is automatic on reentry. The equipment will exert a
pressure to guarantee even the largest of frames is completely weather tight.
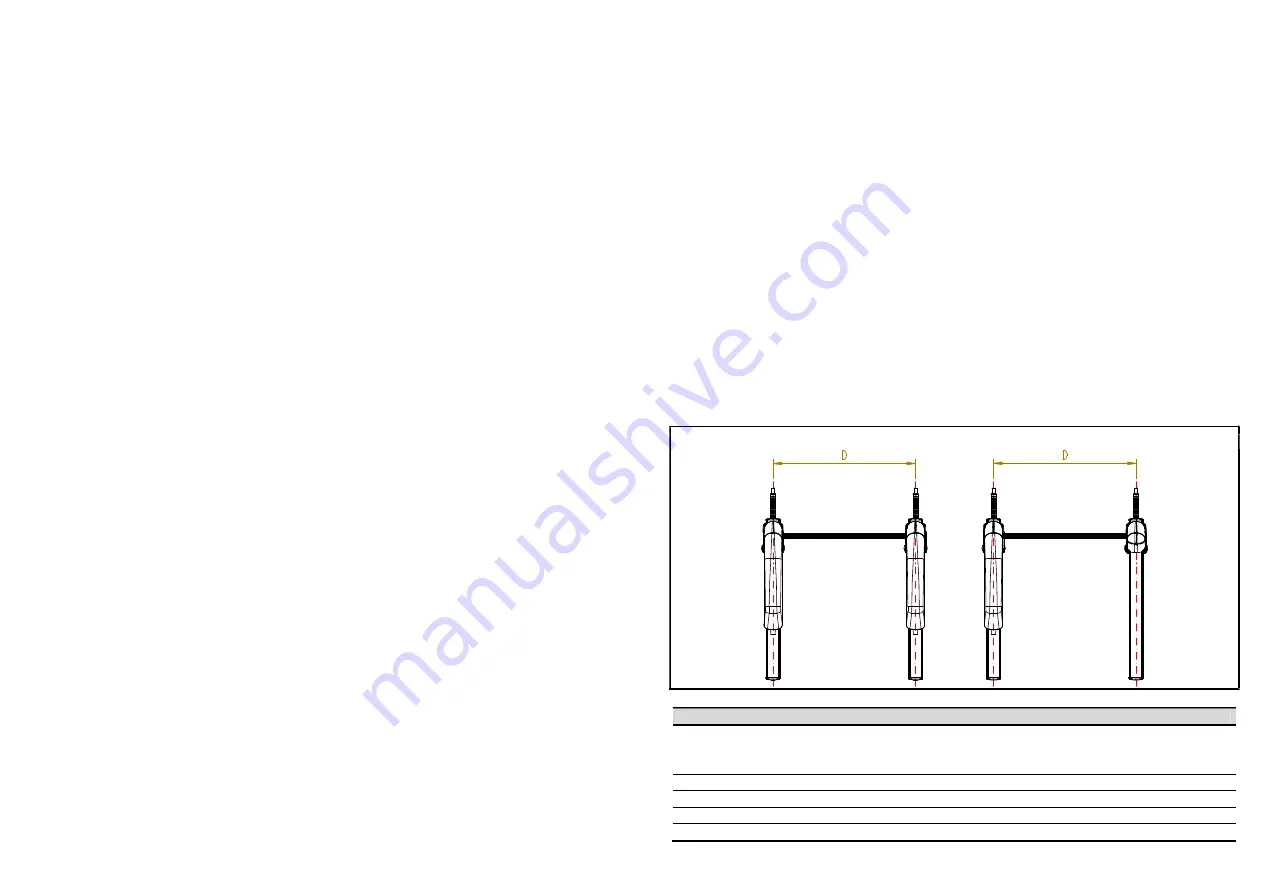
8.5. Assembly of more than one actuator with connection bar
SKY650 actuators can be used in tandem or series by means of a mechanical
connection bar. Movement is thus transmitted mechanically and uniformly and at the
same speed.
Two or more actuators can be mounted on the frame with one or more motors in
accordance with force requirements. The following diagram indicates position and
distance between centres to be used during mounting.
TANDEM WITH TWO MOTORS
TANDEM WITH ONE MOTOR
DISTANCE BETWEEN CENTRES OF THE CONNECTION BARS
Code
Description
Length of bar
(mm)
“D”
distance between
centres (mm)
4010009
Connection bar 1000 mm length
1.035
1.000
4010010
Connection bar 1500 mm length
1.535
1.500
4010011
Connection bar 2000 mm length
2.035
2.000
4010011
Connection bar 2500 mm length
2.535
2.500


